✍🏻 요구사항 분석
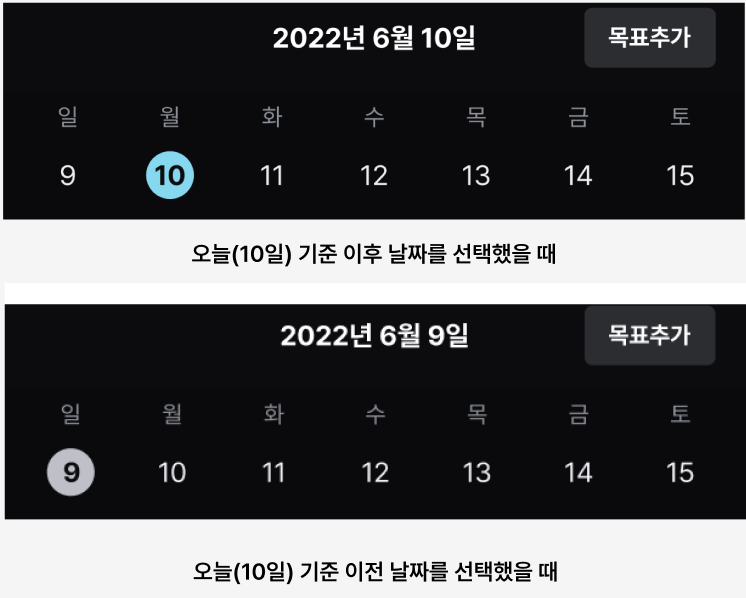
위의 사진처럼 오늘 날짜가 2022년 6월 10일이라고 하고(실제로는 24년 2월이지만), 위의 사진을 살펴보면 주간 달력의 요구사항은 다음과 같다.
🗓️ [주간 달력 요구사항 ]
- 주간 달력은 좌우로 스크롤되어야 함 (일주일 단위로 끊기도록)
- 선택한 날짜 표시
- 처음 들어갔을 때는 현재 날짜를 선택
- 오늘 이후의 날짜는 파란색 배경으로 표시
- 오늘 이전의 날짜는 회색 배경으로 표시
- 선택한 날짜는 상단의 텍스트에 반영됨
😭 겪었던 어려움
처음에 사용한 방법은 주간 달력을 넘기기 위한 리사이클러뷰와, 이를 구성하는 일주일 단위의 리사이블러뷰(그러니까, 이중리사이클러뷰)에다가 뷰페이저까지 연결한 구조였다. 하지만 날짜를 선택할 때마다 달력 전체가 깜빡이고, 달력을 다른 주로 넘겼을 때 선택된 날짜의 배경이 금방 나타났다가 사라지는 등의 자잘한 문제들이 있었다.
🙌🏻 도움의 손길
같이 개발을 하던 언니와도 해결하지 못해서, PM분이 외부에서 도움 주실 분을 찾아 연결해 주셨다. 오랜 시간동안 우리의 코드를 보며 문제점을 찾아주셨고, 직접 시연을 보여주시면서 해결방법을 알려주셨다. 설명을 듣는 것만으로는 '이걸 잘 따라갈 수 있을까?'하는 생각에 조금 걱정되었는데, 멘토링이 끝나고는 설명해 주셨던 방법을 깃허브에 올려서 제공해주셨다..!
우선, 그분이 제시해 주신 💡큰 아이디어💡는 '리사이클러뷰 2개를 사용할 게 아니라, 주 단위로 이루어지는 리사이클러뷰 + 뷰페이저만 적용해라!'였다. 결론은 dayItem만 있으면 됐다. 그래서 기존 리사이클러뷰로 구성되어있던
오늘은 그 분이 알려주신 내용을 더 잘 이해할 겸, 프로젝트에는 어떻게 바꿔서 적용시켰는지 정리해보도록 하겠다:)
도움에 다시 한 번 감사드립니다🙇🏻♀️
💻 코드 작성
xml 코드 작성
주간 달력을 다른 Fragment에 작성한다. HomeFragment에서 바로 작성하면 코드가 복잡해질 것을 우려하여 아예 주간 달력용 프래그먼트를 만들어 로직을 모두 작성해준다.
당연히 xml도 따로 만들었다. 나중에 뷰페이저를 통해 페이지가 넘어가는 스크롤 효과를 추가해 줄 것이다.
1️⃣ 날짜 item 스타일 지정 (styles.xml)
<style name="cal_date_item_layout">
        <item name="android:layout_width">0dp</item>
        <item name="android:layout_height">wrap_content</item>
        <item name="android:gravity">center</item>
        <item name="android:layout_weight">1</item>
    </style>

    <style name="cal_date_item_date_tv">
        <item name="android:layout_width">30dp</item>
        <item name="android:layout_height">30dp</item>
        <item name="android:gravity">center</item>
        <item name="android:layout_gravity">center</item>
        <item name="android:textAlignment">center</item>
        <item name="android:textSize">14sp</item>
        <item name="android:background">@drawable/style_weekly_calendar_circle_selected</item>
        <item name="android:textColor">@color/white</item>
        <item name="backgroundTint">@color/transparent</item>
    </style>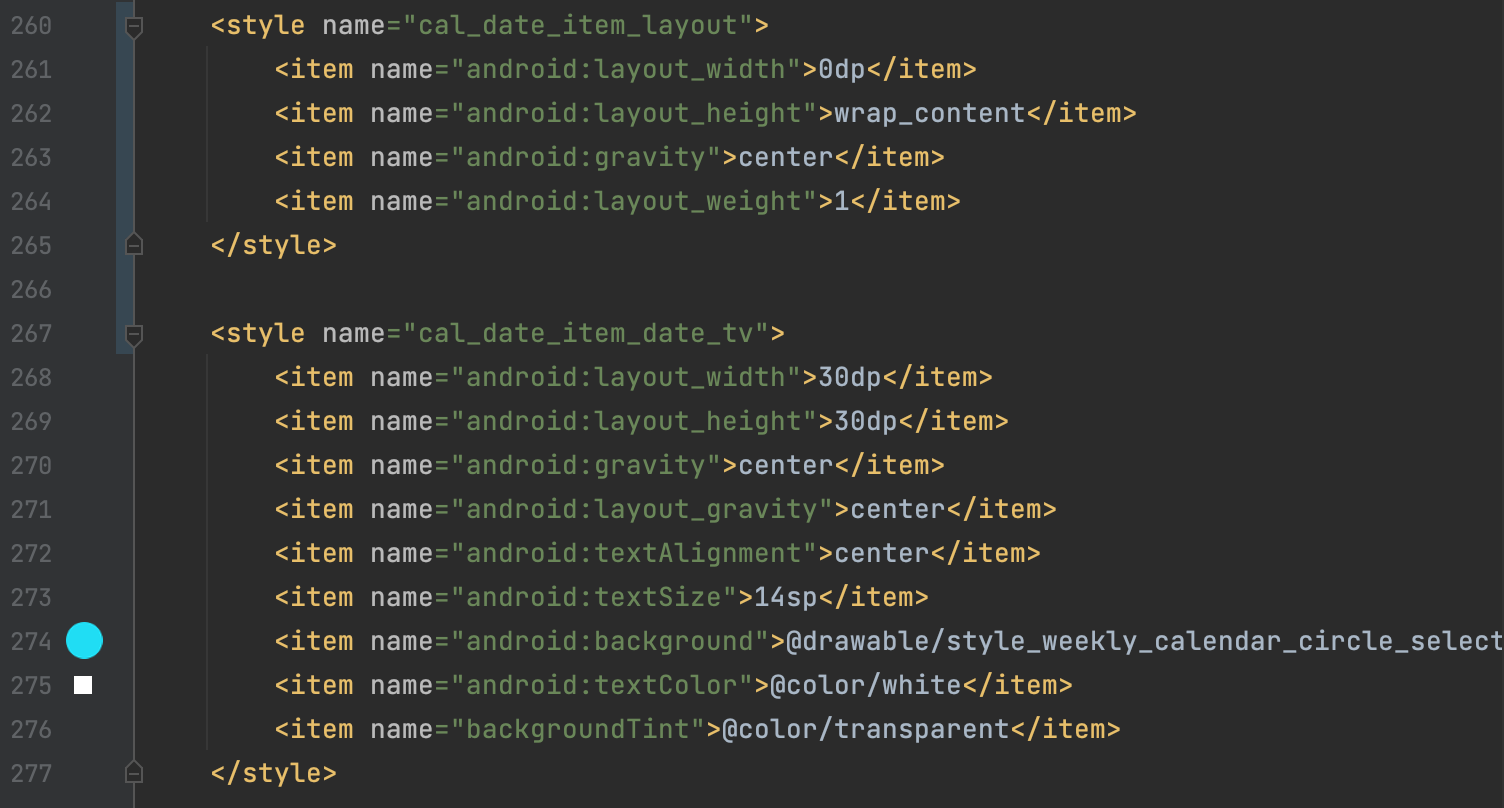
기본 날짜 아이템의 공통된 스타일을 만들어준다. xml의 날짜 아이템 코드에 일관성을 적용해주기 위함이다.
styles.xml에 스타일을 지정해 놓으면 여기 속성들만 바꾸면 한 번에 디자인 변경사항이 적용돼서 좋다. 가뜩이나 뷰페이로 주간 달력을 구현하려면 같은 속성을 가지는 날짜가 요일별로 7개가 필요하니까 이 일곱 날짜에 대해서 같은 스타일을 적용시켜놓으면 매~~우 편하다.
이 부분은 프로젝트의 디자인대로 자유롭게 변경해주면 된다. (이 프로젝트에서는 선택한 날짜에 동그라미를 표시해줌 - background에 적용한 drawable 부분)
2️⃣ 주간 달력 (fragment_caledar_one_week.xml)
<?xml version="1.0" encoding="utf-8"?>
<LinearLayout xmlns:android="http://schemas.android.com/apk/res/android"
    android:layout_width="match_parent"
    android:layout_height="match_parent"
    android:orientation="horizontal"
    android:background="@color/fragment_bg"
    xmlns:tools="http://schemas.android.com/tools">

    <LinearLayout style="@style/cal_date_item_layout">
        <TextView
            android:id="@+id/tv_1"
            tools:text="1"
            style="@style/cal_date_item_date_tv" />
    </LinearLayout>

    <LinearLayout style="@style/cal_date_item_layout">
        <TextView
            android:id="@+id/tv_2"
            tools:text="2"
            style="@style/cal_date_item_date_tv" />
    </LinearLayout>

    <LinearLayout style="@style/cal_date_item_layout">
        <TextView
            android:id="@+id/tv_3"
            tools:text="3"
            style="@style/cal_date_item_date_tv" />
    </LinearLayout>

    <LinearLayout style="@style/cal_date_item_layout">
        <TextView
            android:id="@+id/tv_4"
            tools:text="4"
            style="@style/cal_date_item_date_tv" />
    </LinearLayout>

    <LinearLayout style="@style/cal_date_item_layout">
        <TextView
            android:id="@+id/tv_5"
            tools:text="5"
            style="@style/cal_date_item_date_tv" />
    </LinearLayout>

    <LinearLayout style="@style/cal_date_item_layout">
        <TextView
            android:id="@+id/tv_6"
            tools:text="6"
            style="@style/cal_date_item_date_tv" />
    </LinearLayout>

    <LinearLayout style="@style/cal_date_item_layout">
        <TextView
            android:id="@+id/tv_7"
            tools:text="7"
            style="@style/cal_date_item_date_tv" />
    </LinearLayout>

</LinearLayout>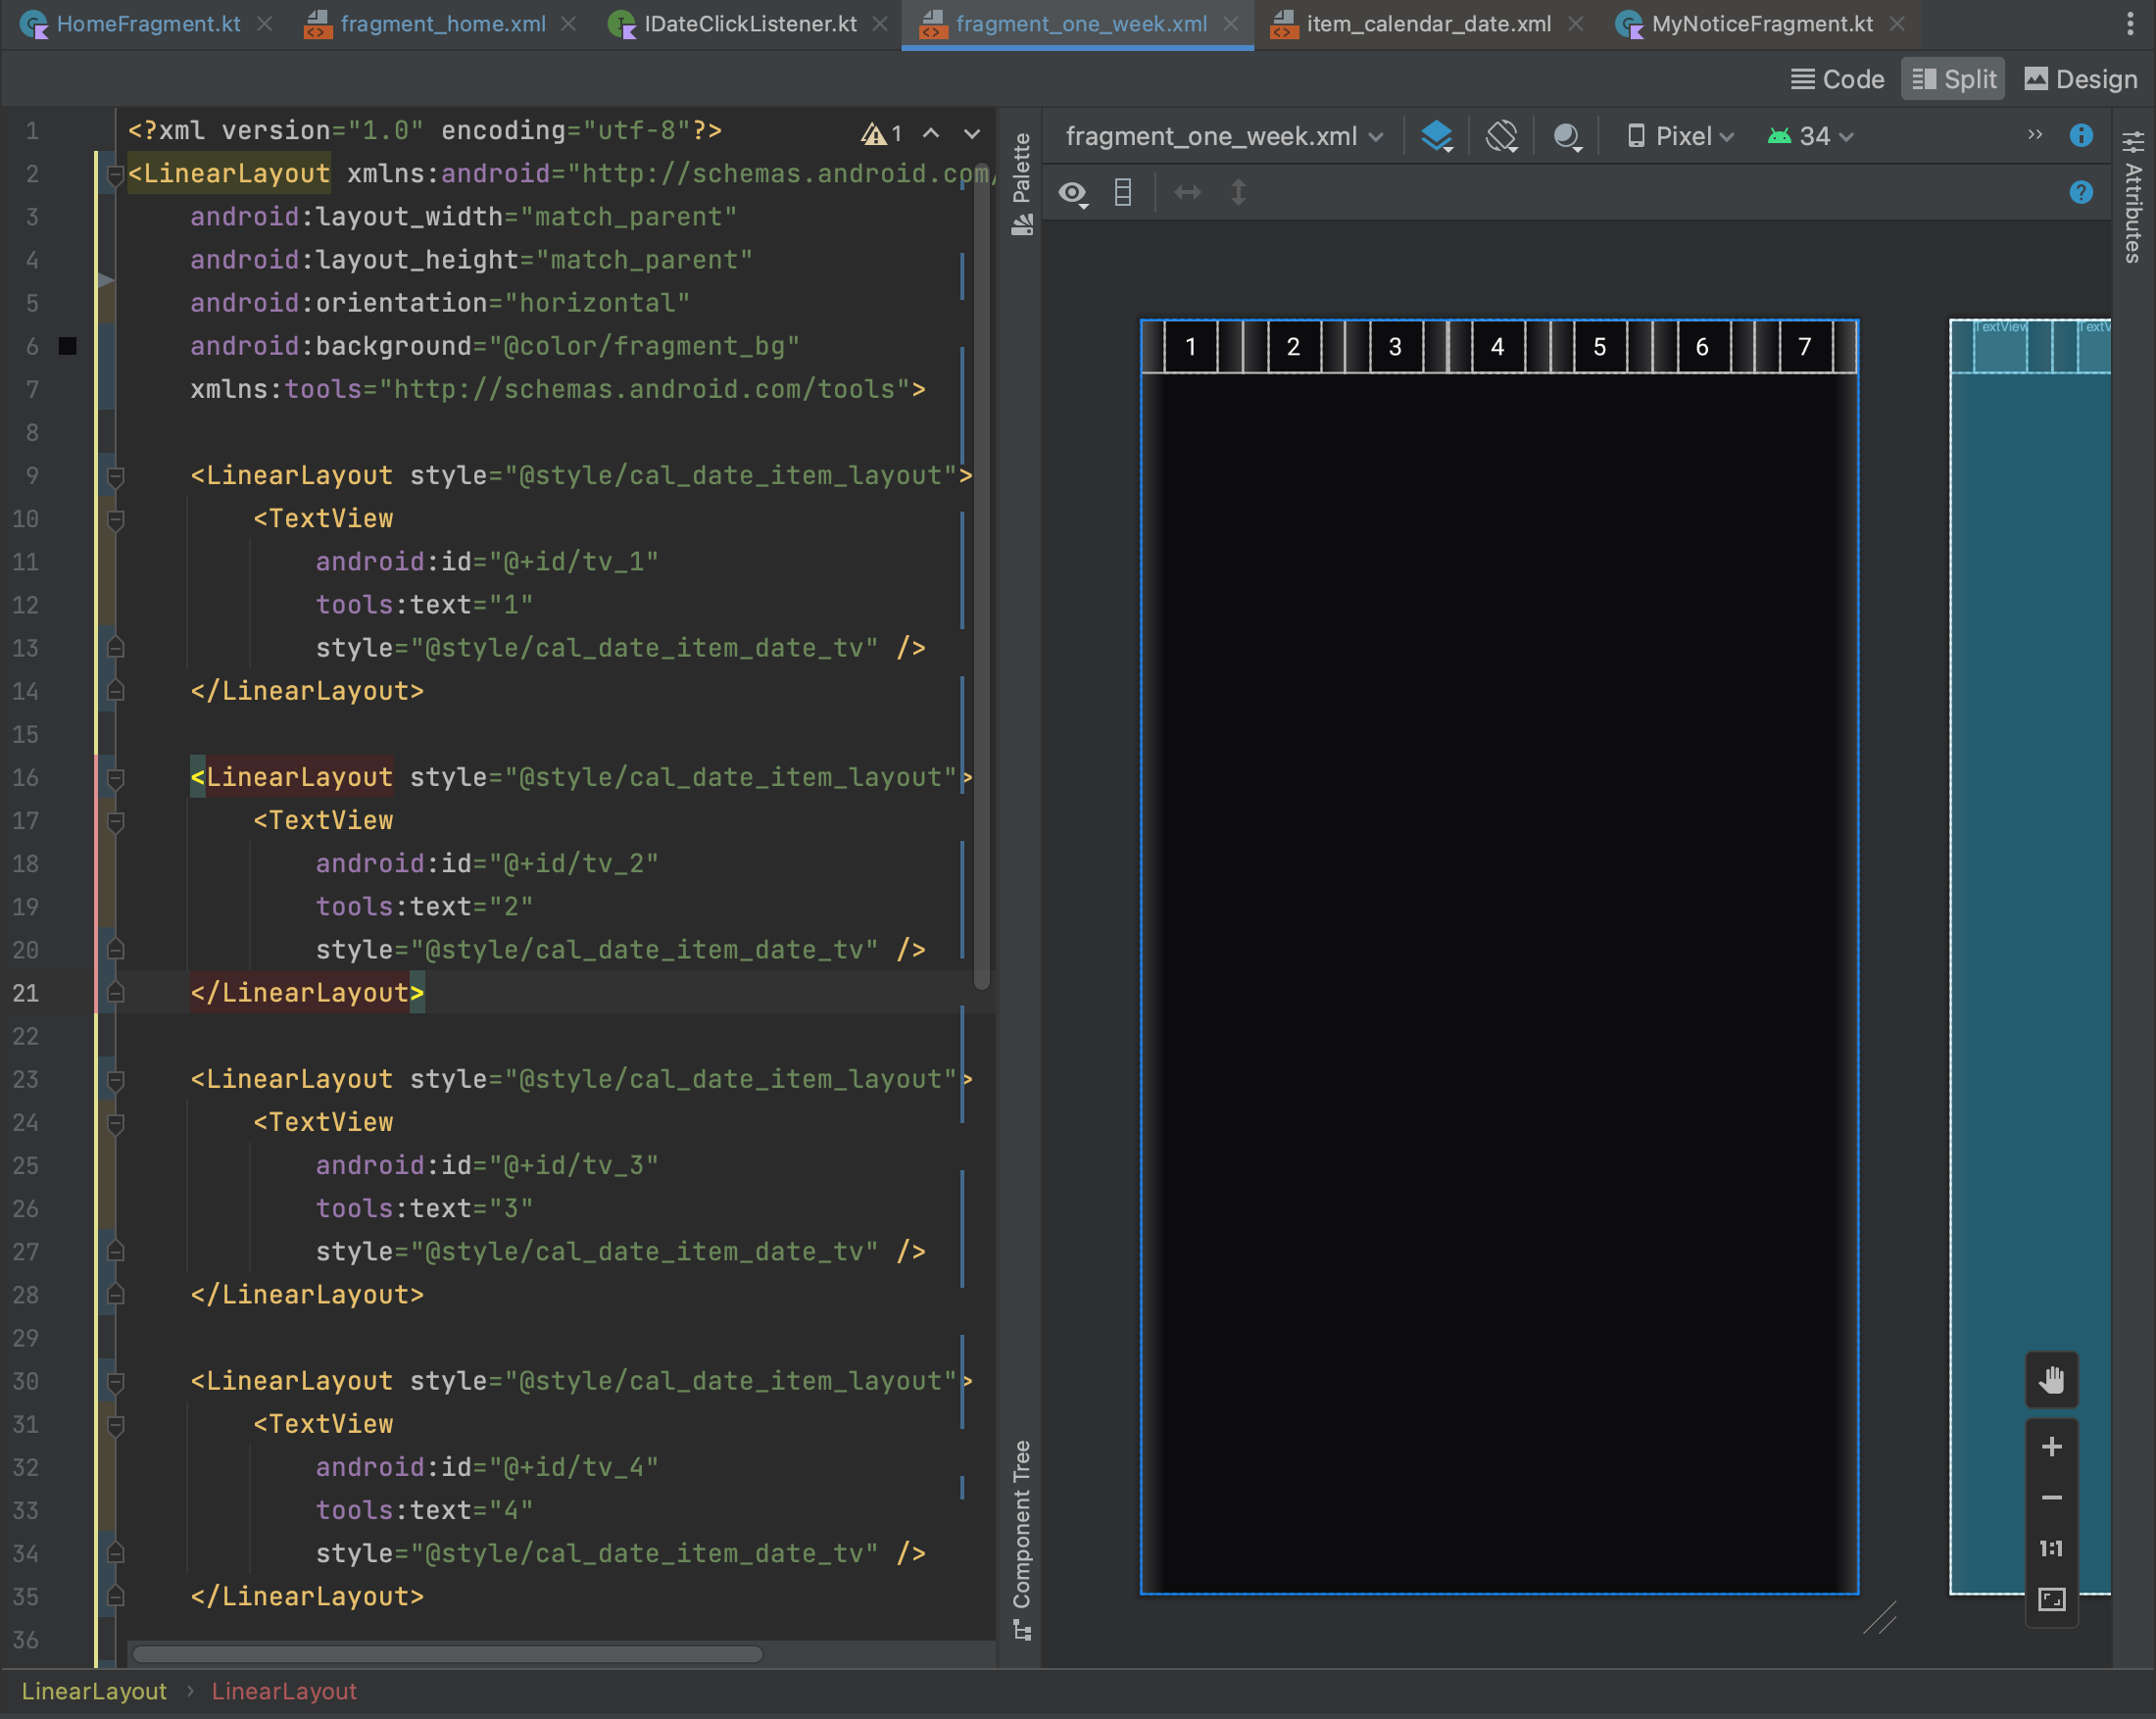
styles.xml에 지정된 weight 속성을 통해 날짜들이 뷰를 일정한 비율로 나눠가진다.
저 1, 2, ..., 7로 표시된 텍스트가 요일 아래에 위치할 날짜들이 된다.
즉, 좌우로 스와이프 되면서 이전/다음 주의 날짜를 새로이 불러와야 할 텍스트뷰를 정의해 준다.
3️⃣ 뷰페이저 코드 작성 (fragment_home.xml)
<?xml version="1.0" encoding="utf-8"?>
<androidx.constraintlayout.widget.ConstraintLayout xmlns:android="http://schemas.android.com/apk/res/android"
    xmlns:tools="http://schemas.android.com/tools"
    android:layout_width="match_parent"
    android:layout_height="match_parent"
    xmlns:app="http://schemas.android.com/apk/res-auto"
    android:background="@color/fragment_bg"
    tools:context=".ui.home.HomeFragment">

    <TextView
        android:id="@+id/home_top_nav_tv"
        android:layout_width="match_parent"
        android:layout_height="54dp"
        android:background="@color/fragment_bg"
        android:gravity="center"
        android:textColor="@color/white"
        android:textStyle="bold"
        app:layout_constraintTop_toTopOf="parent"
        app:layout_constraintStart_toStartOf="parent"
        app:layout_constraintEnd_toEndOf="parent"
        tools:text="선택한 날짜"/>

    <TextView
        android:id="@+id/home_goal_add_top_tv"
        android:layout_width="wrap_content"
        android:layout_height="wrap_content"
        android:layout_marginEnd="16dp"
        android:paddingVertical="6dp"
        android:paddingHorizontal="12dp"
        android:background="@drawable/style_round_corner_btn"
        android:gravity="center"
        android:text="@string/home_add_goal"
        android:textSize="11sp"
        android:textColor="@color/white"
        app:layout_constraintEnd_toEndOf="parent"
        app:layout_constraintTop_toTopOf="@id/home_top_nav_tv"
        app:layout_constraintBottom_toBottomOf="@id/home_top_nav_tv"/>

    <LinearLayout
        android:id="@+id/home_weekly_calendar_day_of_month_ll"
        android:layout_width="match_parent"
        android:layout_height="wrap_content"
        android:orientation="horizontal"
        app:layout_constraintHorizontal_weight="1"
        app:layout_constraintStart_toStartOf="parent"
        app:layout_constraintTop_toBottomOf="@+id/home_top_nav_tv">
        <TextView
            android:id="@+id/home_day_of_week_sun_tv"
            style="@style/weekly_calendar_day_of_month"
            android:text="일"/>
        <TextView
            android:id="@+id/home_day_of_week_mon_tv"
            style="@style/weekly_calendar_day_of_month"
            android:text="월"/>
        <TextView
            android:id="@+id/home_day_of_week_tue_tv"
            style="@style/weekly_calendar_day_of_month"
            android:text="화"/>
        <TextView
            android:id="@+id/home_day_of_week_wed_tv"
            style="@style/weekly_calendar_day_of_month"
            android:text="수"/>
        <TextView
            android:id="@+id/home_day_of_week_thu_tv"
            style="@style/weekly_calendar_day_of_month"
            android:text="목"/>
        <TextView
            android:id="@+id/home_day_of_week_fri_tv"
            style="@style/weekly_calendar_day_of_month"
            android:text="금"/>
        <TextView
            android:id="@+id/home_day_of_week_sat_tv"
            style="@style/weekly_calendar_day_of_month"
            android:text="토"/>
    </LinearLayout>


    <androidx.viewpager2.widget.ViewPager2
        android:id="@+id/home_weekly_calendar_week_vp"
        android:layout_width="match_parent"
        android:layout_height="0dp"
        android:paddingBottom="4dp"
        android:layout_marginTop="4dp"
        app:layout_constraintStart_toStartOf="parent"
        app:layout_constraintTop_toBottomOf="@+id/home_weekly_calendar_day_of_month_ll"/>
<!-- 기타 코드 -->
</androidx.constraintlayout.widget.ConstraintLayout>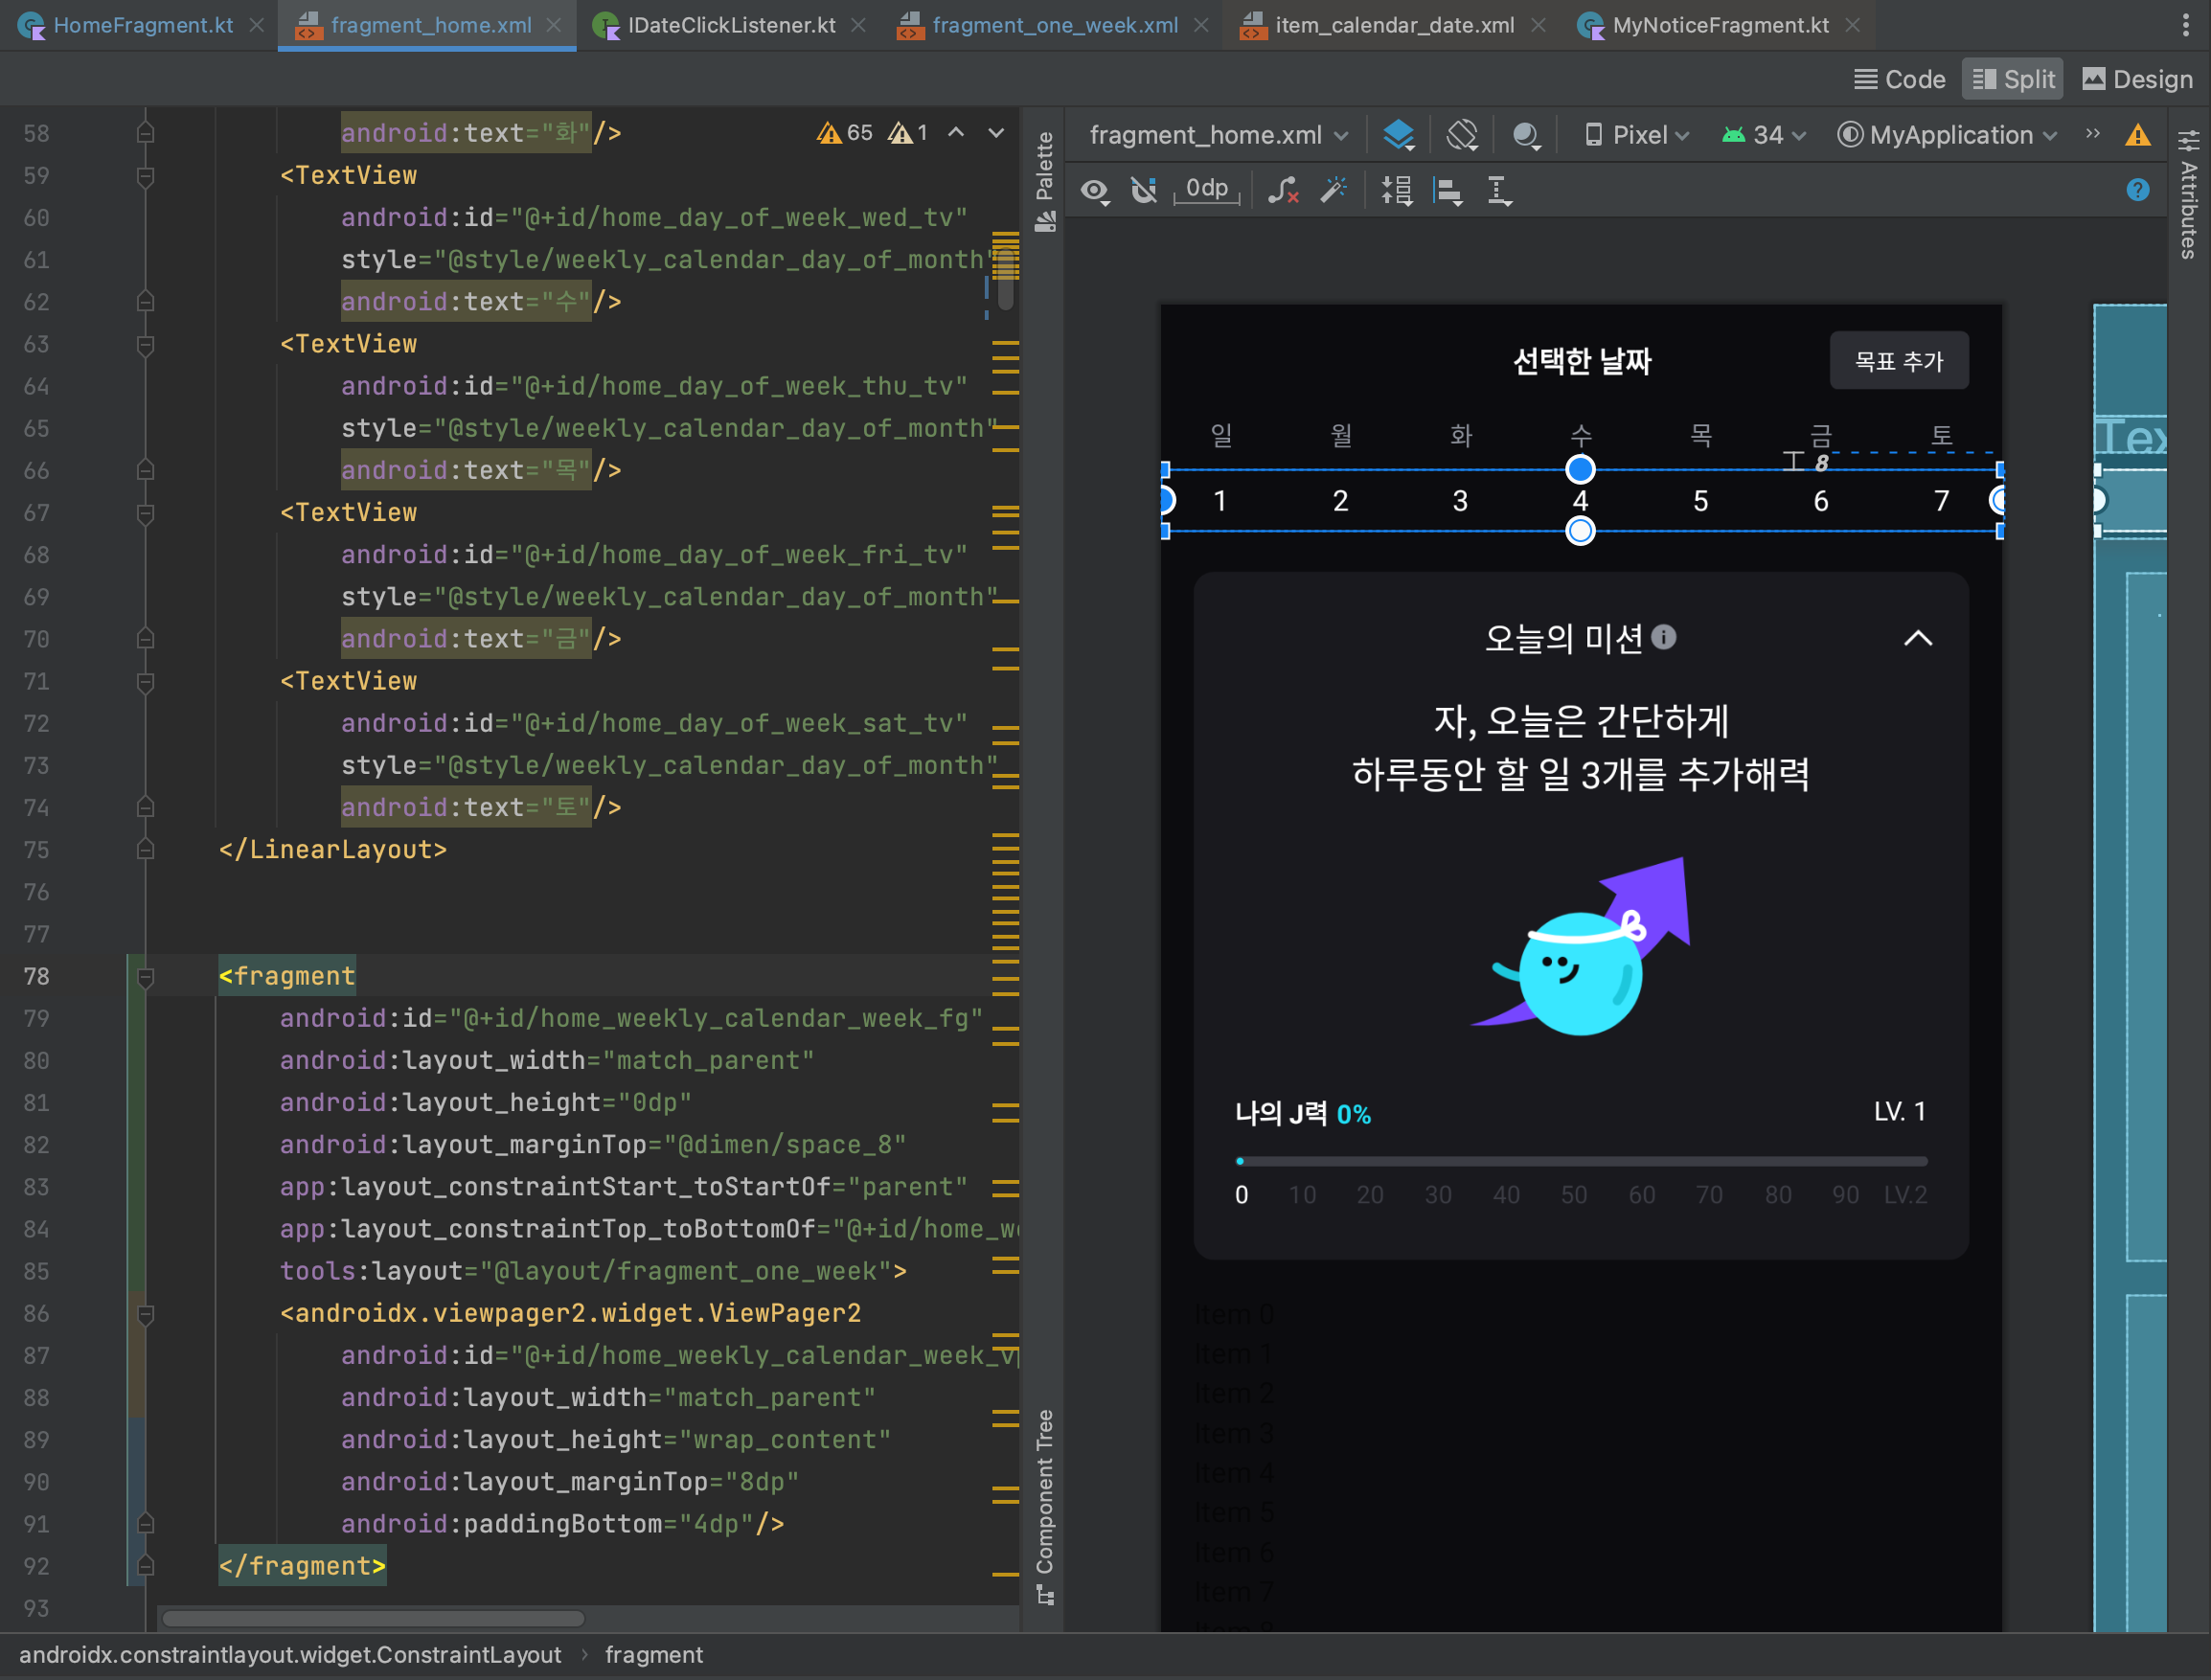
임의로 뷰페이저를 fragment로 감싸 주간 달력이 들어갈 위치를 표시해 본 모습이다. (실제로는 감싸진 태그 없이 뷰페이저가 바로 등장한다.)
2번에서 만든 날짜 프래그먼트는 스크롤되어야 하기에 HomeFragment에 뷰페이저 형태로 넣어놓고, 요일 (일, ..., 토) 텍스트 자체는 고정이어야 하므로 HomeFragment에 그대로 넣어준다.
주간 달력의 날짜를 클릭하면 최상단의 선택한 날짜 부분도 '2024년 5월 11일' 형태로 표시해 주어야 한다.
💬 마치며
오늘은 이렇게 xml의 코드만 다뤄봤는데, 분량 조절 실패로 실제 Fragment와 ViewPagerAdapter의 코드 작성은 다음 편에 이어서 작성해 보도록 하겠다.
(프래그먼트 코드도 같이 다루고 싶었는데, 주석을 세세하게 달고 코드를 리팩토링하다 보니 시간이 많이 소요됐다.)
캘린더를 좌우로 스와이프해서 새로운 날짜를 어떻게 받아오는지, 선택한 날짜는 UI에 어떻게 표시하는지에 대해서도 다음편에 같이 다루겠다!
TO BE CONTINUED...
📚 참고 자료