✍🏻 요구사항 분석
디자인 상에서 다이얼로그는 아래의 세 가지 형태였다.
 1. 제목O, 설명O, 취소 & 확인 버튼 모두 존재 1. 제목O, 설명O, 취소 & 확인 버튼 모두 존재 | 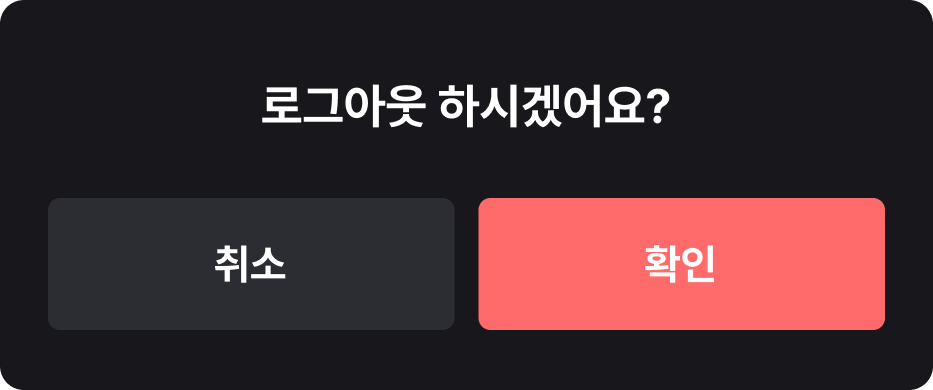 2. 제목O, 설명X, 취소 & 확인 버튼 모두 존재 2. 제목O, 설명X, 취소 & 확인 버튼 모두 존재 3. 제목O 설명O, 취소 버튼 없이 확인 버튼만 존재 3. 제목O 설명O, 취소 버튼 없이 확인 버튼만 존재 |
|---|
디자인을 적용해야 했기에 커스텀 다이얼로그를 만드는 건 확정이었고,
팝업 다이얼로그를 띄워야할 곳이 상당히 많았기에
이 세 가지 경우마다 각각의 파일을 만들어주기 보다는 모두 하나의 파일에서 해결하고 싶었다.
구현 코드는 아래와 같다.
💻 구현 코드
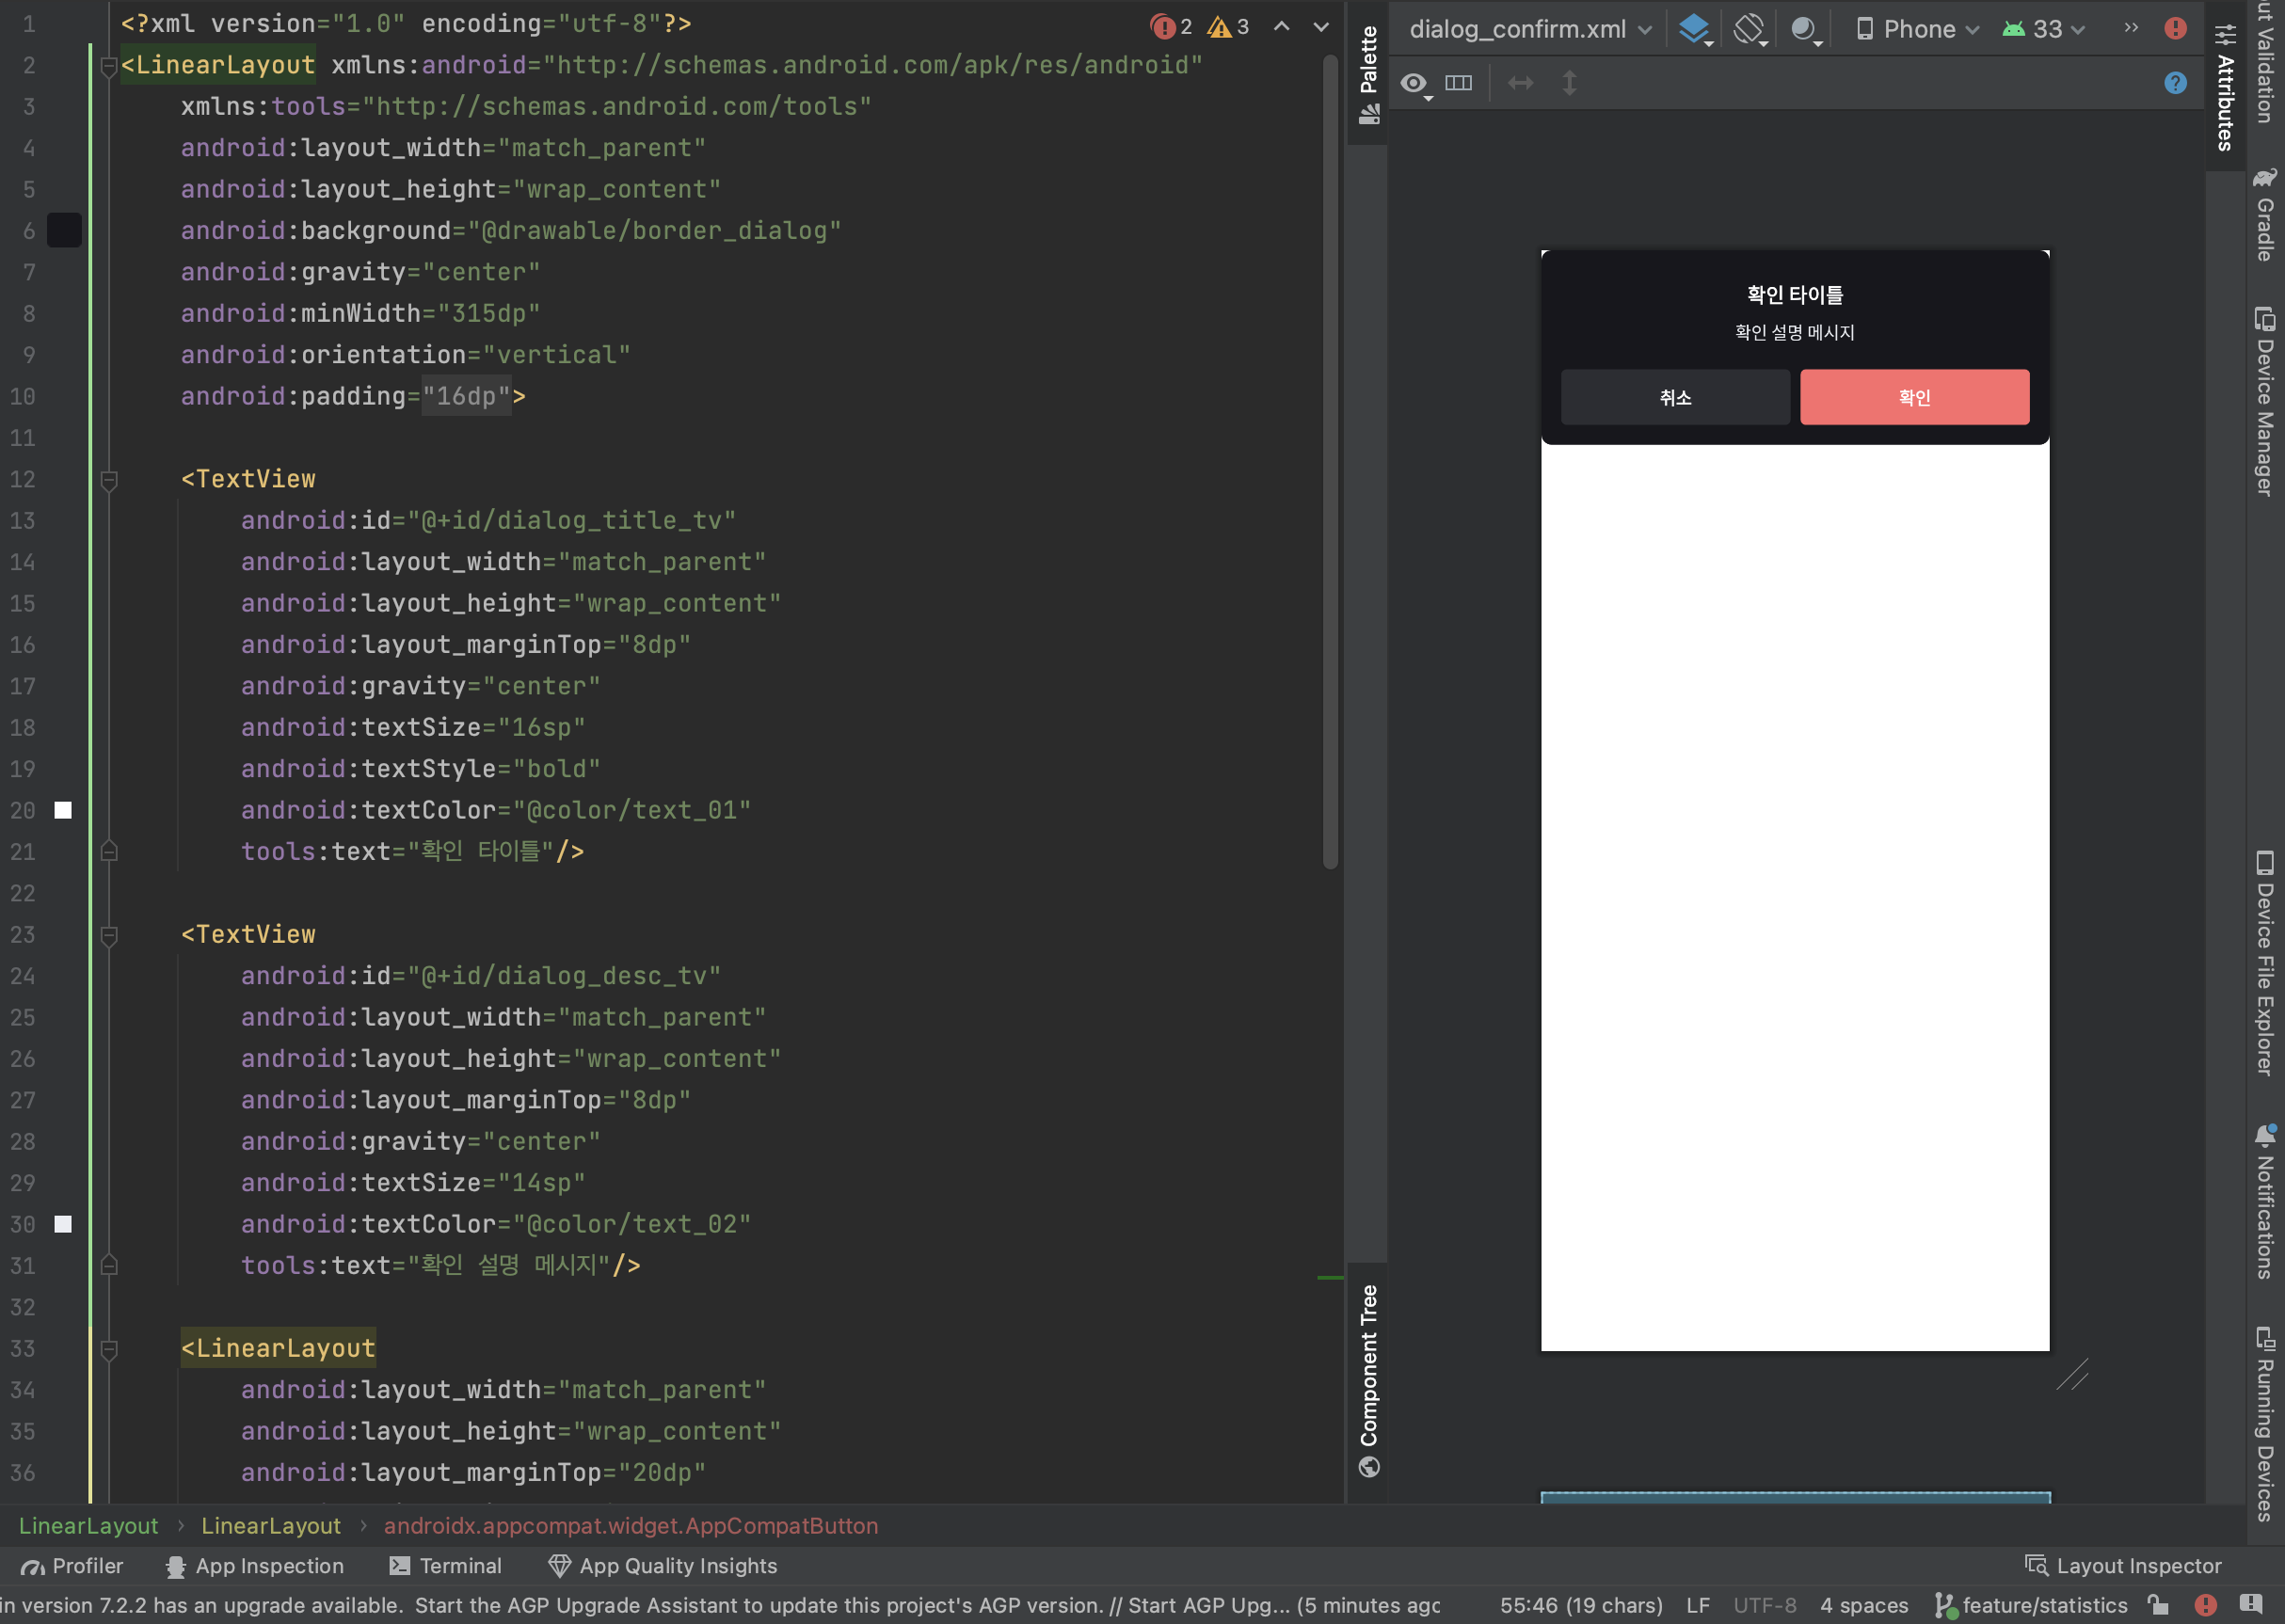
1. xml 파일 작성 (dialog_confirm.xml)
<?xml version="1.0" encoding="utf-8"?>
<LinearLayout xmlns:android="http://schemas.android.com/apk/res/android"
    xmlns:tools="http://schemas.android.com/tools"
    android:layout_width="match_parent"
    android:layout_height="wrap_content"
    android:background="@drawable/border_dialog"
    android:gravity="center"
    android:minWidth="315dp"
    android:orientation="vertical"
    android:padding="@dimen/default_spacing">

    <TextView
        android:id="@+id/dialog_title_tv"
        android:layout_width="match_parent"
        android:layout_height="wrap_content"
        android:layout_marginTop="8dp"
        android:gravity="center"
        android:textSize="16sp"
        android:textStyle="bold"
        android:textColor="@color/text_01"
        tools:text="확인 타이틀"/>

    <TextView
        android:id="@+id/dialog_desc_tv"
        android:layout_width="match_parent"
        android:layout_height="wrap_content"
        android:layout_marginTop="8dp"
        android:gravity="center"
        android:textSize="14sp"
        android:textColor="@color/text_02"
        tools:text="확인 설명 메시지"/>

    <LinearLayout
        android:layout_width="match_parent"
        android:layout_height="wrap_content"
        android:layout_marginTop="20dp"
        android:orientation="horizontal">

        <androidx.appcompat.widget.AppCompatButton
            android:id="@+id/dialog_no_btn"
            android:layout_width="0dp"
            android:layout_height="45dp"
            android:layout_marginEnd="8dp"
            android:layout_weight="1"
            android:text="@string/dialog_cancle"
            android:textStyle="bold"
            style="@style/dialog_cancel_button"/>

        <androidx.appcompat.widget.AppCompatButton
            android:id="@+id/dialog_yes_btn"
            android:layout_width="0dp"
            android:layout_height="45dp"
            android:layout_weight="1"
            android:text="@string/dialog_check"
            style="@style/dialog_check_button"/>

    </LinearLayout>

</LinearLayout>
코드를 작성하고 나면 이런 식으로 보인다.
(참고)
- 버튼 스타일 코드는 👇🏻
<?xml version="1.0" encoding="utf-8"?>
<resources>
    <style name="dialog_cancel_button">
        <item name="android:layout_width">match_parent</item>
        <item name="android:layout_height">wrap_content</item>
        <item name="android:background">@drawable/style_round_corner_btn</item>
        <item name="android:textColor">@color/text_01</item>
        <item name="android:textSize">14sp</item>
        <item name="android:textStyle">bold</item>
        <item name="android:textAlignment">center</item>
        <item name="backgroundTint">@color/gray_700</item>
    </style>

    <style name="dialog_check_button">
        <item name="android:layout_width">match_parent</item>
        <item name="android:layout_height">wrap_content</item>
        <item name="android:background">@drawable/style_round_corner_btn</item>
        <item name="android:textColor">@color/text_01</item>
        <item name="android:textSize">14sp</item>
        <item name="android:textStyle">bold</item>
        <item name="android:textAlignment">center</item>
        <item name="backgroundTint">@color/Jred_500</item>
    </style>

</resources>- 버튼 배경 코드는 👇🏻
<?xml version="1.0" encoding="utf-8"?>
<shape android:shape="rectangle" xmlns:android="http://schemas.android.com/apk/res/android">
    <solid android:color="@color/gray_template"/>
    <corners android:radius="4dp"/>
</shape>
2. kt 코드 작성 (ConfirmDialog.kt)
interface ConfirmDialogInterface {
    fun onClickYesButton(id: Int)
}
class ConfirmDialog(
    confirmDialogInterface: ConfirmDialogInterface,
    title: String, content: String?, buttonText: String, id: Int
) : DialogFragment() {

    // 뷰 바인딩 정의
    private var _binding: DialogConfirmBinding? = null
    private val binding get() = _binding!!

    private var confirmDialogInterface: ConfirmDialogInterface? = null

    private var title: String? = null
    private var content: String? = null
    private var buttonText: String? = null
    private var id: Int? = null

    init {
        this.title = title
        this.content = content
        this.buttonText = buttonText
        this.id = id
        this.confirmDialogInterface = confirmDialogInterface
    }

    override fun onCreateView(
        inflater: LayoutInflater,
        container: ViewGroup?,
        savedInstanceState: Bundle?
    ): View {
        _binding = DialogConfirmBinding.inflate(inflater, container, false)
        val view = binding.root

        // 레이아웃 배경을 투명하게 해줌, 필수 아님
        dialog?.window?.setBackgroundDrawable(ColorDrawable(Color.TRANSPARENT))

        // 제목
        binding.dialogTitleTv.text = title
        // 내용
        if (content == null) {
            binding.dialogDescTv.visibility = View.GONE
        } else {
            binding.dialogDescTv.text = content
        }
        // 확인 버튼 텍스트
        binding.dialogYesBtn.text = buttonText

        // 취소 버튼이 없는 다이얼로그는 id를 -1로 넘겨줌
        if (id == -1) {
            // 취소 버튼을 보이지 않게 처리
            binding.dialogNoBtn.visibility = View.GONE
        }

        // 취소 버튼 클릭
        binding.dialogNoBtn.setOnClickListener {
            dismiss()
        }

        // 확인 버튼 클릭
        binding.dialogYesBtn.setOnClickListener {
            this.confirmDialogInterface?.onClickYesButton(id!!)
            dismiss()
        }

        return view
    }

    override fun onDestroyView() {
        super.onDestroyView()
        _binding = null
    }
}
기본적으로 다이얼로그 호출 시
제목(title)과내용(content)를 넘겨주도록 했다.- 취소 버튼이 없는 경우에는
id를 -1로넘겨주는 방법을 사용했다.- 더불어, '확인' 버튼의 문구가 다른 경우도 있었기에
해당 버튼의 문구도 함께 받도록 했다.- 취소, 확인 버튼을 누르면 다이얼로그가 사라지게 설정했다. (확인 버튼의 경우 interface를 통해 버튼 클릭 시의 동작을 추가할 수 있도록 함)
3. Activity 또는 Fragment에서 호출
앞선 다이얼로그 케이스 1번(회원탈퇴), 2번(로그아웃)은 하나의 화면에서 쓰였다.
이 때문에 다이얼로그 파일에서 id를 구분해주었다.
id로 각각의 경우를 구분해주어야 다이얼로그의 확인 버튼을 눌렀을 때 동작을 처리해줄 수 있다.
(id가 0이면 확인 버튼을 눌렀을 때 로그아웃 진행, 1이면 회원탈퇴 진행)
추가로, 이 id는 나중에 특정 id의 데이터를 삭제할 때도 활용할 수 있다.
class MySettingFragment : BaseFragment<FragmentMySettingBinding>(FragmentMySettingBinding::bind, R.layout.fragment_my_setting), ConfirmDialogInterface {
override fun onViewCreated(view: View, savedInstanceState: Bundle?) {
super.onViewCreated(view, savedInstanceState)
settingListClickEvent()
}
private fun settingListClickEvent() {
with(binding) {
// 로그아웃
mySettingLogoutTv.setOnClickListener {
logout()
}
// 회원탈퇴
mySettingQuitTv.setOnClickListener {
quit()
}
}
}
private fun logout() {
// 다이얼로그
val title = "로그아웃 하시겠어요?"
val dialog = ConfirmDialog(this@MySettingFragment, title, null, "확인", 0)
// 알림창이 띄워져있는 동안 배경 클릭 막기
dialog.isCancelable = false
activity?.let { dialog.show(it.supportFragmentManager, "ConfirmDialog") }
}
private fun quit() {
// 다이얼로그
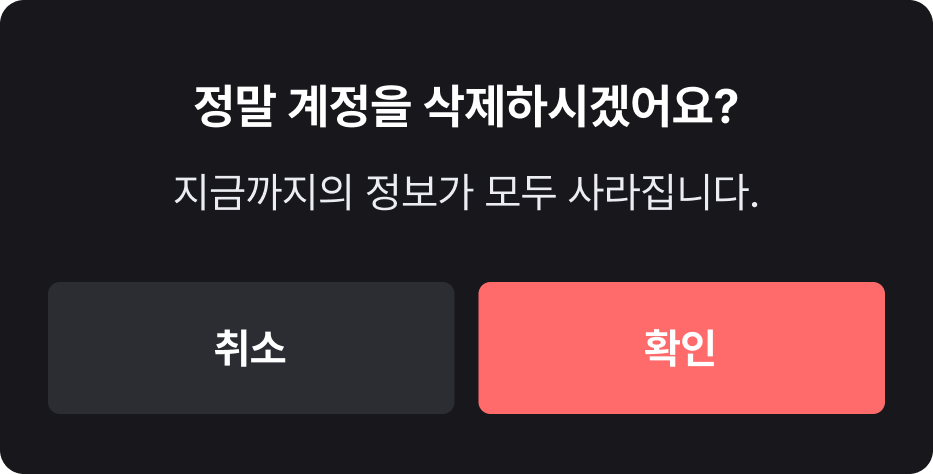
val title = "정말 계정을 삭제하시겠어요?"
val content = "지금까지의 정보가 모두 사라집니다."
val dialog = ConfirmDialog(this@MySettingFragment, title, content, "확인", 1)
// 알림창이 띄워져있는 동안 배경 클릭 막기
dialog.isCancelable = false
activity?.let { dialog.show(it.supportFragmentManager, "ConfirmDialog") }
}
override fun onClickYesButton(id: Int) { // 다이얼로그 확인 메시지 클릭
if (id == 0) { // 로그아웃
LogoutService(this).tryLogout()
}
else if (id == 1) { // 회원탈퇴
LogoutService(this).tryQuit()
}
// 화면 이동
activity?.finishAffinity()
startActivity(Intent(context, LoginActivity()::class.java))
}
}
코드를 하나하나 더 살펴보면
- Case 1) 계정 탈퇴
private fun quit() {
        // 다이얼로그
        val title = "정말 계정을 삭제하시겠어요?"
        val content = "지금까지의 정보가 모두 사라집니다."

        val dialog = ConfirmDialog(this@MySettingFragment, title, content, "확인", 1)
        // 알림창이 띄워져있는 동안 배경 클릭 막기
        dialog.isCancelable = false
        activity?.let { dialog.show(it.supportFragmentManager, "ConfirmDialog") }
}title과 content를 모두 String으로 넘겨주는 것을 확인할 수 있다.
- Case 2) 로그아웃
private fun logout() {
        // 다이얼로그
        val title = "로그아웃 하시겠어요?"

        val dialog = ConfirmDialog(this@MySettingFragment, title, null, "확인", 0)
        // 알림창이 띄워져있는 동안 배경 클릭 막기
        dialog.isCancelable = false
        activity?.let { dialog.show(it.supportFragmentManager, "ConfirmDialog") }
}title은 넘겨주지만, content는 null로 주었다.
- Case 3) 수정 불가 알림
fun noEditDialog(){
        val title = "수정이 불가능해요"
        val content = "이전 일정은 수정이 불가합니다"

        val dialog = ConfirmDialog(this, title, content, "확인", -1)
        dialog.isCancelable = false
        //activity?.let { dialog.show(it.supportFragmentManager, "ConfirmDialog") }
        dialog.show(this.requireFragmentManager(), "ConfirmDialog")
}title과, content를 모두 넘겨주고, id를 -1로 설정했다.
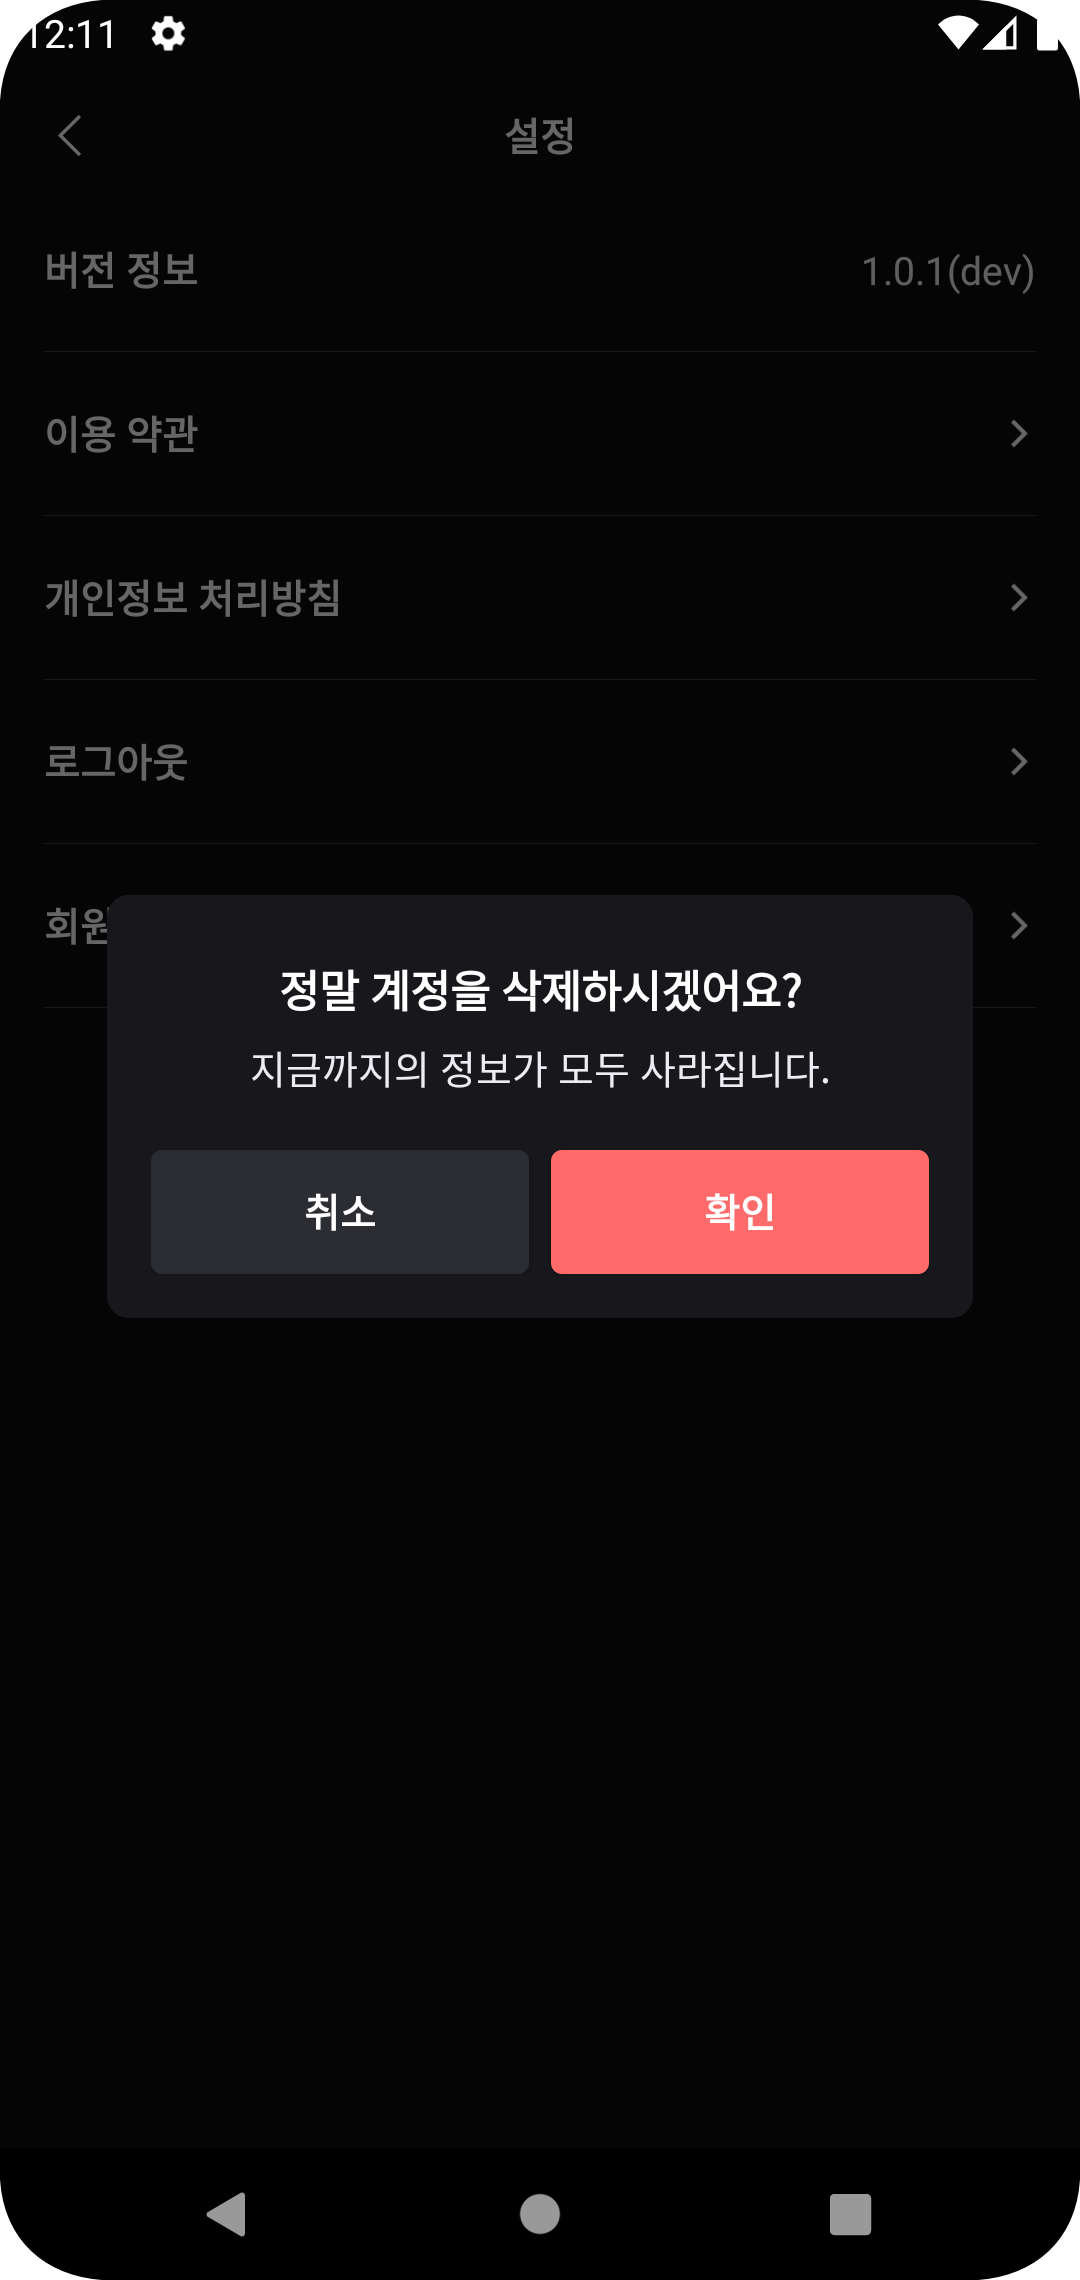
+) 실제로 다이얼로그가 뜨는 모습!
📚 참고 자료

안드로이드 개발자를 꿈꾸는 학생입니다

깔끔하게 설명잘해주셨어요!!! 쓰니님 벨로그 보고 공부해서 다이알로그 객체 사용법도 알아가네요😀