✍🏻 요구사항 분석
공통 컴포넌트 작업, 화면 퉁치기를 좋아하는 사람으로서 이번에 맡은 화면들에서 재밌는 포인트들을 찾아 가지고 왔습니다ㅎㅎ
Compose Navigation에서 UI가 동일하지만, 데이터 소스나 구성 요소가 조금 다른 화면을 하나의 Screen으로 처리한 경험을 적어보려 합니다.
최근 프로젝트를 진행하며 '이 화면을 어떻게 퉁치지?'를 고민했던 화면이 2개 있어서, 오늘은 요구사항 분석이 두 차례에 걸쳐 이루어질 예정입니다.
1️⃣ ProfileScreen
💡Nullable 파라미터를 활용한 내 프로필/타인 프로필 분기
문제 상황
🧐 기본적으로 내 프로필과 타인 프로필 화면의 UI가 동일함 (들어가는 내용들)
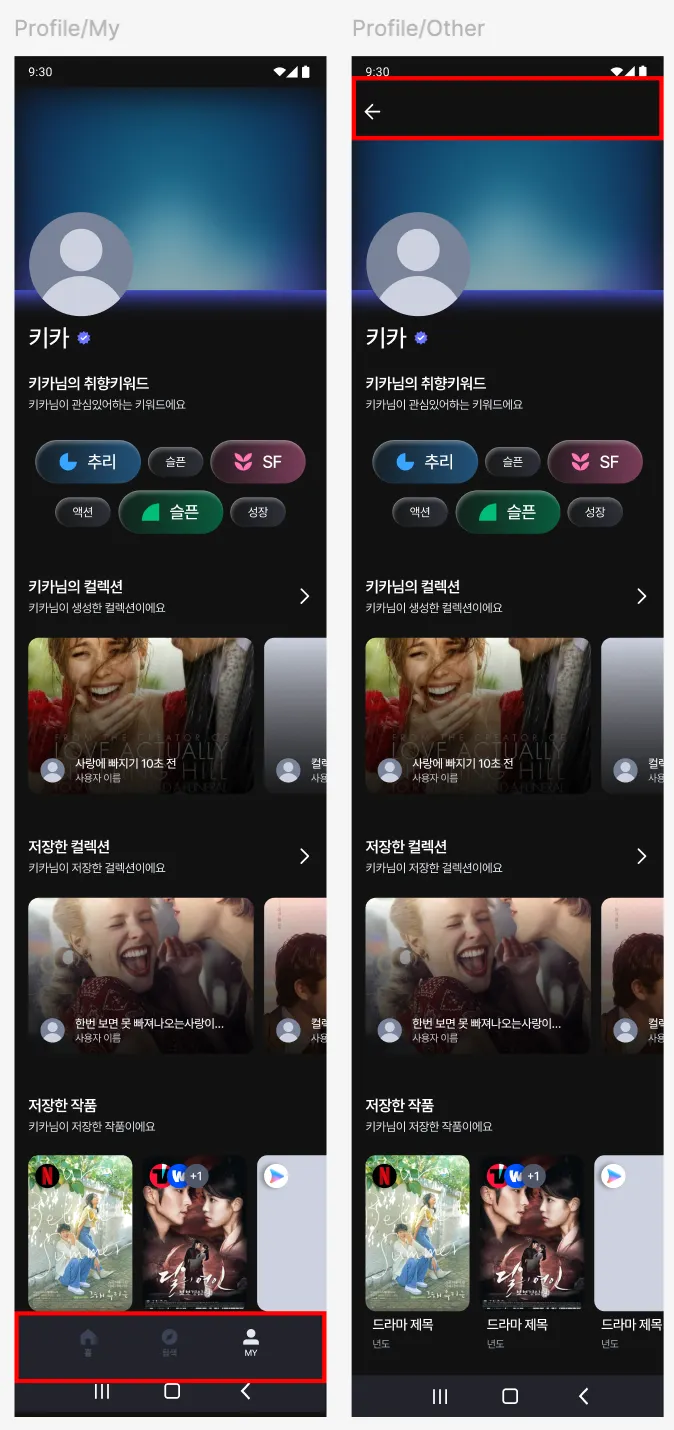
| 공통점 | 차이점 |
|---|---|
| 기본적으로 내 프로필과 타인 프로필 화면의 UI가 동일함 (들어가는 내용들) | 1. 내 프로필(My)에만 BottomBar 표시 2. 타인 프로필(Other)에만 뒤로가기 버튼 표시 3. My/Other에 따른 다른 API 호출 (userId 처리 방식) |
해결 전략
-
동일한 ProfileScreen 사용
-
userId: String? = null로 정의하여 null이면 내 프로필, 값이 있으면 타인 프로필로 구분 -
API 호출: userId를 받아 Repository에서 처리
흑흑.. 같은 API로 퉁치고 싶었는데** 사용자 프로필 조회 시 userId를 Path로 넘기는 방식에서 착안
Route 정의
- My
@Serializable
data object Profile : MainTabRoute // 바텀바 표시 필요- Other
@Serializable
data class Profile(
    val userId: String? = null,  // null = 내 프로필
) : Route
Navigation 함수
// ProfileNavigation.kt

// 내 프로필 (MainTab에서 사용)
fun NavController.navigateToMyProfile(navOptions: NavOptions? = null) {
    navigate(MainTabRoute.Profile, navOptions)
}

// 타인 프로필 (userId 전달)
fun NavController.navigateToOtherProfile(userId: String?, navOptions: NavOptions? = null) {
    navigate(Route.Profile(userId = userId), navOptions)
}
NavGraph 분리
// 내 프로필용 NavGraph (MainTab)
fun NavGraphBuilder.myProfileNavGraph(...) {
    composable<MainTabRoute.Profile> {
        ProfileRoute(navigateUp = {}, ...)  // 뒤로가기 불필요
    }
}

// 타인 프로필용 NavGraph
fun NavGraphBuilder.otherProfileNavGraph(navigateUp: () -> Unit, ...) {
    composable<Route.Profile> {
        ProfileRoute(navigateUp = navigateUp, ...)
    }
}
** ProfileRoute는 동일하게 사용
ViewModel에서 userId 추출
// ProfileViewModel.kt
@HiltViewModel
class ProfileViewModel @Inject constructor(
    savedStateHandle: SavedStateHandle,
    ...
) : ViewModel() {
    val userId = savedStateHandle.toRoute<Route.Profile>().userId // 타인 프로필에서 넘겨받은 userId

    private val _uiState = MutableStateFlow(ProfileUiState(userId = userId))
}
Repository의 API 분기
// UserRepository.kt
class UserRepository @Inject constructor(
    private val api: UserApi,
    private val preferencesManager: PreferencesManager,
) {
		// 로그인 후 저장소에서 저장된 userId
    private suspend fun myUserId(): String {
        return preferencesManager.getString(USER_ID).first()
    }

    // ...
}
// 같은 API를 쓰는 경우
suspend fun getUserProfile(userId: String?): Result<UserProfileResponseModel> =
suspendRunCatching {
apiService.getUserProfile(userId ?: myUserId()).data.toModel()
}
// 다른 API를 쓰는 경우 (일부 API는 내 것과 타인 것의 엔드포인트가 다름)
suspend fun getUserCreatedCollections(userId: String?): Result<CollectionListModel> =
suspendRunCatching {
if (userId == null) { // My
apiService.getMyCreatedCollections().data.toModel() // 내 컬렉션
} else { // Other
apiService.getUserCreatedCollections(userId).data.toModel() // 타인 컬렉션
}
}
내 프로필/타인 프로필 모두 서버로부터 동일한 형태의 Dto를 받아오고, Model도 같은 것을 쓴다.
Screen의 조건부 UI
// ProfileScreen.kt
@Composable
private fun ProfileScreen(uiState: ProfileUiState, ...) {
    Box(...) {
        // 타인 프로필일 때만 뒤로가기 버튼 표시
        if (uiState.userId != null) {
            FlintBackTopAppbar(onClick = onBackClick)
        }

        ~~// 내 프로필에서만 이스터에그 기능 활성화 (궁금하면 데모데이 때 클릭해보세요ㅎㅎ)
        ProfileTopSection(
            onEasterEggWithdraw = {
                if (uiState.userId == null) onEasterEggWithdraw()
            }
        )~~
    }
}
데이터 흐름 요약
┌─────────────────────────────────────────────────────────────┐
│ [내 프로필]                                                   │
│ MainTabRoute.Profile → ProfileRoute(navigateUp={})          │
│   → ViewModel(userId=null)                                   │
│   → Repository: apiService.getMyCreatedCollections()        │
│   → Screen: 뒤로가기 버튼 숨김                                 │
└─────────────────────────────────────────────────────────────┘

┌─────────────────────────────────────────────────────────────┐
│ [타인 프로필]                                                 │
│ Route.Profile(userId="123") → ProfileRoute(navigateUp=...)  │
│   → ViewModel(userId="123")                                  │
│   → Repository: apiService.getUserCreatedCollections("123") │
│   → Screen: 뒤로가기 버튼 표시                                 │
└─────────────────────────────────────────────────────────────┘
2️⃣ CollectionListScreen
💡 Enum 타입을 활용한 다중 분기
문제 상황
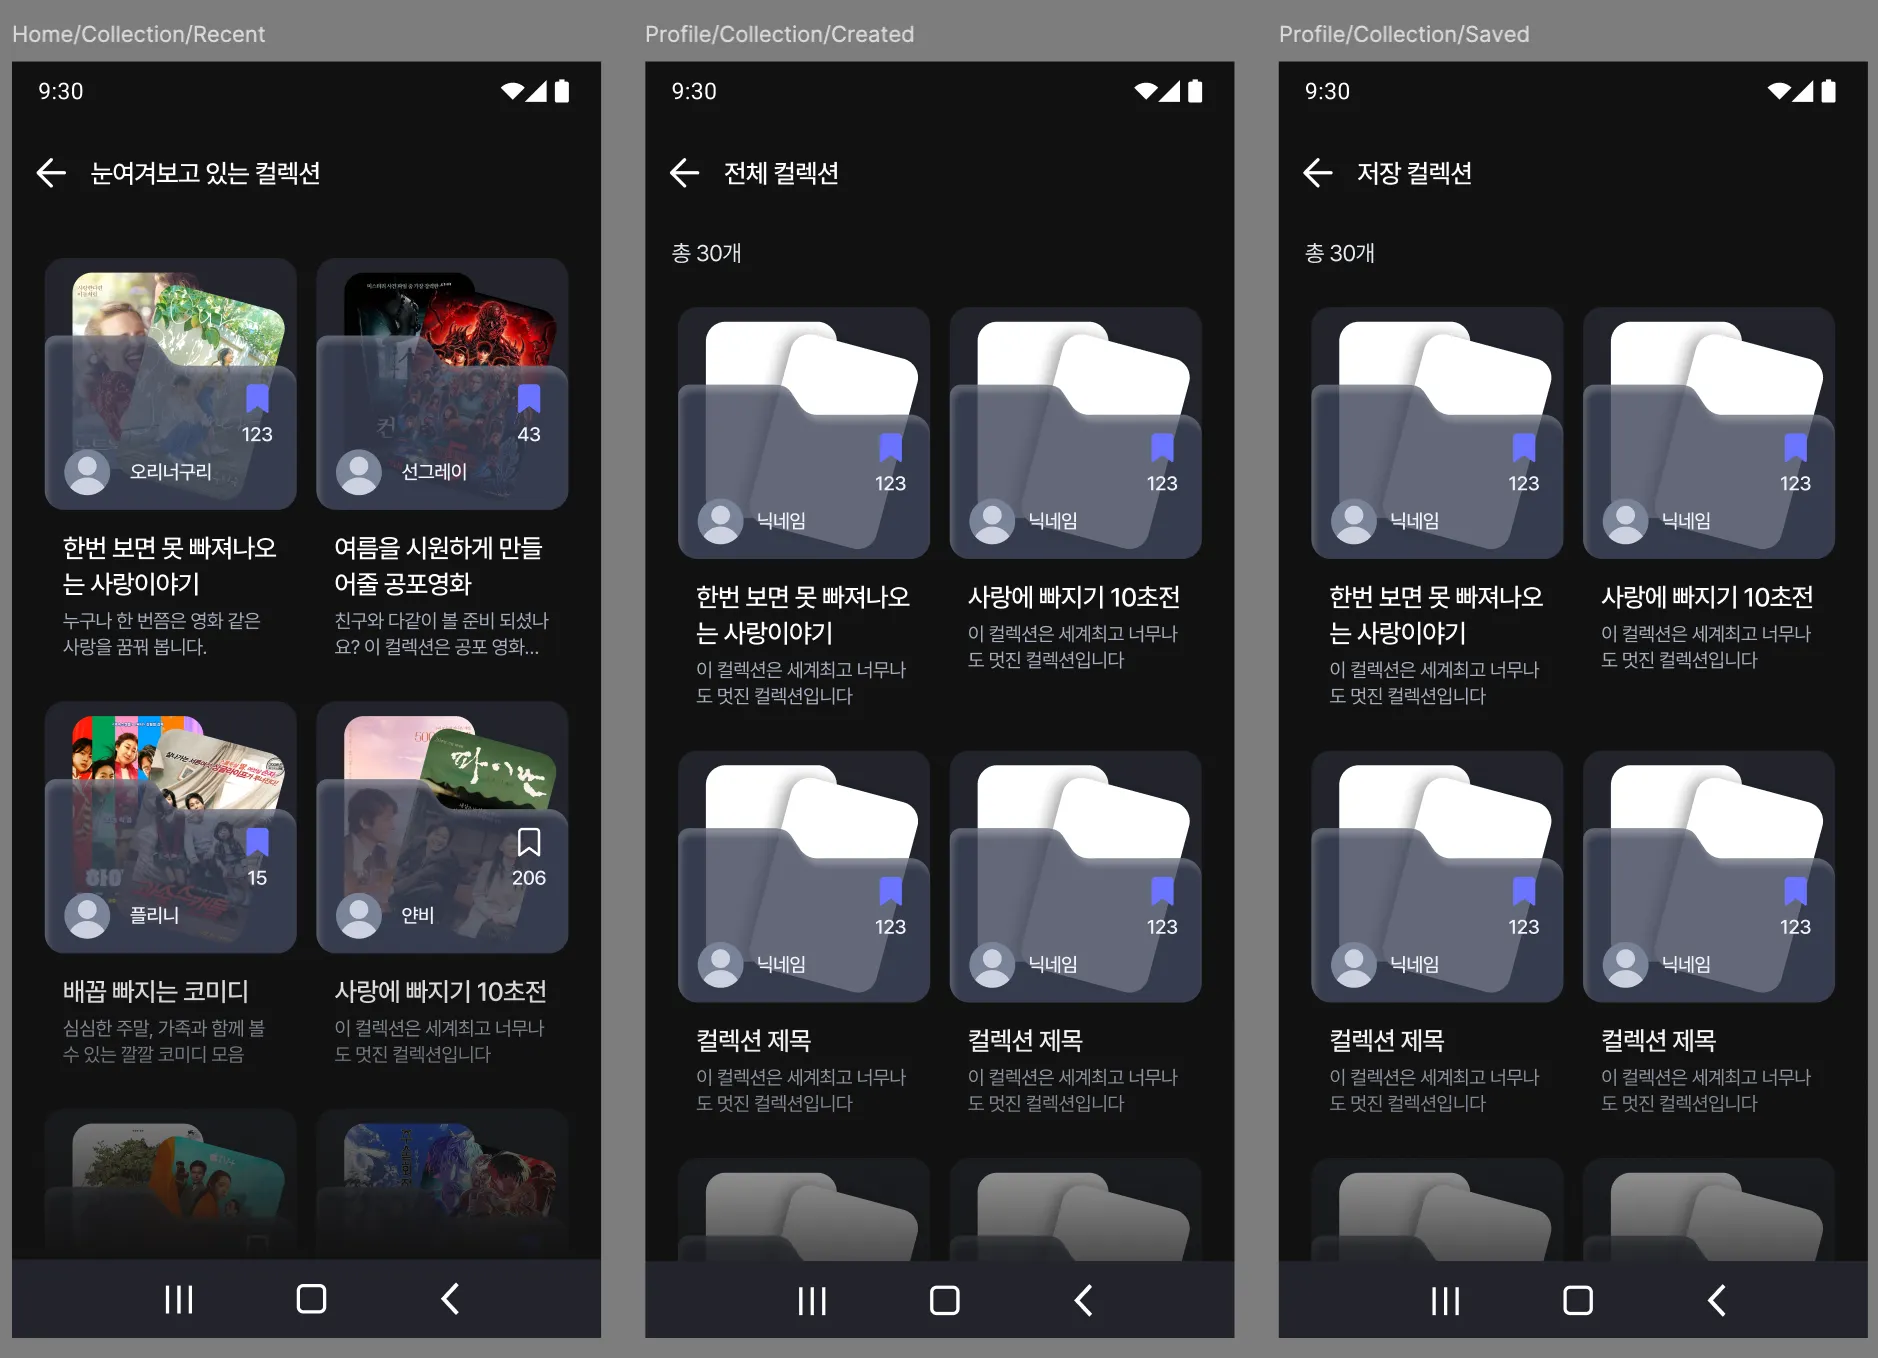
- "생성한 컬렉션", "저장한 컬렉션", "최근 컬렉션" 3가지 화면이 필요
- UI 구조는 동일하나 AppBar 제목과 호출 API가 다름
해결 전략
CollectionListRouteTypeenum으로 화면 타입을 명시적으로 구분- 동일한 Screen, UiState 활용
- TopAppBar 타이틀 및 호출 API 변경
Enum 타입 정의
// CollectionListRouteType.kt
enum class CollectionListRouteType(val title: String) {
    CREATED(title = "전체 컬렉션"),
    SAVED(title = "저장 컬렉션"),
    RECENT(title = "눈여겨보고 있는 컬렉션"),
}
Route 정의
// Route.kt
@Serializable
data class CollectionList(
    val routeType: CollectionListRouteType,
    val userId: String? = null  // Profile과 조합하여 사용 (내 프로필이라면 userId = null)
) : Route
UiState
data class CollectionListUiState(
    val appbarTitle: String = "",
    val collectionList: UiState<CollectionListModel> = UiState.Loading
)
Navigation 함수
// CollectionListNavigation.kt
fun NavController.navigateToCollectionList(
    routeType: CollectionListRouteType,
    userId: String?,
    navOptions: NavOptions? = null
) {
    navigate(
        Route.CollectionList(userId = userId, routeType = routeType),
        navOptions,
    )
}
ViewModel에서 분기 처리
// CollectionListViewModel.kt
@HiltViewModel
class CollectionListViewModel @Inject constructor(
    savedStateHandle: SavedStateHandle,
    private val userRepository: UserRepository,
    private val collectionRepository: CollectionRepository,
    ...
) : ViewModel() {

    init {
        val routeReceiveData = savedStateHandle.toRoute<Route.CollectionList>()
        setAppBarTitle(routeReceiveData.routeType.title)  // enum의 title 사용
        getCollectionList(routeReceiveData)
    }

    private fun getCollectionList(data: Route.CollectionList) {
        viewModelScope.launch {
            // routeType에 따라 다른 API 호출
            when (data.routeType) {
                CollectionListRouteType.CREATED ->
                    userRepository.getUserCreatedCollections(userId = data.userId)
                CollectionListRouteType.SAVED ->
                    userRepository.getUserBookmarkedCollections(userId = data.userId)
                CollectionListRouteType.RECENT ->
                    collectionRepository.getRecentCollectionList()  // userId 불필요
            }.onSuccess { ... }.onFailure { ... }
        }
    }
}
** Repository 데이터 호출은 앞선 Profile과 동일
Screen에서의 활용
Screen은 분기 로직을 알 필요 없이, 전달받은 데이터만 표시
// CollectionListScreen.kt
@Composable
fun CollectionListRoute(viewModel: CollectionListViewModel = hiltViewModel(), ...) {
    val uiState by viewModel.uiState.collectAsStateWithLifecycle()

    CollectionListScreen(
        title = uiState.appbarTitle,  // ViewModel에서 결정된 제목
        collectionList = uiState.collectionList,
        ...
    )
}
호출 예시 (ProfileScreen에서)
// ProfileScreen.kt
ProfileRoute(
    navigateToCollectionList = { routeType, userId ->
        navController.navigateToCollectionList(routeType, userId)
    }
)

// Route 내부
onCreatedCollectionMoreClick = {
    navigateToCollectionList(CollectionListRouteType.CREATED, uiState.userId)
}
onSavedCollectionMoreClick = {
    navigateToCollectionList(CollectionListRouteType.SAVED, uiState.userId)
}
데이터 흐름 요약
┌──────────────────────────────────────────────────────────────────┐
│ [생성한 컬렉션]                                                    │
│ Route.CollectionList(CREATED, userId="123")                      │
│   → ViewModel: title="전체 컬렉션"                                 │
│   → API: userRepository.getUserCreatedCollections("123")         │
└──────────────────────────────────────────────────────────────────┘

┌──────────────────────────────────────────────────────────────────┐
│ [저장한 컬렉션]                                                    │
│ Route.CollectionList(SAVED, userId="123")                        │
│   → ViewModel: title="저장 컬렉션"                                 │
│   → API: userRepository.getUserBookmarkedCollections("123")      │
└──────────────────────────────────────────────────────────────────┘

┌──────────────────────────────────────────────────────────────────┐
│ [최근 컬렉션 - 홈에서 진입]                                         │
│ Route.CollectionList(RECENT, userId=null)                        │
│   → ViewModel: title="눈여겨보고 있는 컬렉션"                        │
│   → API: collectionRepository.getRecentCollectionList()          │
└──────────────────────────────────────────────────────────────────┘
3️⃣ 두 패턴의 비교
| 구분 | ProfileScreen | CollectionListScreen |
|---|---|---|
| 분기 기준 | userId: String? (nullable) | CollectionListRouteType (enum) |
| 분기 개수 | 2가지 (My/Other) | 3가지 (CREATED/SAVED/RECENT) |
| 분기 위치 | Repository + Screen | ViewModel |
| UI 분기 | 조건부 컴포넌트 표시 | 없음 (title만 다름) |
| API 분기 | Repository에서 처리 (userId 기반) | ViewModel의 when문 |
| 확장성 | 단순 (있다/없다) | 타입 추가로 확장 용이 |
선택 기준
- Nullable 파라미터: 이진 분기(내 것/남의 것)이고 UI 차이가 미미할 때
- Enum 타입: 3개 이상의 분기가 필요하고, 각 타입별 동작이 명확히 다를 때
공통 패턴
SavedStateHandle.toRoute<T>()로 Navigation Arguments 추출- Screen은 분기 로직을 모름 (ViewModel/Repository에서 처리)
- Route 정의 시
@Serializable필수 (Type-safe Navigation)
📱 실행 영상
| Profile | CollectionList |
|---|---|
🔥 마치며
어디까지를 공통으로 볼 것인가? 앞으로 얼마나 달라질 것인가?의 관점에서 화면을 최대한 나누는 게 좋을 수도 있을 겁니다.
그러나!!!!!!!!!!
저희는 5주동안 진행되는 앱잼이라는 특수한 상황상, 기존 것을 최대한 재활용하기 위해 일부러 디자인/서버 분들과 많은 논의를 했습니다.
앞으로 Profile과 CollectionList가 서로 UI가 달라질 수 있겠지만, 현재 단계에서는 충분히 통합해서 사용할만하다고 생각했고(뷰모델이랑 스크린 또 만들기 귀찮잖어~) 그래서 분기랑 네비게이션 관리를 열심히 해봤습니다.
어떻게 보면 꼼수를 사용한 건데, 지금 단계에서는 그대로 두고 나중에 필요성을 느낀다면 분리시킬 것 같습니다.
유지보수성에 대해서는 대답하기 힘들지 몰라도, 같은 Screen, ViewModel을 사용하며 Route를 다르게 가져가보는 것이 재밌는 경험이었습니다😄