리덕스
- 상황: state가 너무나 복잡해질 때. 스파게티 코드를 방지하기 위해 리덕스를 사용한다.
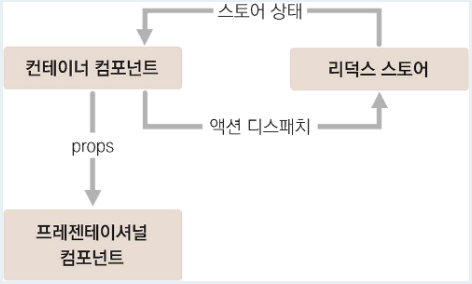
- 다음과 같이 앱을 구성한다.
- 리덕스 스토어 구성: DUCKS 패턴(액션타입, 액션생성함수, 리듀서 코드 한꺼번에 작성)
모듈(=액션타입 + 액션생성함수 + 리듀서 ) 작성하기
- 액션 타입 정의하기
1) counter
const INCREASE = 'counter/INCREASE';
const DECREASE = 'counter/DECREASE';
2) todo
const CHANGE_INPUT = 'todos/CHANGE_INPUT'; // 인풋 값을 변경함
const INSERT = 'todos/INSERT'; // 새로운 todo를 등록함
const TOGGLE = 'todos/TOGGLE'; // todo를 체크/체크 해제함
const REMOVE = 'todos/REMOVE'; // todo를 제거함
- 액션생성함수 만들기
1) counter: 아무것도 전달해줄 게 없을 경우.
export const increase = ()=>({ type: INCREASE});
export const decrease = ()=>({ type: DECREASE});
2) todo: 파라미터가 존재하는 경우( 전달해줄 게 있는 경우) : 값을 변형시킨다.
export const changeInput = input => ({
  type: CHANGE_INPUT,
  input
});

let id = 3; // insert가 호출될 때마다 1씩 더해집니다.
export const insert = text => ({
  type: INSERT,
  todo: {
    id: id++,
    text,
    done: false
  }
});

export const toggle = id => ({
  type: TOGGLE,
  id
});

export const remove = id => ({
  type: REMOVE,
  id
});
3) createAction으로 만들기
(모듈은 미리 추가해두기)
import { createAction } from 'redux-actions';

const INCREASE = 'counter/INCREASE';
const DECREASE = 'counter/DECREASE';

export const increase = createAction(INCREASE);
export const decrease = createAction(DECREASE);
3-2) 무언가 추가할 값이 있을 경우.
export const insert = createAction(INSERT, text => ({
  id: id++,
  text,
  done: false,
}));
- 초기상태 만들기
1) 얕은 객체
const initialState = {
  number: 0
};
2) 깊은 객체 (추후 리듀서 함수에서 변경시 spead 연산자를 사용하거나, immer 라이브러리를 사용한다)
const initialState = {
  input: '',
  todos: [
    {
      id: 1,
      text: '리덕스 기초 배우기',
      done: true
    },
    {
    id: 2,
      text: '리액트와 리덕스 사용하기',
      done: false
    }
  ]
};
- 리듀서 함수 만들기
방법1. switch ~case 문 사용하여 만들기
function counter(state = initialState, action) {
  switch (action.type) {
    case INCREASE:
      return {
        number: state.number + 1
      };
    case DECREASE:
      return {
      number: state.number - 1
      };
    default:
      return state;
  }
}

export default counter;
방법1-2. 깊은 객체 바꾸기
function todos(state = initialState, action) {
  switch (action.type) {
    case CHANGE_INPUT:
      return {
        ...state,
        input: action.input
      };
    case INSERT:
      return {
        ...state,
        todos: state.todos.concat(action.todo)
      };
    case TOGGLE:
      return {
        ...state,
        todos: state.todos.map(todo =>
          todo.id = = = action.id ? { ...todo, done: !todo.done } : todo
        )
      };
    case REMOVE:
      return {
        ...state,
        todos: state.todos.filter(todo => todo.id != = action.id)
      };
    default:
      return state;
  }
}

export default todos;
방법3: handleAction 모듈 사용하기
(모듈은 미리 import 해두기)
import { createAction, handleActions } from 'redux-actions';

...

const counter = handleActions(
  {
    [INCREASE]: (state, action) => ({ number: state.number + 1 }),
    [DECREASE]: (state, action) => ({ number: state.number - 1 }),
  },
  initialState,
);

export default counter;
- 루트 리듀서 만들기
(modules/index.js 에서 모든 리듀서 합치기 )
1) combineReducers 모듈 가져오기
import {combineReducers} from 'redux'2) 다른 리듀서 모듈 가져오기
import counter from './counter'
import todos from './todos';- root 리듀서 만들고 넣고 내보내기
const rootReducer = combineReducers({
  counter,
  todos,
});

export default rootReducer;
스토어 만들기 : 리듀서를 리액트 앱과 연동
- 모듈 추가
import {createStore} from 'redux';- 리듀서 추가
import rootReducer from './modules';- Provider 추가
import {Provider} from 'react-redux';- 리듀서를 리액트 앱에 적용
(src/index.js)
import ReactDOM from 'react-dom';
import { createStore } from 'redux';
import { Provider } from 'react-redux';
import './index.css';
import App from './App';
import rootReducer from './modules';

const store = createStore(rootReducer);

ReactDOM.render(
  <Provider store={store}>
    <App />
  </Provider>,
  document.getElementById('root'),
);- Redux DevTools 모듈 설치
yarn add redux-devtools-extension- 다음과 같이 코드 작성
import ReactDOM from 'react-dom';
import { createStore } from 'redux';
import { Provider } from 'react-redux';
import { composeWithDevTools } from 'redux-devtools-extension';
import './index.css';
import App from './App';
import rootReducer from './modules';

const store = createStore(rootReducer, composeWithDevTools());

ReactDOM.render(
  <Provider store={store}>
    <App />
  </Provider>,
  document.getElementById('root'),
);- 객체 비구조화 할당 문법-다른 이름 주기
컨테이너 만들기 (=리덕스 상태 조회) (1): connect 사용
- 모듈 추가
import {connect} from 'react-redux';- connect 사용하기
1) mapStateToProps(state관리) 와 mapDisapatchToProps(action 함수 관리)를 따로 정의하고, 이를 connect 함수의 첫 번째 인자와 두 번째 인자로 넣은 다음, 컨테이너를 전체 함수의 인자로 넣기.
(ContainerCounter.js)
import { connect } from 'react-redux';
import Counter from '../components/Counter';
import { increase, decrease } from '../modules/counter';

const CounterContainer = ({ number, increase, decrease }) => {
  return (
    <Counter number={number} onIncrease={increase} onDecrease={decrease} />
  );
};

const mapStateToProps = state => ({
  number: state.counter.number,
});
const mapDispatchToProps = dispatch => ({
  increase: () => {
    dispatch(increase());
  },
  decrease: () => {
    dispatch(decrease());
  },
});
export default connect(
  mapStateToProps,
  mapDispatchToProps,
)(CounterContainer);
2) 익명함수로 한 번에 정의하기
import { connect } from 'react-redux';
import Counter from '../components/Counter';
import { increase, decrease } from '../modules/counter';

const CounterContainer = ({ number, increase, decrease }) => {
  return (
    <Counter number={number} onIncrease={increase} onDecrease={decrease} />
  );
};

export default connect(
  state => ({
    number: state.counter.number,
  }),
  dispatch => ({
    increase: () => dispatch(increase()),
    decrease: () => dispatch(decrease()),
  }),
)(CounterContainer);
3) 2를 bindActionCreator를 사용하여 더욱 견고하게 만들기
import { bindActionCreators } from 'redux';
import { connect } from 'react-redux';
import Counter from '../components/Counter';
import { increase, decrease } from '../modules/counter';

const CounterContainer = ({ number, increase, decrease }) => {
  return (
    <Counter number={number} onIncrease={increase} onDecrease={decrease} />
  );
};

export default connect(
  state => ({
    number: state.counter.number,
  }),
  dispatch =>
    bindActionCreators(
      {
        increase,
        decrease,
      },
      dispatch,
    ),
)(CounterContainer);
4) 가장 간단한 방법: mapDispatchToProps에 해당하는 파라미터를 함수 형태가 아닌 액션생성함수로 이루어진 객체 형태로 넣어주기
import { connect } from 'react-redux';
import Counter from '../components/Counter';
import { increase, decrease } from '../modules/counter';

const CounterContainer = ({ number, increase, decrease }) => {
  return (
    <Counter number={number} onIncrease={increase} onDecrease={decrease} />
  );
};
export default connect(
  state => ({
    number: state.counter.number,
  }),
  {
    increase,
    decrease,
  },
)(CounterContainer);- 팁: 액션함수는 바꿀 필요가 없다. 이미 리덕스에서 다 바꿔놨기 때문에 그냥 가져다 쓰면 된다.
(state을 props로 바로 받아오는 경우 )
export default connect(
  state => ({
    number: state.counter
  }),
  {
    increase,
    decrease
  }
)(CounterContainer);
- App.js 에 추가하기
iimport CounterContainer from './containers/CounterContainer';
import TodosContainer from './containers/TodosContainer';

const App = () => {
  return (
    <div>
      <CounterContainer />
      <hr />
      <TodosContainer />
    </div>
  );
};

export default App;
- 컴포넌트에 props 전달하여 요긴하게 써먹기
- 참고: todo는 그저 리듀서 함수가 아니라 state을 의미한다.
const TodoItem = ({ todo, onToggle, onRemove }) => {
  return (
    <div>
      <input
        type="checkbox"
        onClick={() => onToggle(todo.id)}
        checked={todo.done}
        readOnly={true}
      />
      <span style={{ textDecoration: todo.done ? 'line-through' : 'none' }}>
        {todo.text}
      </span>
           <button onClick={() => onRemove(todo.id)}>삭제</button>
    </div>
  );
};

const Todos = ({
  input, // 인풋에 입력되는 텍스트
  todos, // 할 일 목록이 들어 있는 객체
  onChangeInput,
  onInsert,
  onToggle,
  onRemove,
}) => {
  const onSubmit = e => {
    e.preventDefault();
    onInsert(input);
    onChangeInput(''); // 등록 후 인풋 초기화
  };
  const onChange = e => onChangeInput(e.target.value);
  return (
    <div>
      <form onSubmit={onSubmit}>
        <input value={input} onChange={onChange} />
        <button type="submit">등록</button>
      </form>
      <div>
        {todos.map(todo => (
          <TodoItem
            todo={todo}
            key={todo.id}
            onToggle={onToggle}
            onRemove={onRemove}
          />
        ))}
      </div>
    </div>
  );
};

export default Todos;
immer: 객체 업데이트시 불변성 관리하기
- 상황: initialState업데이트 시 불변성 지켜야 할 때, spread 연산자가 너무 복잡할 때
- 모듈 설치
yarn add immer - 모듈 추가
import produce from 'immer'- immer 활용하여 불변성 유지하며 값 바꾸기
- 여기서 draft는 불변성 유지하게 해주는 도우미 역할
(일반적)
const nextState = produce(originalState, draft => {
  // 바꾸고 싶은 값 바꾸기
  draft.somewhere.deep.inside = 5;
})
(리듀서와 함께)
import { createAction, handleActions } from 'redux-actions';
import produce from 'immer';

(...)

const todos = handleActions(
  {
    [CHANGE_INPUT]: (state, { payload: input }) =>
      produce(state, draft => {
        draft.input = input;
      }),
    [INSERT]: (state, { payload: todo }) =>
      produce(state, draft => {
        draft.todos.push(todo);
      }),
    [TOGGLE]: (state, { payload: id }) =>
      produce(state, draft => {
        const todo = draft.todos.find(todo => todo.id = = = id);
        todo.done = !todo.done;
      }),
    [REMOVE]: (state, { payload: id }) =>
      produce(state, draft => {
        const index = draft.todos.findIndex(todo => todo.id = = = id);
        draft.todos.splice(index, 1);
      }),
  },
  initialState,
);

export default todos;
컨테이너 만들기 (=리덕스 상태 조회) (2): useSelector & useDispatch 사용
- 모듈 설치하기
(react-redux 만 설치하면 됨) - 모듈 가져오기 (useSelector, 리덕스함수모듈)
import {useSelector} from 'react-redux';
import Counter from '../components/Counter';
import { increase, decrease } from '../modules/counter';- 모듈 적용하기
1)useSelector로 state 가져온 뒤 그 state에서 선택하기
2) useDispatch로 액션 가져오기
import {useSelector} from 'react-redux';
import Counter from '../components/Counter';
import { increase, decrease } from '../modules/counter';

const CounterContainer = () => {
  const number = useSelector(state => state.counter.number);
  const dispatch = useDispatch();
  return (
    <Counter
      number={number}
      onIncrease={() => dispatch(increase())}
      onDecrease={() => dispatch(decrease())}
    />
  );
};

export default CounterContainer;- 복잡한 것 받아오기
1) useSelector props로 바로 받아오기
2) useDispatch로 깊은 객체 받아오기 (액션 안에 액션이 있다>?!)
import React, { useCallback } from 'react';
import { useSelector, useDispatch } from 'react-redux';
import { changeInput, insert, toggle, remove } from '../modules/todos';
import Todos from '../components/Todos';

const TodosContainer = () => {
  const { input, todos } = useSelector(({ todos }) => ({
    input: todos.input,
    todos: todos.todos
  }));
  const dispatch = useDispatch();
  const onChangeInput = useCallback(input => dispatch(changeInput(input)), [
    dispatch
  ]);
  const onInsert = useCallback(text => dispatch(insert(text)), [dispatch]);
  const onToggle = useCallback(id => dispatch(toggle(id)), [dispatch]);
  const onRemove = useCallback(id => dispatch(remove(id)), [dispatch]);

  return (
    <Todos
      input={input}
      todos={todos}
      onChangeInput={onChangeInput}
      onInsert={onInsert}
      onToggle={onToggle}
      onRemove={onRemove}
    />
  );
};

export default TodosContainer;- (선택) 최적화: useCallback으로 감싸고 두 번째 인수로 dispatch 넣기
import React, { useCallback } from 'react';
import { useSelector, useDispatch } from 'react-redux';
import Counter from '../components/Counter';
import { increase, decrease } from '../modules/counter';

const CounterContainer = () => {
  const number = useSelector(state => state.counter.number);
  const dispatch = useDispatch();
  const onIncrease = useCallback(() => dispatch(increase()), [dispatch]);
  const onDecrease = useCallback(() => dispatch(decrease()), [dispatch]);
  return (
    <Counter number={number} onIncrease={onIncrease} onDecrease={onDecrease} />
  );
};

export default CounterContainer;
useAction
- 상황: 액션생성함수를 액션을 디스패치하는 함수로 변환해야 할 때
그러나 나는 사용하지 않겠다 이거 가독성 떨어짐.
connect vs useSelector & useDispatch
- 컨테이너 컴포넌트( = 리덕스 함수와 프레젠테이셔널 컴포넌트 연결)를 어떻게 구현할까?
-
connect
컨테이너 컴포넌트의 props가 바뀌지 않는다면 리렌더링이 자동으로 방지됨 -
useSelector
자동으로 이뤄지지 않으므로 React.memo 필수
(아래 예시는 app 컴포넌트가 리렌더링되는 일이 없을 테므로 불필요 하지만, 하여튼 말이 그렇다는 거다.)
import React from 'react';
import { useSelector } from 'react-redux';
import { changeInput, insert, toggle, remove } from '../modules/todos';
import Todos from '../components/Todos';
import useActions from '../lib/useActions';

const TodosContainer = () => {
  (...)
};

export default React.memo(TodosContainer);
미들웨어 사용하기: 직접 만들기
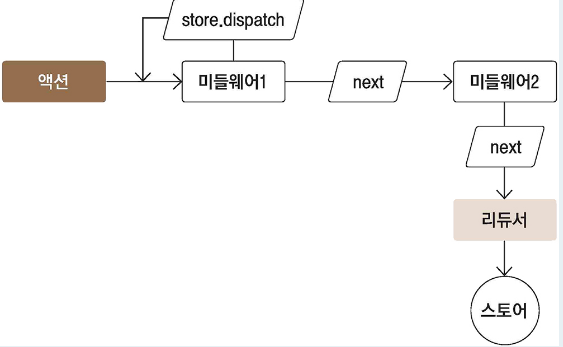
- 미들웨어란?
함수를 반환하는 함수를 반환하는 함수 (인자가 3개) - next(action)
다음에 처리해야 할 미들웨어에게 액션을 넘겨주고, 그 다음 미들웨어가 없다면 리듀서에게 액션 넘겨줌.
(next가 없으면 액션이 무시됨.)
- 모듈 설치하기
yarn add redux-actions- 모듈 가져오기
import { createStore, applyMiddleware } from 'redux';- lib 폴더에 미들웨어 만들기
(이전 상태와 액션 정보와 새로워진 상태를 반환하는 미들웨어)
(./lib/loggerMiddleware)
const loggerMiddleware = store => next => action => {
  console.group(action && action.type); // 액션 타입으로 log를 그룹화함
  console.log('이전 상태', store.getState());
  console.log('액션', action);
  next(action); // 다음 미들웨어 혹은 리듀서에게 전달
  console.log('다음 상태', store.getState()); // 업데이트된 상태
  console.groupEnd(); // 그룹 끝
};

export default loggerMiddleware;
- 미들웨어 스토어(index.js)에 적용하기
- 모듈 가져오기
import loggerMiddleware from './lib/loggerMiddleware';- 미들웨어 적용하기ㅏ
const store = createStore(rootReducer, applyMiddleware(loggerMiddleware));- index.js 파일
import ReactDOM from 'react-dom';
import { createStore, applyMiddleware } from 'redux';
import { Provider } from 'react-redux';
import './index.css';
import App from './App';
import rootReducer from './modules';
import loggerMiddleware from './lib/loggerMiddleware';

const store = createStore(rootReducer, applyMiddleware(loggerMiddleware));

ReactDOM.render(
  <Provider store={store}>
    <App />
  </Provider>,
  document.getElementById('root')
);
미들웨어 사용하기: redux-logger 사용하기
- 모듈 설치
yarn add redux-logger- 모듈 가져오기
import { createLogger } from 'redux-logger';- 미들웨어 생성하기
const logger = createLogger();- 생성한 미들웨어 store에 적용하기 ( applyMiddleware(logger) )
- index.js 수정하기 (store 수정하기)
import ReactDOM from 'react-dom';
import { createStore, applyMiddleware } from 'redux';
import { Provider } from 'react-redux';
import './index.css';
import App from './App';
import rootReducer from './modules';
// import loggerMiddleware from './lib/loggerMiddleware';
import { createLogger } from 'redux-logger';

const logger = createLogger();
const store = createStore(rootReducer, applyMiddleware(logger));

ReactDOM.render(
  <Provider store={store}>
    <App />
  </Provider>,
  document.getElementById('root')
);
미들웨어 사용하기: 비동기 작업 처리하는 미들웨어 사용하기(redux-thunk )
- redux-thunk: 액션 생성 함수에서 일반 액션 객체를 반환하는 대신, 함수를 반환
(기존 액션생성함수 작성법)
export const increase = createAction(INCREASE);(무언가 넣을 게 있다면)
export const insert = createAction(INSERT, text => ({
id: id++,
text,
done: false,
}));(redux-thunk 모듈을 미들웨어에 넣은 리덕스모듈의 작성법)
export const increaseAsync = () => dispatch => {
  setTimeout(() => {
    dispatch(increase());
  }, 1000);
};- 모듈 설치
yarn add redux-thunk- 모듈 추가
import ReduxThunk from 'redux-thunk';- 미들웨어 적용 후 store에 넣기
const store = createStore(rootReducer, applyMiddleware(logger, ReduxThunk));- (index.js 전체 파일)
import ReactDOM from 'react-dom';
import { createStore, applyMiddleware } from 'redux';
import { Provider } from 'react-redux';
import './index.css';
import App from './App';
import rootReducer from './modules';
// import loggerMiddleware from './lib/loggerMiddleware';
import { createLogger } from 'redux-logger';
import ReduxThunk from 'redux-thunk';

const logger = createLogger();
const store = createStore(rootReducer, applyMiddleware(logger, ReduxThunk));

ReactDOM.render(
  <Provider store={store}>
    <App />
  </Provider>,
  document.getElementById('root')
);- 리덕스 모듈 바꾸기
export const decreaseAsync = () => dispatch => {
  setTimeout(() => {
    dispatch(decrease());
  }, 1000);
};
(modules/counter.js 전체파일)
import { createAction, handleActions } from 'redux-actions';

const INCREASE = 'counter/INCREASE';
const DECREASE = 'counter/DECREASE';

export const increase = createAction(INCREASE);
export const decrease = createAction(DECREASE);

// 1초 뒤에 increase 혹은 decrease 함수를 디스패치함
export const increaseAsync = () => dispatch => {
  setTimeout(() => {
    dispatch(increase());
  }, 1000);
};
export const decreaseAsync = () => dispatch => {
  setTimeout(() => {
    dispatch(decrease());
  }, 1000);
};

const initialState = 0; // 상태는 꼭 객체일 필요가 없습니다. 숫자도 작동해요.

const counter = handleActions(
  {
    [INCREASE]: state => state + 1,
    [DECREASE]: state => state - 1
  },
  initialState
);

export default counter;- 컨테이너에서 기존 함수 바꾸기(간단)
(container/CounterContianer.js)
import { connect } from 'react-redux';
import { increaseAsync, decreaseAsync } from '../modules/counter';
import Counter from '../components/Counter';

const CounterContainer = ({ number, increaseAsync, decreaseAsync }) => {
  return (
    <Counter
    number={number}
      onIncrease={increaseAsync}
      onDecrease={decreaseAsync}
    />
  );
};

export default connect(
  state => ({
    number: state.counter
  }),
  {
    increaseAsync,
    decreaseAsync
  }
)(CounterContainer);
미들웨어 사용하기: 웹 요청 비동기 작업 처리하는 미들웨어 사용하기(redux-thunk )
- 상황: 웹에서 비동기 작업을 처리해야 할 때
- 모듈 설치
yarn add axios - api 파일 따로 만들기 + api파일에 axios모듈 가져오기 + api는 모두 함수화(가독성 및 유지보수가 좋아지기 때문)
(lib/api.js)
import axios from 'axios';

export const getPost = id =>
  axios.get(`https://jsonplaceholder.typicode.com/posts/${id}`);

export const getUsers = id =>
axios.get(`https://jsonplaceholder.typicode.com/users`);- 리덕스 모듈 제작: 모듈 가져오고 액션 타입 정의 (요청 시작/ 성공/실패)
import { handleActions } from 'redux-actions';
import * as api from '../lib/api';
// 액션 타입을 선언합니다.
// 한 요청당 세 개를 만들어야 합니다.

const GET_POST = 'sample/GET_POST';
const GET_POST_SUCCESS = 'sample/GET_POST_SUCCESS';
const GET_POST_FAILURE = 'sample/GET_POST_FAILURE';

const GET_USERS = 'sample/GET_USERS';
const GET_USERS_SUCCESS = 'sample/GET_USERS_SUCCESS';
const GET_USERS_FAILURE = 'sample/GET_USERS_FAILURE';- 리덕스 모듈 제작: 액션 생성 함수(thunk의 영향을 받아 함수형으로 작성했으며 async~ await를 적용한) 작성
(modules/sample.js)
export const getPost = id => async dispatch => {
  dispatch({ type: GET_POST }); // 요청을 시작한 것을 알림
  try {
    const response = await api.getPost(id);
    dispatch({
      type: GET_POST_SUCCESS,
      payload: response.data
    }); // 요청 성공
  } catch (e) {
    dispatch({
      type: GET_POST_FAILURE,
      payload: e,
      error: true
    }); // 에러 발생
    throw e; // 나중에 컴포넌트단에서 에러를 조회할 수 있게 해 줌
  }
};

export const getUsers = () => async dispatch => {
  dispatch({ type: GET_USERS }); // 요청을 시작한 것을 알림
  try {
    const response = await api.getUsers();
    dispatch({
      type: GET_USERS_SUCCESS,
      payload: response.data
    }); // 요청 성공
  } catch (e) {
    dispatch({
      type: GET_USERS_FAILURE,
      payload: e,
      error: true
    }); // 에러 발생
    throw e; // 나중에 컴포넌트단에서 에러를 조회할 수 있게 해 줌
  }
};
- 리덕스 모듈 제작: 초기상태 지정
// 초기 상태를 선언합니다.
// 요청의 로딩 중 상태는 loading이라는 객체에서 관리합니다.

const initialState = {
  loading: {
    GET_POST: false,
    GET_USERS: false
  },
  post: null,
  users: null
};- 리덕스 모듈 함수 만들기 : 리덕스 함수 (각 액션별 요청/성공/실패 시 실행할 내용 정하기)
- ... : 기존 내용을 불변성을 유지하며 그대로 가져옴
const sample = handleActions(
  {
    [GET_POST]: state => ({
      ...state,
      loading: {
        ...state.loading,
        GET_POST: true // 요청 시작
      }
    }),
    [GET_POST_SUCCESS]: (state, action) => ({
      ...state,
      loading: {
        ...state.loading,
        GET_POST: false // 요청 완료
      },
      post: action.payload
    }),
    [GET_POST_FAILURE]: (state, action) => ({
      ...state,
      loading: {
        ...state.loading,
        GET_POST: false // 요청 완료
      }
    }),
    [GET_USERS]: state => ({
      ...state,
      loading: {
        ...state.loading,
        GET_USERS: true // 요청 시작
      }
    }),
    [GET_USERS_SUCCESS]: (state, action) => ({
      ...state,
      loading: {
        ...state.loading,
        GET_USERS: false // 요청 완료
      },
      users: action.payload
    }),
    [GET_USERS_FAILURE]: (state, action) => ({
      ...state,
      loading: {
        ...state.loading,
        GET_USERS: false // 요청 완료
      }
    })
  },
  initialState
);

export default sample;- (전체 모듈)
import { handleActions } from 'redux-actions';
import * as api from '../lib/api';

// 액션 타입을 선언합니다.
// 한 요청당 세 개를 만들어야 합니다.

const GET_POST = 'sample/GET_POST';
const GET_POST_SUCCESS = 'sample/GET_POST_SUCCESS';
const GET_POST_FAILURE = 'sample/GET_POST_FAILURE';

const GET_USERS = 'sample/GET_USERS';
const GET_USERS_SUCCESS = 'sample/GET_USERS_SUCCESS';
const GET_USERS_FAILURE = 'sample/GET_USERS_FAILURE';

// thunk 함수를 생성합니다.
// thunk 함수 내부에서는 시작할 때, 성공했을 때, 실패했을 때 다른 액션을 디스패치합니다.

export const getPost = id => async dispatch => {
  dispatch({ type: GET_POST }); // 요청을 시작한 것을 알림
  try {
    const response = await api.getPost(id);
    dispatch({
      type: GET_POST_SUCCESS,
      payload: response.data
    }); // 요청 성공
  } catch (e) {
    dispatch({
      type: GET_POST_FAILURE,
      payload: e,
      error: true
    }); // 에러 발생
    throw e; // 나중에 컴포넌트단에서 에러를 조회할 수 있게 해 줌
  }
};

export const getUsers = () => async dispatch => {
  dispatch({ type: GET_USERS }); // 요청을 시작한 것을 알림
  try {
    const response = await api.getUsers();
    dispatch({
      type: GET_USERS_SUCCESS,
      payload: response.data
    }); // 요청 성공
  } catch (e) {
    dispatch({
      type: GET_USERS_FAILURE,
      payload: e,
      error: true
    }); // 에러 발생
    throw e; // 나중에 컴포넌트단에서 에러를 조회할 수 있게 해 줌
  }
};

// 초기 상태를 선언합니다.
// 요청의 로딩 중 상태는 loading이라는 객체에서 관리합니다.

const initialState = {
  loading: {
    GET_POST: false,
    GET_USERS: false
  },
  post: null,
  users: null
};

const sample = handleActions(
  {
    [GET_POST]: state => ({
      ...state,
      loading: {
        ...state.loading,
        GET_POST: true // 요청 시작
      }
    }),
    [GET_POST_SUCCESS]: (state, action) => ({
      ...state,
      loading: {
        ...state.loading,
        GET_POST: false // 요청 완료
      },
      post: action.payload
    }),
    [GET_POST_FAILURE]: (state, action) => ({
      ...state,
      loading: {
        ...state.loading,
        GET_POST: false // 요청 완료
      }
    }),
    [GET_USERS]: state => ({
      ...state,
      loading: {
        ...state.loading,
        GET_USERS: true // 요청 시작
      }
    }),
    [GET_USERS_SUCCESS]: (state, action) => ({
      ...state,
      loading: {
        ...state.loading,
        GET_USERS: false // 요청 완료
      },
      users: action.payload
    }),
    [GET_USERS_FAILURE]: (state, action) => ({
      ...state,
      loading: {
        ...state.loading,
        GET_USERS: false // 요청 완료
      }
    })
  },
  initialState
);

export default sample;- 루드 리듀서에 포함시키기
import { combineReducers } from 'redux';
import counter from './counter';
import sample from './sample';

const rootReducer = combineReducers({
  counter,
  sample
});

export default rootReducer;
- api를 통해 전달받은 데이터의 구조 파악하기
(예시)
// post
{
  "userId": 1,
  "id": 1,
  "title": "sunt aut facere repellat provident occaecati excepturi optio reprehenderit",
  "body": "quia et suscipit\nsuscipit recusandae consequuntur expedita et cum\nreprehenderit molestiae ut ut quas totam\nnostrum rerum est autem sunt rem eveniet architecto"
}

// users
[
  {
    "id": 1,
    "name": "Leanne Graham",
    "username": "Bret",
    "email": "Sincere@april.biz",
    "address": {
      "street": "Kulas Light",
      "suite": "Apt. 556",
      "city": "Gwenborough",
      "zipcode": "92998-3874",
      "geo": {
        "lat": "-37.3159",
        "lng": "81.1496"
      }
    },
    "phone": "1-770-736-8031 x56442",
    "website": "hildegard.org",
    "company": {
      "name": "Romaguera-Crona",
      "catchPhrase": "Multi-layered client-server neural-net",
      "bs": "harness real-time e-markets"
    }
  },
  (...)
]- 프레젠테이셔널 컴포넌트 작성하기 :
1)어떤 요청이 필요한지 props에 적어두기
2) 가져온 요청에서 데이터 뽑아내기
3) 디자인 등 하기
(components/Sample.js)
const Sample = ({ loadingPost, loadingUsers, post, users }) => {
  return (
    <div>
      <section>
        <h1>포스트</h1>
        {loadingPost && '로딩 중...'}
        {!loadingPost && post && (
          <div>
            <h3>{post.title}</h3>
            <h3>{post.body}</h3>
          </div>
        )}
      </section>
      <hr />
      <section>
        <h1>사용자 목록</h1>
        {loadingUsers && '로딩 중...'}
        {!loadingUsers && users && (
          <ul>
            {users.map(user => (
              <li key={user.id}>
                {user.username} ({user.email})
              </li>
            ))}
          </ul>
        )}
      </section>
    </div>
  );
};

export default Sample;- 컨테이너 작성하기
1) 모듈 가져오기 (connect 모듈, 컴포넌트 모듈, 리듀서 모듈 중 액션생성함수만, 렌더링 직전과 직후의 동작을 관리하는 useEffect모듈)
import { connect } from 'react-redux';
import Sample from '../components/Sample';
import { getPost, getUsers } from '../modules/sample';
const { useEffect } = React;
2) 컨테이너에서 가져올 props 정의하기
- post, users, loadingPost, loadingUsers: state에서 가져오는 것. connect 함수의 첫째 인자.
- getPost, getUsers: 액션생성함수에서 가져오는 것. connect함수의 둘째 인자.
3) useEffect 사용하여 효과 넣기
const SampleContainer = ({
  getPost,
  getUsers,
  post,
  users,
  loadingPost,
  loadingUsers
}) => {
  // 클래스 형태 컴포넌트였다면 componentDidMount
  useEffect(() => {
    getPost(1);
    getUsers(1);
  }, [getPost, getUsers]);
  return (
    <Sample
      post={post}
      users={users}
      loadingPost={loadingPost}
      loadingUsers={loadingUsers}
    />
  );
};
4) connect 함수 사용하여 적용하기
export default connect(
  ({ sample }) => ({
    post: sample.post,
    users: sample.users,
    loadingPost: sample.loading.GET_POST,
    loadingUsers: sample.loading.GET_USERS
  }),
  {
    getPost,
    getUsers
  }
)(SampleContainer);
(전체 파일)
import { connect } from 'react-redux';
import Sample from '../components/Sample';
import { getPost, getUsers } from '../modules/sample';

const { useEffect } = React;
const SampleContainer = ({
  getPost,
  getUsers,
  post,
  users,
  loadingPost,
  loadingUsers
}) => {
  // 클래스 형태 컴포넌트였다면 componentDidMount
  useEffect(() => {
    getPost(1);
    getUsers(1);
  }, [getPost, getUsers]);
  return (
    <Sample
      post={post}
      users={users}
      loadingPost={loadingPost}
      loadingUsers={loadingUsers}
    />
  );
};

export default connect(
  ({ sample }) => ({
    post: sample.post,
    users: sample.users,
    loadingPost: sample.loading.GET_POST,
    loadingUsers: sample.loading.GET_USERS
  }),
  {
    getPost,
    getUsers
  }
)(SampleContainer);- app.js 에서 container 넣기
import SampleContainer from './containers/SampleContainer';

const App = () => {
  return (
  <div>
      <SampleContainer />
    </div>
  );
};

export default App;
- 리액토링(선택)
(기존코드-액션생성함수)
export const getUsers = () => async dispatch => {
  dispatch({ type: GET_USERS }); // 요청을 시작한 것을 알림
  try {
    const response = await api.getUsers();
    dispatch({
      type: GET_USERS_SUCCESS,
      payload: response.data
    }); // 요청 성공
  } catch (e) {
    dispatch({
      type: GET_USERS_FAILURE,
      payload: e,
      error: true
    }); // 에러 발생
    throw e; // 나중에 컴포넌트단에서 에러를 조회할 수 있게 해 줌
  }
};

export const getPost = id => async dispatch => {
  dispatch({ type: GET_POST }); // 요청을 시작한 것을 알림
  try {
    const response = await api.getPost(id);
    dispatch({
      type: GET_POST_SUCCESS,
      payload: response.data
    }); // 요청 성공
  } catch (e) {
    dispatch({
      type: GET_POST_FAILURE,
      payload: e,
      error: true
    }); // 에러 발생
    throw e; // 나중에 컴포넌트단에서 에러를 조회할 수 있게 해 줌
  }
};
(리팩토링)
- SUCCESS 와 FAILURE 정의하기
- params 에는 id 등 인자가 들어감
- type에는 'GET_USERS' 등 요청함수가 들어감
- request(params)에는 api.getUsers(params) 등이 들어감
export default function createRequestThunk(type, request) {
  // 성공 및 실패 액션 타입을 정의합니다.
  const SUCCESS = `${type}_SUCCESS`;
  const FAILURE = `${type}_FAILURE`;
  return params => async dispatch => {
    dispatch({ type }); // 시작됨
    try {
      const response = await request(params);
      dispatch({
        type: SUCCESS,
        payload: response.data
      }); // 성공
    } catch (e) {
      dispatch({
        type: FAILURE,
        payload: e,
        error: true
      }); // 에러 발생
      throw e;
    }
  };
}

// 사용법: createRequestThunk('GET_USERS',api.getUsers);
(리듀서 모듈에 적용하기 )
export const getPost = createRequestThunk(GET_POST, api.getPost);
export const getUsers = createRequestThunk(GET_USERS, api.getUsers);
로딩 리듀서 추가하기
- 로딩 리듀서 파일(react-thunk 적용x) 작성
(로딩 리듀서 추가하기)
import { createAction, handleActions } from 'redux-actions';

const START_LOADING = 'loading/START_LOADING';
const FINISH_LOADING = 'loading/FINISH_LOADING';

/*
 요청을 위한 액션 타입을 payload로 설정합니다(예: "sample/GET_POST").
*/

export const startLoading = createAction(
  START_LOADING,
  requestType => requestType
);

export const finishLoading = createAction(
  FINISH_LOADING,
  requestType => requestType
);

const initialState = {};

const loading = handleActions(
  {
    [START_LOADING]: (state, action) => ({
      ...state,
      [action.payload]: true
    }),
    [FINISH_LOADING]: (state, action) => ({
      ...state,
      [action.payload]: false
    })
  },
  initialState
);

export default loading;- 로딩 리듀서 함수 내부에서 벌어지는 일.
{
  type: 'loading/START_LOADING',
  payload: 'sample/GET_POST'
}- 위 action이 dispatch되면 sample/GET_POST 값을 true로 설정해주며, 기존 상태에 sample/GET_POST 필드가 존재하지 않으면 새로 값을 설정해 준다.
- 결과적으로 다음과 같은 상황이 된다.
{'sample/GET_POST': true}
- 요청이 끝나면 다음 액션을 디스패치해야 한다.
{
  type: 'loading/FINISH_LOADING',
  payload: 'sample/GET_POST'
}- 결과적으로 다음과 같은 상황이 된다.
{'sample/GET_POST': false}- 루트 리듀서에 포함시키기
import { combineReducers } from 'redux';
import counter from './counter';
import sample from './sample';
import loading from './loading';

const rootReducer = combineReducers({
  counter,
  sample,
  loading
});

export default rootReducer;
(이하 전부 리팩토링)
3. lib/createRequestThunk.js 에서 loading 함수 사용하기
import { startLoading, finishLoading } from '../modules/loading';

export default function createRequestThunk(type, request) {
  // 성공 및 실패 액션 타입을 정의합니다.
  const SUCCESS = `${type}_SUCCESS`;
  const FAILURE = `${type}_FAILURE`;
  return params => async dispatch => {
    dispatch({ type }); // 시작됨
    dispatch(startLoading(type));
    try {
      const response = await request(params);
      dispatch({
        type: SUCCESS,
        payload: response.data
        }); // 성공
      dispatch(finishLoading(type));
    } catch (e) {
      dispatch({
        type: FAILURE,
        payload: e,
        error: true
      }); // 에러 발생
      dispatch(startLoading(type));
      throw e;
    }
  };
}

// 사용법: createRequestThunk('GET_USERS',api.getUsers);- container에서 로딩 상태 조회하기
loading['sample/GET_POST'] //true 혹은 false를 반환한다. (containers/sampleContainer.js)
import { connect } from 'react-redux';
import Sample from '../components/Sample';
import { getPost, getUsers } from '../modules/sample';

const { useEffect } = React;
const SampleContainer = ({
  getPost,
  getUsers,
  post,
  users,
  loadingPost,
  loadingUsers
}) => {
  // 클래스 형태 컴포넌트였다면 componentDidMount
  useEffect(() => {
    getPost(1);
    getUsers(1);
  }, [getPost, getUsers]);
  return (
    <Sample
      post={post}
      users={users}
      loadingPost={loadingPost}
      loadingUsers={loadingUsers}
    />
  );
};

export default connect(
  ({ sample, loading }) => ({
  post: sample.post,
    users: sample.users,
    loadingPost: loading['sample/GET_POST'],
    loadingUsers: loading['sample/GET_USER']
  }),
  {
    getPost,
    getUsers
  }
)(SampleContainer);

(성공시에만 success 액션으로 action.payload 값을 가져온다. ) - sample 리듀서에서 불필요한 코드 지우기
(modules/sample.js)
- 해당 코드를 지웠다.
const GET_POST_FAILURE ='sample/GET_POST_FAILURE'

//loading 은 loading 에서 관리하기 때문이다.
const initialState = {
  loading: {
    GET_POST: false,
    GET_USERS: false
  },
  post: null,
  users: null
};
import { handleActions } from 'redux-actions';
import * as api from '../lib/api';
import createRequestThunk from '../lib/createRequestThunk';
// 액션 타입을 선언합니다.
const GET_POST = 'sample/GET_POST';
const GET_POST_SUCCESS = 'sample/GET_POST_SUCCESS';
const GET_USERS = 'sample/GET_USERS';
const GET_USERS_SUCCESS = 'sample/GET_USERS_SUCCESS';
// thunk 함수를 생성합니다.
// thunk 함수 내부에서는 시작할 때, 성공했을 때, 실패했을 때 다른 액션을 디스패치합니다.
export const getPost = createRequestThunk(GET_POST, api.getPost);
export const getUsers = createRequestThunk(GET_USERS, api.getUsers);
// 초기 상태를 선언합니다.
// 요청의 로딩 중 상태는 loading이라는 객체에서 관리합니다.
const initialState = {
post: null,
users: null
};
const sample = handleActions(
{
[GET_POST_SUCCESS]: (state, action) => ({
...state,
post: action.payload
}),
[GET_USERS_SUCCESS]: (state, action) => ({
...state,
users: action.payload
})
},
initialState
);
export default sample;
(sampleContainer.js)
useEffect(() => {
    // useEffect에 파라미터로 넣는 함수는 async로 할 수 없기 때문에
    // 그 내부에서 async 함수를 선언하고 호출해 줍니다.
    const fn = async () => {
      try {
        await getPost(1);
        await getUsers(1);
      } catch (e) {
        console.log(e); // 에러 조회
      }
    };
    fn();
  }, [getPost, getUsers]);
jwt 토큰 발급 및 회원가입