Spring Cache
캐싱은 Spring 내부에서도 비교적 간단하게 구성
몇가지 설정을 통해 어떤 방식으로 캐싱할 것인지를 정하면 어노테이션을 통해 메서드에 쉽게 적용
@EnableCaching
먼저 새로운 @Configuration을 만들고, @EnableCaching을 추가
@EnableCaching은 어노테이션을 바탕으로 캐싱을 조절할 수 있게 해준다.
// 나머지 import 문들

import static org.springframework.data.redis.serializer.RedisSerializationContext.SerializationPair;

@Configuration
@EnableCaching
public class CacheConfig {

    @Bean
    // CacheManager로 진행해도 정상 동작
    public RedisCacheManager cacheManager(
            RedisConnectionFactory redisConnectionFactory
    ) {
        // 설정 구성을 먼저 진행한다.
        // Redis를 이용해서 Spring Cache를 사용할 때
        // Redis 관련 설정을 모아두는 클래스
        RedisCacheConfiguration configuration = RedisCacheConfiguration
                .defaultCacheConfig()
                // null을 캐싱 할것인지
                .disableCachingNullValues()
                // 기본 캐시 유지 시간 (Time To Live)
                .entryTtl(Duration.ofSeconds(10))
                // 캐시를 구분하는 접두사 설정
                .computePrefixWith(CacheKeyPrefix.simple())
                // 캐시에 저장할 값을 어떻게 직렬화 / 역직렬화 할것인지
                .serializeValuesWith(
                        SerializationPair.fromSerializer(RedisSerializer.java())
                );

        return RedisCacheManager
                .builder(redisConnectionFactory)
                .cacheDefaults(configuration)
                .build();
    }
}- Redis를 사용하고 있는 만큼,
RedisCacheManager를 만들어 Bean으로 등록
캐싱이 적용되는 어노테이션
@EnableCaching을 적용했다면, 이제 어노테이션을 바탕으로 메서드의 결과를 캐싱
대표적인 어노테이션으로 @Cacheable, @CachePut, @CacheEvict
@Cacheable
readOne 메서드에 @Cacheable을 추가
// cacheNames: 메서드로 인해서 만들어질 캐시를 지칭하는 이름
// key: 캐시에서 데이터를 구분하기 위해 활용할 값
@Cacheable(cacheNames = "itemCache", key = "args[0]")
public ItemDto readOne(Long id) {
    log.info("Read One: {}", id);
    return repository.findById(id)
            .map(ItemDto::fromEntity)
            .orElseThrow(()
                    -> new ResponseStatusException(HttpStatus.NOT_FOUND));
}readAll에 적용
@Cacheable(cacheNames = "itemAllCache", key = "methodName")
public List<ItemDto> readAll() {
    return repository.findAll()
            .stream()
            .map(ItemDto::fromEntity)
            .toList();
}cacheNames는 Spring 내부에서 캐시를 구분하기 위해 붙여주는 이름
- 나중에 캐시된 데이터를 삭제하고 싶다면, 이 이름을 기억
key는 Redis, 또는 다른 캐싱을 위한 데이터베이스에서 데이터를 구분하기 위해 사용할 값을 지정
- SpEL(Spring Expression Language)를 사용하는데, 지금은 현재 메서드의 첫번째 인자(
.args[0])을 지정
@Cacheable이 포함되게 되면 CacheConfig에서 설정한데로 캐싱 어노테이션이 동작
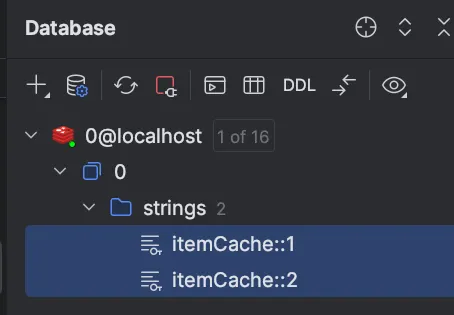
전달된 인자가 동일한 호출에 대하여 캐시에서 데이터를 돌려주는 Cache Aside 방식의 캐싱
- 처음에는 메서드를 실행해서 결과를 가져오지만, 해당 반환값을 캐시에 저장한 뒤 캐시가 삭제되기 전까지는 메서드를 실제로 실행하지 않고 캐시에서 데이터를 반환
- 만약 내부에 로그를 작성해 둔다면, 처음 한 번만 로그가 작성되며 그 이후로는 작성되지 않음
@CachePut
create 메서드에 @CachePut을 추가
@CachePut(cacheNames = "itemCache", key = "#result.id")
public ItemDto create(ItemDto dto) {
    return ItemDto.fromEntity(itemRepository.save(Item.builder()
            .name(dto.getName())
            .description(dto.getDescription())
            .price(dto.getPrice())
            .stock(dto.getStock())
            .build()
    ));
}@Cacheable은 데이터를 캐시에서 발견할 경우(Hit), 메서드 자체를 실행하지 않다.
반면, @CachePut은 항상 메서드를 실행하고, 결과를 캐싱 ⇒ Write Through 전략처럼 동작
주목할 만한건, create()의 경우 key를 #result.id로 설정한 점
ItemDto.id를 활용한다는 의미인데, 이렇게 만들어진 데이터가 캐시에 저장되기 때문에readOne메서드도 그 결과를 활용할 수 있다는 점- Redis에 저장하는 데이터의 Key가
cacheName::key의 형태로 저장되기 때문에,readOne이 찾는cacheName::key도 동일한 Key를 찾아내서, Redis의 데이터를 활용
@CacheEvict
update 메서드에 @CachePut과 @CacheEvict를 추가
@CachePut(cacheNames = "itemCache", key = "args[0]")
@CacheEvict(cacheNames = "itemAllCache", allEntries = true)
public ItemDto update(Long id, ItemDto dto) {
    Item item = itemRepository.findById(id)
                    .orElseThrow(() -> new ResponseStatusException(HttpStatus.NOT_FOUND));
    item.setName(dto.getName());
    item.setDescription(dto.getDescription());
    item.setPrice(dto.getPrice());
    item.setStock(dto.getStock());
    return ItemDto.fromEntity(itemRepository.save(item));
}
Evict라는 말에서 유추 가능하듯, @CacheEvict는 주어진 정보를 바탕으로 저장된 캐시를 지워준다.
key를 통해서 명확히 하나의 캐시를 지정할수도 있지만, 지금은 모든 아이템을 저장한 캐시인itemAllCache를 목표로 하고 있습니다. 아이템의 정보가 바뀌었으니, 데이터를 전부 돌려준 결과가 더이상 유효하지 않다
검색 결과 캐싱
RedisApplication에 @EnableSpringDataWebSupport(pageSerializationMode = VIA_DTO)를 추가
@SpringBootApplication
@EnableSpringDataWebSupport(pageSerializationMode = VIA_DTO)
public class RedisApplication {
    // ...
}
가장 단순한 상황인 이름을 기준으로 검색
JPA Query Method 하나
public interface ItemRepository extends JpaRepository<Item, Long> {
    Page<Item> findAllByNameContains(String name, Pageable pageable);
    // ...
}
해당 메서드를 Service에서 호출
@Cacheable(
        cacheNames = "itemSearchCache",
        key = "{ args[0], args[1].pageNumber, args[1].pageSize }"
)
public Page<ItemDto> searchByName(String query, Pageable pageable) {
    return itemRepository.findAllByNameContains(query, pageable)
            .map(ItemDto::fromEntity);
}key는 전달받은 인자를 바탕으로 만들어지는데, query로 전달된 값과, pageable이 들고 있는 정보 중 몇 페이지인지를 나타내는 pageNumber, 페이지 당 크기를 나타내는 pageSize를 사용
Controller와 연결
@GetMapping(
        "search"
)
public Page<ItemDto> search(
        @RequestParam(name = "q")
        String query,
        Pageable pageable
) {
    return itemService.searchByName(query, pageable);
}
검색 URL을 본따서, q 라는 파라미터로 검색어를 받은 다음 서비스 메서드 호출 시 넘겨준다.
이제 실행하고 테스트
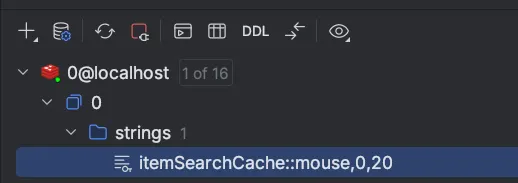
전달했던 캐시 이름, query로 전달한 데이터, 그리고 페이지 정보로 전달한 0페이지 20장까지 합쳐서 키가 만들어진 것
실습
세션 클러스터링 구현해보기
로그인 없는 장바구니 기능을 만들어보자.
- 데이터 타입은 Hash를 사용한다.
- 특정 사용자의 장바구니가 사용된지 3시간이 지나면 삭제되도록 조정한다.
- 장바구니에 물품 조정, 장바구니 조회 기능이 존재한다.
- 특별한 Entity의 추가 구현 없이, 대상 물품과 수량은 클라이언트가 정해서 전달한다고 가정하자.
- 만약 수량을 줄이고 싶다면 음수가 전달되며,
- 수량이 0 이하가 되면 장바구니에서 제거된다.
- 여러 애플리케이션 인스턴스에 걸쳐 부하가 분산됨을 가정하자.
이건 그냥 세션 클러스터링이 아니라 Redis 사용 방법이랑 같다.
RedisConfig
@Configuration
public class RedisConfig {
    @Bean
    public RedisTemplate<String, String> redisTemplate(RedisConnectionFactory factory) {
        RedisTemplate<String, String> redisTemplate = new RedisTemplate<>();
        redisTemplate.setConnectionFactory(factory);
        redisTemplate.setKeySerializer(RedisSerializer.string());
        redisTemplate.setHashKeySerializer(RedisSerializer.string());
        redisTemplate.setHashValueSerializer(new GenericToStringSerializer<>(Integer.class));

        return redisTemplate;
    }
}
OrderItemDto
@Getter
@Setter
@Builder
@NoArgsConstructor
@AllArgsConstructor
public class OrderItemDto {
    private String item;
    private Integer count;
}
OrderDto
@Getter
@Setter
@Builder
@NoArgsConstructor
@AllArgsConstructor
public class OrderDto {
    private Set<OrderItemDto> items;
    private Date expireAt;

    public static OrderDto fromHashPairs(
        Map<String, Integer> entries,
        Date expireAt
    ) {
        return OrderDto.builder()
            .items(entries.entrySet().stream()
                .map(entry -> OrderItemDto.builder()
                    .item(entry.getKey())
                    .count(entry.getValue())
                    .build())
                .collect(Collectors.toUnmodifiableSet()))
            .expireAt(expireAt)
            .build();
    }
}
OrderService
@Service
public class OrderService {
    private final String KEY_PREFIX = "order:%s";
    private final RedisTemplate<String, String> redisTemplate;
    private final HashOperations<String, String, Integer> hashOps;

    public OrderService(RedisTemplate<String, String> redisTemplate) {
        this.redisTemplate = redisTemplate;
        this.hashOps = redisTemplate.opsForHash();
    }

    public void modifyOrder(String sessionId, OrderItemDto itemDto) {
        hashOps.increment(
            KEY_PREFIX.formatted(sessionId),
            itemDto.getItem(),
            itemDto.getCount()
        );

        int count = Optional.ofNullable(hashOps.get(KEY_PREFIX.formatted(sessionId), itemDto.getItem()))
            .orElse(0);

        if (count <= 0) {
            hashOps.delete(
                KEY_PREFIX.formatted(sessionId),
                itemDto.getItem()
            );
        }
    }

    public OrderDto getOrder(String sessionId) {
        boolean exists = redisTemplate.hasKey(KEY_PREFIX.formatted(sessionId));

        if (!exists) {
            throw new ResponseStatusException(HttpStatus.NOT_FOUND);
        }

        Date expireAt = Date.from(Instant.now().plus(30, ChronoUnit.SECONDS));
        redisTemplate.expireAt(
            KEY_PREFIX.formatted(sessionId),
            expireAt
        );

        return OrderDto.fromHashPairs(
                hashOps.entries(KEY_PREFIX.formatted(sessionId)),
                expireAt
        );
    }
}
private final HashOperations<String, String, Integer> hashOps; 이거 타입을 잘 설정해야 한다.
OrderController
@RestController
@RequestMapping("/order")
@RequiredArgsConstructor
public class OrderController {

    private final OrderService orderService;

    @PutMapping
    public ResponseEntity<OrderDto> modifyOrder(@RequestBody OrderItemDto itemDto, HttpSession session) {
        orderService.modifyOrder(session.getId(), itemDto);
        return ResponseEntity.ok(orderService.getOrder(session.getId()));
    }

    @GetMapping
    public ResponseEntity<OrderDto> getOrder(HttpSession session) {
        return ResponseEntity.ok(orderService.getOrder(session.getId()));
    }
}
Spring Security의 Form Login의 세션을 클러스터링 해보자.
- Spring Security의 Form Login 기능을 구현하고, 로그인 정보가 여러 애플리케이션 인스턴스에 걸쳐서 공유되는 것을 확인해보자.
- 편의를 위해 csrf 보안은 해제하고 진행하자.
UserDetailsService를 직접 구현하지 않고InMemoryUserDetailsManager사용해도 괜찮다.
세션 클러스터링 기능을 확인하는 실습이다.
로그인 프로필 html은 그냥 복붙
SecurityConfig
@Configuration
@EnableWebSecurity
public class SecurityConfig {

    @Bean
    public SecurityFilterChain securityFilterChain(HttpSecurity http) throws Exception {
        http
            .csrf(AbstractHttpConfigurer::disable)
            .authorizeHttpRequests(auth -> auth
                .requestMatchers(
                    "/auth/my-profile"
                ).authenticated()
            )
            .formLogin(form -> form
                .loginPage("/auth/login")
                .defaultSuccessUrl("/auth/my-profile")
                .failureUrl("/auth/login?error")
                .permitAll()
            )
            .logout(logout -> logout
                .logoutUrl("/auth/logout")
                .logoutSuccessUrl("/auth/login")
            );
        return http.build();
    }

    @Bean
    public UserDetailsService userDetailsService(PasswordEncoder passwordEncoder) {
        UserDetails user1 = User.withUsername("user1")
            .password(passwordEncoder.encode("password1"))
            .build();
        UserDetails user2 = User.withUsername("user2")
            .password(passwordEncoder.encode("password2"))
            .build();

        return new InMemoryUserDetailsManager(user1, user2);
    }

    @Bean
    public PasswordEncoder passwordEncoder() {
        return new BCryptPasswordEncoder();
    }
}
UserDetailsService를 동작하게 하는데 기본 유저 두명을 세션에 올려놓는다.
RedisSessionConfig
@Configuration
@EnableRedisHttpSession
public class RedisConfig {
    @Bean
    public RedisSerializer<Object> springSessionDefaultRedisSerializer() {
        return RedisSerializer.json();
    }
}
이걸로 세션 저장소를 Redis로 동작하게 한다. 직렬화는 json 방식으로 하게 된다.
AuthController
@Controller
@RequestMapping("auth")
public class AuthController {
    @GetMapping("login")
    public String loginForm() {
        return "login-form";
    }

    @GetMapping("my-profile")
    public String myProfile() {
        return "my-profile";
    }
}
SessionController
@RestController
public class SessionController {
    @GetMapping("/set")
    public String set(
        @RequestParam("q")
        String q,
        HttpSession session
    ) {
        session.setAttribute("q", q);
        return "Saved: " + q;
    }

    @GetMapping("/get")
    public String get(
        HttpSession session
    ) {
        return session.getAttribute("q").toString();
    }
}
세션에 값을 저장하고 해당 값이 redis에 저장되는 걸 보면 된다.
Redis를 이용한 캐싱 적용해보기
상품을 판매하는 스토어(Store)를 만들고, CRUD를 구현한 다음 필요한 지점에 캐싱을 구현해보자.
Store는 JPA Entity로서, 다음과 같은 속성을 가지고 있다.- 스토어 ID - Long
- 이름 - String
- 분류 - String (패션, 디지털 등)
- 완료 후 각 기능에 적용한 캐싱과 방법, 그리고 그 이유를 정리해보자.
C - CacheEvict → all Store 조회에 대한 캐시 삭제, 새로 만든 상점은 인지도가 낮으므로 캐시에 올리지는 않는다.
R - Cacheable
U - CachePut, CacheEvict
D - CacheEvict → 삭제된 애 뿐 아니라 전체 캐시도 날려야 함.
@Configuration
@EnableCaching
public class CacheConfig {
    @Bean
    public RedisCacheManager cacheManager(RedisConnectionFactory redisConnectionFactory) {
        RedisCacheConfiguration config = RedisCacheConfiguration
            .defaultCacheConfig()
            .disableCachingNullValues()
            .entryTtl(Duration.ofSeconds(120))
            // 캐시 이름을 키 prefix로 사용 (cacheName::key 형태)
            .computePrefixWith(CacheKeyPrefix.simple())
            .serializeValuesWith(
                SerializationPair.fromSerializer(
                    RedisSerializer.java()
                )
            );

				// "store"라는 캐시 이름에만 적용되는 별도 설정
        RedisCacheConfiguration individual = RedisCacheConfiguration
            .defaultCacheConfig()
            .disableCachingNullValues()
            .entryTtl(Duration.ofSeconds(20))
            .computePrefixWith(CacheKeyPrefix.simple())
            .serializeValuesWith(
                SerializationPair.fromSerializer(
                    RedisSerializer.json()
                )
            );

        return RedisCacheManager
            .builder(redisConnectionFactory)
            .cacheDefaults(config)
            // .withCacheConfiguration("store", individual) → "store" 캐시에만 다른 설정 적용
            .withCacheConfiguration("store", individual)
            .build();
    }
}
@Service
@RequiredArgsConstructor
public class StoreService {
private final StoreRepository storeRepository;
@CacheEvict(cacheNames = "storeAll", allEntries = true)
public StoreDto createStore(StoreDto storeDto) {
Store store = Store.builder()
.name(storeDto.name())
.type(storeDto.type())
.build();
storeRepository.save(store);
return StoreDto.from(store);
}
@Cacheable(cacheNames = "store", key = "args[0]")
public StoreDto getStore(Long id) {
Store store = storeRepository.findById(id).orElseThrow(IllegalArgumentException::new);
return StoreDto.from(store);
}
@Cacheable(cacheNames = "storeAll", key = "methodName")
public List<StoreDto> getAllStores() {
List<Store> stores = storeRepository.findAll();
return stores.stream().map(StoreDto::from).collect(Collectors.toList());
}
@Transactional
@CachePut(cacheNames = "store", key = "#result.id")
@CacheEvict(cacheNames = "storeAll", allEntries = true)
public StoreDto updateStore(Long id, StoreDto storeDto) {
Store store = storeRepository.findById(id).orElseThrow(IllegalArgumentException::new);
store.setName(storeDto.name());
store.setType(storeDto.type());
return StoreDto.from(store);
}
@Caching(evict = {
@CacheEvict(cacheNames = "store", key = "args[0]"),
@CacheEvict(cacheNames = "storeAll", allEntries = true),
})
public Long deleteStore(Long id) {
Store store = storeRepository.findById(id).orElseThrow(IllegalArgumentException::new);
storeRepository.delete(store);
return id;
}
}SpEL에 대해서 좀 알아야 할 것 같음.
CachePut에는 #result를 쓸 수 있지만 Cacheable에는 쓸 수 없음 ⇒ CachePut은 캐시 먼저 안보고 메소드 실행하고 넣으니까 result가 존재하는데 Cacheable은 먼저 캐시를 방문하기 때문에 에러가 난다. 처음 실행에서.
특가 물량, 라이브 등 특정 상황에서는 짧은 시간동안 물품이 엄청나게 많이 팔린다!
- 마지막에 만든 Cache 프로젝트에 리더보드 기능에서 사용한
ItemOrder를 추가해보자. (복습)- 구매된
Item들의 구매 순위를 Sorted Set으로 관리하자. - 가장 많이 구매된
Item10개를 조회하는 기능을 만들어보자.
- 구매된
ItemOrder에 대하여 Write-Behind 캐싱을 구현해보자.- Write-Behind는 Annotation 기반으로 구현할 수 없다.
RestTemplate등을 통하여 수동으로 Redis에 저장하고, 조회도 Redis에서 진행하자.- 이후 일정 시간바다 Redis의 데이터를 데이터베이스로 옮기는 기능을 만들어보자.
CacheConfig
@Configuration
@EnableCaching
public class CacheConfig {

    @Bean
    public RedisCacheManager cacheManager(RedisConnectionFactory redisConnectionFactory) {
        RedisCacheConfiguration config = RedisCacheConfiguration
            .defaultCacheConfig()
            .disableCachingNullValues()
            .entryTtl(Duration.of(30, ChronoUnit.SECONDS))
            .serializeValuesWith(
                RedisSerializationContext.SerializationPair.fromSerializer(
                    RedisSerializer.java()
                )
            );

        return RedisCacheManager
            .builder(redisConnectionFactory)
            .cacheDefaults(config)
            .build();
    }
}
RedisConfig
@Configuration
public class RedisConfig {
    @Bean
    public RedisTemplate<String, ItemDto> rankTemplate(RedisConnectionFactory factory) {
        RedisTemplate<String, ItemDto> template = new RedisTemplate<>();
        template.setConnectionFactory(factory);
        template.setKeySerializer(RedisSerializer.string());
        template.setValueSerializer(RedisSerializer.json());
        return template;
    }

    @Bean
    public RedisTemplate<String, ItemOrderDto> orderTemplate(RedisConnectionFactory factory) {
        RedisTemplate<String, ItemOrderDto> template = new RedisTemplate<>();
        template.setConnectionFactory(factory);
        template.setKeySerializer(RedisSerializer.string());
        template.setValueSerializer(RedisSerializer.java());
        return template;
    }
}
ItemService
@Service
public class ItemService {
    private final ItemRepository itemRepository;
    private final OrderRepository orderRepository;
    private final RedisTemplate<String, ItemDto> rankTemplate;
    private final RedisTemplate<String, ItemOrderDto> orderTemplate;

    private final ZSetOperations<String, ItemDto> rankOps;
    private final ListOperations<String, ItemOrderDto> orderOps;

    public ItemService(ItemRepository itemRepository,
                       OrderRepository orderRepository,
                       RedisTemplate<String, ItemDto> rankTemplate,
                       RedisTemplate<String, ItemOrderDto> orderTemplate) {
        this.itemRepository = itemRepository;
        this.orderRepository = orderRepository;
        this.rankTemplate = rankTemplate;
        this.orderTemplate = orderTemplate;

        this.rankOps = rankTemplate.opsForZSet();
        this.orderOps = orderTemplate.opsForList();
    }

    @CachePut(cacheNames = "itemCache", key = "#result.id")
    public ItemDto create(ItemDto itemDto) {
        return ItemDto.from(itemRepository.save(
            Item.builder()
                .name(itemDto.name())
                .description(itemDto.description())
                .price(itemDto.price())
                .build()
        ));
    }

    @Cacheable(cacheNames = "itemAllCache", key = "methodName")
    public List<ItemDto> readAll() {
        return itemRepository.findAll().stream().map(ItemDto::from).toList();
    }

    @Cacheable(cacheNames = "itemCache", key = "args[0]")
    public ItemDto readOne(Long id) {
        return itemRepository.findById(id).map(ItemDto::from).orElseThrow(IllegalArgumentException::new);
    }

    @CachePut(cacheNames = "itemCache", key = "#result.id")
    @CacheEvict(cacheNames = "itemAllCache", allEntries = true)
    @Transactional
    public ItemDto update(Long id, ItemDto dto) {
        Item item = itemRepository.findById(id).orElseThrow(IllegalArgumentException::new);
        item.update(dto);
        return ItemDto.from(item);
    }

    @Caching(evict = {
        @CacheEvict(cacheNames = "itemCache", key = "args[0]"),
        @CacheEvict(cacheNames = "itemAllCache", allEntries = true)
    })
    public void delete(Long id) {
        itemRepository.deleteById(id);
    }

    @Cacheable(
        cacheNames = "itemSearchCache",
        key = "{ args[0], args[1].pageNumber, args[1].pageSize}")
    public Page<ItemDto> searchByName(String query, Pageable pageable) {
        return itemRepository.findAllByNameContains(query, pageable).map(ItemDto::from);
    }

    public void purchase(ItemOrderDto dto) {
        Item item = itemRepository.findById(dto.id()).orElseThrow(IllegalArgumentException::new);

        orderOps.rightPush("orderCache::behind", dto);
        rankOps.incrementScore("soldRanks", ItemDto.from(item), 1);
    }

    @Transactional
    @Scheduled(cron = "*/20 * * * * *")
    public void insertOrders() {
        boolean exist = Optional.of(orderTemplate.hasKey("orderCache::behind")).orElse(false);

        if (!exist) {
            return;
        }

        orderTemplate.rename("orderCache::behind", "orderCache::now");

        orderRepository.saveAll(orderOps.range("orderCache::now", 0, -1).stream()
            .map(dto -> ItemOrder.builder()
                .itemId(dto.itemId())
                .count(dto.count())
                .build()
            ).toList());

        orderTemplate.delete("orderCache::now");
    }

    public List<ItemDto> getMostSold() {
        Set<ItemDto> ranks = rankOps.reverseRange("rankCache", 0, 9);
        if (ranks == null) return Collections.emptyList();
        return ranks.stream().toList();
    }
}
저 Scheduled로 Write-behind 캐싱 전략을 구현할 수 있다.