Vue.js 화면 설계
- 이해를 위해 그린 필자의 미숙한 그림과 악필은 못 본 척 해주길 바란다.. (
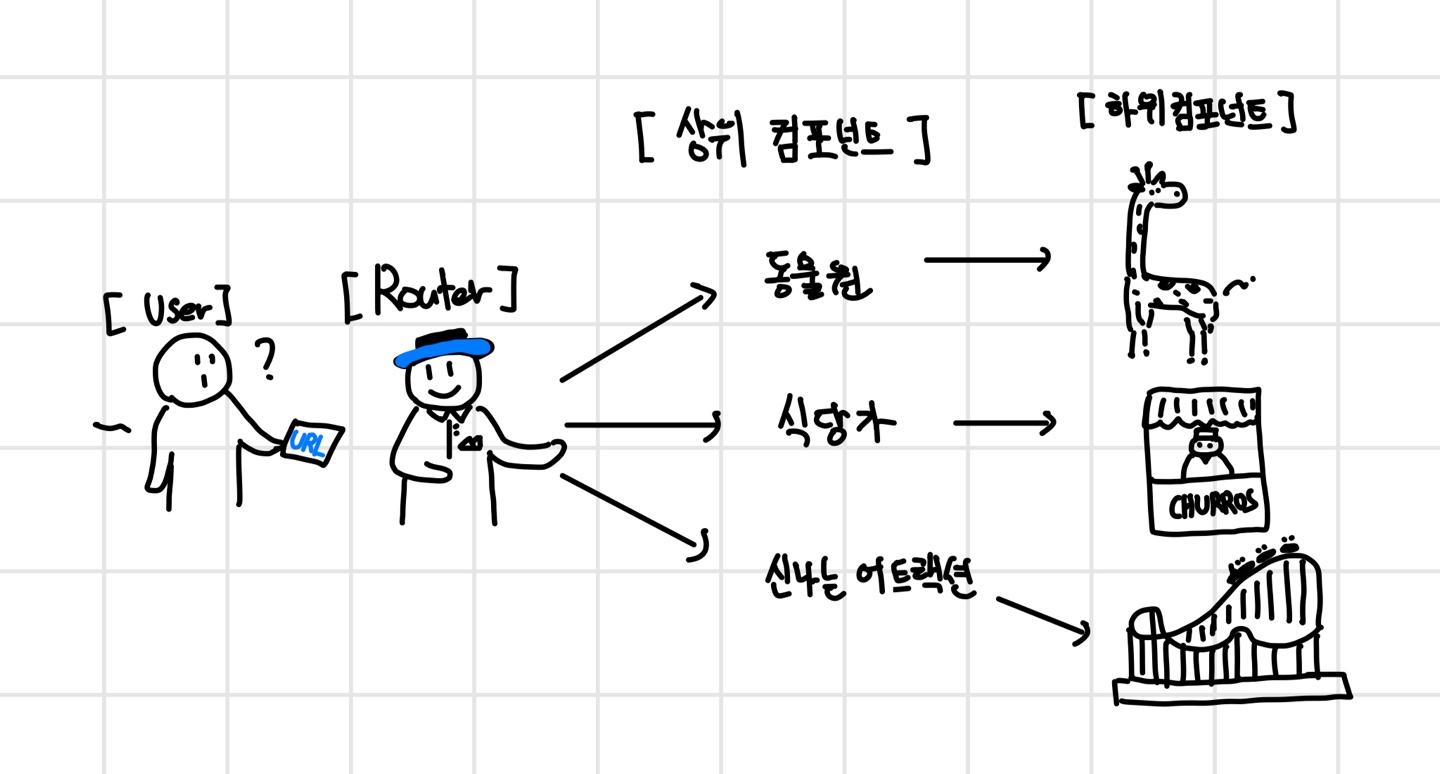
노력이 가상하다고 생각해주었으면 한다) - User가 들고 온 URL (ex.
/franchisee-accounts/:id)을 Router에서 보고 그에 맞는 Component를 연결해준다. - 필자는 Router에서 바로 기능들이 다닥다닥 붙어 있는 페이지로 연결하지 않고, 하위 컴포넌트를 import 해서 쓰는 상위 컴포넌트들을 연결했다.
- 위 그림을 토대로 짧게 비유하면, 고객(
User)이 원하는 어트랙션을 타기 위해 어트랙션 주소(URL)가 적힌 지도를 들고 가이드(Router)에게 물으면, 가이드가 어트랙션 지역(상위 컴포넌트) 안내하고 해당 컴포넌트 내에 들어 있는 신나는 어트랙션(하위 어트랙션)을 마주하게 되는 구조이다. - 어떻게 돌아가는지 직접 코드를 봐보자.
🧙♀️Router (놀이공원 가이드)
- 놀이공원 가이드는 user들이 들고 오는 지도에 대한 컴포넌트를 바로바로 소개할 수 있도록 정보를 저장하고 있어야 한다.
- Router는 URL 경로와 컴포넌트를 매핑하여, 특정 URL에 해당하는 Vue 컴포넌트를 렌더링하도록 설정한다.
import { useAuthStore } from '@/stores/auth'
import { createRouter, createWebHistory } from 'vue-router'

const AuthLayout = () => import('@/layout/AuthLayout.vue');
const BaseLayout = () => import('@/layout/BaseLayout.vue');
const Login = () => import('@/views/auth/Login.vue');
const NotFound = () => import('@/views/common/NotFound.vue');
const MainView = () => import('@/views/MainView.vue')

const FranchiseeAccount = () => import('@/views/accounts/FranchiseeAccount.vue')
const FranchiseeAccountListView = () => import('@/views/accounts/FranchiseeAccountListView.vue')

...

// createRouter : Vue Router 설정 함수
const router = createRouter({
  // 라우터가 사용할 라우팅 모드 지정 (HTML 5 모드)
  history: createWebHistory(import.meta.env.BASE_URL),
  routes: [
    {
      path: '/',
      name: 'base',
      component: BaseLayout,
      children: [
        {
          path:'',
          name: 'main',
          component: MainView,
        },
        {
          path:'user-account',
          name: 'user-account',
          component: UserAccount,
        },
        {
          path:'user-account-modify',
          name: 'user-account-modify',
          component: UserAccountModifyView,
        },
        {
          path:'password-modify',
          name: 'password-modify',
          component: PasswordModifyView,
        },
        {
          path:'franchisee-accounts/:userId',
          name: 'franchisee-accounts',
          component: FranchiseeAccount,
        },

        ...

   ],
});

router.beforeEach((to, from, next) => {
  // 라우트가 변경되기 전에 실행되는 가드 -> 라우팅 제어 및 조건에 맞지 않는 경로의 이동을 막기 위함
  const authStore = useAuthStore();

  if(to.name === 'login' && authStore.isLoggedIn){
    // 이미 로그인 했는데 로그인 페이지로 이동하는 경우
    next({name: 'base'});
  }

  // 로그인 페이지가 아니고, 로그인 상태가 아니면 로그인 페이지로 리다이렉트한다.
  // 로그인하지 않은 상태에서 로그인 페이지가 아닌 다른 페이지로 가는 경우, 로그인페이지로 리다이렉트 되도록
  if(to.name !== 'login' && to.name !== 'franchisee-join' && to.name !== 'manager-join' && !authStore.isLoggedIn) {
    next({name: 'login'});
  } else {
    next();
  }
});

export default router
🪧 상위 컴포넌트 (안내 받은 놀이공원 구역)
- 가이드 (Router)가 안내해준 대로 내가 원하는 놀이공원 구역에 도착했다.
- 페이지 진입점 역할로, 화면에 자식 컴포넌트를 렌더링하는 Wrapper 역할을 한다.
- 상위 컴포넌트는 단순히 구조와 진입만 담당하고 하위 컴포넌트에서 데이터 로직 및 렌더링 처리를 담당한다.
- 역할 분리, 재사용성 및 유지보수와 가독성 면에서 강점을 가지기 때문에 이러한 구조를 선택했다. 내가 작성한 하위 컴포넌트를 다른 페이지에서도 쓸 수 있으니까
- 구현한 기능 중
가맹점주 계정 관리 화면을 예시로 들겠다.
<template>
    <v-container>
        <FranchiseeDetailForm />
    </v-container>
</template>

<script setup>
import FranchiseeDetailForm from '@/components/forms/userform/FranchiseeDetailForm.vue';
import { reactive } from 'vue';
import apiClient from '@/api';
import { useRouter } from 'vue-router';

const router = useRouter();

import { defineProps } from 'vue';

const props = defineProps({
  id: {
    type: String,
    required: true
  }
});

...- 해당 상위 컴포넌트인
FranchiseeAccount.vue는 하위 컴포넌트인FranchiseeDetailForm.vue를 가져와 진입점을 만들어준다.
🎢 하위 컴포넌트 (타고 싶었던 어트랙션)
- 여기까지 왔다. 이제 어트랙션 타기만 하면 된다!
- 상위 컴포넌트가 감싸던 하위 컴포넌트들의 내용에 대한 얘기다.
- 실제 기능들이 여기 안에 들어있다.
<template>
  <v-container class="py-4 hei"  fluid>
    <!-- 상단 타이틀 -->

    <!-- 두 카드 나란히 배치 -->
    <v-row dense>
      <!-- 회원 정보 카드 -->
      <v-col cols="12" md="6">
        <v-card class="pa-6" elevation="2" style="width: 100%; height: 650px;">

            <v-typography class="list"  align="center">
            계정 관리 /
            </v-typography>
            <v-typography class="title"  align="center">
            가맹점주 정보 수정
            </v-typography>

            <br>
            <br>

          <div class="d-flex justify-center mb-6">
            <v-avatar size="120">
              <v-img :src="franchiseeInfo.userImage || 'https://bonbon-file-bucket.s3.ap-northeast-2.amazonaws.com/profile-default.jpg'"
              cover/>
            </v-avatar>
          </div>

          <v-row dense>
            <v-col cols="12" md="12" class="mb-3">
              <div class="info-label">이메일</div>
              <div class="info-value">{{ franchiseeInfo.email }}</div>
            </v-col>
            <v-col cols="12" md="12" class="mb-3">
              <div class="info-label">가맹점주 이름</div>
              <div class="info-value">{{ franchiseeInfo.name }}</div>
            </v-col>
            <!-- <v-col cols="12" md="12" class="mb-3">
              <div class="info-label">비밀번호</div>
              <div class="d-flex align-center gap-2">
                <div class="info-value">************</div>
                <v-btn size="small" variant="outlined" color="primary">비밀번호 확인</v-btn>
              </div>
            </v-col> -->
            <v-col cols="12" md="6" class="mb-3">
              <div class="info-label">전화번호</div>
              <div class="info-value">{{ franchiseeInfo.phone }}</div>
            </v-col>
            <v-col cols="12" md="6" class="mb-3">
              <div class="info-label">가맹점</div>
              <!-- <div class="info-value">{{ franchiseeInfo.franchiseId }}</div> -->
              <div class="info-value">{{ franchiseeInfo.franchiseName }}</div>
            </v-col>
            <v-col cols="12" md="6" class="mb-3">
              <div class="info-label">계정상태</div>
              <v-chip :color="getStatusColor(franchiseeInfo.status)" text-color="white" variant="elevated" size="small">{{ franchiseeInfo.status }}</v-chip>
            </v-col>

            <br>
            <v-divider></v-divider>

            <v-col cols="12" class="d-flex justify-center mt-4" style="gap: 10px;">
              <v-btn color="secondary" @click="goToList">목록으로</v-btn>
              <v-btn color="primary" @click="goToEdit">수정하기</v-btn>
            </v-col>

          </v-row>
        </v-card>
      </v-col>

      <!-- 추가 카드 -->
      <v-col cols="12" md="6">
        <v-card class="pa-6" elevation="2" style="width: 100%; height: 650px;">
          <div>
            <v-typography class="title2"  align="center">
              가맹점 위치 확인
            </v-typography>
          </div>
          <KakaoMap class="kakao-map" />
        </v-card>
      </v-col>
    </v-row>
  </v-container>
</template>

<script setup>
// 추후 props 또는 store 연결 가능
import KakaoMap from '@/components/map/KakaoMap.vue';
import { onMounted, ref } from 'vue';
import { useRoute, useRouter } from 'vue-router';
import apiClient from '@/api';

const route = useRoute();
const router = useRouter();
const userId = route.params.userId;
const franchiseeInfo = ref({});

onMounted(() => {
  // KakaoMap이 로드된 후 높이를 동적으로 설정하는 코드 추가 가능
  const kakaoMapElement = document.querySelector('.kakao-map');
  const parentHeight = kakaoMapElement.parentElement.clientHeight;

  // 카드 높이에 맞춰서 카카오맵 높이 설정
  kakaoMapElement.style.height = `${parentHeight}px`;
  kakaoMapElement.style.width = '100%';
});

const goToList = () => {
  router.push({name : 'franchisee-accounts-list'}); // 원하는 목록 페이지 경로로 변경
};

const goToEdit = () => {
  router.push(`/franchisee-accounts/${userId}/edit`);
};

const getStatusColor = (status) => {
  switch (status) {
    case 'ACTIVE':
      return 'green';
    case 'INACTIVE':
      return 'grey';
    case 'PENDING':
      return 'orange';
    case 'EXPIRED':
      return 'grey';
    case 'DELETED':
      return 'red';
    default:
      return 'blue';
  }
};

onMounted(async () => {
  try {
    const accessToken = localStorage.getItem('accessToken');
    console.log('userId:', userId); // userId 확인
    console.log('accessToken:', accessToken); // 토큰 확인

    const response = await apiClient.get(`/bonbon/user/franchisee/${userId}`, {
      headers: {
        Authorization: `Bearer ${accessToken}`,
      },
    });

    console.log('API 응답:', response);
    franchiseeInfo.value = response.data;
    console.log(franchiseeInfo.value);

    const kakaoMapElement = document.querySelector('.kakao-map');
    if (kakaoMapElement && kakaoMapElement.parentElement) {
      kakaoMapElement.style.height = `${kakaoMapElement.parentElement.clientHeight}px`;
      kakaoMapElement.style.width = '100%';
    }
  } catch (error) {
    console.error('가맹점주 정보 로드 실패:', error);
    if (error.response) {
      console.error('응답 데이터:', error.response.data);
      console.error('응답 상태:', error.response.status);
    } else {
      console.error('요청 실패:', error.message);
    }
  }
});
Vue.js 구현
- 위에 소개한 방식으로 화면을 구현했다.
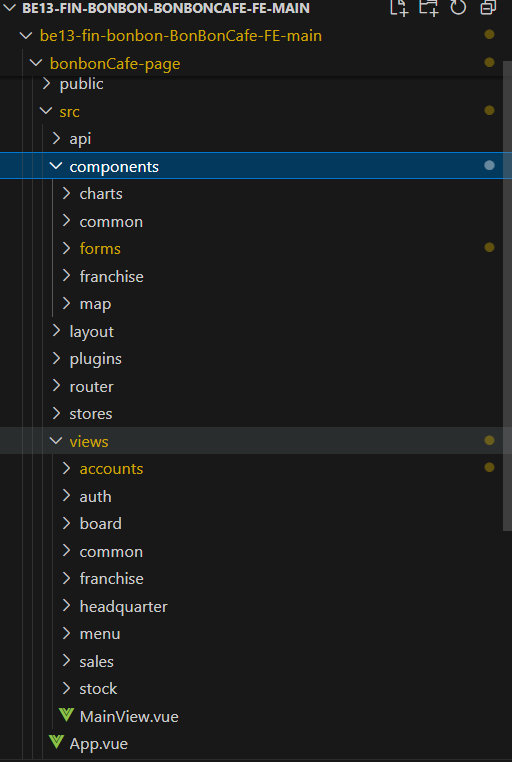
- Components와 view들을 나눠서 구현하고, 이를 Router에 등록하는 흐름으로 구현했다.
- 큰 구조적 흐름이 익으니 개발에 속도가 붙는... 듯 했다가 디테일한 화면 구성이나 기능적인 부분에서 뭔갈 붙이고 빼고 붙이고 빼고 ... 를 무한 반복하다 보니 눈이 빠질 것 같았다. 디자이너 분들은 여분의 눈을 들고다니시는게 분명하다.

백엔드 개발자 나무입니다