우리가 쓰는 인터넷은 http통신을 이용한다.
HTTP통신
프로토콜
통신 프로토콜 또는 통신 규약은 컴퓨터나 원거리 통신 장비 사이에서 메시지를 주고 받는 양식과 규칙의 체계이다.(출처:나무위키)
대표적으로는 다음과 같은 것이 있다.
-HTTP : Hyper Text Transfer Protocol
-HTTPS : Hyper Text Transfer Protocol Secure
-FTP : File Transfer Protocol
-SFTP : Secure File Transfer Protocol
우리는 여기서 http통신을 알아보도록 하겠다.
구조
HTTP통신은 요청을 하는 메세지를 보내고 응답 메세지를 받는 것이다.
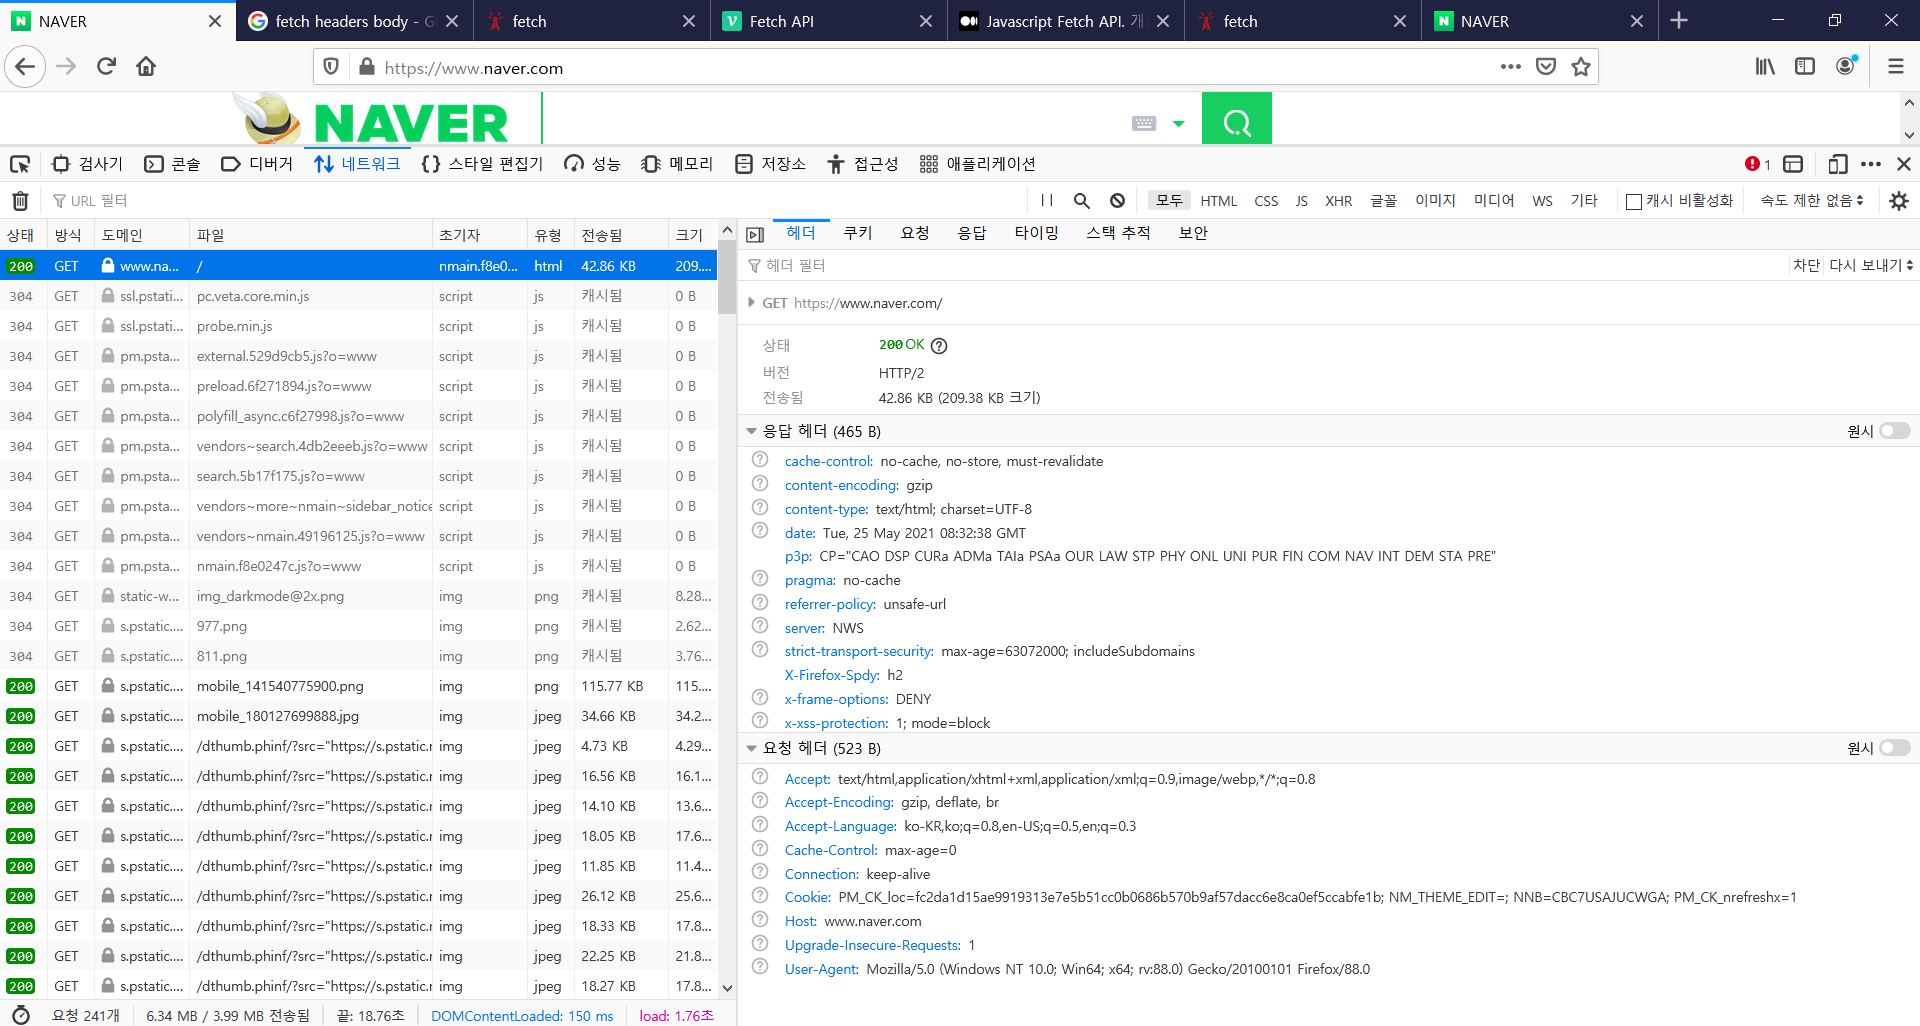
브라우저에서 F12를 눌러 NETWORK탭에서 확인해 볼 수 있다.(공부하기 위해서는 firefox를 추천한다.)
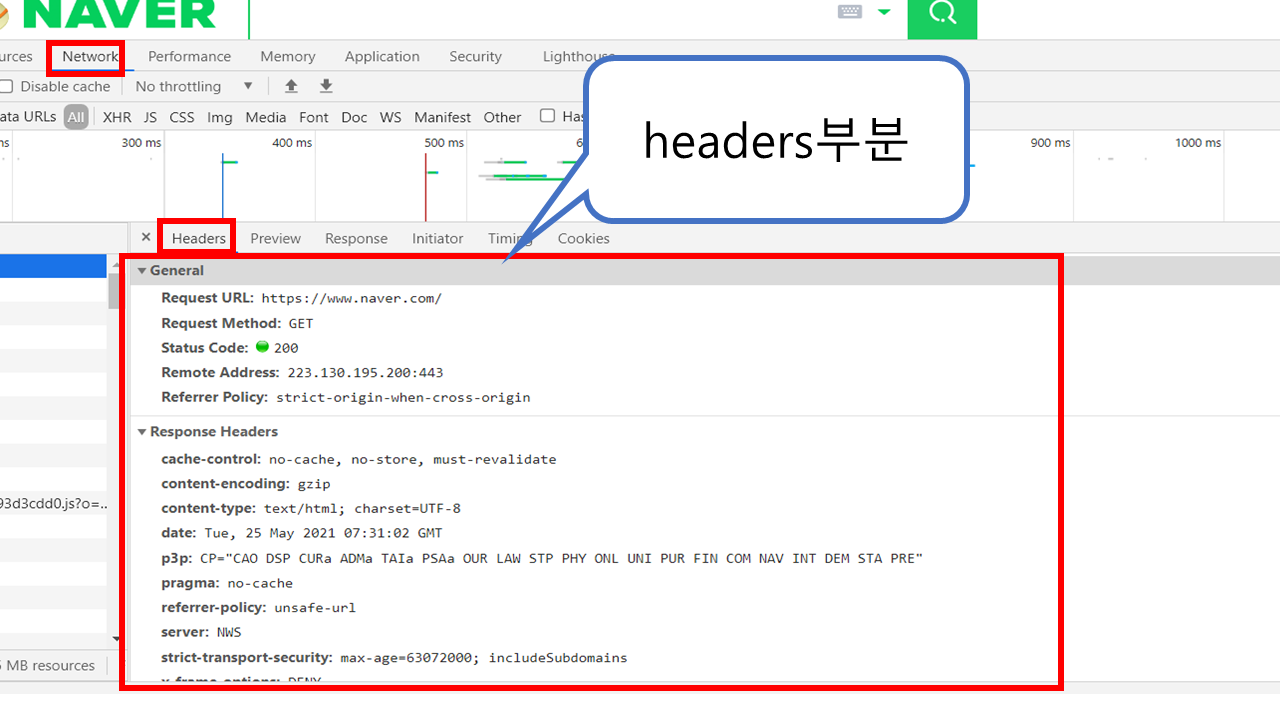
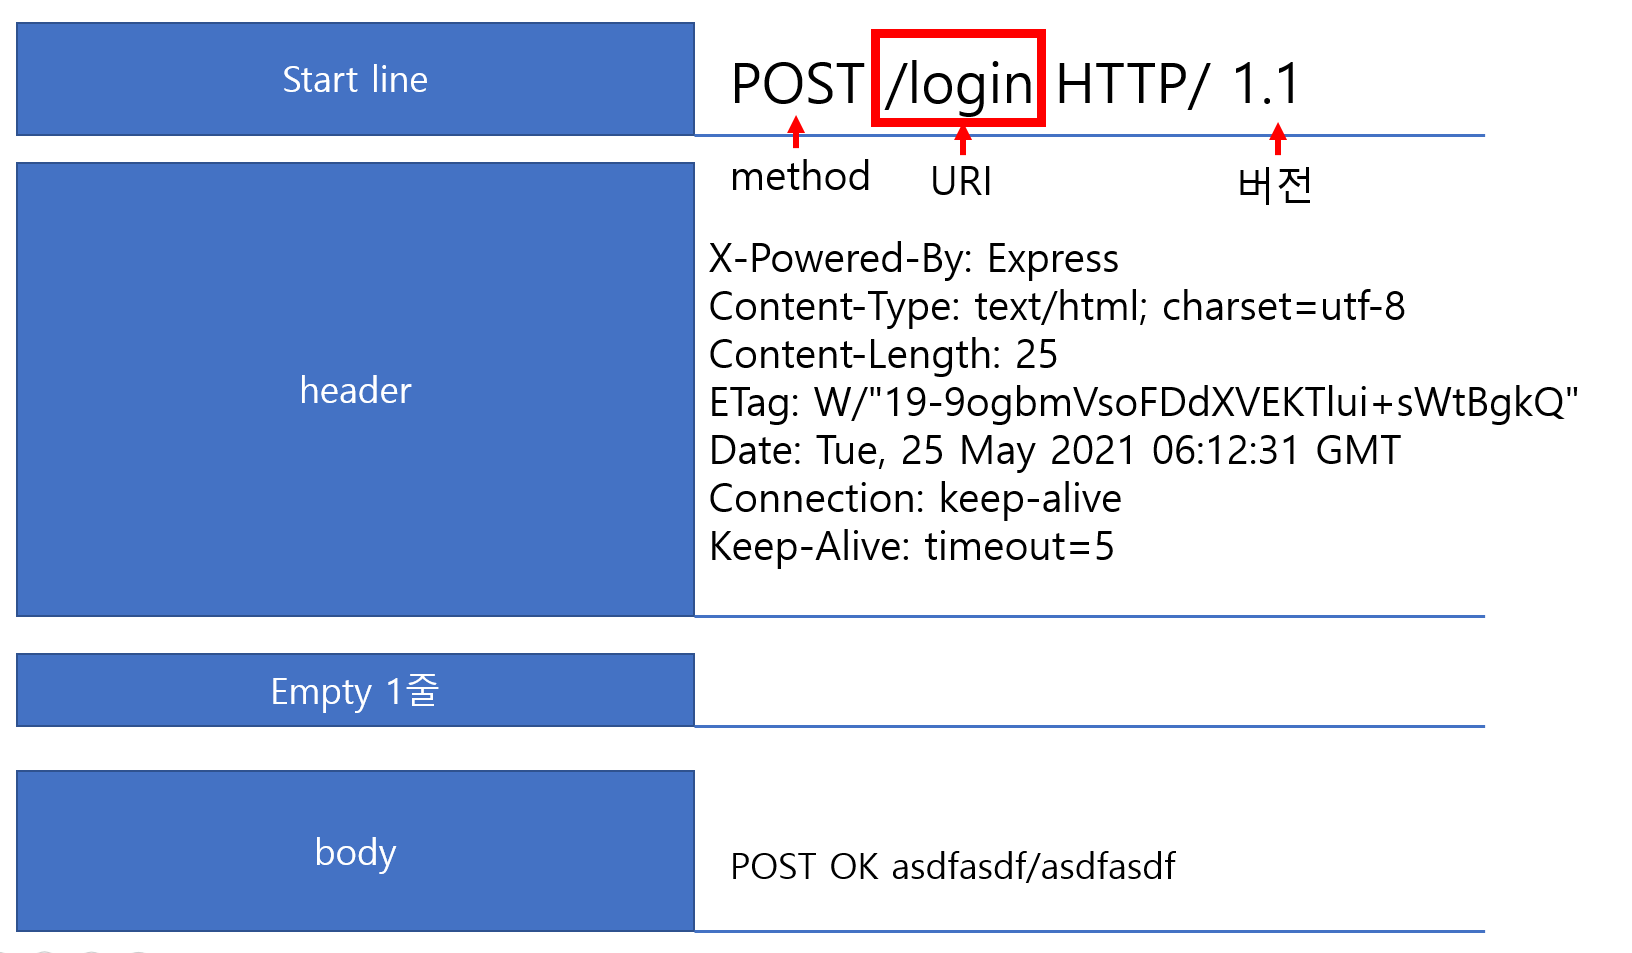
메세지 구조
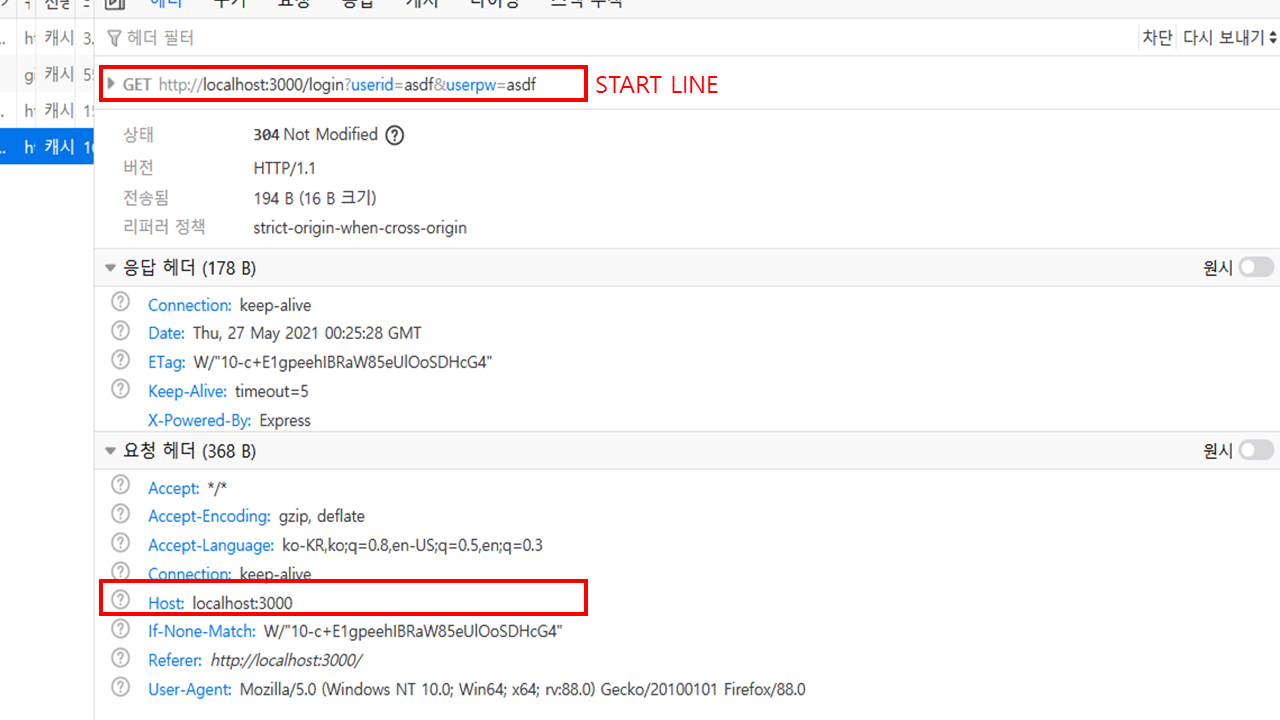
네이버의 파이어폭스에서 NETWORK 탭을 보면 다음과 같이 나온다.
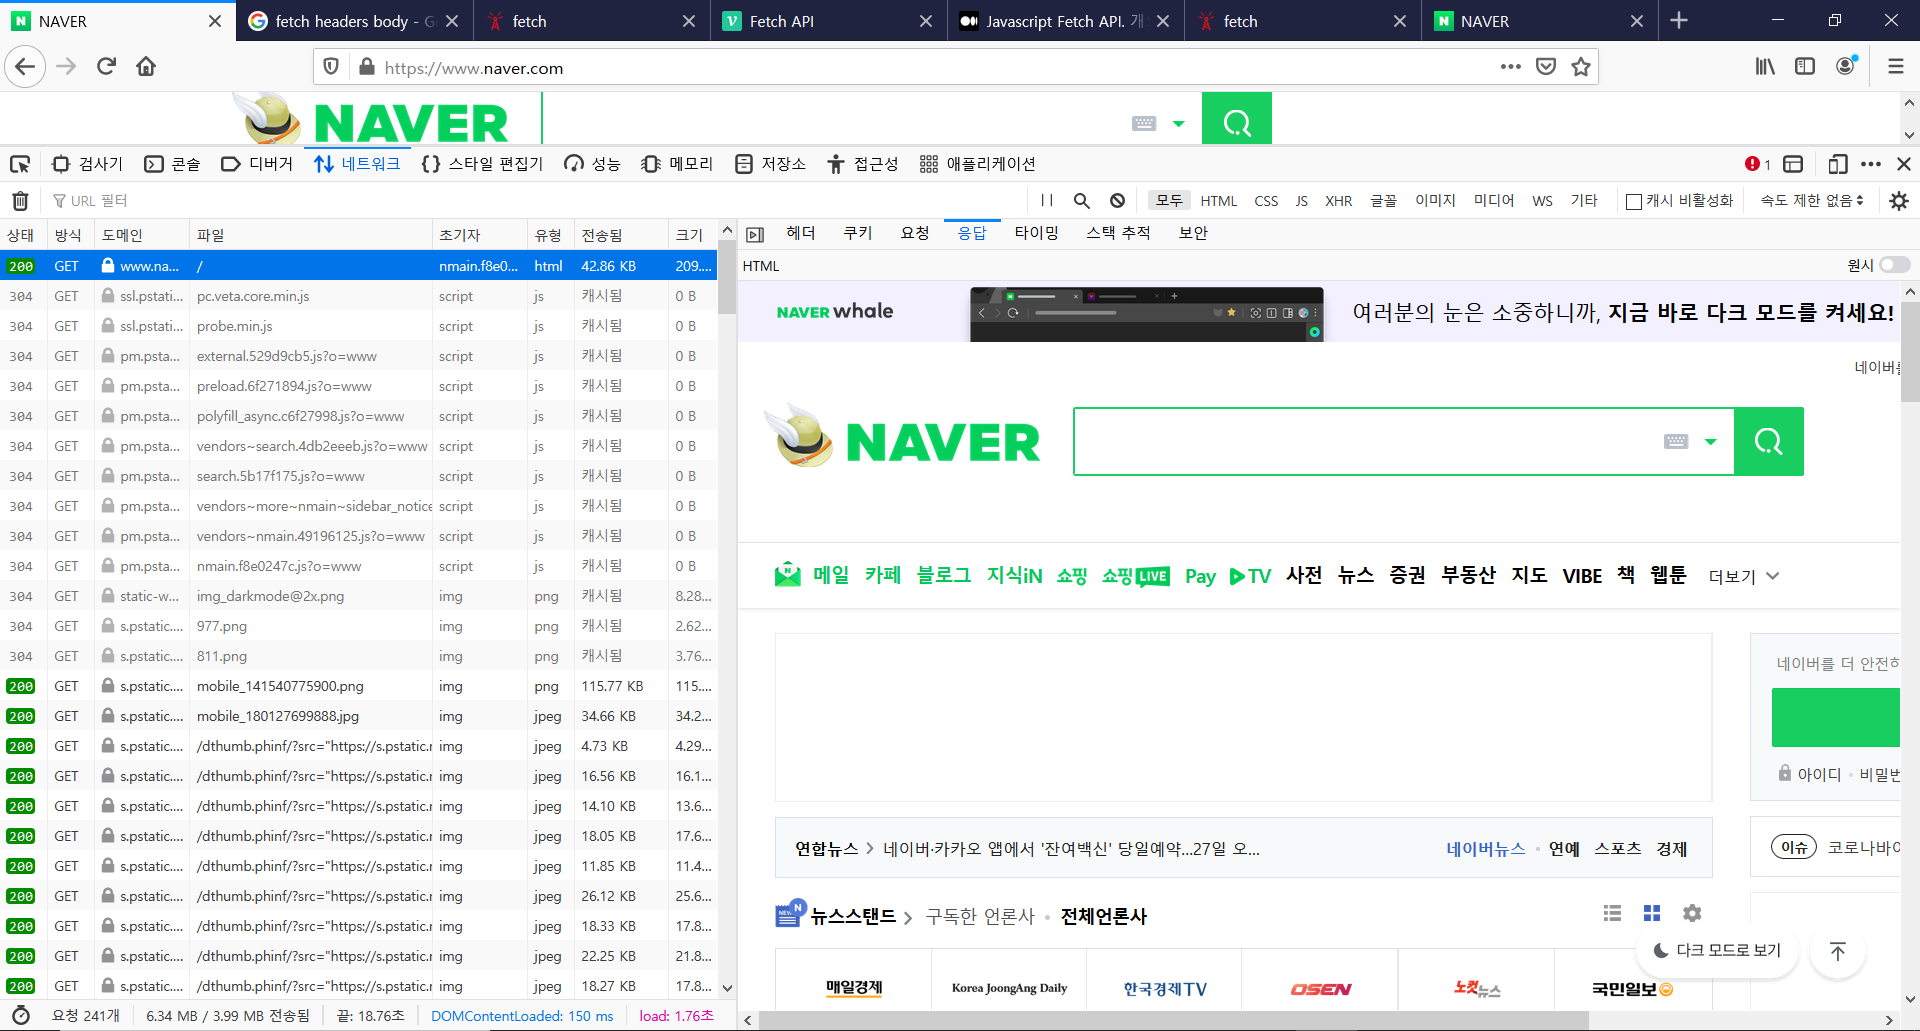
응답쪽엔 이렇게 주어진다.
비동기 통신
기본적으로 HTTP통신은 동기이다. 하나의 요청에 대한 응답을 할 때까지 다른 응답에 답할 수 없는 구조이다. 하나의 html페이지를 여는 동안 다른 작업이 시행되지 않는 것이 그 예이다.
동기
순차적으로 실행이 되는 것이다. 작업을 완료할 동안 다른 작업을 실행하지 않는다.
비동기
병렬적으로 실행을 하는 것이다. shortin방식으로 운영된다. 짧은 시간 걸리는 것이 빨리 실행된다. fetch, axios등으로 페이지가 새롭게 로딩되는 일이 없이 그 페이지 내에서 원하는 결과값을 얻을 수 있게 한다.
fetch
fetch는 javascript 내의 내장 함수로 원격 API를 간편하게 호출할 수 있도록 한다.
문법
fetch() 함수는 두개의 인잣값을 받는다. 첫번째는 uri이고, 두번째는 옵션 객체를 받는다. 그리고 이는 Promise 타입의 객체를 반환한다. API 호출이 성공할경우, response 객체가 resolve되고, 실패했을경우 error객체를 reject한다.
fetch('url',options)
.then(res=>{
      return })
.catch((e)=>{
  console.loge(e);)
적용
server.js파일
const express= require('express');
const nunjucks = require('nunjucks');
const bodyParser = require('body-parser');
const app = express();

app.use(bodyParser.urlencoded({extended:false}));

app.set('view engine','html');
nunjucks.configure('views',{
    express:app
})

app.get('/',(req,res)=>{
    res.render('0525index',{
        title:'ingoo'
    })
});

app.get('/login',(req,res)=>{
    let {userid,userpw}= req.query;
    console.log(userid,userpw);

    res.setTimeout(3000,()=>{
        res.send(`GET OK ${userid}/${userpw}`)
    })
    //res.send(`GET OK ${userid}/${userpw}`)
});

app.post('/login',(req,res)=>{
    let {userid,userpw}= req.body;
    console.log(userid,userpw);
    res.send(`POST OK ${userid}/${userpw}`)
});


app.listen(3000,()=>{
    console.log('server start 3000')
});
GET
#index.html
<h1>비동기 활용하기 GET</h1>
<button id = "btn">통신하기</button>
<div id="getroot"></div>
<script type = "text/javascript">
    const btn = document.querySelector('#btn');
    btn.addEventListener('click',btnFn);
    function btnFn(){
        console.log('req click');
        let options = {
            method :'GET'
        }
        fetch('http://localhost:3000/login?userid=asdf&userpw=asdf',options)
        .then(data =>{
            return data.text();
        })
        .then(text=>{
            const root = document.querySelector('#getroot');
            root.innerHTML += text+'<br />';
        })
    }
</script>
GET-page/headers
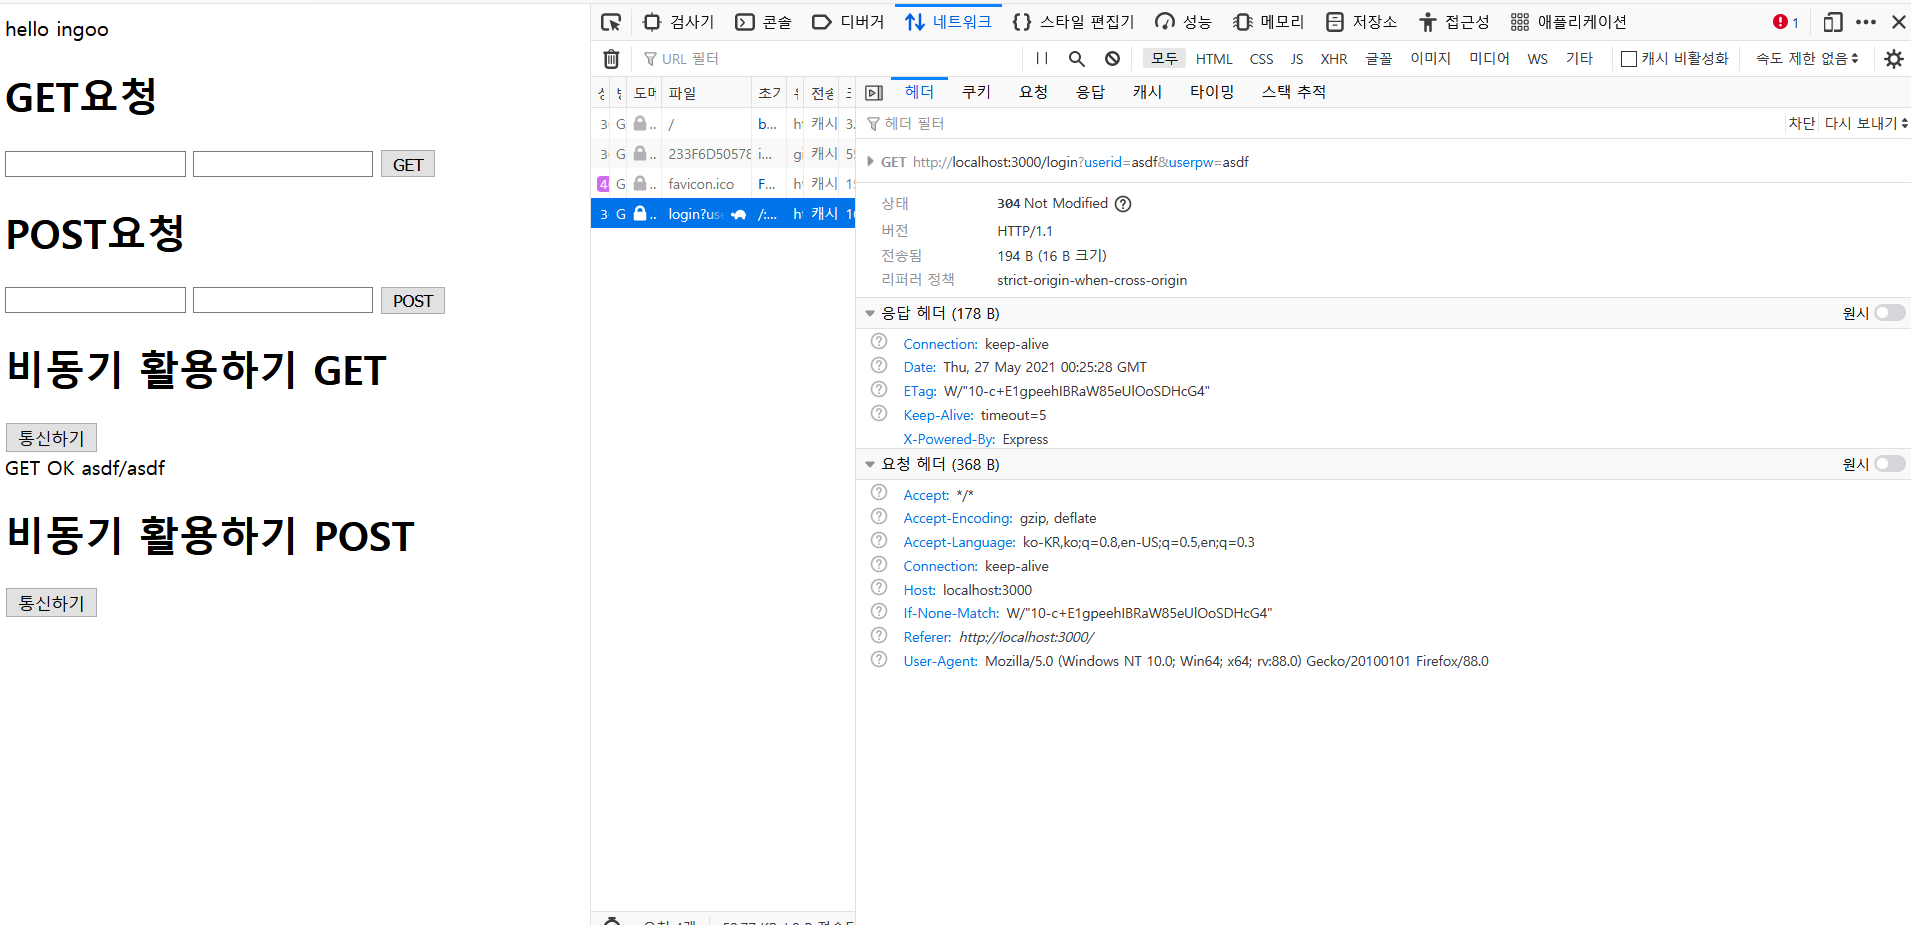
GET-headers
POST
<h1>비동기 활용하기 POST</h1>
<button id="btn2">통신하기</button>
<div id="postroot"></div>
<script type = "text/javascript">
    const btn2 = document.querySelector('#btn2');
    btn2.addEventListener('click',btnFn2);
    function btnFn2(){
        console.log('req click');
        let options = {
            method:'post',
            headers:{
                'content-type':'application/x-www-form-urnencoded',
            },
            body:'userid=asdfasdf&userpw=asdfasdf',
            }
            fetch('http://localhost:3000/login',options)
            .then(data =>{
                return data.text();
            })
            .then(text =>{
                const root = document.querySelector('#postroot');
                root.innerHTML += text+'<br />';
            })
    }
</script>
####POST-page/headers
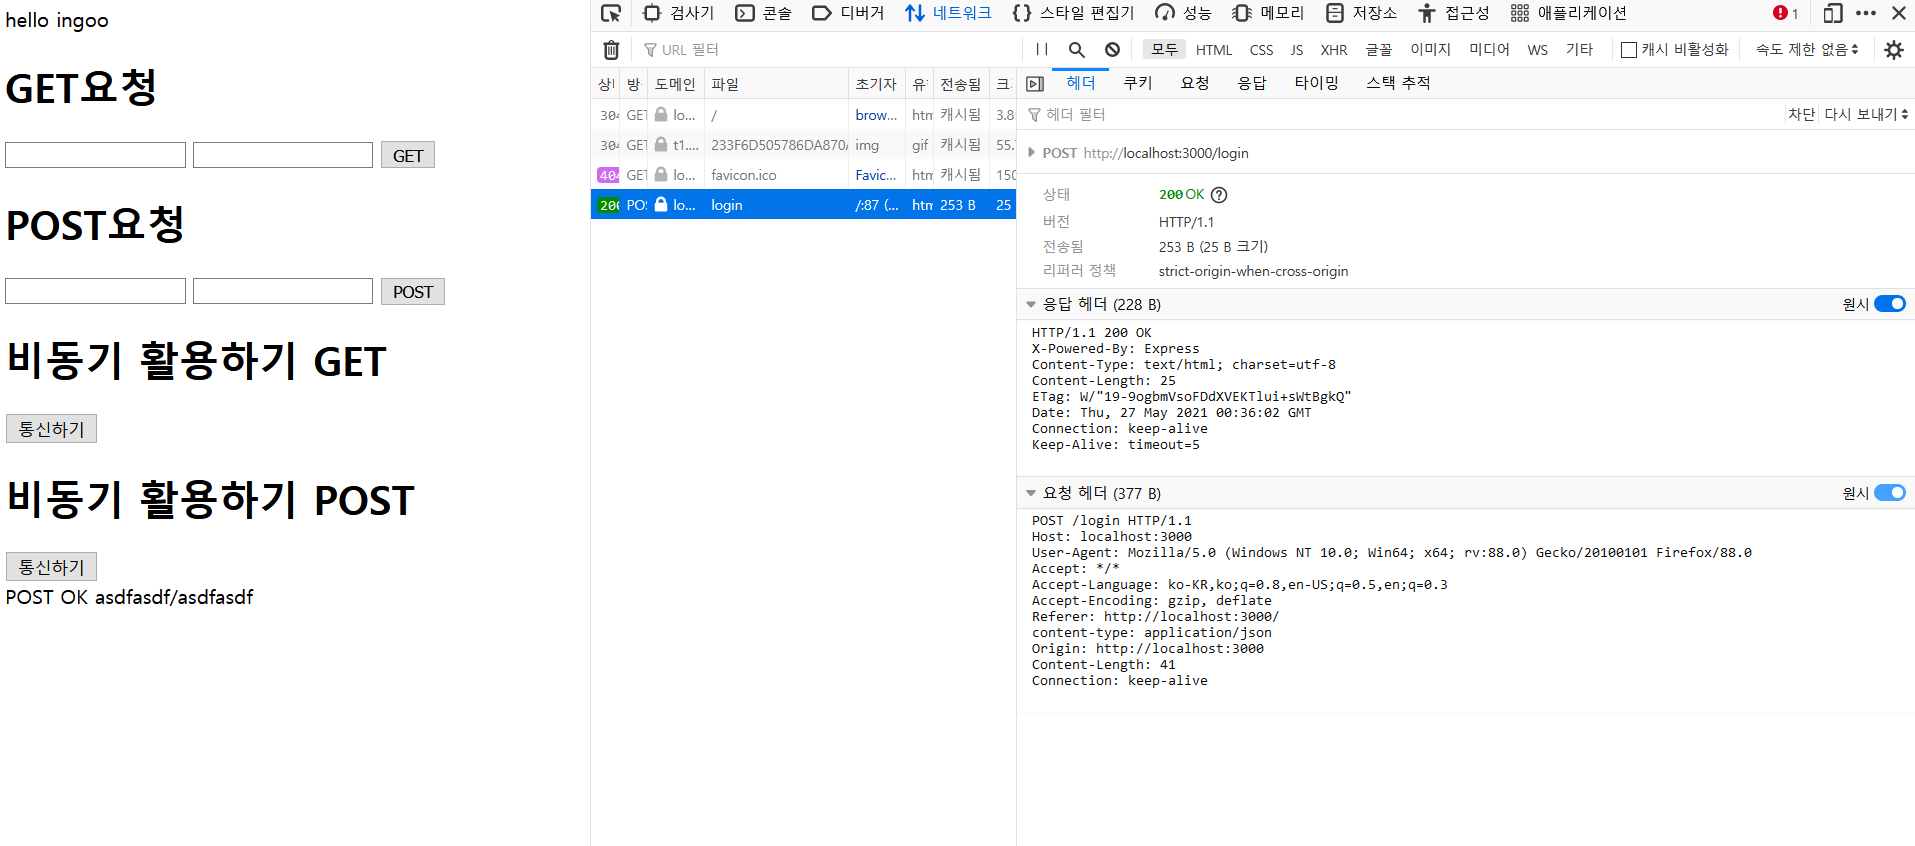
####POST-headers
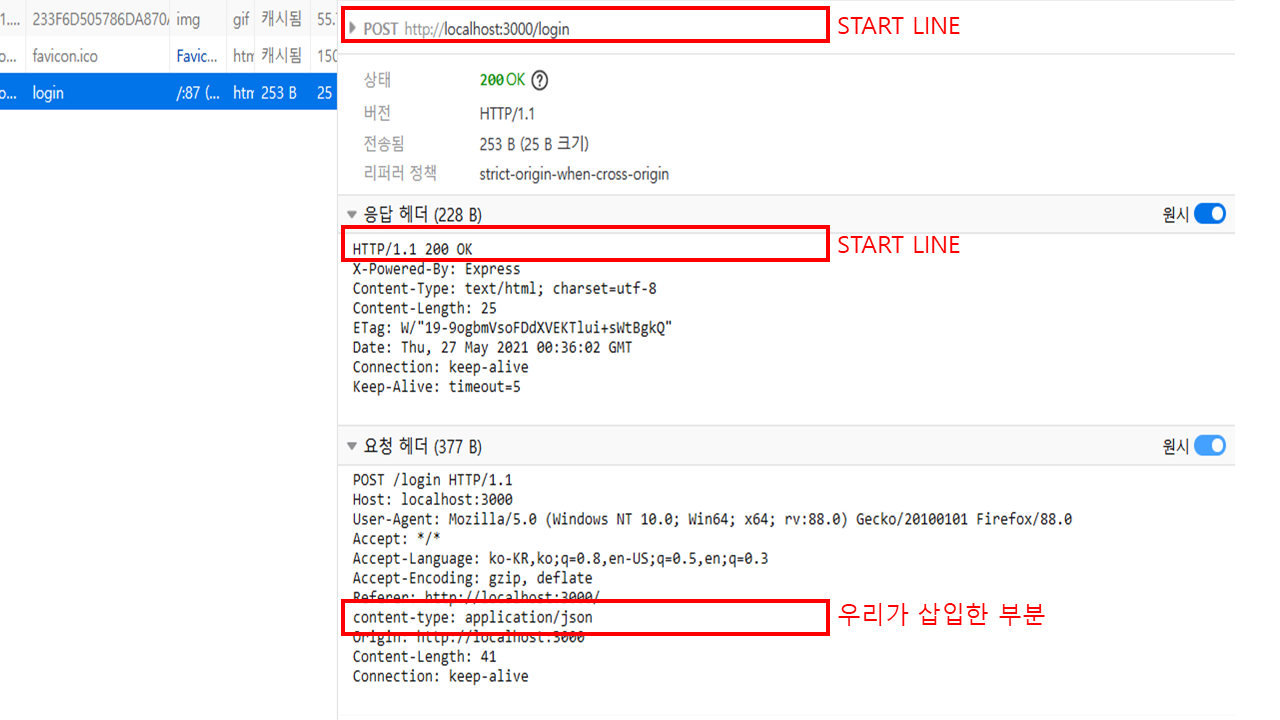

이를 바탕으로 요청헤드를 만들어보자.
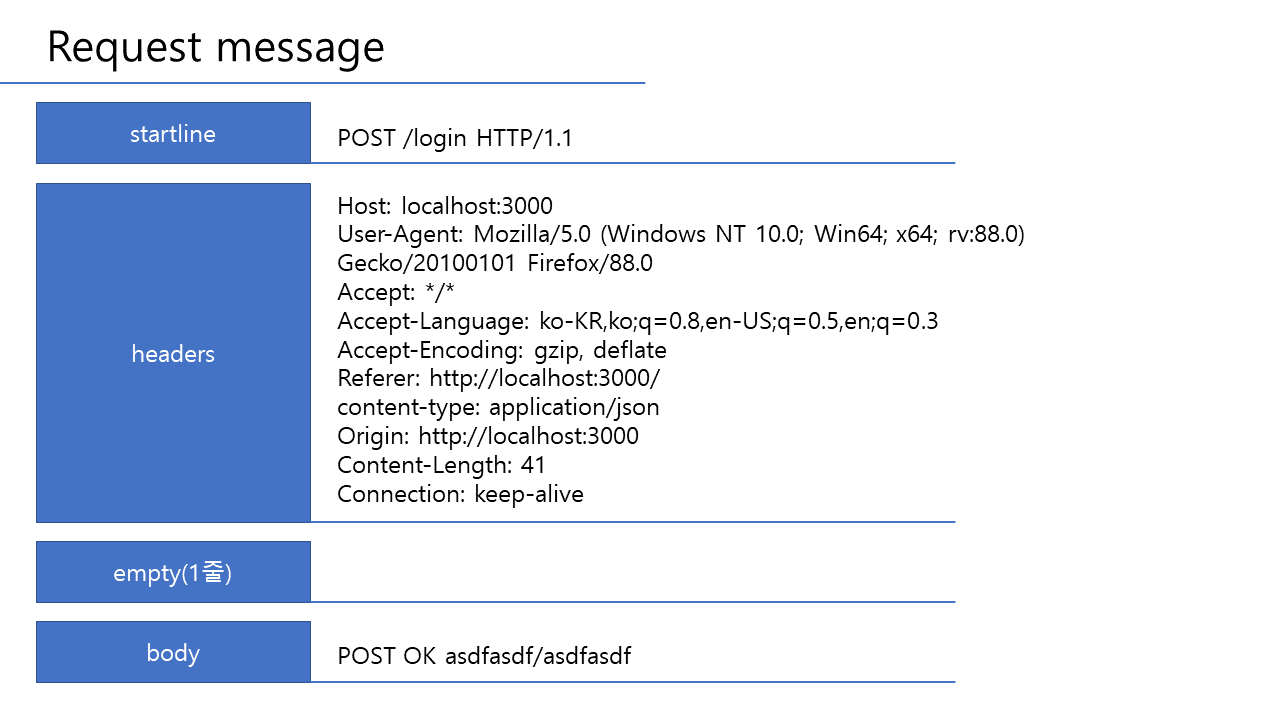
이렇게 된다.우리가 headers:{}이렇게 삽입한 것이, headers에 추가되는 것을 주의하자.
메세지를 이해하는 것이 중요하다. 왜냐하면 이것을 모르면 API문서를 읽어도 내용을 이해하지 못하고, 어떻게 쓰는지도 모르기 때문이다.
