연결리스트(Linked List)란?
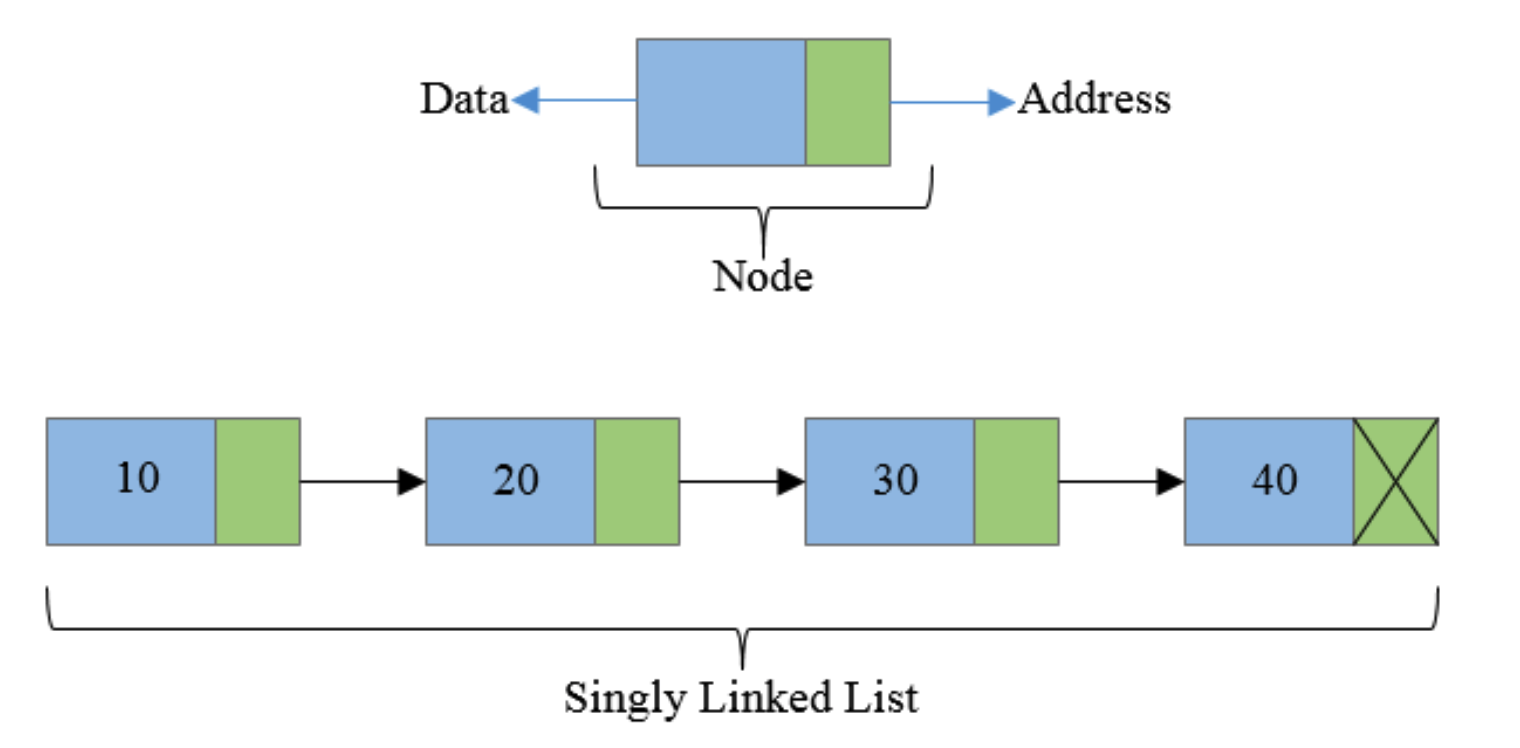
Linked List 는 value 와 pointer가 한 쌍인 노드가 모여있는 자료구조형을 의미한다.
위 사진에서 푸른색 부분은 data를 저장하고 있고, 초록색 부분은 다음 노드를 가르키는 pointer 역항을 하는 address 부분이다.
Linked List에서 가장 앞 쪽의 시작부분은 (위 사진에서 10을 가지고 있는 노드)을 Head
가장 마지막 부분 (40을 가지고 있는 노드)를 Tail이라고 부른다.
Tail의 pointer는 더 이상 가리킬 노드가 존재하지 않으므로 Null을 가리키게 된다.
Linked List 어디에 쓰일까?
연결 리스트는 자바스크립트에서 어떻게 사용할 수 있을까요? 본격적으로 살펴보기 앞서, 연결 리스트에 대해 간단하게 알아보겠습니다.
연결 리스트는 큐와 비슷하게도 무언가를 기다리기 위해 차례대로 줄을 서 있는 구조라고 생각하면 편할 것 같습니다.
이런 연결 리스트는 웹 브라우저의 history 관리를 할 때 사용됩니다. 웹 브라우저에서 여러 사이트들을 돌아다니면, 방문 history에 방문 기록들이 연결 리스트와 같은 구조로 저장됩니다. 연결 리스트 자료구조를 통해 사용하고 있던 사이트에서 다른 사이트로 넘어갈 때, 이전 사이트의 정보를 가지고 넘어갑니다.
따라서 우리가 브라우저에서 뒤로 가기, 앞으로 가기 버튼을 누르면 우리가 열람했던 사이트들로 이동할 수 있습니다. 그렇다면 연결 리스트란 과연 무엇일까요? 본격적으로 알아보겠습니다.
Linked List vs 배열, 객체
Linked List vs 배열
-
search: 배열은 모든 element가 인덱싱 되어 있기 때문에 특정 값을 살펴볼 경우 시간복잡도는 O(1)이다. 반면 Linked List는 특정 값을 살펴보려면 Head에서부터 시작해서 Linked List내의 노드들을 traversing해야 한다. 따라서 Linked List에서 search의 시간복잡도는 O(n)이다.
-
insert: 반면 특정 값을 삽입할 경우에는 Linked List가 배열보다 낫다.
Linked List vs. 객체
-
delete, insert : Linked List와 객체 모두 빠르다.
-
Linked List는 다음 노드를 가리키는 pointer가 있으므로 order가 있는 자료구조인 반면, 객체는 unordered한 자료구조이다.
Linked List의 작업별 시간복잡도
-
unshift(맨 앞에 삽입) : O(1)
-
push(맨 뒤에 삽입) : O(1)
-
seach : O(n)
-
insert : O(n)
-
delete : O(n)
Linked List와 배열의 시간복잡도 차이
1) 데이터 탐색
연결리스트: 순차 접근 방식을 사용하기 때문에 어떤 한 데이터를 찾기 위해서는 처음부터 순차적으로 탐색해야 한다.
따라서 이 때 연결리스트는 O(n)의 시간복잡도를 가진다.
배열: 임의 접근 방식을 사용하기 때문에 데이터를 탐색할 때 처음부터 찾을 필요가 없다. 인덱스 번호가 있기 때문에 인덱스를 통해서 매우 빠르게 탐색할 수 있다. 이 때 배열은 O(1)의 시간복잡도를 가진다.
2) 데이터 추가
이 때부터는 경우에 따라 시간복잡도가 달라진다.
연결리스트: 먼저 오해하지 말아야 할 것이, 데이터를 추가하는 행위 자체의 시간복잡도는 O(1)이다. 노드가 가지고 있는 메모리 주소 값만 갈아 끼워주면 되기 때문이다. 다만, 추가하려는 데이터의 위치가 맨 처음이 아니고 그 이후라면 순차적으로 탐색하면서 해당 위치까지 가야한다. 이 때 발생하는 시간복잡도가 O(n)이다. 따라서 크게 두가지로 나눠볼 수 있다.
-
추가하려는 데이터의 위치가 맨 앞이라면, O(1)의 시간복잡도를 가진다.
-
추가하려는 데이터의 위치가 맨 앞 그 이후라면, O(n)의 시간복잡도를 가진다.
배열: 배열의 경우에는 데이터들이 순차적으로 저장되어있다. 따라서 맨 처음이나 그 이후에 데이터가 추가될 경우 그 뒤에 있는 데이터들을 전부 한 칸씩 뒤로 미뤄야 한다. 여기서 시간복잡도가 O(n)이다. 만약에 배열에 공간이 남아 있고 데이터를 맨 뒤에 추가한다면 이 때는 O(1)이다.
-
추가하려는 데이터가 맨 뒤가 아니라면, 추가되는 데이터 위치 이후에 있는 모든 데이터들을 한 칸씩 미뤄야 하므로 O(n)의 시간복잡도를 가진다.
-
추가하려는 데이터의 위치가 맨 뒤이고 배열에 공간이 남아있다면, O(1)의 시간복잡도를 가진다.
3) 데이터 삭제
데이터 추가하는 경우와 같다.
연결리스트:
-
삭제하려는 데이터의 위치가 맨 앞이라면, O(1)의 시간복잡도를 가진다.
-
삭제하려는 데이터의 위치가 맨 앞 그 이후라면, O(n)의 시간복잡도를 가진다.
배열:
-
삭제하려는 데이터의 위치가 맨 뒤가 아니라면, O(n)의 시간복잡도를 가진다.
-
삭제하려는 데이터의 위치가 맨 뒤이고 배열에 공간이 남아있다면, O(1)의 시간복잡도를 가진다.
포인터(pointer)란?
const obj1 = { a: true };
const obj2 = obj1; // 이게 pointer이다.
포인터는 기본적으로 원하는 데이터가 저장되어 있는 메모리 주소를 참조 하는 작업이다.
위 코드의 경우 { a: true } 라는 객체는 하나의 메모리 공간만 차지해서 저장되어 있다.
다만 obj1과 obj2가 모두 그 메모리 주소를 참조하고 있을 뿐이다.
참고로 자바스크립트에서는 포인터가 특정 메모리 주소를 참조하고 있을 경우, garbage collector가 해당 메모리 주소가 사용 중인 것으로 간주하여 메모리 공간에서 삭제되지 않는다.
const obj1 = {a: true};
const obj2 = obj1;
delete obj1;

console.log(obj1); // ReferenceError
console.log(obj2); // {a: true}
Linked List 메소드 구현
class Node {
    constructor(value) {
      this.value = value;
      this.next = null;
    }
}

class SinglyLinkedList {
    constructor() {
      this.head = null;
      this.tail = null;
      this.length = 0;
    }
    // 맨 끝에 값을 추가
    push(val) {
      const newNode = new Node(val);
      if (!this.head) {
        this.head = newNode;
        this.tail = newNode;
      } else {
        this.tail.next = newNode;
        this.tail = newNode;
      }
      this.length++;
      return this;
    }
    // 맨 끝에 값을 제거
    pop() {
      if (!this.tail) {
        return false;
      }
      const poppedNode = this.tail;
      if (this.head !== this.tail) {
        const newTail = this.getNodeAtIndex(this.length - 2);
        newTail.next = null;
        this.tail = newTail;
      } else {
        this.head = null;
        this.tail = null;
      }
      this.length--;
      return poppedNode;
    }
    // 맨 앞에 값을 추가
    unshift(val) {
      const newNode = new Node(val);
      if (!this.head) {
        this.head = newNode;
        this.tail = newNode;
      } else {
        newNode.next = this.head;
        this.head = newNode;
      }
      this.length++;

      return this;
    }
    // 맨 앞에 값을 제거
    shift() {
      if (!this.head) return false;
      const shiftedNode = this.head;
      const newHead = this.head.next;
      if (!newHead) {
        this.tail = newHead;
      }
      this.head = newHead;
      this.length--;
      return shiftedNode;
    }
    // 중간 삽입
    insertAtIndex(index, val) {
      if (index < 0 || index > this.length) return false;
      if (index === 0) return this.unshift(val);
      if (index === this.length) return this.push(val);

      const newNode = new Node(val);
      const after = this.getNodeAtIndex(index);
      const before = this.getNodeAtIndex(index - 1);
      newNode.next = after;
      before.next = newNode;

      this.length++;
      return this;
    }
    // 특정 인덱스 삭제
    removeAtIndex(index) {
      if (index < 0 || index >= this.length) return false;

      if (index === 0) return this.shift();
      if (index === this.length - 1) return this.pop();
      const before = this.getNodeAtIndex(index - 1);
      const removedNode = this.getNodeAtIndex(index);
      before.next = removedNode.next;
      removedNode.next = null;
      this.length--;
      return removedNode;
    }
     // 특정 번째의 노드를 가져옴
    getNodeAtIndex(index) {
      if (index >= this.length || index < 0) return null;
      let currentNode = this.head;
      let currentIndex = 0;
      while (currentIndex !== index) {
        currentNode = currentNode.next;
        currentIndex++;
      }
      return currentNode;
    }
    // 특정 번째의 노드 값을 바꿈
    setNodeAtIndex(index, val) {
      const foundNode = this.getNodeAtIndex(index);
      if (foundNode) {
        foundNode.value = val;
        return foundNode;
      }
      return null;
    }
    // 프린팅
     printList() {
      if(this.head){
        let current = this.head;
        while (current.next) {
          console.log(current);
          current = current.next;
        }
        console.log(current);
      } else {
        console.log("empty list")
      }
    }
}
Doubly Linked List
Singly Linked List의 경우 하나의 노드가 value와 다음 노드 pointer 두개로 이루어졌다면, Doubly Linked List는 value, 이전 노드 pointer, 다음 노드 pointer 이렇게 3개의 조각으로 이루어져 있다.
Singly Linked List와 Doubly Linked List의 차이는 이 그림으로 설명할 수 있다.
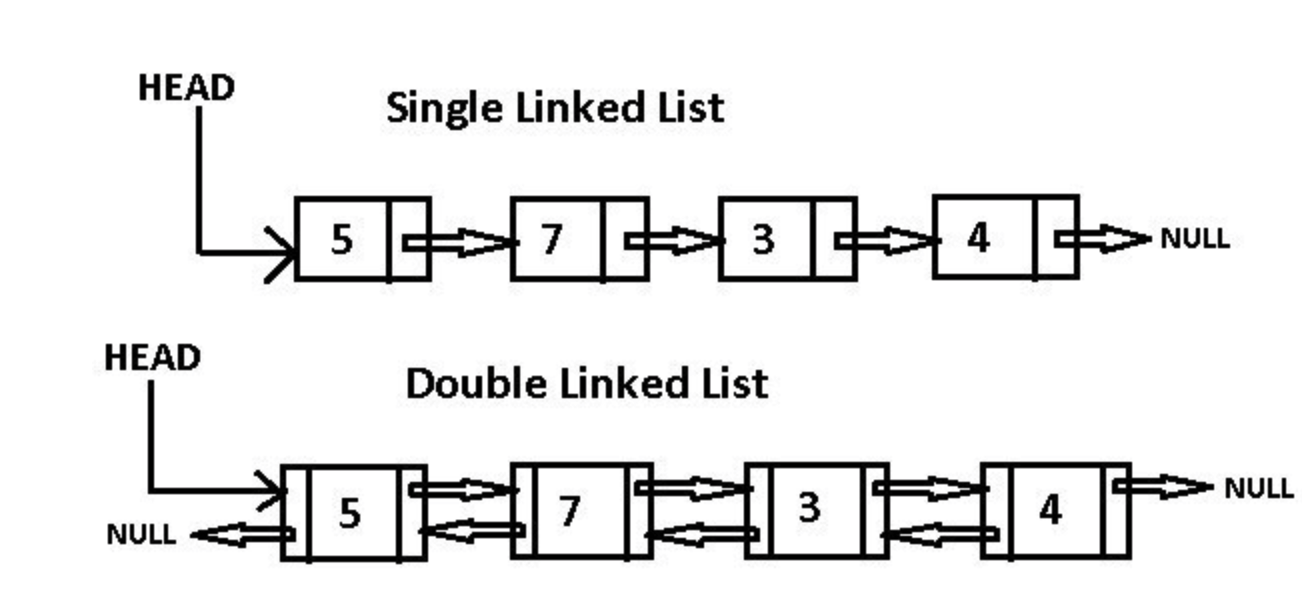
Singly Linked List 는 자신의 뒤의 노드 pointer 만 저장하고 있다면,
Doubly Linked List 는 자신의 앞의 노드의 pointer 도 저장하고 있어서, 앞뒤로의 노드 이동이 수월하다.
Doubly Linked List 메소드 구현
class Node {
    constructor(value) {
      this.value = value;
      this.next = null;
    }
}

class SinglyLinkedList {
    constructor() {
      this.head = null;
      this.tail = null;
      this.length = 0;
    }
    // 맨 끝에 값을 추가
    push(val) {
      const newNode = new Node(val);
      if (!this.head) {
        this.head = newNode;
        this.tail = newNode;
      } else {
        this.tail.next = newNode;
        this.tail = newNode;
      }
      this.length++;
      return this;
    }
    // 맨 끝에 값을 제거
    pop() {
      if (!this.tail) {
        return false;
      }
      const poppedNode = this.tail;
      if (this.head !== this.tail) {
        const newTail = this.getNodeAtIndex(this.length - 2);
        newTail.next = null;
        this.tail = newTail;
      } else {
        this.head = null;
        this.tail = null;
      }
      this.length--;
      return poppedNode;
    }
    // 맨 앞에 값을 추가
    unshift(val) {
      const newNode = new Node(val);
      if (!this.head) {
        this.head = newNode;
        this.tail = newNode;
      } else {
        newNode.next = this.head;
        this.head = newNode;
      }
      this.length++;

      return this;
    }
    // 맨 앞에 값을 제거
    shift() {
      if (!this.head) return false;
      const shiftedNode = this.head;
      const newHead = this.head.next;
      if (!newHead) {
        this.tail = newHead;
      }
      this.head = newHead;
      this.length--;
      return shiftedNode;
    }
    // 중간 삽입
    insertAtIndex(index, val) {
      if (index < 0 || index > this.length) return false;
      if (index === 0) return this.unshift(val);
      if (index === this.length) return this.push(val);

      const newNode = new Node(val);
      const after = this.getNodeAtIndex(index);
      const before = this.getNodeAtIndex(index - 1);
      newNode.next = after;
      before.next = newNode;

      this.length++;
      return this;
    }
    // 특정 인덱스 삭제
    removeAtIndex(index) {
      if (index < 0 || index >= this.length) return false;

      if (index === 0) return this.shift();
      if (index === this.length - 1) return this.pop();
      const before = this.getNodeAtIndex(index - 1);
      const removedNode = this.getNodeAtIndex(index);
      before.next = removedNode.next;
      removedNode.next = null;
      this.length--;
      return removedNode;
    }
     // 특정 번째의 노드를 가져옴
    getNodeAtIndex(index) {
      if (index >= this.length || index < 0) return null;
      let currentNode = this.head;
      let currentIndex = 0;
      while (currentIndex !== index) {
        currentNode = currentNode.next;
        currentIndex++;
      }
      return currentNode;
    }
    // 특정 번째의 노드 값을 바꿈
    setNodeAtIndex(index, val) {
      const foundNode = this.getNodeAtIndex(index);
      if (foundNode) {
        foundNode.value = val;
        return foundNode;
      }
      return null;
    }
    // 프린팅
     printList() {
      if(this.head){
        let current = this.head;
        while (current.next) {
          console.log(current);
          current = current.next;
        }
        console.log(current);
      } else {
        console.log("empty list")
      }
    }
}
결론
- 장점 : 빠른 삽입, 빠른 삭제, 순서대로 배열, 유연한 사이즈
- 단점 : 느린 searching, 많은 메모리 사용
참고
자료구조 연결리스트 with JavaScript
연결리스트(Linked List)와 배열(Array), 그리고 시간복잡도의 차이에 대해
Singly and Doubly-Linked Lists in JavaScript