
프로젝트를 진행하면서 처음으로 User에 대한 회원가입, 로그인을 맡았다. 개인적으로 처음으로 맡아서 미숙한 점과 부족한 부분, 처음 알게 된 내용들을 많이 접했기 때문에 스프링 시큐리티에 대한 공부를 다시 진행하는 중이다.
스프링 시큐리티 공부를 다시하면서 정리한 내용들을 작성하기로 마음을 먹었다.
(스프링 시큐리티 인 액션)
이 책을 바탕으로 공부한 내용들을 정리하였다.

스프링 시큐리티
-> 스프링 시큐리티는 스프링 어플리케이션에 보안을 적용하는 과정을 크게 간소화하는 프레임워크이다.
스프링 시큐리티는 스프링 어플리케이션에서 어플리케이션 수준 보안을 구현하기 위한 사실상의 표준이지만 자동으로 어플리케이션을 보호 하는것은 아니다. 개발자는 필요에 맞게 스프링 시큐리티를 구성하고, 기능적 요구 사항에서 아키텍처 까지 여러 요소에 따라 방법이 다르다.
-> 스프링 시큐리티를 이용해 '스프링'의 방식으로 애플리케이션 수준 보안을 애플리케이션에 적용 가능하다. 이때 스프링 방식이란 어노테이션,빈,SqEL(Spring Expression Language) 등을 이용하는 것이다.
->스프링 시큐리티를 바르게 이용하는 것은 개발자의 책임이다. 스프링 시큐리티가 애플리케이션이나 저장 데이터나 전송 중인 민감한 데이타를 자동으로 보호해주는 것은 아니다.
예제 1 - 기본 시큐리티
개발환경:
IntelliJ
JDK 11
Maven
(스프링 시큐리티 종속성)
        <dependency>
            <groupId>org.springframework.boot</groupId>
            <artifactId>spring-boot-starter-security</artifactId>
        </dependency>
        <dependency>
            <groupId>org.springframework.boot</groupId>
            <artifactId>spring-boot-starter-web</artifactId>
        </dependency>
(클래스와 REST 엔드포인트)
-> 아무것도 설정하지 않은 채 호출
@RestController
public class HelloController {
    @GetMapping("/hello")
    public String hello(){
        return "Hello!";
    }
}
실행 할 때마다 새로운 암호를 생성한다.
Using generated security password: 9748e23f-45ae-461b-a490-6ca8977a74bcHTTP Basic 인증으로 애플리케이션의 엔드포인트를 호출하려면 이 암호를 이용해야 한다.
Authorization 헤더를 이용하지 않고 엔드포인트 호출
curl http://localhost:8080/hello호출에 대한 응답
{
  "status": 401,
  "error": "Unauthorized",
  "message": "Unauthorized",
  "path": "/hello"
}
응답 상태로 HTTP 4010 권한 없음이 반환된다.
인증을 위한 올바른 자격 증명을 제공하지 않았기 때문이다. 이번에는 올바른 자격 증명을 지정하고 다시 호출한다.
curl -u user: 9748e23f-45ae-461b-a490-6ca8977a74bc http://localhost:8080/hello결과
hello올바른 응답이 변환된다.
예제1 은 스프링 부트가 제공하는 기본 구현을 사용했고, 이 구현은 애플리케이션의 내부 메모리에 기본 자격 증명을 등록하는 일만 한다.
이런 기본 자격 증명에서는 사용자 이름은 'user'이고, 기본 암호는 'UUID(Universally Unique Identifier)' 형식이며 암호는 스프링 컨텍스트가 로드될 때, 자동으로 생성된다.
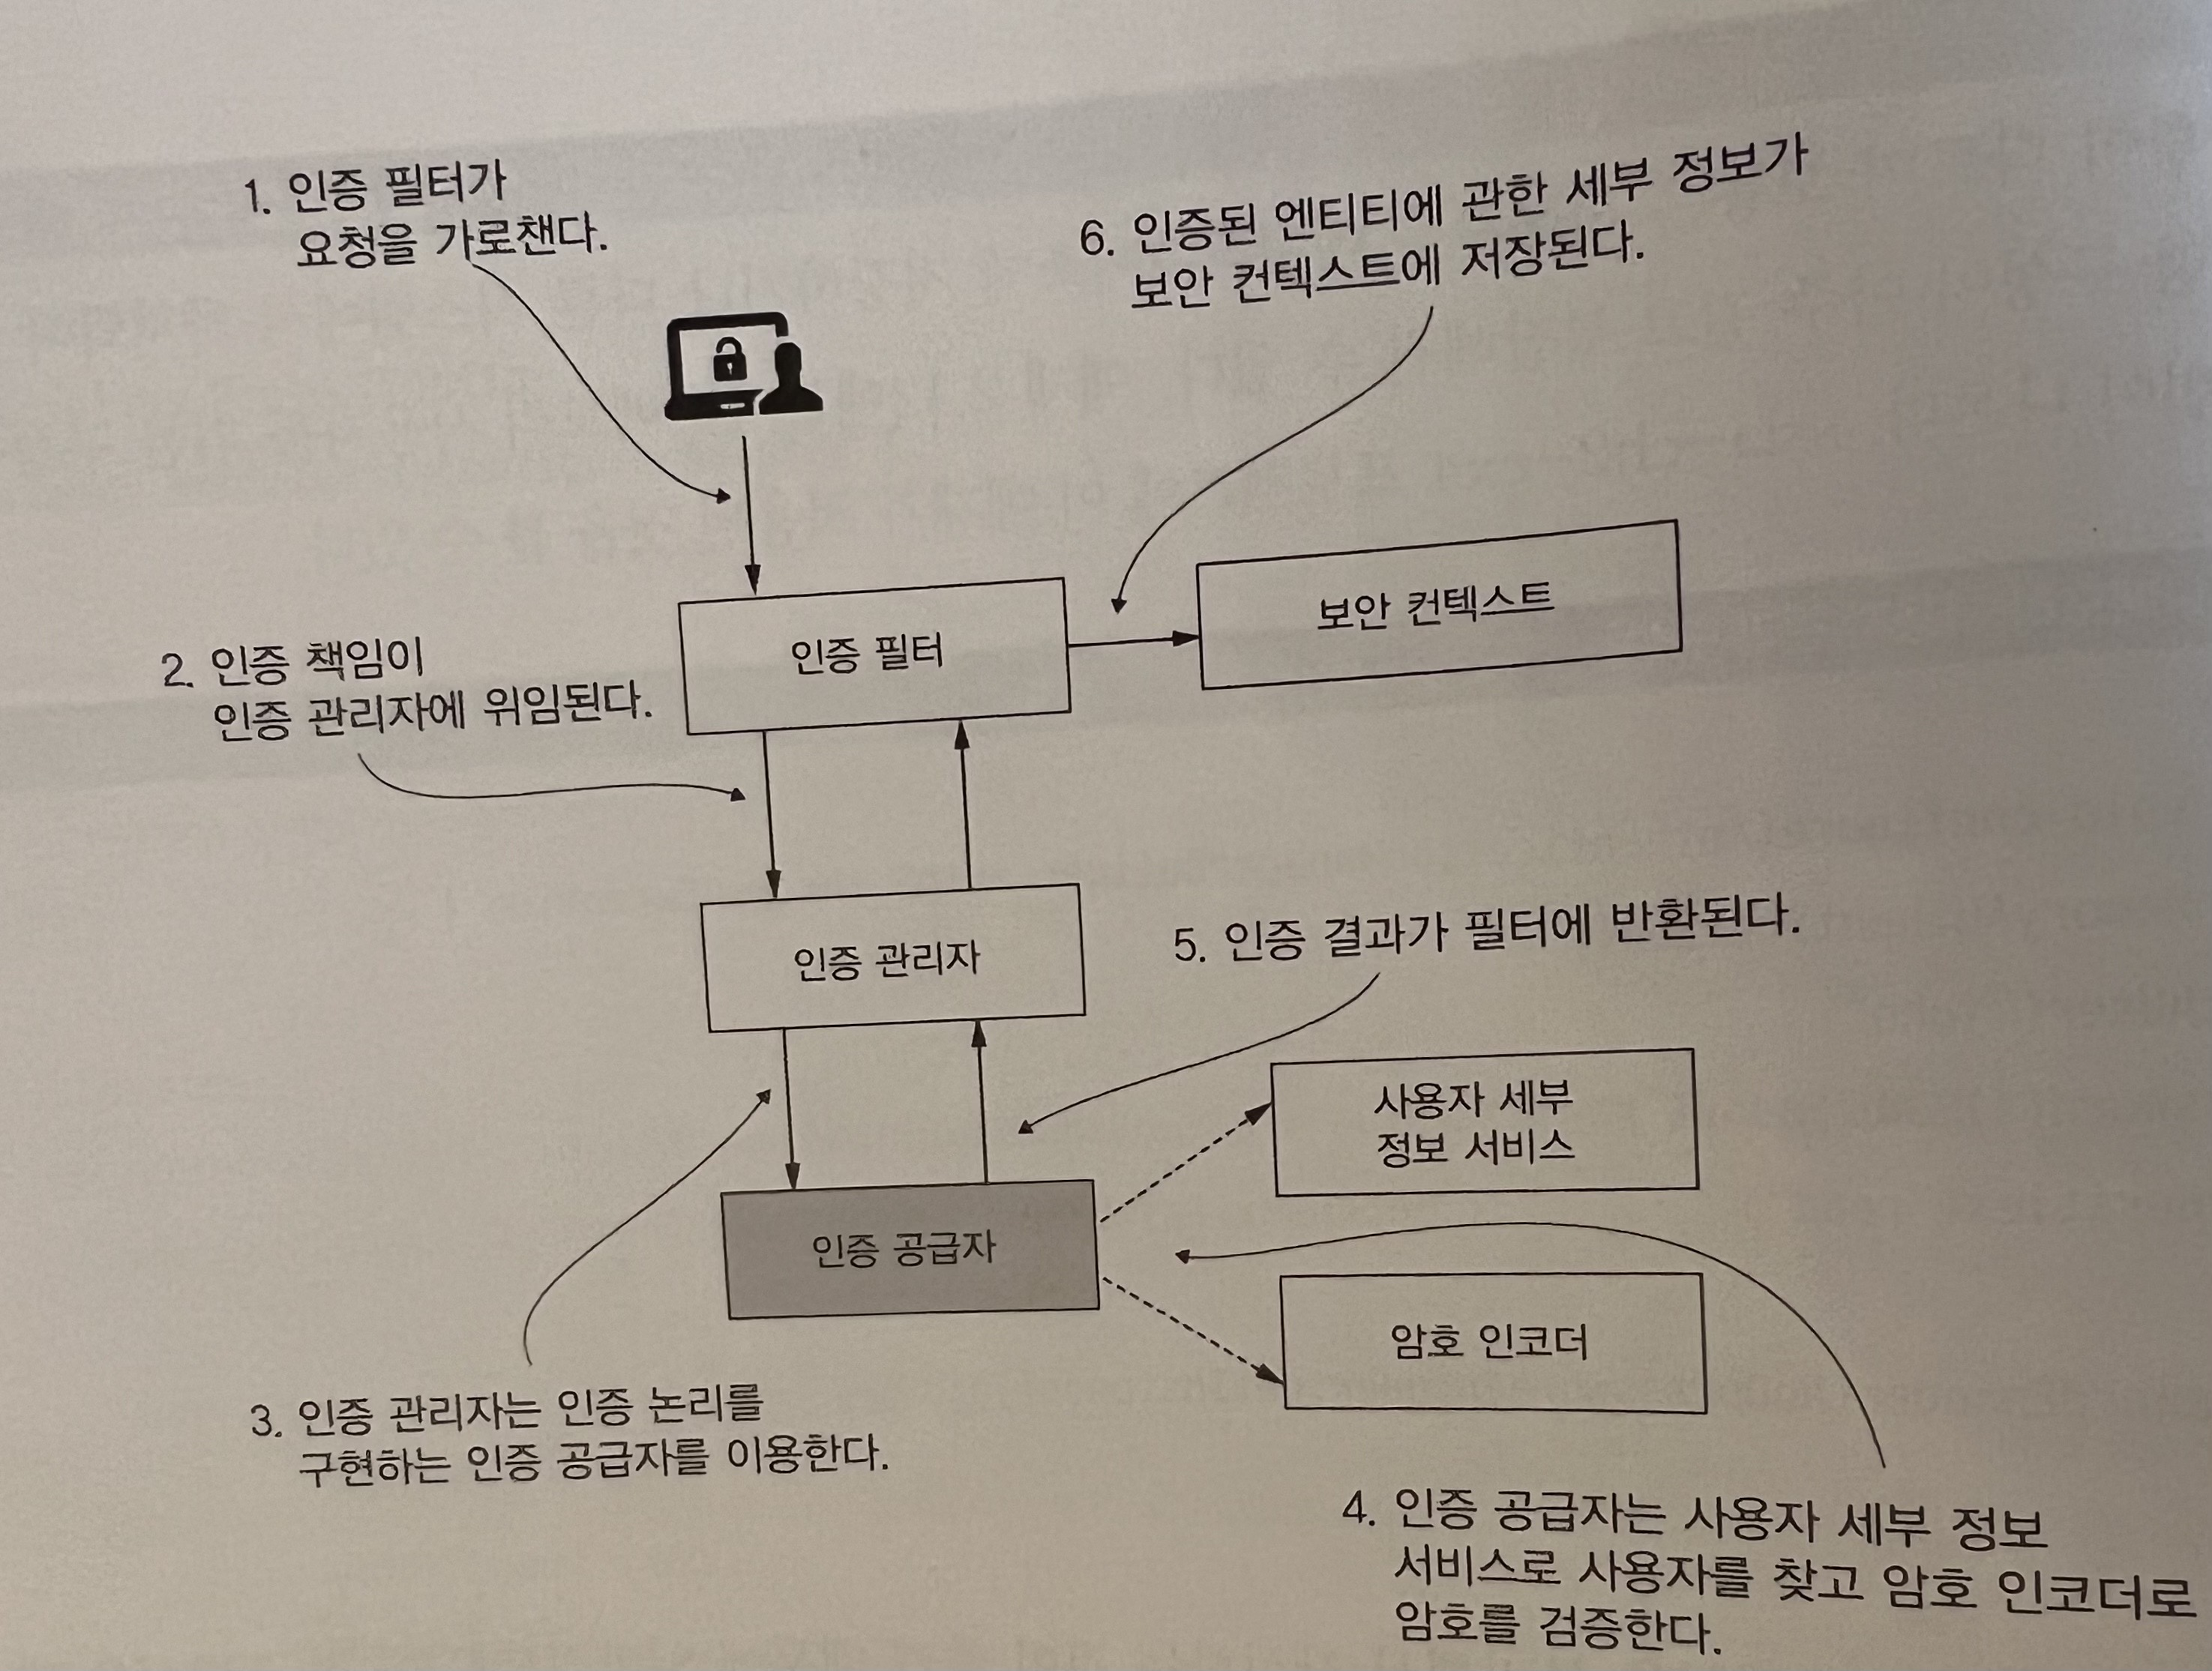
스프링 시큐리티 기본 흐름
-
인증 필터는 인증요청을 인증 관리자에 위임하고 응답을 바탕으로 보안 컨텍스트를 구성한다.
-
인증 관리자는 인증 공급자를 이용해 인증을 처리한다.
-
인증 공급자는 인증 논리를 구현한다.
-
인증 공급자는 사용자 관리 책임을 구현하는 사용자 세부 정보 서비스를 인증 논리에 이용한다.
-
인증 공급자는 암호 관리를 구현하는 암호 인코더를 인증 논리에 이용한다.
-
보안 컨텍스트는 인증 프로세스 후 인증 데이터를 유지한다.
자동으로 구성되는 빈
- UserDetailService
- PasswordEncoder
사용자에 관한 세부 정보는 스프링 시큐리티로 UserDetailService 계약(인터페이스)을 구현하는 객체가 관리한다.
PasswordEncoder는 2가지 일을 한다.
- 암호를 인코딩한다.
- 암호가 기존 인코딩과 일치하는지 확인한다.
UserDetailService 구성 요소 재정의
이번 방법에서는 직접 구현하지 않고, InMemoryUserDetailManager 구현을 이용한다.
이 구현은 메모리에 다격 증명을 저장해서 스프링 시큐리티가 요청을 인증할 때 이용할 수 있게 한다.
- InMemoryUserDetailManager 구현은 운영단계 애플리케이션을 위한 것은 어나며 예제나 개념 증명용으로 좋은 툴이다.
(UserDetailService 빈에 대한 구성 클래스)
@Configuration //클래스를 구성클래스로 표시한다.
public class SecurityConfig {
    @Bean // 반환된 값을 스프링 컨텍스트에 빈으로 추가하도록 스프링에 지시
    public UserDetailsService userDetailsService() {
        var userDetailsService = new InMemoryUserDetailsManager();

        return userDetailsService;
    }
클래스에 @Configuration 어노테이션 지정했다.
@Bean 어노테이션은 메사드가 반환한 인스턴스를 스프링 컨텍스트에 추가하도록 스프링에 지시한다.
이 코드를 그대로 실행하면 콘솔에 암호가 출력되지 않는다. 이제 애플리케이션은 자동 구성된 기본 구성 요소 대신 컨텍스트에 추가할 UserDetailService 형식의 인스턴스를 이용한다. 하지만 2가지 이유로 엔드포인트에 접근 불가.
- 사용자 x
- Passwordencoder x
-필요한 작업-
- 자격 증명이 있는 사용자를 하나 이상 만든다.
- 사용자를 UserDetailService에서 관리하도록 추가한다.
- 주어진암호를 UserDetailService가 저장하고 관리하는 암호를 검증하는 PasswordEncoder 형식의 빈을 정의한다.
(UserDetailService에 필요한 사용자 생성)
@Configuration //클래스를 구성클래스로 표시한다.
public class SecurityConfig {
    @Bean // 반환된 값을 스프링 컨텍스트에 빈으로 추가하도록 스프링에 지시
    public UserDetailsService userDetailsService() {
        var userDetailsService = new InMemoryUserDetailsManager();

        //주어진 사용자 이름,암호,권한 목록으로 사용자 생성.
        var user = User.withUsername("John")
                .password("12345")
                .authorities("read")
                .build();
        userDetailsService.createUser(user); //userDetailsService 에서 관리하도록 사용자 추가.

        return userDetailsService;
    }
UserDetailService를 이용하면 PasswordEncoder도 자동 구성 되지만, UserDetailService를 재정의 하면 PasswordEncoder도 다시 선언 해야한다.
    @Bean
    public PasswordEncoder passwordEncoder(){
        return NoOpPasswordEncoder.getInstance();
}- NoOpPasswordEncoder -> NoOpPasswordEncoder 인스턴스는 암호에 암호화나 해시를 적용하지 안ㄶ고 일반 텍스트 처럼 처리한다. NoOpPasswordEncoder는 암호를 비교할 때 String 클래스의 기본 equals(Object o 메서드로 간단한 문자 열 비교만 한다.
운영 단계에서는 NoOpPasswordEncoder를 이용하면 안된다. 암호의 해싱 알고리즘에 신경 쓰고 싶지 않을 대 좋은 옵션이다.
호출
curl -u John:12345 http://localhost:8080/hello결과
hello엔드포인트 권한 부여 구성 재정의
(WebSecurityConfigurerAdapter 확장 및 매개변수로 구성 변경)
@Configuration //클래스를 구성클래스로 표시한다.
public class SecurityConfig extends WebSecurityConfigurerAdapter {
    @Bean // 반환된 값을 스프링 컨텍스트에 빈으로 추가하도록 스프링에 지시
    public UserDetailsService userDetailsService() {
        var userDetailsService = new InMemoryUserDetailsManager();

        //주어진 사용자 이름,암호,권한 목록으로 사용자 생성.
        var user = User.withUsername("John")
                .password("12345")
                .authorities("read")
                .build();
        userDetailsService.createUser(user); //userDetailsService 에서 관리하도록 사용자 추가.

        return userDetailsService;
    }

    @Bean
    public PasswordEncoder passwordEncoder(){
        return NoOpPasswordEncoder.getInstance();
    }

    @Override
    protected void configure(HttpSecurity http) throws Exception{
        http.httpBasic();
        http.authorizeRequests()
                .anyRequest().authenticated();
                //모든 요청에 인증이 필요하다.

    }

}
약간의 변경으로 모든 엔드포인트를 자격 증명 없이 접근 가능하게 할 수있다.
(permitAll()을 이용해 권한 부여 구성 변경)
@Configuration //클래스를 구성클래스로 표시한다.
public class SecurityConfig extends WebSecurityConfigurerAdapter {
    @Bean // 반환된 값을 스프링 컨텍스트에 빈으로 추가하도록 스프링에 지시
    public UserDetailsService userDetailsService() {
        var userDetailsService = new InMemoryUserDetailsManager();

        //주어진 사용자 이름,암호,권한 목록으로 사용자 생성.
        var user = User.withUsername("John")
                .password("12345")
                .authorities("read")
                .build();
        userDetailsService.createUser(user); //userDetailsService 에서 관리하도록 사용자 추가.

        return userDetailsService;
    }

    @Bean
    public PasswordEncoder passwordEncoder(){
        return NoOpPasswordEncoder.getInstance();
    }

    @Override
    protected void configure(HttpSecurity http) throws Exception{
        http.httpBasic();
        http.authorizeRequests()
                .anyRequest().permitAll();
                //모든 요청에 접근 허용.

    }

}
호출
curl http://localhost:8080/hello결과
hello다른 방법으로 구성 재정의
(congigure()에서 UserDetailService와 PasswordEncoder 설정)
@Configuration
public class SecurityConfg extends WebSecurityConfigurerAdapter {
    @Override
    protected void configure(AuthenticationManagerBuilder auth)throws  Exception{
    //사용자를 메모리에 저장하기 위해 UserDeatailService 선언
        var userDetailService = new InMemoryUserDetailsManager();
        //모든 세부 정보를 지정해 사용자를 정의
        var user = User.withUsername("John")
                .password("12345")
                .authorities("read")
                .build();

       //UserDeatailService에서 관리하도록 사용자 추가 userDetailService.createUser(user);

//이제 configure() 메서드에서 UserDeatailService와 PasswordEncoder가 설정됨.
auth.userDetailsService(userDetailService)
                .passwordEncoder(NoOpPasswordEncoder.getInstance());

    }
    //모든 요청에 인증을 요구하도록 지정
    @Override
    protected void configure(HttpSecurity http) throws Exception{
        http.httpBasic();
        http.authorizeRequests().anyRequest().authenticated();

    }
}
(혼합된 구성 스타일)
@Configuration
public class SecurityConfig extends WebSecurityConfigurerAdapter {
	//PasswordEncoder를 빈으로 설계
    @Bean
    public PasswordEncoder passwordEncoder(){
        return NoOpPasswordEncoder.getInstance();
    }

    @Override
    protected void configure(AuthenticationManagerBuilder auth) throws Exception{
        var userDetailService = new InMemoryUserDetailsManager();

        var user = User.withUsername("John")
                .password("12345")
                .authorities("read")
                .build();
        userDetailService.createUser(user);

 //configure() 메서드 에서 직접 UserDetailService를 구성 auth.userDetailsService(userDetailService);
    }

    @Override
    protected void configure(HttpSecurity http)throws Exception{
        http.httpBasic();
        http.authorizeRequests()
                .anyRequest().authenticated();
    }

}
(인-메모리 사용자 관리 구성)
@Override
protected void configure(AuthenticationManagerBuilder auth) throws Exception{
	auth.inMemoryAuthentication()
    	.withUser("John")
        .password("12345")
       	.authorities("read")
     .and()
     	.passwordEncoder(NoOpPasswordEncoder.getInstance());
}
AuthenticaiotnProvider 구현 재정의
AuthenticaiotnProvider을 이용하여 작업들을 위임하는 맞춤 구성을 할 수있다.
(AuthenticaiotnProvider 인터페이스 , 인증논리 구현)
@Component
public class CustomAuthenticationProvider implements AuthenticationProvider {
    @Override
    public Authentication authenticate(Authentication authentication)throws AuthenticationException {
        String username = authentication.getName();
        String password = String.valueOf(authentication.getCredentials());

        if("John".equals(username)&&
        "12345".equals(password)){
        return new UsernamePasswordAuthenticationToken(username,password, Arrays.asList());
        }else{
            throw new AuthenticationCredentialsNotFoundException("Error in authentication!!!");
        }
    }
(인증 공급자 전체구현)
@Component
public class CustomAuthenticationProvider implements AuthenticationProvider {
    @Override
    public Authentication authenticate(Authentication authentication)throws AuthenticationException {
        String username = authentication.getName();
        String password = String.valueOf(authentication.getCredentials());

        if("John".equals(username)&&
        "12345".equals(password)){
        return new UsernamePasswordAuthenticationToken(username,password, Arrays.asList());
        }else{
            throw new AuthenticationCredentialsNotFoundException("Error in authentication!!!");
        }
    }

    @Override
    public boolean supports(Class<?> authenticationType){
        return UsernamePasswordAuthenticationToken.class
                .isAssignableFrom(authenticationType);
    }

}
(새로운 AuthenticaiotnProvider 구현 등록)
@Configuration
public class SecurityConfig extends WebSecurityConfigurerAdapter {

    @Autowired
    private CustomAuthenticationProvider authenticationProvider;

    @Override
    protected  void configure(AuthenticationManagerBuilder auth){
        auth.authenticationProvider(authenticationProvider);
    }

    @Override
    protected void configure(HttpSecurity http)throws Exception{
        http.httpBasic();
        http.authorizeRequests()
                .anyRequest().authenticated();
    }
}
호출
curl http://localhost:8080/hello결과
hello요약
- 스프링 시큐리티를 애플리케이션의 종속성으로 추가하면 스프링 부트가 약간의 기본 구성을 제공한다.
- 인증과 권한 부여를 위한 기본 구성 요소인 UserDetailService, PasswordEncoder, AuthenticationProvider를 구현 했다.
- User 클래스로 정의할 수 있다. 사용자는 사용자 이름, 암호,권한을 가져야 한다. 권한은 사용자가 애플리케이션의 컨텍스트에서 수행할 수 있는 작업을 지정한다.
- 스프링 시큐리티는 UserDetailService의 간단한 구현인 InMemoryDetailManager를 제공한다. UserDetailService의 인스턴스와 같은 사용자를 추가해서 애플리케이션의 메모리에서 사용자를 관리할 수 있다.
- NoOpPasswordEncoder는 PasswordEncoder 계약을 구현하며 암호를 일반 텍스트로 처리한다. 이구현은 학습 예제와 개념 증명에 적합하지만 운영 단계 애플리케이션에는 적합하지않다.
- AuthenticaiotnProvider 계약을 이용해 애플리케이션의 맞춤형 인증 논리를 구현할 수 있다.
- 구성을 작성하는 방법은 여러 가지가 있지만, 한 애플리케이션에서는 한 방법을 선택하고 고수해야 코드를 깔끔하고 이해하기 쉽게 만들 수 있다.