들어가며
이 프로젝트의 알림 기능은 추후 알림 서버 분리와 분산 시스템을 염두하고 구상했었다. (실제로 scale-out은 적용된 상태다.)
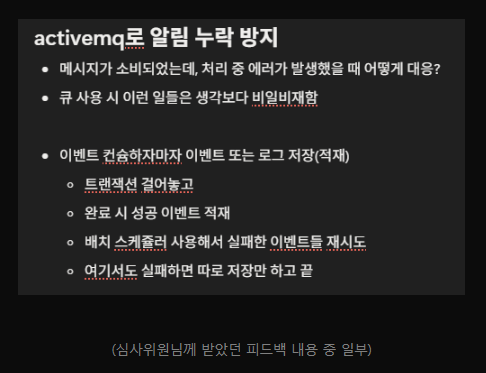
그래서 알림 이벤트가 발생하면 외부 메시지 큐(ActiveMQ)를 사용하는 비동기 방식으로 구현했다.
지금이야 트래픽이 적어 문제가 없지만, 서비스가 성장함에 따라 발생할 수 있는 잠재적인 문제점들을 미리 파악하고 개선하고자 했다.
단순한 비동기 처리 구조는 다음과 같은 상황에 취약할 수 있다.
-
1, 2차 장애 발생 위험
- DB 등 외부 시스템에 장애가 발생하면, 처리 실패한 메시지들이 재처리를 위해 계속 큐(DLQ)에 쌓인다.
- 이후 장애가 복구되었을 때, 이 메시지들이 한꺼번에 몰리면서 시스템에 다시 과부하를 주어 2차 장애를 유발할 수 있다.
-
데이터 유실 위험
- consumer가 큐에서 메시지를 가져온 후, 로직을 처리하는 과정에서 예상치 못한 에러가 발생하면 해당 메시지는 추적되지 않고 그대로 유실될 위험이 있다.
이러한 문제들을 해결하고, 어떤 장애 상황에서도 메시지 유실 없이 안정적으로 동작하는 알림 시스템을 구축하는 것이 목표다.
이를 위해 적용한 여러 패턴(서킷 브레이커, 상태 기반 재처리 등)과 그 구현 과정을 기록하고 공유해보고자 한다.
(이전 글에서 다루었던 MongoDB 트랜잭션 적용도 이 내용의 일환이다.)
전체 아키텍처 및 데이터 흐름
이 글에서 구현할 고가용성을 위한 알림 시스템은 다음과 같은 흐름으로 동작한다.
1. 메시지 발행 (Producer)
- 애플리케이션에서 알림 이벤트가 발생하면, 고유 ID(
custom_message_id)를 포함하여 메시지를 ActiveMQ로 발행한다.
2. 메시지 수신 및 상태 기록 (Consumer)
JmsListener가 메시지를 수신하고custom_message_id를 추출함- MongoDB의
notification_process_log컬렉션을 조회하여 이미 성공적으로 처리된 메시지인지 체크함 - 중복이 아닐 경우, 처리 상태를
PENDING으로 기록함
3. 핵심 비즈니스 로직 실행 (Service)
- DB 장애로부터 시스템을 보호하는 서킷 브레이커(
@CircuitBreaker)가 적용된 메서드를 호출함 - 해당 메서드는
@Transactional범위 내에서 실제 알림 데이터를 MongoDB에 저장하는 로직을 실행함 - 서킷 브레이커의 fallback 메서드에서는 지정된 예외가 발생했을 때 에러 로그를 찍고 커스텀 예외(
NotificationException)를 발생시킴
4. 성공 및 실패 처리 (Consumer)
- 알림 핵심 로직 호출 부분을
try - catch구문으로 감싸서 예외를 감지 - 성공 시 : 정상적으로 완료되면 Consumer는
notification_process_log의 상태를SUCCESS로 업데이트함. 이후@TransactionalEventListener에서 DB 커밋을 감지하고 우베소켓으로 사용자에게 실시간으로 알림을 발송함 - 실패 시 : 예외가 발생하면 Consumer의
catch블록이 이를 잡아notification_process_log의 상태를FAILED로 업데이트함. 이 때 메시지는 DLQ로 가지 않음
5. 자동 복구 (Scheduler)
@Scheduled스케줄러가 주기적으로notification_process_log에서FAILED상태인 작업들을 조회함- 실패한 작업들을 다시 ActiveMQ 큐로 보내 재처리를 유도함
- 이 스케줄러에서도 일정 횟수 이상 실패한 메시지들은
notification_process_log에서 상태를PERMANENTLY_FAILED로 변경함- 개발자들이 직접 확인하고 조치를 취할 수 있도록 알림 등을 발송 (이 부분은 구현되지는 않았지만 크게 어렵지는 않을 것 같음. Grafana, 자체 스케줄러 사용 등)
6. 최후의 안정망 (DLQ)
- 메시지 형식 오류 등 상태 기록조차 불가능한 예외적인 경우, 메시지는 DLQ(Dead Letter Queue)로 이동하여 데이터 유실을 방지하고 수동 분석의 기회를 제공함
- 해당 큐 역시 개발자가 직접 확인할 수 있도록 알림 발송
서킷 브레이커 적용
서킷 브레이커란?
서킷 브레이커(Circuit Breaker)는 집안의 차단기에 비유할 수 있다.
특정 가전제품에 문제가 생겨 과부하가 걸리면 차단기가 내려가 집 전체의 전기를 보호하는 것처럼, 서킷 브레이커는 서로 다른 시스템 간의 연동 시 장애전파 차단을 목적으로 한다. 연동 시 이상을 감지하고 이상이 발생하면 연동을 차단하고, 이후 이상이 회복되면 자동으로 다시 연동하기 위한 기술이다.
서킷 브레이커는 CLOSED, OPEN, HALF_OPEN의 세 가지 일반 상태와 METRICS_ONLY, DISABLED, FORCED_OPEN의 세 가지 특수 상태를 갖는 FSM(finite-state machine, 유한 상태 기계)을 통해 구현된다.
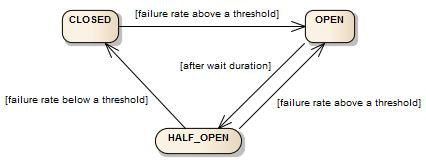
서킷 브레이커는 슬라이딩 윈도우(sliding window)를 사용하여 호출 결과를 저장하고 집계한다.
슬라이딩 윈도우는 최근 N번의 호출 결과를 집계하는 횟수 기반(Count-based) 슬라이딩 윈도우와 최근 N초 동안의 호출 결과를 집계하는 시간 기반(Time-based) 슬라이딩 윈도우로 나누어진다.
방식에 따라 슬라이딩 윈도 안에서 정해진 확률보다 높은 확률로 호출에 실패하게 되면 상태를 OPEN으로 변경한다. OPEN 상태에서는 연동된 시스템 호출을 시도하지 않으며, 바로 호출 실패 Exception을 발생시키거나 정해진 fallback 동작을 수행한다.
OPEN 이후 설정한 시간이 지나면 HALF_OPEN 상태로 변경되며, 호출이 정상화되었는지 다시한번 실패 확률로 확인합니다. 정상회되었다고 판단되면, CLOSED 상태로 변경되며, 아직 정상화되지 못했다고 판단되면 다시 OPEN 상태로 되돌아 간다.
Resilience4j
서킷 브레이커를 제공하는 Java 라이브러리에는 Java6 기반의 Netflix Hystrix와 Java8 기반의 Resilience4j가 있다. 그러나 Netflix Hystrix는 현재 유지보수만을 하고 있는 상태가 되어 Resilience4j를 주로 사용한다고 한다.
적용 이유
안정적으로 동작하는 알림 시스템을 구축하기 위해 서킷 브레이커 패턴을 적용한 이유는 다음과 같다.
1. 장애 격리 및 전파 방지
- 알림 시스템의 핵심 의존성인 DB에 장애가 발생하더라도, 서킷 브레이커카 DB로의 호출을 차단하여 알림 서비스 자체는 멈추지 않고 안정적인 상태를 유지할 수 있다.
2. 시스템 리소스 보호
- 외부 시스템(MQ, DB 등)이 응답하지 않을 때, 불필요한 호출을 계속 시도하며 스레드나 DB 커넥션 같은 리소스를 낭비하는 것을 막아준다.
3. 빠른 실패 및 유연한 후속 처리
- 서킷이 열리면, 요청은 오랜 시간 대기하지 않고 즉시 실패한다.
- 이후 Fallback 메서드를 통해 "현재 DB 장애 상태이니 나중에 다시 시도해달라"는 식의 비즈니스 로직(예: 상태 테이블에 FAILED로 기록)을 실행할 수 있어, 장애 상황을 더 유연하고 체계적으로 관리할 수 있다.
적용하기
의존성 및 설정
- build.gradle
// Circuit Breaker
implementation 'io.github.resilience4j:resilience4j-spring-boot3:2.2.0'
implementation 'io.github.resilience4j:resilience4j-circuitbreaker:2.2.0'
Resilience4j 라이브러리를 사용하기 위해 의존성을 추가한다.
- application.properties
resilience4j.circuitbreaker.instances.db-circuit.sliding-window-size=10
resilience4j.circuitbreaker.instances.db-circuit.minimum-number-of-calls=5
resilience4j.circuitbreaker.instances.db-circuit.failure-rate-threshold=50
resilience4j.circuitbreaker.instances.db-circuit.wait-duration-in-open-state=10s
resilience4j.circuitbreaker.instances.db-circuit.slow-call-duration-threshold=2s
resilience4j.circuitbreaker.instances.db-circuit.slow-call-rate-threshold=60
resilience4j.circuitbreaker.instances.db-circuit.register-health-indicator=true
resilience4j.circuitbreaker.instances.db-circuit.record-exceptions=org.springframework.dao.DataAccessResourceFailureException,org.springframework.dao.DataAccessException,com.mongodb.MongoTimeoutException,java.net.ConnectException,java.util.concurrent.TimeoutException
서킷 브레이커의 이름을 db-circuit으로 지정한다.
최근 10번의 DB 호출 중 50% 이상(5번)이 실패하면, 서킷을 열고 10초 동안 DB 접근을 차단한다. 10초가 지나면 한 번의 테스트 호출을 보내고, 성공하면 회로를 다시 닫는다.
@CircuitBreaker 적용
- NotificationService.java
@CircuitBreaker(name = "db-circuit", fallbackMethod = "createNewNotificationFallback")
@Transactional
public void createNewNotification(NotificationCreateEvent event) {

	NotificationDocument savedNotification = mongoRepository.save(NotificationDocument.from(event));

	publisher.publishEvent(new NotificationSavedEvent(
		event.principalName(),
		NotificationResponse.from(savedNotification)
	));
}

/**
 * createNewNotification의 Fallback 메서드
 * 서킷이 열리면 이 메서드가 대신 실행됨
 * @param event 원본 메서드와 동일한 파라미터
 * @param ex 발생한 예외
 */
private void createNewNotificationFallback(NotificationCreateEvent event, Throwable ex) {
	// 어떤 예외 때문에 서킷이 열렸는지 로그를 남김
	log.warn("Circuit Breaker is open for createNewNotification. Event: {}, Error: {}", event, ex.getMessage());

	//  메시지를 "처리 실패"로 알려서 MQ가 재시도하거나 DLQ로 보내도록 함
	throw new NotificationException(
		NotificationExceptionCode.NOTIFICATION_DB_ERROR,
		ex.getMessage()
	);
}
DB와 직접 통신하는 서비스 메서드에 @CircuitBreaker 어노테이션을 붙여서 방금 만든 db-circuit 규칙을 적용한다.
서킷이 열렸을 때 실행될 fallback 메서드도 지정해준다. 이 때 fallback 메서드는 서킷 브레이커가 적용된 메서드와 동일한 반환타입과 파라미터를 가져야 하며, 마지막에 Throwable 타입의 파라미터를 추가하여 어떤 예외가 발생했는지 받을 수 있다.
fallback 메서드는 서킷 브레이커의 상태와 무관하게 원본 메서드가 실패하면 수행된다.
서킷 브레이커 어노테이션이 달린 메서드에서 db-circuit.record-exceptions에 설정된 예외가 발생하면 실패로 간주하고 서킷 브레이커의 실패율 통계에 기록된다. (그 외의 예외는 기록되지 않음)
동작 테스트
적용한 서킷 브레이커가 잘 동작하는지 테스트 코드로 확인해보자.
@SpringBootTest(properties = {
	// 테스트 실행 속도를 위해 서킷 대기 시간을 짧게 조정
	"resilience4j.circuitbreaker.instances.db-circuit.wait-duration-in-open-state=2s"
})
@ActiveProfiles("test")
public class NotificationCircuitBreakTest {

	@Autowired
	private NotificationService notificationService;

	@Autowired
	private CircuitBreakerRegistry circuitBreakerRegistry;

	@MockitoBean
	private NotificationMongoRepository mongoRepository;

	private CircuitBreaker dbCircuitBreaker;

	@BeforeEach
	void setUp() {
		// 테스트 시작 전에 서킷 브레이커를 초기화 (CLOSED 상태로 강제)
		dbCircuitBreaker = circuitBreakerRegistry.circuitBreaker("db-circuit");
		dbCircuitBreaker.reset();
	}

	@AfterEach
	void tearDown() {
		mongoRepository.deleteAll();
	}

	@Test
	@DisplayName("1. 정상 상황: DB가 안정적일 때 서킷은 CLOSED 상태를 유지한다")
	void whenDbIsStable_thenCircuitRemainsClosed() {
		// Given
		NotificationCreateEvent event = createNotificationCreateEvent();
		NotificationDocument dummyDocument = NotificationDocument.from(event);

		when(mongoRepository.save(any(NotificationDocument.class))).thenReturn(dummyDocument);

		// When & Then
		for (int i = 0; i < 10; i++) {
			assertDoesNotThrow(() -> notificationService.createNewNotification(createNotificationCreateEvent()));
		}
		assertThat(dbCircuitBreaker.getState()).isEqualTo(CircuitBreaker.State.CLOSED);
		System.out.println("✅ 성공: 정상 상황 테스트 완료");
	}

	@Test
	@DisplayName("2. 장애 발생: DB 장애 반복 시 서킷이 OPEN 상태로 변경된다")
	void whenDbFailureRepeats_thenCircuitOpens() {
		// Given
		String errorMessage = "DB Connection Failed";
		when(mongoRepository.save(any(NotificationDocument.class)))
			.thenThrow(new DataAccessResourceFailureException(errorMessage));

		// When & Then
		for (int i = 0; i < 5; i++) {
			assertThatThrownBy(() -> notificationService.createNewNotification(createNotificationCreateEvent()))
				.isInstanceOf(NotificationException.class)
				.hasCauseInstanceOf(DataAccessResourceFailureException.class);
		}

		assertThat(dbCircuitBreaker.getState()).isEqualTo(CircuitBreaker.State.OPEN);
		System.out.println("✅ 성공: 장애 발생 시 OPEN 전환 테스트 완료");
	}

	@Test
	@DisplayName("3. 자동 복구: 서킷이 열린 후, 시간이 지나면 HALF_OPEN을 거쳐 CLOSED로 복구된다")
	void whenCircuitIsOpen_andAfterWaitDuration_thenTransitionsToHalfOpenAndClosed() throws InterruptedException {
		// Given
		NotificationCreateEvent event = createNotificationCreateEvent();
		NotificationDocument dummyDocument = NotificationDocument.from(event);

		dbCircuitBreaker.transitionToOpenState();
		Thread.sleep(Duration.ofSeconds(2).toMillis());
		when(mongoRepository.save(any(NotificationDocument.class))).thenReturn(dummyDocument);

		// When
		for (int i = 0; i < 5; i++) {
			notificationService.createNewNotification(createNotificationCreateEvent());
		}

		// Then
		assertThat(dbCircuitBreaker.getState()).isEqualTo(CircuitBreaker.State.CLOSED);
		System.out.println("✅ 성공: 자동 복구 테스트 완료");
	}

	@Test
	@DisplayName("4. 복구 실패: HALF_OPEN 상태에서 호출이 실패하면 다시 OPEN 상태로 돌아간다")
	void whenCircuitIsHalfOpen_andCallFails_thenTransitionsBackToOpen() throws InterruptedException {
		// Given
		String errorMessage = "DB Still Down";
		int minimumCalls = 5;

		// 1. 서킷을 OPEN 상태로 만들고, HALF_OPEN이 될 때까지 대기
		dbCircuitBreaker.transitionToOpenState();
		Thread.sleep(Duration.ofSeconds(2).toMillis());

		// 2. HALF_OPEN 상태에서 DB가 여전히 장애 상황임을 흉내
		when(mongoRepository.save(any(NotificationDocument.class)))
			.thenThrow(new DataAccessResourceFailureException(errorMessage));

		// When: 최소 호출 횟수만큼 실패를 유도
		for (int i = 0; i < minimumCalls; i++) {
			assertThatThrownBy(() -> notificationService.createNewNotification(createNotificationCreateEvent()))
				.isInstanceOf(NotificationException.class);
		}

		// Then: 이제 충분한 실패 데이터가 쌓였으므로 서킷은 다시 OPEN 상태로 돌아가야 함
		assertThat(dbCircuitBreaker.getState()).isEqualTo(CircuitBreaker.State.OPEN);
		System.out.println("✅ 성공: 복구 실패 테스트 완료");
	}

	@Test
	@DisplayName("5. 서킷이 OPEN일 때 Fallback 동작 검증")
	void whenCircuitIsOpen_thenFallbackIsExecuted() {
		// Given
		dbCircuitBreaker.transitionToOpenState();

		// When & Then
		assertThatThrownBy(() -> notificationService.createNewNotification(createNotificationCreateEvent()))
			.isInstanceOf(NotificationException.class)
			.hasCauseInstanceOf(CallNotPermittedException.class);

		// DB Repository는 절대 호출되지 않았어야 함
		verify(mongoRepository, never()).save(any(NotificationDocument.class));
		System.out.println("✅ 성공: OPEN 상태에서 Fallback 동작 검증 완료");
	}


	private NotificationCreateEvent createNotificationCreateEvent() {
		return NotificationCreateEvent.of(
			"test@test.com",
			NotificationType.COMMUNITY_DISCUSSION_VOTED_UP,
			null
		);
	}
}
정상적으로 모든 테스트를 통과한다.

상태 기반 재처리
위에서 적용한 서킷 브레이커 패턴은 일시적인 장애를 감지하고 시스템 과부하를 방지한다. 이 때 예외가 발생한 MQ의 메시지는 그대로 유실된다.
때문에 메시지 본문과 처리 상태를 로그로 DB에 저장하고 별도의 스케쥴러에서 재처리를 시도하도록 하려고 한다.
상태 관리 Document
메시지 처리 상태를 저장할 MongoDB Document와 관련 서비스를 구현한다.
- NotificationProcessLog.java
@Document(collection = "notification_process_log")
@Getter
@NoArgsConstructor(access = AccessLevel.PROTECTED)
@AllArgsConstructor
public class NotificationProcessLog {

	@Id
	private String messageId;

	private String payload;

	private ProcessStatus status;

	private int retryCount;

	private String errorMessage;

	private LocalDateTime lastAttemptAt;

	private LocalDateTime createdAt;

	public enum ProcessStatus {
		PENDING, SUCCESS, FAILED, PERMANENTLY_FAILED
	}

	public static NotificationProcessLog of(String messageId, String payload) {

		return new NotificationProcessLog(
			messageId,
			payload,
			ProcessStatus.PENDING,
			0,
			null,
			LocalDateTime.now(),
			LocalDateTime.now()
		);
	}

	public void markAsSuccess() {
		this.status = ProcessStatus.SUCCESS;
		this.lastAttemptAt = LocalDateTime.now();
		this.errorMessage = null;
	}

	public void markAsFailed(String errorMessage, int maxRetries) {
		this.retryCount++;
		this.lastAttemptAt = LocalDateTime.now();
		this.errorMessage = errorMessage;

		if (this.retryCount >= maxRetries) {
			this.status = ProcessStatus.PERMANENTLY_FAILED;
		} else {
			this.status = ProcessStatus.FAILED;
		}
	}

	public void updateLastAttempt() {
		this.lastAttemptAt = LocalDateTime.now();
	}
}- NotificationProcessLogRepository.java
public interface NotificationProcessLogRepository extends MongoRepository<NotificationProcessLog, String> {

	// 재시도할 작업들을 찾는 쿼리 메서드
	List<NotificationProcessLog> findByStatusAndRetryCountLessThan(NotificationProcessLog.ProcessStatus status, int maxRetries);
}- ProcessLogService.java
@Service
@Slf4j
@RequiredArgsConstructor
public class ProcessLogService {

	private final NotificationProcessLogRepository processLogRepository;

	@Value("${application.notification.max-retries:5}")
	private int maxRetries;

	/**
	 * 메시지 처리 시작 및 중복 저장 검사
	 * @param messageId 메시지 고유 ID
	 * @param payload 메시지 본문
	 * @return 처리를 계속해야 하면 true, 중복 메시지이면 false를 반환
	 */
	@Transactional
	public boolean startProcessing(String messageId, String payload) {

		Optional<NotificationProcessLog> existingLogOpt = processLogRepository.findById(messageId);

		if (existingLogOpt.isPresent()) {
			NotificationProcessLog existingLog = existingLogOpt.get();

			// 1. 이미 성공한 경우 -> 중복이므로 처리 중단
			if (existingLog.getStatus() == ProcessStatus.SUCCESS) {
				log.warn("이미 성공적으로 처리된 메시지입니다. messageId={}", messageId);
				return false;
			}

			// 2. 실패했거나, 중간에 멈춘(PENDING) 경우 -> 재처리를 위해 계속 진행
			//    이때는 새 로그를 만드는 대신, 마지막 시도 시간만 업데이트
			log.info("실패했거나 PENDING 상태인 메시지를 재시도합니다. messageId={}", messageId);
			existingLog.updateLastAttempt();
			processLogRepository.save(existingLog);
			return true;
		}

		NotificationProcessLog newLog = NotificationProcessLog.of(messageId, payload);
		processLogRepository.save(newLog);
		return true;
	}

	// 메시지 처리 성공으로 기록
	@Transactional
	public void finishProcessing(String messageId) {

		processLogRepository.findById(messageId).ifPresent(log -> {
			log.markAsSuccess();
			processLogRepository.save(log);
		});
	}

	// 메시지 처리 실패로 기록
	@Transactional
	public void failProcessing(String messageId, String errorMessage) {

		processLogRepository.findById(messageId).ifPresent(log -> {
			log.markAsFailed(errorMessage, maxRetries);
			processLogRepository.save(log);
		});
	}

	// 재시도할 작업 목록 조회
	@Transactional(readOnly = true)
	public List<NotificationProcessLog> findRetryableJobs() {

		return processLogRepository.findByStatusAndRetryCountLessThan(ProcessStatus.FAILED, maxRetries);
	}
}
startProcessing 메서드에서는 메시지 ID로 기존 로그를 조회하여, 이미 SUCCESS 상태라면 false를 반환하여 Consumer가 중복 처리를 하지 않도록 막아준다.
Consumer
@Slf4j
@Service
@RequiredArgsConstructor
public class NotificationQueueConsumer {

	private final NotificationService notificationService;

	private final SimpMessagingTemplate messagingTemplate;

	private final ObjectMapper objectMapper;
	private final ProcessLogService processLogService;

	@JmsListener(destination = NOTIFICATION_QUEUE_CREATE)
	public void handleNotificationCreateEvent(Message<String> message) {

		String messageId = (String) message.getHeaders().get(CUSTOM_HEADER_MESSAGE_ID);
		String payload = message.getPayload();

		if (!processLogService.startProcessing(messageId, payload)) {
			log.warn("이미 처리되었거나 처리 중인 메시지입니다. messageId: {}", messageId);
			return;
		}

		try {
			NotificationCreateEvent event = convertObject(payload, NotificationCreateEvent.class);
			notificationService.createNewNotification(event);

			processLogService.finishProcessing(messageId);
		} catch (Exception e) {
			log.error("메시지 처리 실패. 재시도를 위해 FAILED로 기록합니다. messageId: {}", messageId);
			processLogService.failProcessing(messageId, e.getMessage());
		}
	}

	...

}
ActiveMQ에서 메시지를 받아서 멱등 체크 후 핵심 로직을 호출한다. 이후 예외 발생 여부에 따라 상태 로그를 업데이트한다.
재처리 로직
@Slf4j
@Component
@RequiredArgsConstructor
public class NotificationRetryScheduler {

	private final ProcessLogService processLogService;
	private final JmsTemplate jmsTemplate;

	@Scheduled(fixedRate = 300000)	// 5분마다 실행
	public void retryFailedNotifications() {

		log.info("실패할 알림 재처리를 시작합니다...");
		List<NotificationProcessLog> retryableJobs = processLogService.findRetryableJobs();

		for (NotificationProcessLog job : retryableJobs) {
			log.info("재처리 시도: messageId={}", job.getMessageId());

			jmsTemplate.convertAndSend(NOTIFICATION_QUEUE_CREATE, job.getPayload(), message -> {
				message.setStringProperty(CUSTOM_HEADER_MESSAGE_ID, job.getMessageId());
				return message;
			});
		}
	}
}
실패한 작업을 주기적으로 복구 시도한다.
만약 서비스의 규모가 커진다면 배치(batch)를 적용해봐도 좋을 것 같다.
동작 테스트
@SpringBootTest
@ActiveProfiles("test")
public class NotificationIntegrationTest {

	@Autowired
	private JmsTemplate jmsTemplate;

	@Autowired
	private ObjectMapper objectMapper;

	@Autowired
	private NotificationMongoRepository notificationRepository;

	@Autowired
	private NotificationProcessLogRepository processLogRepository;

	@Autowired
	private NotificationRetryScheduler retryScheduler;

	@MockitoSpyBean
	private NotificationService notificationService;

	@MockitoSpyBean
	private ProcessLogService processLogService;

	@AfterEach
	void tearDown() {
		notificationRepository.deleteAll();
		processLogRepository.deleteAll();
	}

	@Test
	@DisplayName("1. 정상 시나리오: 메시지가 성공적으로 처리되고 상태가 SUCCESS로 기록된다")
	void happyPath_shouldProcessMessageSuccessfully() {
		// Given: 정상 메시지 준비
		String messageId = "ID-" + UUID.randomUUID();
		String payload = createDummyPayload();

		// When: 메시지를 JMS 큐로 전송
		sendMessageToQueue(messageId, payload);

		// Then: 비동기 처리가 완료될 때까지 대기 후 검증
		Awaitility.await().atMost(Duration.ofSeconds(5)).untilAsserted(() -> {
			// 1. 처리 상태 로그가 SUCCESS로 저장되었는지 확인
			Optional<NotificationProcessLog> logOpt = processLogRepository.findById(messageId);
			assertThat(logOpt).isPresent();
			assertThat(logOpt.get().getStatus()).isEqualTo(ProcessStatus.SUCCESS);

			// 2. 실제 알림 데이터가 DB에 저장되었는지 확인
			assertThat(notificationRepository.count()).isEqualTo(1);
		});
	}

	@Test
	@DisplayName("2. 자동 복구 시나리오: 첫 시도 실패 후, 스케줄러에 의해 재처리되어 성공한다")
	void whenTransientErrorOccurs_shouldBeRecoveredByScheduler() {
		// Given: 메시지 준비 및 첫 시도에만 DB 장애가 발생하도록 설정
		String messageId = "ID-" + UUID.randomUUID();
		String payload = createDummyPayload();

		// 첫 번째 processCreationEvent 호출 시에만 예외를 던지고, 그 이후에는 실제 메서드를 호출하도록 설정
		doThrow(new DataAccessResourceFailureException("DB is temporarily down"))
			.doCallRealMethod()
			.when(notificationService).createNewNotification(any(NotificationCreateEvent.class));

		// When: 1. 첫 번째 메시지 전송 (실패 유도)
		sendMessageToQueue(messageId, payload);

		// Then: 1. 상태가 FAILED로 기록될 때까지 대기
		Awaitility.await().atMost(Duration.ofSeconds(5)).untilAsserted(() -> {
			Optional<NotificationProcessLog> logOpt = processLogRepository.findById(messageId);
			assertThat(logOpt).isPresent();
			assertThat(logOpt.get().getStatus()).isEqualTo(ProcessStatus.FAILED);
			// 아직 성공 전이므로 알림 데이터는 없어야 함
			assertThat(notificationRepository.count()).isZero();
		});

		// When: 2. 재처리 스케줄러 수동 실행
		System.out.println("--- 재처리 스케줄러 실행 ---");
		retryScheduler.retryFailedNotifications();

		// Then: 2. 재처리가 성공하여 상태가 SUCCESS로 변경될 때까지 대기
		Awaitility.await().atMost(Duration.ofSeconds(5)).untilAsserted(() -> {
			Optional<NotificationProcessLog> logOpt = processLogRepository.findById(messageId);
			assertThat(logOpt).isPresent();
			assertThat(logOpt.get().getStatus()).isEqualTo(ProcessStatus.SUCCESS);
			// 최종적으로 알림 데이터가 저장되었는지 확인
			assertThat(notificationRepository.count()).isEqualTo(1);
		});
	}

	@Test
	@DisplayName("3. 멱등성 시나리오: 성공한 메시지를 다시 보내도 중복 처리되지 않는다")
	void whenSameMessageIsSent_shouldNotBeProcessedAgain() {
		// Given: 메시지를 한 번 성공적으로 처리
		String messageId = "ID-" + UUID.randomUUID();
		String payload = createDummyPayload();
		sendMessageToQueue(messageId, payload);
		Awaitility.await().atMost(Duration.ofSeconds(5)).untilAsserted(() ->
			assertThat(processLogRepository.findById(messageId).get().getStatus()).isEqualTo(ProcessStatus.SUCCESS)
		);
		// UseCase가 1번 호출되었는지 확인
		verify(notificationService, times(1)).createNewNotification(any(NotificationCreateEvent.class));

		// When: 동일한 메시지를 다시 전송
		System.out.println("--- 동일 메시지 재전송 ---");
		sendMessageToQueue(messageId, payload);

		// 잠시 대기 (소비자가 메시지를 처리할 시간)
		try { Thread.sleep(2000); } catch (InterruptedException e) {}

		// Then: UseCase가 추가로 호출되지 않았어야 함 (총 호출 횟수가 여전히 1이어야 함)
		verify(notificationService, times(1)).createNewNotification(any(NotificationCreateEvent.class));
		// 최종 데이터도 1개여야 함
		assertThat(notificationRepository.count()).isEqualTo(1);
	}

	private void sendMessageToQueue(String messageId, String payload) {
		jmsTemplate.convertAndSend(NOTIFICATION_QUEUE_CREATE, payload, message -> {
			message.setStringProperty(CUSTOM_HEADER_MESSAGE_ID, messageId);
			return message;
		});
	}


	private String createDummyPayload() {
		try {
			return objectMapper.writeValueAsString(
					NotificationCreateEvent.of(
					"test@test.com",
					NotificationType.COMMUNITY_DISCUSSION_VOTED_UP,
					null
				)
			);
		} catch (JsonProcessingException e) {
			throw new RuntimeException(e);
		}
	}
}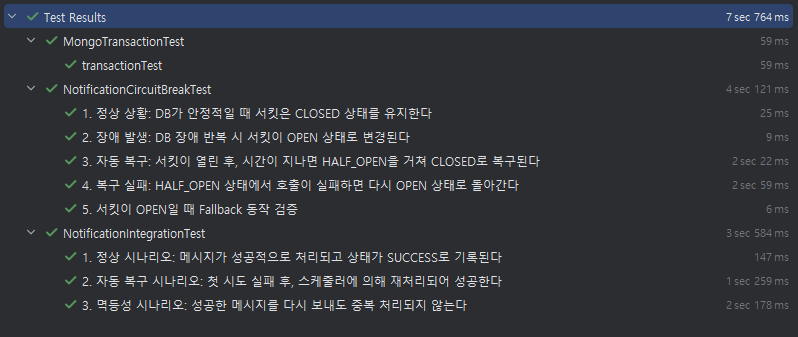
MongoDB 트랜잭션, 서킷 브레이커, 상태 기반 재처리 테스트들이 모두 통과하는 모습이다.
DLQ
상태 관리 테이블에는 반복된 재시도에도 불구하고 끝까지 실패한 작업이 무엇인지 영구적으로 기록된다. 이는 개발자가 원인을 분석하고 수동으로 조치할 근거가 될 수 있다.
메시지 형식 오류나 MongoDB 완전 중단 등, 상태 기록조차 불가능한 예상치 못한 심각한 문제가 발생했을 때 메시지는 ActiveMQ의 DLQ에 적재된다. ActiveMQ는 디스크 기반의 메시지큐이므로 안전하게 보관된다.
여기에 주기적으로 DLQ를 검사하는 스케쥴러 등을 통해 개발자에게 알림이 가도록 할 수도 있을 것 같다. 이 부분은 다음 프로젝트에서 기회가 된다면 적용해보려고 한다.
마치며
이로써 최종 프로젝트에서 받았던 피드백의 대부분을 반영하게 되었다.
사실 이 외의 내용도 더 있기는 하지만 이 프로젝트에는 적용하기 여러모로 애매한 것 같아서 다음 프로젝트에서 시도해보려고 한다.
어쨌든 ezcode 프로젝트의 마지막 블로그 글이 될 것 같다.
끝!
참고