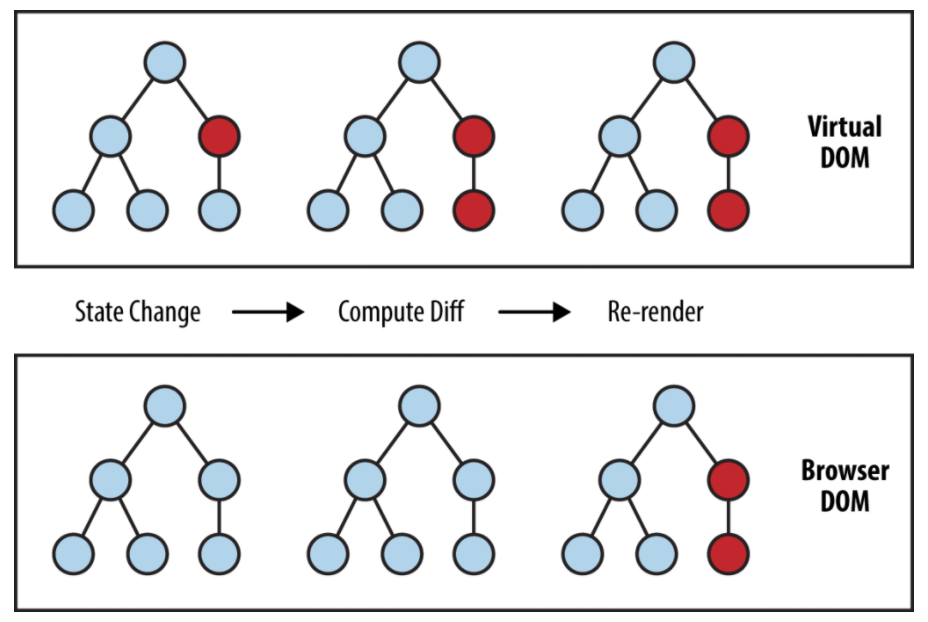
1. React와 Virtual DOM
리액트를 비롯한 일부 주요 프론트엔드 프레임워크는 가상 돔(Virtual DOM) 개념을 도입해 실제 돔(Real DOM)을 보다 효율적으로 업데이트했다. 이러한 방식은 불필요한 DOM 조작을 줄이고, 사용자 인터페이스를 더 빠르게 반응하게 만들었다.
그리고 JSX 문법을 통해 컴포넌트 기반의 UI를 직관적으로 구성할 수 있게 되었다.
지금까지는 리액트를 사용하면서 자연스럽게 다음과 같은 방식으로 작업을 해왔다:
- JSX 문법으로 컴포넌트를 만들고, 이를 상위 뷰에서 렌더링
- 각 요소에 onClick과 같은 이벤트 핸들러를 선언하고, 함수를 연결
- useState, useEffect 등의 훅(Hook)을 활용해 손쉽게 상태를 관리
하지만 이러한 추상화 뒤에서는 어떤 동작 원리가 숨어 있었는지 깊이 생각해본 적은 없었다.
이 글에서는 Vanilla JavaScript만을 사용해 가상 DOM과 diffing 알고리즘을 직접 구현하며, 리액트가 어떻게 효율적으로 DOM을 업데이트하는지 알아본다.
1-1. Virtual DOM, 그리고 JSX 란
Virtual DOM을 요약한다면 아래와 같이 표현할 수 있을 것이다.
VirtualDOM
= 객체 (메모리 상에 존재하는 가벼운 리얼돔의 복사본) =UI 를 표현한 객체
= 객체로 표현된 UI의 구조 = UI를 표현한 자료구조
= DOM 처럼 생긴 객체
Vanilla JS를 공부하면서 좋아요, 포스팅 기능이 있는 간단한 SPA를 만든 적이 있었다.
당시에는 간단한 형태였지만 이 패턴으로 복잡한 구조의 SPA를 개발한다면 실제 DOM을 조작하고 여러가지 이벤트를 관리하는 것이 매우 복잡하고 어려워 질 것이라 직감했다.
예를 들어, 당시에 구현했던 코드는 아래와 같다.
export const Router = {
  render: () => {
    document.body.innerHTML = '<div id="root"></div>';
    const root = document.getElementById("root");
    ,,,(생략),,,

    root.addEventListener("click", (e) => {
      if (e.target.matches("a")) {
        e.preventDefault();
        ,,,(생략: 클릭에 대한 로직),,,
        Router.render();
      }
    });
  },
  navigate: (path) => {
    ,,,(생략),,,
  },
};
a 태그를 클릭하면 페이지를 변경하는 이벤트 위임 방식의 로직인데, 이와 같이 실제 DOM에 변경이 생기게 되면 Router.render()를 통해 전체 페이지를 다시 렌더하게 된다.
그렇다면 "DOM에 변화가 있을 때 변화가 있는 부분만 변경되게 하고, 각 컴포넌트에서 사용하는 이벤트를 코드에서 쉽게 관리할 수 있는 방법이 있을까" 라는 고민을 해결한 개념이 Virtual DOM이다.
이러한 html이 있다고 해보자.
<div id="app">
  <ul>
    <li>
      <input type="checkbox" class="toggle" />
      todo list item 1
      <button class="remove">삭제</button>
    </li>
    <li class="completed">
      <input type="checkbox" class="toggle" checked />
      todo list item 2
      <button class="remove">삭제</button>
    </li>
  </ul>
  <form>
    <input type="text" />
    <button type="submit">추가</button>
  </form>
</div>
그리고 이를 우리에게 익숙한 jsx로 표현하면, 이렇게 바뀔 수 있다.
/** @jsx h */
function createvNode(type, props, ...children) { /* 중간 생략 */ }

const result = (
  <div id="app">
    <ul>
      <li>
        <input type="checkbox" class="toggle" />
        todo list item 1
        <button class="remove">삭제</button>
      </li>
      <li class="completed">
        <input type="checkbox" class="toggle" checked />
        todo list item 2
        <button class="remove">삭제</button>
      </li>
    </ul>
    <form>
      <input type="text" />
      <button type="submit">추가</button>
    </form>
  </div>
);
jsx는 브라우저가 이해할 수 있는 코드가 아니다.
코드 상단에 보이는function createVNode(type, props, ...children)함수를 통해 babel이 jsx 코드를 객체 형태로 변환한다.
그러니까 사실 위 jsx코드는 브라우저에서는 아래와 같이 해석되는 것이다.
const result = (
    createvNode('div', { id: 'app' },
      createvNode('ul', null,
        createvNode('li', null,
          createvNode('input', { type: 'checkbox', className: 'toggle' }),
          'todo list item 1',
          createvNode('button', { className: 'remove' }, '삭제')
        ),
        createvNode('li', { className: 'completed' },
          createvNode('input', { type: 'checkbox', className: 'toggle', checked: true }),
          'todo list item 2',
          createVNode('button', { className: 'remove' }, '삭제')
        ),
      ),
      createVNode('form',
        createVNode('input', { type: 'text' }),
        createVNode('button', { type: 'submit' }, '추가'),
      )
    )
);
이를 createVNode 함수를 통해 객체 형태로 표현하면 아래와 같다.
{
  "type": "div",
  "props": { "id": "app" },
  "children": [
    {
      "type": "ul",
      "props": null,
      "children": [
        {
          "type": "li",
          "props": null,
          "children": [
            {
              "type": "input",
              "props": { "type": "checkbox", "className": "toggle" },
              "children": []
            },
            "todo list item 1",
            {
              "type": "button",
              "props": { "className": "remove" },
              "children": [ "삭제" ]
            }
          ]
        },
        {
          "type": "li",
          "props": { "className": "completed" },
          "children": [
            {
              "type": "input",
              "props": { "type": "checkbox", "className": "toggle", "checked": true },
              "children": []
            },
            "todo list item 2",
            {
              "type": "button",
              "props": { "className": "remove" },
              "children": [ "삭제" ]
            }
          ]
        }
      ]
    },
    {
      "type": "form",
      "props": {
        "type": "input",
        "props": { "type": "text" },
        "children": []
      },
      "children": [
        {
          "type": "button",
          "props": { "type": "submit" },
          "children": [ "추가" ]
        }
      ]
    }
  ]
}
즉 Virtual DOM은 실제 DOM의 형태를 본따 만든 객체 덩어리라고 할 수 있다.
하지만 Virtual DOM은 객체일 뿐이기 때문에 이것을 사용하는 것 만으로는 브라우저의 성능을 높여주지 않는다.
만약에 뷰에 변화가 있다면, 그 변화는 Real DOM 에 적용되기전에 Virtual DOM 에 먼저 적용시키고 변화가 있는 Node를 파악하여 전체 DOM을 다시 Render하는 대신 해당 Node만 변화 시켜서 브라우저의 연산 성능을 높여야 한다.
이는 diffing 알고리즘 통해 아래와 같은 형태로 구현될 수 있다.
function updateElement(parent, newNode, oldNode) {
  /* 중간 생략 */
}
const oldNode = render(oldState);
const newNode = render(newState);

const $root = document.createElement('div');

document.body.appendChild($root);
updateElement($root, oldNode);
setTimeout(() =>
  updateElement($root, newNode, oldNode),
  1000
);
정리하자면 아래 그림과 같이 표현할 수 있다.
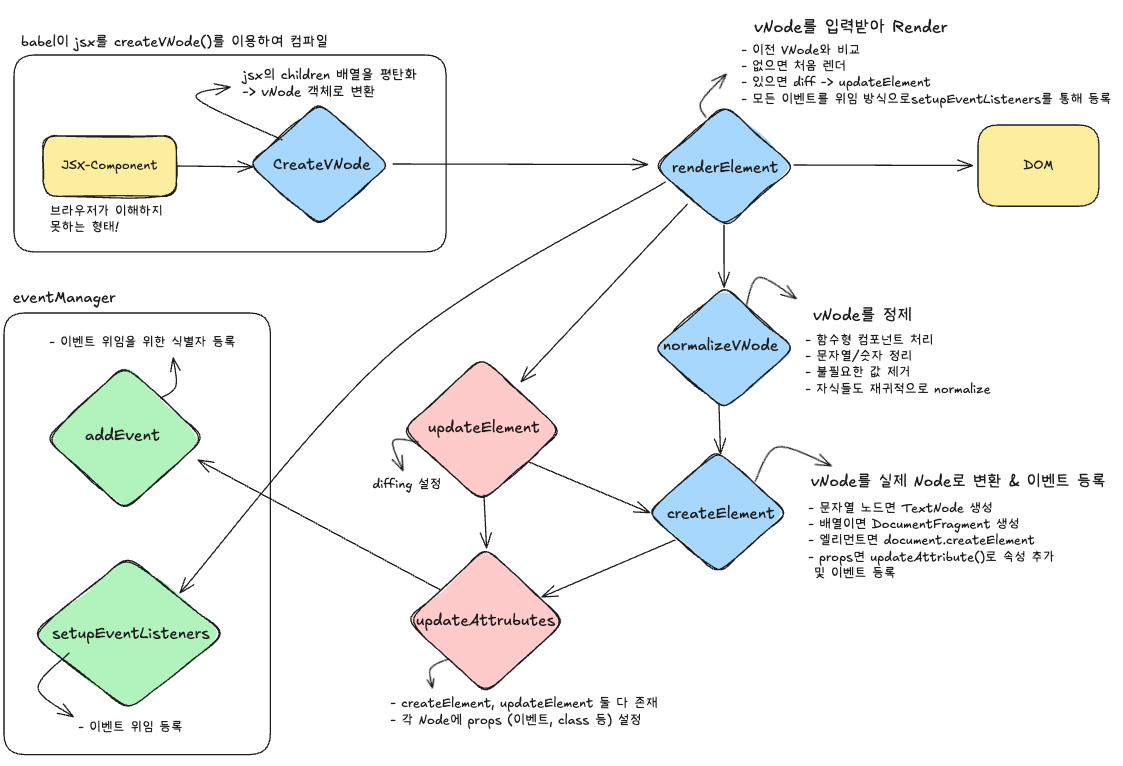
즉, 우리가 프레임워크를 통해 자연스럽게 사용하던 Virtual DOM은 이와 같은 흐름으로 실제 DOM으로 변환되어 브라우저에 나타나는 것이다.
2. Virtual DOM & Diffing 구현 (w. Vanilla JS)
지금부터는 Vanilla JS로 작성되어 있던 간단한 SPA를 Virtual DOM과 Diffing을 활용해서 React의 렌더링 시스템을 따라가보려 한다. 나아가 React의 상태 관리 시스템 또한 흉내내보자.
2-1. JSX → Virtual DOM 객체: createVNode
export function createVNode(type, props, ...children) {
  return {
    type,
    props,
    children: children.flat().filter(Boolean),
  };
}
JSX로 쓴 UI 코드를 실제 객체 형태로 바꿔주는 역할.
리액트에서 말하는 Virtual DOM의 가장 첫 단추이다.
2-2. 컴포넌트 처리 및 정리: normalizeVNode
export function normalizeVNode(vNode) {
  if (vNode == null || typeof vNode === "boolean") return "";
  if (typeof vNode === "string") return vNode;
  if (typeof vNode === "number") return vNode.toString();
  if (typeof vNode.type === "function") {
    const component = vNode.type({
      ...vNode.props,
      children: vNode.children,
    });
    return normalizeVNode(component);
  }
  return {
    type: vNode.type,
    props: vNode.props,
    children: Array.isArray(vNode.children)
      ? vNode.children.map(normalizeVNode).filter((node) => node != "")
      : vNode.children,
  };
}
normalizeVNode는 JSX를 통해서 만들어진VNode를 실제 렌더링에 적합한 형태로 정규화 한다.
- 다양한 형태로 들어올 수 있는 노드를 일관된 구조로 정리해서 후속 처리(
createElement)에 전달할 수 있도록 만든다. type이 함수일 경우, 이 경우 컴포넌트를 실행해서 나온 결과를 다시normalizeVNode에 넣어 정규화 해야 한다.children안에 또 다시 배열의 형태로vNode가 정의 되어 있는 경우 마찬가지로normalizeVNode를 재귀적으로 호출해 정규화 한다.
2-3. Virtual DOM → 실제 DOM: createElement
import { addEvent } from "./eventManager";

export function createElement(vNode) {
  if (vNode == null || typeof vNode === "boolean") {
    return document.createTextNode("");
  }
  if (typeof vNode === "string" || typeof vNode === "number") {
    return document.createTextNode(vNode);
  }
  if (Array.isArray(vNode)) {
    const docFrag = document.createDocumentFragment();
    docFrag.append(...vNode.map(createElement));
    return docFrag;
  }
  const el = document.createElement(vNode.type);
  vNode.children.map(createElement).forEach((child) => el.appendChild(child));
  updateAttributes(el, vNode.props);
  return el;
}

function updateAttributes($el, props) {
  if (!props || typeof props !== "object") return; // undefined, null, boolean 값에 대한 방어

  Object.entries(props).forEach(([attr, val]) => {
    if (val == null || val === false) return; // null, undefined, false 건너뜀
    if (attr.startsWith("on") && typeof val === "function") {
      // 이벤트 속성 처리 onClick > click > 위임 방식으로 처리
      const eventType = attr.slice(2).toLowerCase();
      addEvent($el, eventType, val);
    } else if (attr === "className") {
      $el.setAttribute("class", val); // JSX > HTML 속성 변환
    } else {
      $el.setAttribute(attr, val);
    }
  });
}
createElement는 가상 DOM을 실제 DOM으로 바꾼다.
null,false등 렌더링이 필요 없는 노드는 빈 텍스트로 대체한다.- 문자열/숫자는 그대로 텍스트 노드로 변환한다.
- 자식 노드의 배열일 경우,
DocumentFragment로 묶어서 반환한다. - 일단 node 요소의 경우, vNode type에 따라
div,li,input등의 요소를 생성하고 자식들을 순회하며 재귀적으로createElement를 호출한다. - 그리고 모든 속성에 대해
updateAttribute()로 처리한다.
updateAttribute는 node의 props를 DOM에 반영한다.
- 이벤트 속성 (
onClick,onInput등)은addEvent()를 호출해 이벤트 위임 방식으로 등록한다. className의 경우class로 변환해서 HTML 속성으로 등록한다.- 일반 속성 (
id,type등)의 경우 그대로setAttribute를 진행한다.
2-4. 변환된 DOM을 렌더링: renderElement
import { setupEventListeners } from "./eventManager";
import { createElement } from "./createElement";
import { normalizeVNode } from "./normalizeVNode";
import { updateElement } from "./updateElement";

const vNodeHistory = new WeakMap();

export function renderElement(vNode, container) {
  const prevVNode = vNodeHistory.get(container);
  const nextVNode = normalizeVNode(vNode);

  if (!prevVNode) {
    const element = createElement(nextVNode);
    container.appendChild(element);
  } else {
    updateElement(container, nextVNode, prevVNode);
  }

  vNodeHistory.set(container, nextVNode);
  setupEventListeners(container);
}
앞서 작성한 코드를 활용해 renderElemet로 가상 DOM을 받아서 실제 화면에 렌더링한다.
WeakMap을 이용해 이 컨테이너에 마지막으로 렌더링된vNode를 가져온다. (과거 노드)createVNode를 통해 변환된 jsx 노드를normalizeVNode를 통해 다시한번 정제한다. (현재 렌더링할 노드)- 최초 렌더링인지 판단하고 최초라면
createElement으로 변환하여append한다. - 재렌더링 대상이라면 diff 알고리즘을 수행한다. →
updateElement(container, nextVNode, prevVNode) - 다음 렌더링을 위해
vNodeHistory에 상태를 저장한다. setupEventListeners(container)를 통해 이벤트를 등록한다. → 루트 요소에 한번만 등록하여 위임
Weak Map을 쓰는 이유
container DOM 요소를 키로 저장하여 GC (가비지 컬렉션) 대상이 되면 자동으로 정리된다.
이를 통해 메모리 누수를 막을 수 있다.
2-5. 변경된 부분만 반영: updateElement
import { addEvent, removeEvent } from "./eventManager";
import { createElement } from "./createElement.js";

function updateAttributes(targetEl, newProps = {}, oldProps = {}) {
  // 삭제된 속성 제거
  for (const key in oldProps) {
    if (key.startsWith("on")) {
      const eventType = key.slice(2).toLowerCase();
      removeEvent(targetEl, eventType, oldProps[key]);
    } else if (!(key in newProps)) {
      targetEl.removeAttribute(key);
    }
  }
  // 새로 추가되거나 변경된 속성 적용
  for (const key in newProps) {
    const value = newProps[key];
    if (key === "className") {
      targetEl.setAttribute("class", value);
    } else if (key.startsWith("on")) {
      const eventType = key.slice(2).toLowerCase();
      addEvent(targetEl, eventType, value);
    } else {
      targetEl.setAttribute(key, value);
    }
  }
}

export function updateElement(parentEl, newVNode, oldVNode, index = 0) {
  const currentEl = parentEl.childNodes[index];
  // 새 노드만 있는 경우
  if (newVNode && !oldVNode) {
    const newEl = createElement(newVNode);
    parentEl.appendChild(newEl);
    return;
  }
  // 기존 노드만 있는 경우
  if (!newVNode && oldVNode) {
    parentEl.removeChild(currentEl);
    return;
  }
  // 텍스트 노드 변경
  if (typeof newVNode === "string" && typeof oldVNode === "string") {
    if (newVNode !== oldVNode) {
      const textEl = createElement(newVNode);
      parentEl.replaceChild(textEl, currentEl);
    }
    return;
  }
  // 노드 타입이 다르면 교체
  if (newVNode.type !== oldVNode.type) {
    const replacedEl = createElement(newVNode);
    parentEl.replaceChild(replacedEl, currentEl);
    return;
  }
  // 동일 타입이면 속성만 갱신
  updateAttributes(currentEl, newVNode.props, oldVNode.props);
  // 자식 노드 재귀적으로 diff
  const newChildren = newVNode.children || [];
  const oldChildren = oldVNode.children || [];
  const maxLen = Math.max(newChildren.length, oldChildren.length);
  for (let i = 0; i < maxLen; i++) {
    updateElement(currentEl, newChildren[i], oldChildren[i], i);
  }
}
updateElement는 이전의 가상 DOM과 새로운 가상 DOM을 비교 (diff)해서 바뀐 부분만 선택적으로 업데이트한다.
- 이전 노드가 없고 새로운 노드만 있는 경우 새 DOM요소를 생성해서 추가
- 새로운 노드가 없고 이전 노드만 있는 경우 DOM요소 제거
- 텍스트 노드가 변경된 경우, 교체
- 태그명이 다른 경우, 전체 교체
- 태그는 같고 속성만 변경된 경우,
updateAttribute()호출 →addEvent로 이벤트 등록 - 자식 노드가 변경된 경우, 재귀적으로 diff 실행
2-6. 이벤트 위임 처리: eventManager.js
const eventTypes = [];
const elementMap = new Map();

const handleEvent = (e) => {
  const targetMap = elementMap.get(e.target);
  const handler = targetMap?.get(e.type);
  if (handler) {
    handler.call(e.target, e);
  }
};

export function setupEventListeners(root) {
  eventTypes.forEach((eventType) => {
    root.addEventListener(eventType, handleEvent);
  });
}

export function addEvent(element, eventType, handler) {
  if (!eventTypes.includes(eventType)) {
    eventTypes.push(eventType);
  }
  const targetMap = elementMap.get(element) || new Map();
  if (targetMap.get(eventType) === handler) return;
  targetMap.set(eventType, handler);
  elementMap.set(element, targetMap);
}

export function removeEvent(element, eventType, handler) {
  const targetMap = elementMap.get(element);
  if (!targetMap) return;
  if (targetMap.get(eventType) === handler) {
    targetMap.delete(eventType);
  }
  if (targetMap.size === 0) {
    elementMap.delete(element);
  }
}
eventManager는 이벤트 위임 방식으로 효율적으로 이벤트를 처리한다.
핵심은 하나의 root 요소에만 이벤트 리스너를 등록하고 실제 이벤트 처리는 개별 DOM 요소에 따라 다르게 분기하는 방식.
eventTypes: 어떤 이벤트 타입이 등록되어 있는지 추적하는 배열 (click, focus, ...)eventMap: 특정 DOM 요소에 어떤 이벤트 핸들러가 등록되어 있는지 저장하는 MapaddEvent()를 통해 새로운 이벤트 타입의 경우eventTypes에 추가하고 해당 DOM 요소에 이벤트 타입과 핸들러를 매핑한다.
Map {
  <button> => Map { "click" => handleClick }
}
이런 식으로 저장된다.
removeEvent()를 통해 특정 핸들러를 제거한다. 해당 element에 더 이상 이벤트가 없다면elementMap에서 삭제한다. (메모리 누수 방지)setupEventListeners(root)를 통해 실제 브라우저 DOM에eventTypes에 있는 항목이 저장된다.handleEvent(e)를 통해 이벤트가 발생한 타겟을 기준으로 handler를 가져오고 등록된 handler가 있으면 실행한다.- React의 SyntheticEvent 시스템과 구조적으로 유사한 방식
2-7. 상태 관리: createStore
import { createObserver } from "./createObserver.js";

export const createStore = (initialState, initialActions) => {
  const { subscribe, notify } = createObserver();

  let state = { ...initialState };

  const setState = (newState) => {
    state = { ...state, ...newState };
    notify();
  };

  const getState = () => ({ ...state });

  const actions = Object.fromEntries(
    Object.entries(initialActions).map(([key, value]) => [
      key,
      (...args) => setState(value(getState(), ...args)),
    ]),
  );

  return { getState, setState, subscribe, actions };
};
  return store;
}
createStore는 상태를 중앙에서 관리하면서, 상태가 바뀌면 subscribe된 렌더 함수를 다시 호출한다.
리액트의useState+useEffect구조와 유사하다.
2-8. 기능 구현: 클릭 이벤트
이제 위에서 구성한 VirtualDOM 렌더링 시스템을 활용해서 함수형 컴포넌트를 생성해보자.
리액트를 사용할 때 처럼 JSX 문법을 활용해 화면을 렌더링하고 컴포넌트에 이벤트를 추가해서 정상 동작하는지 확인해본다.
구현해볼 기능은:
- 포스팅 추가
- 좋아요 토글
인데, globalStore에서 모든 이벤트를 처리하도록 설정했다.
예를 들어 좋아요 토글 기능의 경우, 컴포넌트는 아래와 같다.
import { globalStore } from "../../stores";

export const Post = ({
  id,
  author,
  time,
  content,
  likeUsers,
  activationLike = false,
}) => {
  const { currentUser, loggedIn } = globalStore.getState();
  const { togglePostLike } = globalStore.actions;
  const handleClick = () => {
    if (loggedIn) {
      togglePostLike(currentUser.username, id);
    } else {
      alert("로그인 후 이용해주세요");
    }
  };
  return (
    <div className="bg-white rounded-lg shadow p-4 mb-4">
      <div className="flex items-center mb-2">
        <div>
          <div className="font-bold">{author}</div>
          <div className="text-gray-500 text-sm">{toTimeFormat(time)}</div>
        </div>
      </div>
      <p>{content}</p>
      <div className="mt-2 flex justify-between text-gray-500">
        <span
          className={`like-button cursor-pointer${activationLike ? " text-blue-500" : ""}`}
          onClick={handleClick}
        >
          좋아요 {likeUsers.length}
        </span>
        <span>댓글</span>
        <span>공유</span>
      </div>
    </div>
  );
그리고 globalStore는 아래와 같다.
import { createStore } from "../lib";
import { userStorage } from "../storages";
const 초 = 1000;
const 분 = 초 * 60;
const 시간 = 분 * 60;
export const globalStore = createStore(
  {
    currentUser: userStorage.get(),
    loggedIn: Boolean(userStorage.get()),
    posts: [
      ...내용 생략...
    ],
    error: null,
  },
  {
    logout(state) {
      userStorage.reset();
      return { ...state, currentUser: null, loggedIn: false };
    },
    addPost(state, content) {
     ...기능 생략...
    },
    togglePostLike(state, username, postId) {
      const newPosts = state.posts.map((post) => {
        if (post.id === postId) {
          const likeUsers = post.likeUsers;
          const newLikeUsers = likeUsers.includes(username)
            ? likeUsers.filter((name) => name !== username)
            : likeUsers.concat(username);
          return {
            ...post,
            likeUsers: newLikeUsers,
          };
        } else {
          return post;
        }
      });
      return { ...state, posts: newPosts };
    },
  },
);createStore를 호출하여
- 전역 상태를 저장하고 (
state) actions를 통해 상태를 변경하고- 상태가 변경되면
notify()를 통해 자동으로 구독자 (render 함수 등)을 호출한다.
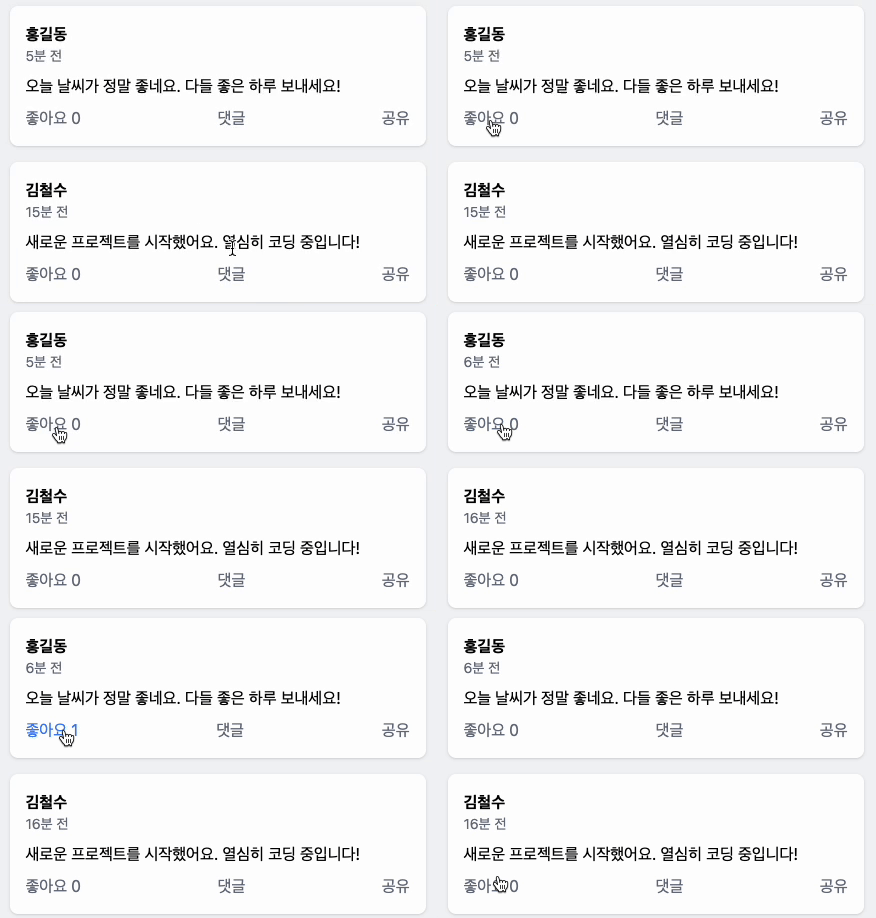
렌더링 및 이벤트 적용이 성공적으로 동작하는 것을 확인할 수 있었다.
3. 마무리
프레임워크 없이 Vanilla JS만으로 렌더링을 직접 다뤄보면서, 평소에는 느끼지 못했던 다양한 문제들을 체험했었다.
특히 DOM을 직접 조작하는 과정에서 다음과 같은 어려움이 반복적으로 발생했었다:
- 불필요한 렌더링이 과도하게 일어났고
- 이벤트가 예상대로 동작하지 않거나
- 동적으로 생성된 요소에 이벤트가 제대로 연결되지 않는 문제가 발생했었다
이런 문제들을 어떻게 하면 더 안정적이고 예측 가능하게 다룰 수 있을까 고민하다 보니,
이미 React와 Vue 같은 프레임워크들이 이런 부분을 미리 체계적으로 해결해두었다는 점을 다시금 실감할 수 있었다.
그리고 그 핵심에는 바로 Virtual DOM이라는 개념이 있었다.
이번 학습을 통해 아래와 같은 질문들에 대해 스스로 답을 찾아볼 수 있었다:
- React는 왜 이런 구조를 갖게 되었는지
- 렌더링 최적화는 실제로 어떤 방식으로 이루어지는지
- 상태 변화가 화면에 반영되기까지 어떤 과정을 거치는지
JSX는 단순히 보기 좋게 만든 문법이 아니라, 결국 가상 DOM 구조로 진입하는 관문이었고, 그 아래에는 잘 설계된 렌더링 시스템이 자리하고 있었다.