블록체인 개발이 처음이거나 NeoX 블록체인에서 스마트 컨트랙트를 배포하고 상호작용하는 방법을 이해하고 싶다면, 이 가이드를 따라 해보세요. 여기서는 가상 지갑(Metamask), Solidity, Hardhat을 사용하여 NeoX 테스트 네트워크에 간단한 스마트 컨트랙트를 생성하고 배포하는 과정을 단계별로 설명합니다.
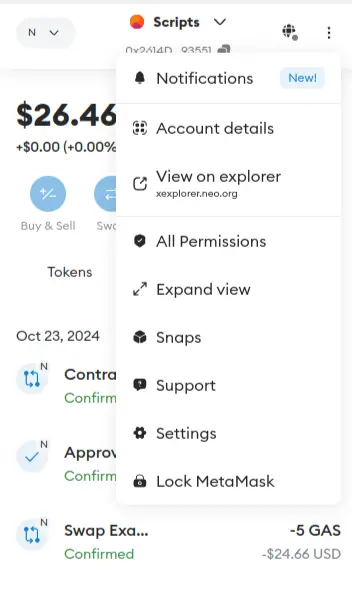
1단계: Metamask에서 NeoX 개인 키 가져오기
먼저 NeoX 테스트넷 체인과 상호작용하려면 개인 키가 필요합니다. Metamask를 사용 중이라면 매우 간단합니다.
- Metamask 지갑에서 Account details(계정 세부정보) 로 이동합니다.
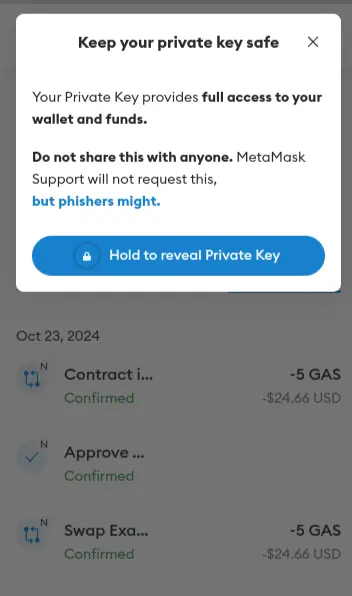
- 비밀번호를 입력한 후 Hold to reveal Private Key(개인 키 표시하려면 누르고 있기) 를 클릭합니다.
2단계: 테스트넷 토큰 얻기(파우셋 사용)
NeoX 테스트넷 토큰을 얻는 방법은 두 가지가 있습니다.
- NeoX 파우셋 웹사이트에서 클레임
- NeoX Discord 서버의 #dev-resources 채널에서 파우셋 봇과 상호작용
토큰을 받은 후에는 NeoX 테스트넷 익스플로러에 접속하여 잔액을 확인할 수 있습니다.
3단계: 프로젝트 초기화
커맨드 라인에서 다음 명령을 입력하여 프로젝트용 폴더를 생성하고 이동합니다.
mkdir hello-world
cd hello-world
폴더 안에서 npm init을 실행하여 프로젝트를 초기화합니다. 아직 npm이 설치되어 있지 않다면 Node.js와 npm 설치 안내를 참고하세요.
npm init 명령을 실행하고 다음과 같은 정보를 입력합니다:
package name: (hello-world)
version: (1.0.0)
description: My Neox Hello World contract
entry point: (index.js)
test command:
git repository:
keywords:
author: NeoDashboard
license: (ISC)
yes 를 입력하면 아래와 같이 package.json 파일이 생성됩니다.
{
  "name": "hello-world",
  "version": "1.0.0",
  "description": "My Neox Hello World contract",
  "main": "index.js",
  "scripts": {
    "test": "echo \"Error: no test specified\" && exit 1"
  },
  "author": "NeoDashboard",
  "license": "ISC"
}
4단계: Hardhat 설치
Hardhat을 사용하여 Neox 스마트 컨트랙트를 컴파일, 배포, 테스트, 디버깅합니다. 다음 명령으로 개발 의존성에 Hardhat을 설치하세요.
npm install --save-dev hardhat설치가 완료되면 npx hardhat 명령을 실행하고 create an empty hardhat.config.js 옵션을 선택합니다. 그러면 프로젝트 루트에 hardhat.config.js 파일이 생성됩니다.
5단계: 컨트랙트 작성
프로젝트 폴더에 contracts 폴더를 생성하고, 그 안에 HelloWorld.sol 파일을 생성합니다. 다음 코드를 추가하세요:
// SPDX-License-Identifier: MIT
// 시맨틱 버전 관리를 사용하여 Solidity 버전을 지정합니다.
// 자세한 내용: https://solidity.readthedocs.io/en/v0.5.10/layout-of-source-files.html#pragma
pragma solidity >=0.7.3;
// `HelloWorld`라는 이름의 컨트랙트를 정의합니다.
// 컨트랙트는 함수와 데이터(상태)의 모음입니다. 배포되면 이 컨트랙트는 Ethereum 블록체인 상의 특정 주소에 존재합니다.
contract HelloWorld {
   // update 함수가 호출될 때 발생합니다.
   // 스마트 컨트랙트 이벤트는 블록체인에서 무언가가 발생했음을 앱 프론트엔드에 알리고,
   // 해당 이벤트를 '리스닝'하여 특정 작업을 수행할 수 있게 합니다.
   event UpdatedMessages(string oldStr, string newStr);
   // `message`라는 상태 변수를 `string` 타입으로 선언합니다.
   // 상태 변수는 컨트랙트의 저장소에 영구적으로 저장되는 변수입니다.
   // `public` 키워드는 변수를 외부에서 접근 가능하게 하고, 해당 값을 가져오는 함수를 자동으로 생성합니다.
   string public message;
   // 많은 클래스 기반 객체지향 언어와 유사하게, 생성자(constructor)는
   // 컨트랙트 생성 시에만 실행되는 특별한 함수입니다.
   // 생성자는 컨트랙트의 데이터를 초기화하는 데 사용됩니다.
   // 자세한 내용: https://solidity.readthedocs.io/en/v0.5.10/contracts.html#constructors
   constructor(string memory initMessage) {
      // 문자열 인자 `initMessage`를 받아 컨트랙트의 `message` 저장소 변수에 할당합니다.
      message = initMessage;
   }
   // 문자열 인자 `newMessage`를 받아 `message` 저장소 변수를 업데이트하는 공개 함수입니다.
   function update(string memory newMessage) public {
      string memory oldMsg = message;
      message = newMessage;
      emit UpdatedMessages(oldMsg, newMessage);
   }
}
이 컨트랙트는 생성 시 메시지를 저장하고, update 함수를 호출하여 메시지를 업데이트하며, 업데이트 시 이전 메시지와 새 메시지를 이벤트로 발생시킵니다.
6단계: 프로젝트 구성 완료
모든 트랜잭션에는 개인 키로 서명해야 합니다. 안전하게 개인 키를 저장하기 위해 .env 파일을 사용합니다. 먼저 dotenv 패키지를 설치하세요:
npm install dotenv --save프로젝트 루트에 .env 파일을 생성하고 다음 내용을 추가합니다:
PRIVATE_KEY = "your-metamask-private-key"hardhat.config.js 파일을 다음과 같이 수정합니다:
require("dotenv").config();
require("@nomicfoundation/hardhat-toolbox");

const { NEOX_PK } = process.env;

module.exports = {
    solidity: {
      version: "0.8.26",
      settings: {
        optimizer: {
          enabled: true,
          runs: 200,
          details: {
            yul: false,
          },
        },
      }
    },
    networks: {
        'neox-t4': {
            url: 'https://neoxt4seed1.ngd.network',
            accounts: [`${NEOX_PK}`],
            gasPrice: 40e9,
            gas: 50e6,
        },
    },
    etherscan: {
        apiKey: {
            'neox-t4': 'empty'
        },
        customChains: [
            {
                network: 'neox-t4',
                chainId: 12227332,
                urls: {
                    apiURL: 'https://xt4scan.ngd.network',
                    browserURL: 'https://neoxt4scan.ngd.network'
                }
            }
        ]
    }
};
7단계: 컨트랙트 컴파일
7단계: 컨트랙트 컴파일
npx hardhat compile성공적으로 컴파일되면 다음 메시지가 표시됩니다:
Compiled 1 Solidity file successfully (evm target: paris).8단계: 컨트랙트 배포
deploy.js 스크립트를 작성하기 위해 scripts 폴더를 생성하고 다음 코드를 추가합니다:
async function main() {
  const HelloWorld = await ethers.getContractFactory("HelloWorld");
  // 배포 시작: 컨트랙트 객체를 반환하는 프로미스를 반환합니다.
  const hello_world = await HelloWorld.deploy("Hello World!");
  console.log("Contract deployed to address:", hello_world.target);
}

main()
  .then(() => process.exit(0))
  .catch((error) => {
    console.error(error);
    process.exit(1);
  });
다음 명령을 실행하여 배포를 시작합니다:
npx hardhat run scripts/deploy.js --network neox-t4정상적으로 배포되면 다음 메시지가 표시됩니다:
Contract deployed to address: 0x769427b5A043b4aB2f4c31A7Da819526F3B0d181배포된 컨트랙트는 익스플로러에서 확인할 수 있습니다. (예: https://neoxt4scan.ngd.network)
9단계: 배포된 컨트랙트와 상호작용
먼저 저장된 메시지를 읽는 스크립트를 read.js로 작성합니다:
async function main() {
    const contractAddress = "0x769427b5A043b4aB2f4c31A7Da819526F3B0d181";
    const helloWorldContract = await hre.ethers.getContractAt("HelloWorld", contractAddress);
    const message = await helloWorldContract.message();
    console.log("Message is:", message);
}

main()
    .then(() => process.exit(0))
    .catch((error) => {
        console.error(error);
        process.exit(1);
    });
다음 명령을 실행하면 다음과 같은 메시지가 표시됩니다:
Message is: Hello World!다음과 같은 메시지가 표시됩니다:
Changing the message on transaction: 0x61b9b275547e34c1d83a132ba39376bed80f6d1e8f56905f1e8de97d7aca7e77익스플로러에서 해당 트랜잭션을 확인하고, read.js 스크립트를 다시 실행하면 메시지가 변경된 것을 볼 수 있습니다.
마무리
축하합니다! NeoX 체인에 Hello World 컨트랙트를 성공적으로 배포했습니다. 요약하자면 다음을 배웠습니다:
- NeoX 체인에서 스마트 컨트랙트 컴파일하기
- NeoX 체인에 스마트 컨트랙트 배포하기
- 배포된 스마트 컨트랙트와 상호작용하기
이제 이 튜토리얼에서 얻은 기술을 바탕으로 자신만의 dApp 프로젝트를 구축해 보세요! 질문이 있다면 NeoX Discord 서버에서 언제든 문의하세요.