빈 스코프
우리가 일반적으로 빈(Bean)이라고 생각하는 것은, 스프링 컨테이너가 시작될 때 함께 생성되고, 스프링 컨테이너가 종료될 때까지 유지되는 것이다. 이것은 스프링 빈이 기본적으로 싱글톤 스코프로 생성되기 때문이다. 스코프란 빈이 존재할 수 있는 범위를 뜻한다.
스프링은 다음과 같은 다양한 스코프를 지원한다.
- 싱글톤 : 디폴트 스코프. 스프링 컨테이너의 시작과 종료까지 유지되는 가장 넓은 범위의 스코프이다.
- 프로토타입 : DI가 발생할 때 마다 새로운 객체가 생성된다. 스프링 컨테이너는 프로토타입 빈의 생성과 의존 관계 주입까지만 관여하고, 더는 관리하지 않는 매우 짧은 범위의 스코프이다. 따라서 종료 메서드는 호출되지 않는다.
- 웹 관련 스코프
- session : 웹 세션이 생성되고 종료될 때까지 유지되는 스코프이다.
- application : 웹의 서블릿 컨텍스트와 같은 범위로 유지되는 스코프이다.
- request : 웹 요청이 들어오고 나갈 때까지 유지되는 스코프이다.
빈 스코프는 아래와 같이 지정할 수 있다.
@Scope("prototype")
@Component
public class NetworkClient {
}

@Configuration
class LifeCycleConfig {
    @Scope("prototype")
    @Bean
    public NetworkClient networkClient() {
        final NetworkClient networkClient = new NetworkClient();
        return networkClient;
    }
}
싱글톤 스코프
싱글톤 빈은 기본값으로 대상 클래스에 @Scope 또는 @Scope(”singleton”)을 붙여 사용한다. 싱글톤 빈은 스프링 컨테이너에서 한 번만 생성되며 스프링 컨테이너가 종료될 때 소멸된다. 스프링 빈은 하나의 공유 인스턴스만 관리하게 되며, 동일 참조를 보장한다. 싱글톤 빈을 사용할 때는 private 생성자를 사용하여 외부에서 임의로 new를 사용하지 못하도록 막아야 한다.
싱글톤으로 적합한 객체
- 상태가 없는 공유 객체
- 읽기 전용 상태의 객체
- 쓰기가 가능한 상태를 지니면서도 사용 빈도가 매우 높은 객체 (동기화 전략 필요)
public class SingletonTest {

    @Test
    void singletonBeanFind() {
        AnnotationConfigApplicationContext ac = new AnnotationConfigApplicationContext(SingletonBean.class);

        SingletonBean singletonBean1 = ac.getBean(SingletonBean.class);
        SingletonBean singletonBean2 = ac.getBean(SingletonBean.class);

        System.out.println("singletonBean1 = " + singletonBean1);
        System.out.println("singletonBean2 = " + singletonBean2);

        Assertions.assertThat(singletonBean1).isSameAs(singletonBean2);

        ac.close();
    }

    @Scope("singleton")
    static class SingletonBean {
        @PostConstruct
        public void init() {
            System.out.println("SingletonBean.init");
        }

        @PreDestroy
        public void destroy() {
            System.out.println("SingletonBean.destroy");
        }
    }
}
// 출력
SingletonBean.init
singletonBean1 = hello.core.scope.SingletonTest$SingletonBean@58326051
singletonBean2 = hello.core.scope.SingletonTest$SingletonBean@58326051
03:30:17.485 [main] DEBUG org.springframework.context.annotation.AnnotationConfigApplicationContext - Closing org.springframework.context.annotation.AnnotationConfigApplicationContext@48aca48b, started on Sun Oct 23 03:30:17 KST 2022
SingletonBean.destroy빈 초기화 메서드를 실행하고 같은 인스턴스의 빈을 조회하며, 종료 메서드까지 정상 호출된다. 싱글톤 빈은 스프링 컨테이너 생성 시점에 초기화 메서드가 실행된다. 또한, 싱글톤 빈은 스프링 컨테이너가 관리하기 때문에 스프링 컨테이너가 종료될 때 빈의 종료 메서드가 실행된다.
프로토타입 스코프
싱글톤 스코프의 빈을 조회하면, 스프링 컨테이너는 항상 같은 인스턴스를 반환한다. 반면 프로토타입 스코프의 경우, 스프링 컨테이너는 항상 새로운 인스턴스를 생성해서 반환한다. 또한 프로토타입 스코프의 빈의 경우, 생성된 이후에는 스프링 컨테이너에 의해 관리되지 않는다는 점도 싱글톤 스코프와의 차이점이다. 따라서 종료 메서드는 호출되지 않는다. 클라이언트에 빈을 반환한 이후에는 스프링 컨테이너는 프로토타입 빈을 관리하지 않는다. 프로토타입 빈을 관리할 책임은 프로토타입 빈을 받은 클라이언트에 있다.
프로토타입으로 적합한 객체
- 사용할 때마다 상태가 달라져야 하는 객체
- 쓰기가 가능한 상태가 있는 객체
아래 코드를 보면, 프로토타입 스코프 빈의 경우 빈을 조회할 때마다 빈의 생성과 의존 관계 주입, 초기화가 이뤄진다는 것을 확인할 수 있고, 스프링 컨테이너가 종료될 때도 destroy 메서드는 호출되지 않는 것을 볼 수 있다.
class PrototypeTest {
    @Test
    void prototypeBeanFind() {
        ConfigurableApplicationContext ac = new AnnotationConfigApplicationContext(PrototypeBean.class);
        System.out.println("find prototypeBean1");
        final PrototypeBean prototypeBean1 = ac.getBean(PrototypeBean.class);
        System.out.println("find prototypeBean2");
        final PrototypeBean prototypeBean2 = ac.getBean(PrototypeBean.class);
        assertThat(prototypeBean1).isNotSameAs(prototypeBean2);
        ac.close();
    }

    @Scope("prototype")
    static class PrototypeBean {
        @PostConstruct
        public void init() {
            System.out.println("SingletonBean.init");
        }

        @PreDestroy
        public void destroy() {
            System.out.println("SingletonBean.destroy");
        }
    }
}
프로토타입 스코프 - 싱글톤 빈과 함께 사용시 문제점
앞서 말했듯이 프로토타입 스코프의 빈은 해당 타입의 빈이 스프링 컨테이너에 요청될 때마다 생성된다. 헌데 싱글톤 스코프의 빈이 프로토타입의 빈을 주입 받는다면, 싱글톤 스코프의 빈이 생성되고 의존 관계가 주입되는 시점에만 프로토타입 빈이 조회될 것이고, 이후에는 계속 같은 빈이 사용될 것이다. 대부분의 경우, 개발자는 이를 의도하지 않았을 것이다. 애초에 매번 새로운 객체가 필요하기 때문에 프로토 타입으로 선언했을 것이기 때문이다.
따라서 아래와 같은 테스트 코드를 실행한다면, 테스트는 실패할 것이다.
class SingletonWithPrototypeTest1 {
    @Test
    void singletonClientUserPrototype() {
        final AnnotationConfigApplicationContext ac = new AnnotationConfigApplicationContext(PrototypeBean.class, ClientBean.class);
        final ClientBean clientBean1 = ac.getBean(ClientBean.class);
        final int count1 = clientBean1.logic();
        assertThat(count1).isEqualTo(1); // 반환값 1

        final ClientBean clientBean2 = ac.getBean(ClientBean.class);
        final int count2 = clientBean2.logic();
        assertThat(count2).isEqualTo(1); // 반환값 2로 실패

        ac.close();
    }

    @Scope("singleton")
    static class ClientBean {
        private final PrototypeBean prototypeBean; // 생성 시점에 주입

        public ClientBean(final PrototypeBean prototypeBean) {
            this.prototypeBean = prototypeBean;
        }

        public int logic() {
            prototypeBean.addCount();
            return prototypeBean.getCount();
        }
    }

    @Scope("prototype")
    static class PrototypeBean {
        private int count = 0;

        public void addCount() {
            count++;
        }

        public int getCount() {
            return count;
        }

        @PostConstruct
        public void init() {
            System.out.println("PrototypeBean.init " + this);
        }

        @PreDestroy
        public void destroy() {
            System.out.println("PrototypeBean.destroy");
        }
    }
}
프로토타입 스코프 - 싱글톤 빈과 함께 사용시 Provider로 문제 해결
가장 간단한 방법은, 프로토타입의 의존 관계를 주입받지 않고 ApplicationContext에 매번 빈을 아래와 같이 요청하는 것이다. 하지만 이렇게 되면, 스프링에 종속적인 코드가 되고 단위테스트도 어려워 진다.
@Scope("singleton")
static class ClientBean {
    @Autowired
    private ApplicationContext ac;

    public int logic() {
        final PrototypeBean prototypeBean = ac.getBean(PrototypeBean.class);
        prototypeBean.addCount();
        return prototypeBean.getCount();
    }
}
1) ObjectFactory, ObjectProvider
ObjectProvider는 지정한 빈을 컨테이너에서 대신 찾아주는 DL(Dependency Lookup) 서비스를 제공한다. 원래는 ObjectFactory만 있었는데, 여기에 편의 기능을 추가해서 ObjectProvider가 만들어졌다. 아래와 같이 사용할 수 있다.
@Scope("singleton")
static class ClientBean {
    private final ObjectProvider<PrototypeBean> prototypeBeanProvider;

    public ClientBean(final ObjectProvider<PrototypeBean> prototypeBeanProvider) {
        this.prototypeBeanProvider = prototypeBeanProvider;
    }

    public int logic() {
        final PrototypeBean prototypeBean = prototypeBeanProvider.getObject();
        prototypeBean.addCount();
        return prototypeBean.getCount();
    }
}-
스프링이 제공하는 기능을 사용하긴 하지만, 기능이 단순하므로 단위테스트를 만들거나 mock 코드를 만들기 쉬워진다.
-
딱 필요한 DL(Dependency Lookup) 기능만 제공한다.
2) JSR-330 Provider
이 방법은 javax.inject.Provider 라는 JSR-330 자바 표준을 사용하는 방법이다. 이 방법을 사용하기 위해선 javax.inject:javax.inject:1 라이브러리를 gradle에 별도로 추가해야 한다. 아래와 같이 사용할 수 있다.
@Scope("singleton")
static class ClientBean {
    private final Provider<PrototypeBean> prototypeBeanProvider;

    ClientBean(final Provider<PrototypeBean> prototypeBeanProvider) {
        this.prototypeBeanProvider = prototypeBeanProvider;
    }

    public int logic() {
        final PrototypeBean prototypeBean = prototypeBeanProvider.get();
        prototypeBean.addCount();
        return prototypeBean.getCount();
    }
}- 자바 표준이므로 스프링이 아닌 다른 컨테이너에서도 사용할 수 있다.
- 기능이 단순하므로 단위테스트를 만들거나 mock 코드를 만들기 쉬워진다.
- 딱 필요한 DL(Dependency Lookup) 기능만 제공한다.
- 별도의 라이브러리가 필요하다.
웹 스코프
웹 스코프는 웹 환경에서만 동작한다. 웹 스코프는 프로토타입과는 다르게, 스프링 컨테이너가 해당 스코프의 종료 시점까지 관리를 한다. 따라서 종료 메서드가 호출된다.
웹 스코프 종류
- request : HTTP 요청 하나가 들어오고 나갈 때까지 유지되는 스코프. 각각의 HTTP 요청마다 별도의 빈 인스턴스가 생성되고 관리된다.
- session : HTTP session 과 동일한 생명 주기를 가지는 스코프
- application : 서블릿 컨텍스트과 동일한 생명 주기를 가지는 스코프
- websocket : 웹 소켓과 동일한 생명 주기를 가지는 스코프
request 스코프 예제
request 스코프의 경우, HTTP 요청이 들어왔을 때마다 빈이 생성되고 요청이 끝날 때까지 유지가 된다. 즉 요청이 들어왔을 때 생성이 되기 때문에, 일반적인 생성자/수정자 주입 방식 등으로 의존 관계를 주입하려고 하면 에러가 발생한다.
1) ObjectProvider를 사용
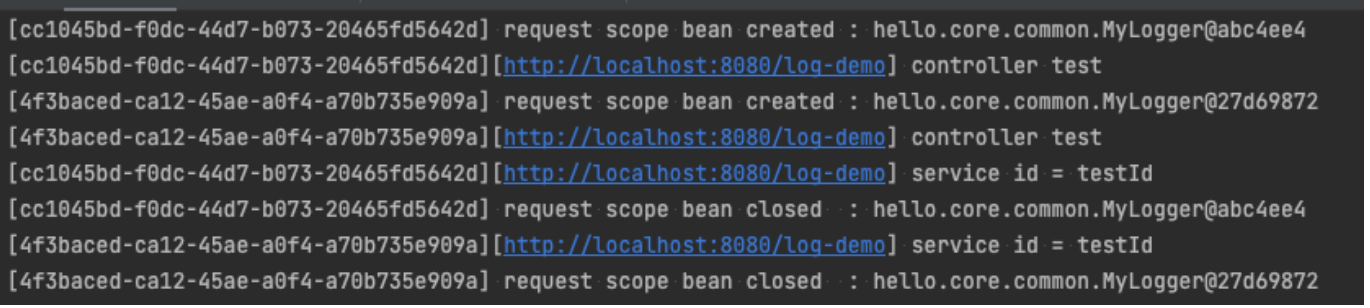
아래에서 하나의 HTTP 요청에서는 같은 빈 인스턴스를 공유한다는 것을 확인할 수 있다.
@Component
@Scope(value = "request")
public class MyLogger {

    private String uuid;
    private String requestUrl;

    public void setRequestUrl(final String requestUrl) {
        this.requestUrl = requestUrl;
    }

    public void log(String message) {
        System.out.println("[" + uuid + "]" + "[" + requestUrl + "] " + message);
    }

    @PostConstruct
    public void init() {
        uuid = UUID.randomUUID().toString();
        System.out.println("[" + uuid + "] request scope bean created : " + this);
    }

    @PreDestroy
    public void close() {
        System.out.println("[" + uuid + "] request scope bean closed  : " + this);
    }
}
@Controller
@RequiredArgsConstructor
public class LogDemoController {
private final LogDemoService logDemoService;
private final ObjectProvider<MyLogger> myLoggerProvider;
@RequestMapping("/log-demo")
@ResponseBody
public String logDemo(HttpServletRequest request) throws InterruptedException {
final String requestURL = request.getRequestURL().toString();
final MyLogger myLogger = myLoggerProvider.getObject();
myLogger.setRequestUrl(requestURL);
myLogger.log("controller test");
Thread.sleep(1000);
logDemoService.logic("testId");
return "OK";
}
}@Service
@RequiredArgsConstructor
public class LogDemoService {
private final ObjectProvider<MyLogger> myLoggerProvider;
public void logic(final String id) {
final MyLogger myLogger = myLoggerProvider.getObject();
myLogger.log("service id = " + id);
}
}
2) 프록시 사용
proxyMode를 사용하면 마치 싱글톤 스코프 빈을 주입받는 것처럼 코드를 간결하게 만들 수 있다. 적용 대상이 클래스라면 proxyMode = ScopedProxyMode.TARGET_CLASS, 인터페이스라면 proxyMode = ScopedProxyMode.INTERFACES 를 선택하면 된다.
@Component
@Scope(value = "request", proxyMode = ScopedProxyMode.TARGET_CLASS)
public class MyLogger {

    private String uuid;
    private String requestUrl;

    public void setRequestUrl(final String requestUrl) {
        this.requestUrl = requestUrl;
    }

    public void log(String message) {
        System.out.println("[" + uuid + "]" + "[" + requestUrl + "] " + message);
    }

    @PostConstruct
    public void init() {
        uuid = UUID.randomUUID().toString();
        System.out.println("[" + uuid + "] request scope bean created : " + this);
    }

    @PreDestroy
    public void close() {
        System.out.println("[" + uuid + "] request scope bean closed  : " + this);
    }
}
@Controller
@RequiredArgsConstructor
public class LogDemoController {
private final LogDemoService logDemoService;
private final MyLogger myLogger; // 싱글톤 스코프처럼 주입 받음
@RequestMapping("/log-demo")
@ResponseBody
public String logDemo(HttpServletRequest request) throws InterruptedException {
final String requestURL = request.getRequestURL().toString();
myLogger.setRequestUrl(requestURL);
myLogger.log("controller test");
System.out.println("myLogger = " + myLogger);
Thread.sleep(1000);
logDemoService.logic("testId");
return "OK";
}
}@Service
@RequiredArgsConstructor
public class LogDemoService {
private final MyLogger myLogger;
public void logic(final String id) {
myLogger.log("service id = " + id);
}
}프록시 모드를 사용하면, 어노테이션 설정 변경만으로 원본 객체를 프록시 객체로 대체할 수 있다. 스프링은 CGLIB이라는 라이브러리를 이용하여, 내 클래스를 상속 받은 프록시 객체를 만들어서 주입한다. 따라서 스프링 컨테이너가 생성되고 빈의 의존 관계를 주입할 때, 프록시 객체가 주입되는 것이다.
가짜 프록시 객체는, HTTP 요청이 들어왔을 때 내부에서 진짜 빈을 요청하는 위임 로직을 가지고 있다. 프록시 객체는 원본 클래스를 상속해서 만들어졌기 때문에, 이 객체를 사용하는 클라이언트 입장에서는 원본인지 아닌지 모르게 동일하게 사용할 수 있다.
주의할 점은 다음과 같다.
- 마치 싱글톤을 사용하는 것 같지만 다르게 동작하기 때문에 주의해서 사용해야 한다.
- 이런 특별한 scope는 꼭 필요한 곳에만 최소화해서 사용하자. 무분별하게 사용하면 유지보수하기 어려워진다.