
0. INTRO
-
이번 글은 관리형 쿠버네티스 환경(현재 글에서는 NKS)에 Helm을 이용하여 Airflow를 설치하고 이를 ALB Ingress Controller를 통해 Load Balancer와 연결시키고 Github의 Repository와 Dag가 연동되도록 설정까지 해보는 방법을 정리해볼까 한다. 순서는 아래와 같다.
- 연동할 Git Repo 생성 및 SSH Key 등록
- Helm를 이용하여 Airflow 설치
- ALB Ingress Controller 설치
- Ingress 적용하여 ALB와 연동
- Airflow UI 접속 및 Git 연동 확인
-
쿠버네티스 환경에 Helm은 이미 설치되어 있다고 가정한다. ( -> Helm 설치)
1. 연동할 Git Repo 생성 및 SSH Key 등록
-
Github에 Airflow Dag가 저장될 Repository를 생성해준다.
-
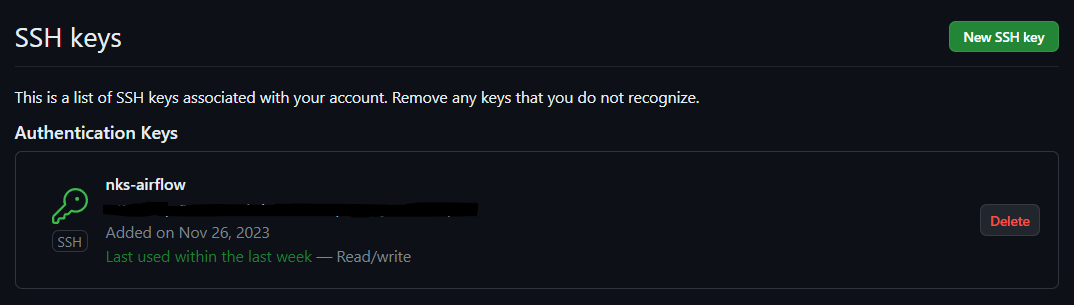
아래 단계들을 따라서 SSH Key를 생성해준다.
-
.pem 파일 생성
cd ~/.ssh mkdir pem cd pem ssh-keygen -t rsa -b 2048 -f nks-airflow -
Github에 SSH Key등록
-github > settings > SSH and GPG keys > SSH keys > New SSH key탭으로 들어가서 위에서 생성한 nks-airflow Key 중 .pub가 붙은 public key 값을 복사해서 붙여넣어 등록해준다.
-
2. Helm을 이용한 Airflow 설치
1. airflow namespace 생성

	> kubectl create namespace airflow


2. Helm repo add

    > helm repo add apache-airflow https://airflow.apache.org


3. Airflow Helm Chart Pull

> helm pull apache-airflow/airflow- helm pull까지 하게 되면 현재 경로에 airflow helm관련 파일들이
airflow-1.11.0.tgz이런 형식의 압축파일로 다운받아진다.
4. airflow 압축파일 압축 해제

	> tar - zxvf airflow-1.11.0.tgz

5. git sync 관련 secret 생성

> kubectl create secret generic airflow-ssh-git-secret --from-file=gitSshKey=[SSH private key 경로] --namespace airflow- 압축을 풀고 values.yaml 파일을 오버라이딩 할 것이기 때문에 my-values.yaml 라는 이름의 파일로 복사해준다.
6. values.yaml 파일을 my-values.yaml 파일로 복사

> cp values.yaml my-values.yaml- my-values.yaml 파일에서 Git sync 관련 부분을 수정해준다.
dags:
	.
    .
    .
  gitSync:
    enabled: true
    repo: [github repo SSH 주소]
    branch: [branch 이름]
    rev: HEAD
    depth: 1
    maxFailures: 0
    subPath: [github repo 폴더에서 dag가 저장될 sub 디렉토리 이름]
    sshKeySecret: [위에서 만든 kubernetes secret 이름
------------------------------------------------------------------
<예시>
dags:
	.
    .
    .
  gitSync:
    enabled: true

    repo: git@github.com:Hyunsoo-Ryan-Lee/Kubernetes-Airflow.git
    branch: master
    rev: HEAD
    depth: 1
    maxFailures: 0
    subPath: "dags"
sshKeySecret: airflow-ssh-git-secret- my-values.yaml 파일에서 webserver의 service 관련 부분을 수정해준다. (
ClusterIP -> NodePort)
webserver:
  service:
    type: NodePort
    ## service annotations
    annotations: {}
    ports:
      - name: airflow-ui
port: "{{ .Values.ports.airflowUI }}"- my-values.yaml로 오버라이딩하여 airflow helm chart 설치
7. airflow helm chart install

> helm install airflow -n airflow -f my-values.yaml .- 아래와 같은 메세지가 뜨면서 설치가 완료된다.
Release "airflow" does not exist. Installing it now.
NAME: airflow
LAST DEPLOYED: Sun Nov 26 01:15:51 2023
NAMESPACE: airflow
STATUS: deployed
REVISION: 1
TEST SUITE: None
NOTES:
Thank you for installing Apache Airflow 2.7.1!

Your release is named airflow.
You can now access your dashboard(s) by executing the following command(s) and visiting the corresponding port at localhost in your browser:

Airflow Webserver:     kubectl port-forward svc/airflow-webserver 8080:8080 --namespace airflow
Default Webserver (Airflow UI) Login credentials:
    username: admin
    password: admin
Default Postgres connection credentials:
    username: postgres
    password: postgres
    port: 5432

You can get Fernet Key value by running the following:

    echo Fernet Key: $(kubectl get secret --namespace airflow airflow-fernet-key -o jsonpath="{.data.fernet-key}" | base64 --decode)

###########################################################
#  WARNING: You should set a static webserver secret key  #
###########################################################

You are using a dynamically generated webserver secret key, which can lead to
unnecessary restarts of your Airflow components.

Information on how to set a static webserver secret key can be found here:
https://airflow.apache.org/docs/helm-chart/stable/production-guide.html#webserver-secret-key
3. ALB Ingress Controller 설치
kubectl apply -f https://raw.githubusercontent.com/NaverCloudPlatform/nks-alb-ingress-controller/main/docs/install/pub/install.yaml4. Ingress 적용하여 ALB와 연동
apiVersion: networking.k8s.io/v1
kind: Ingress
metadata:
  name: airflow-webserver-ingress
  annotations:
    alb.ingress.kubernetes.io/description: 'airflow-webserver'
    alb.ingress.kubernetes.io/load-balancer-name: 'airflow-webserver-alb'
  labels:
    app: airflow-webserver-ingress
spec:
  ingressClassName: alb
  rules:
  - http:
      paths:
      - path: /
        pathType: Prefix
        backend:
          service:
            name: airflow-webserver
            port:
number: 8080- 위의 YAML 파일을 apply를 하게되면 아래와 같이 ingress가 alb와 연동되어 보이는 것을 확인할 수 있다.
kubectl apply -f webserver-ingress.yaml
kubectl get ingress
NAME CLASS HOSTS ADDRESS PORTS AGE
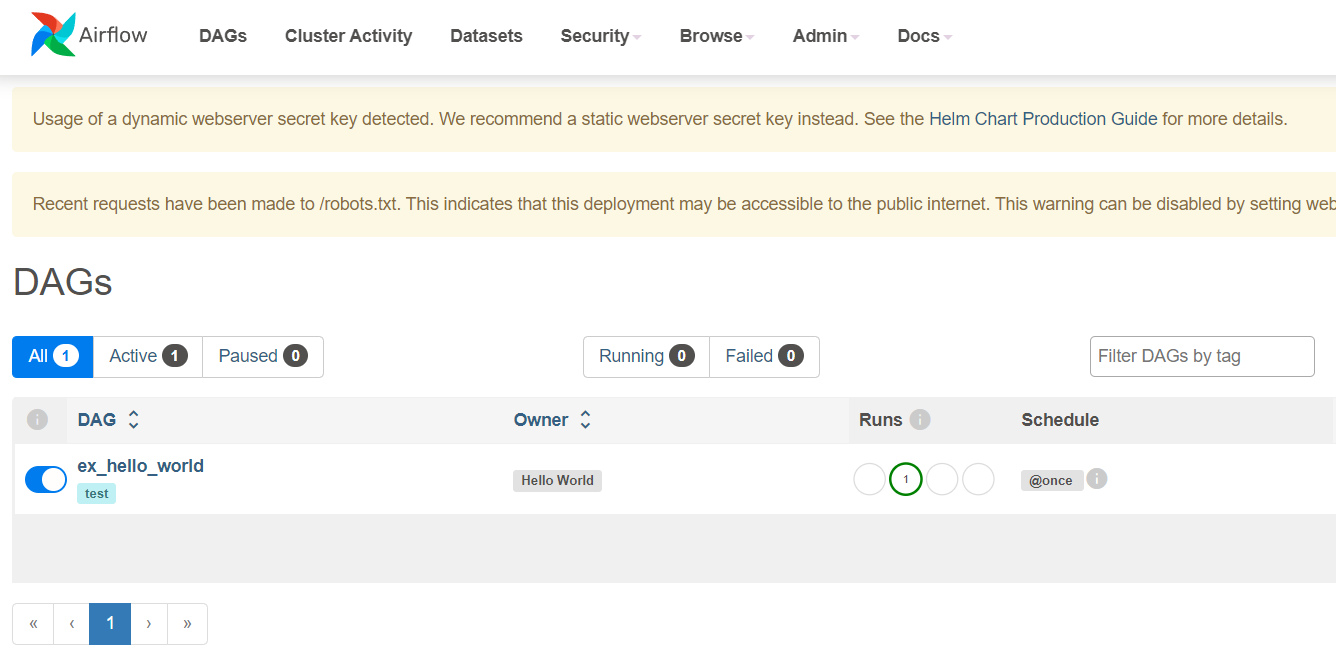
airflow-webserver-ingress alb * airflow-webserver-alb-OOOOOOOOOOOOOOOO.kr.lb.naverncp.com 80 10m5. Airflow UI 접속 및 Git 연동 확인
- 위의 ingress에 나온 ALB ADDRESS로 접속하게 되면 Airflow UI가 나오고 ID : admin / PW : admin 으로 접속하게 되면 git repo에 올려두었던 임시 dag가 연동되어 보여진다.

데이터 엔지니어의 작업공간 / #PYTHON #CLOUD #SPARK #AWS #GCP #NCLOUD