iOS 앱개발 기초반 - 5 주차
[수업 목표]
- 인터렉션
1) 화면 터치
2) 기기 진동
3) 애니메이션 심화 - 인터렉션 앱 구현
- 광고(AdMob) 넣기
- Firebase로 사용자 수 확인하기
- 아카이브와 출시
01. 5 주차
- 터치, 진동, 애니메이션
유저에게 생동감 있는 경험을 만들어주는 인터렉션 - 광고
AdMob을 이용해 제작한 앱에 광고 삽입 - Firebase
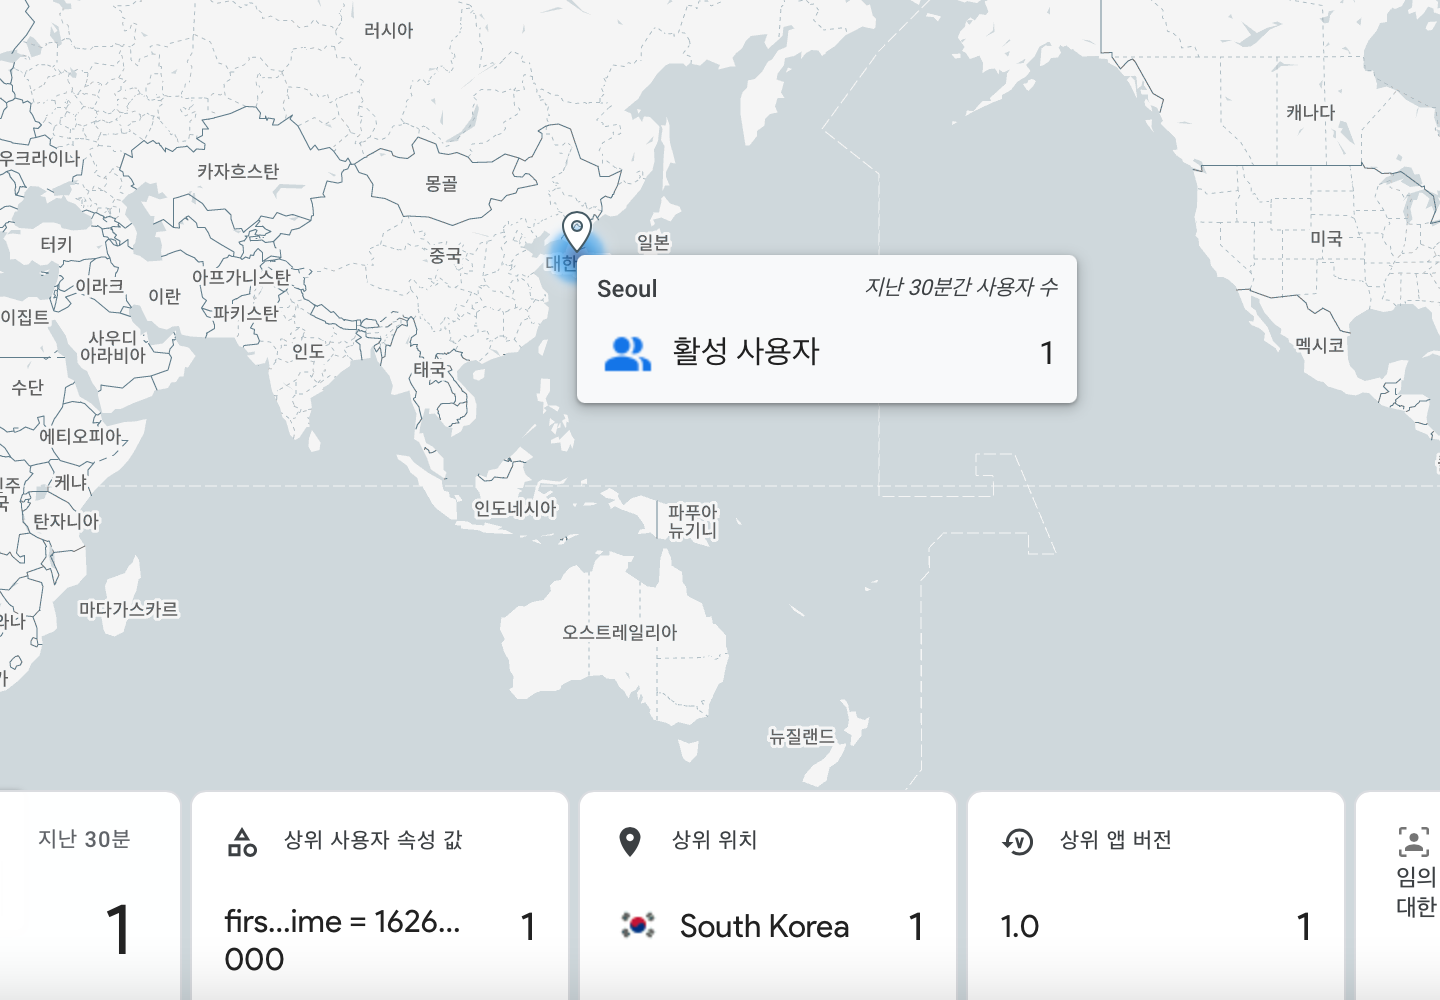
Firebase를 이용해 이용자 수를 확인하고 로그(log)를 넣어 사용자에 대한 자세한 기록 획득 - 앱스토어 출시
아카이브를 통한 앱 출시
02. 인터렉션
- 유저에게 제공되는 화면을 유저가 누르고 드래그하는 등의 입력을 수행 시, 유저의 생동감 있는 경험을 위해 인터렉션을 신경써야 한다.
- impact : 물리적 충돌 묘사. 충돌 강도에 따라 스타일 지정 가능
- selection : 화면 어떤 요소 선택 시 사용
- notification : 액션에 대해 성공, 실패, 주의
// 가벼운 물리적 충돌을 묘사
let impactLight = UIImpactFeedbackGenerator(style: .light)
impactLight.impactOccurred()

// 무거운 물리적 충돌을 묘사
let impactHeavy = UIImpactFeedbackGenerator(style: .heavy)
impactHeavy.impactOccurred()

// 어떤 요소를 선택하거나 했을 때 사용
let selection = UISelectionFeedbackGenerator()
selection.selectionChanged()

//notification 은 한 번만 선언해도 됨!
let noti = UINotificationFeedbackGenerator()

//액션의 결과에 따라 각각 성공, 에러, 주의를 위한 진동
noti.notificationOccurred(.success) // 성공
noti.notificationOccurred(.error)   // 에러
noti.notificationOccurred(.warning) // 주의
03. 인터렉션 앱 구현 - storyboard
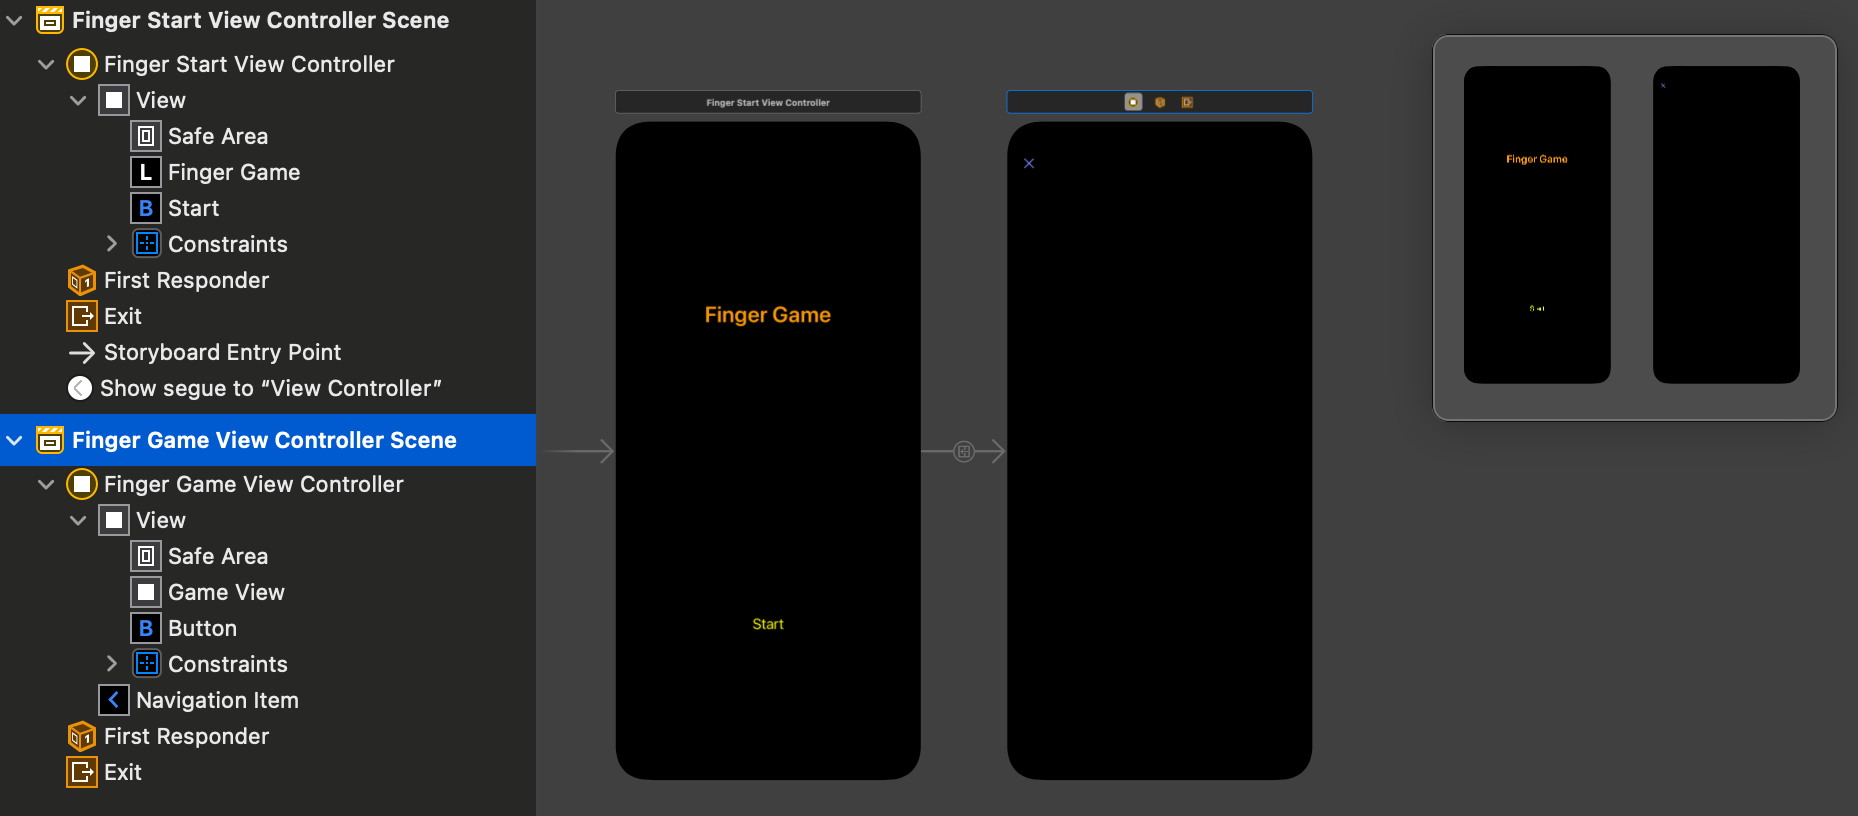
UIView - 게임 화면으로 터치와 연결되는 view
04. 인터렉션 앱 구현 - 터치
- 화면에 터치 누르기 (시작) - 화면에 터치 움직이기 (중간) - 화면에서 터치 떼기 (끝)
//터치 시작
override func touchesBegan(_ touches: Set<UITouch>, with event: UIEvent?) {

}

//터치 이동
override func touchesMoved(_ touches: Set<UITouch>, with event: UIEvent?) {

}

//터치 끝
override func touchesEnded(_ touches: Set<UITouch>, with event: UIEvent?) {

}

//터치가 비정상적인 이유로 끝남
override func touchesCancelled(_ touches: Set<UITouch>, with event: UIEvent?) {

}
05. 인터렉션 앱 구현 - 알고리즘
06. 인터렉션 앱 구현 - 애니메이션
- 애니메이션 : 화면에 더욱 생동감을 주는 요소. 자연스러운 전환 제공
UIView.animate(withDuration: 5) { // 5는 애니메이션이 움직일 시간 길이입니다.
		// 애니메이션이 끝난 후 보였으면 하는 결과물 블록
    view.frame.height = 100
}- 애니메이션의 결과물 블록에 들어갈 수 있는 것
- 뷰의 frame, bounds, center 등 뷰의 프레임 정보
- 뷰의 backgroundColor, alpha 등 뷰의 배경색 및 투명도
- 뷰를 회전하거나 확대하는데 쓰이는 transform
- 이 외에 애니메이션을 넣기 위해서 Timer 사용
07. Firebase - 사용자 수
Firebase 설정
GoogleService-Info.plist 다운로드 > 프로젝트에 드래그 앤 드롭 > Copy items if needed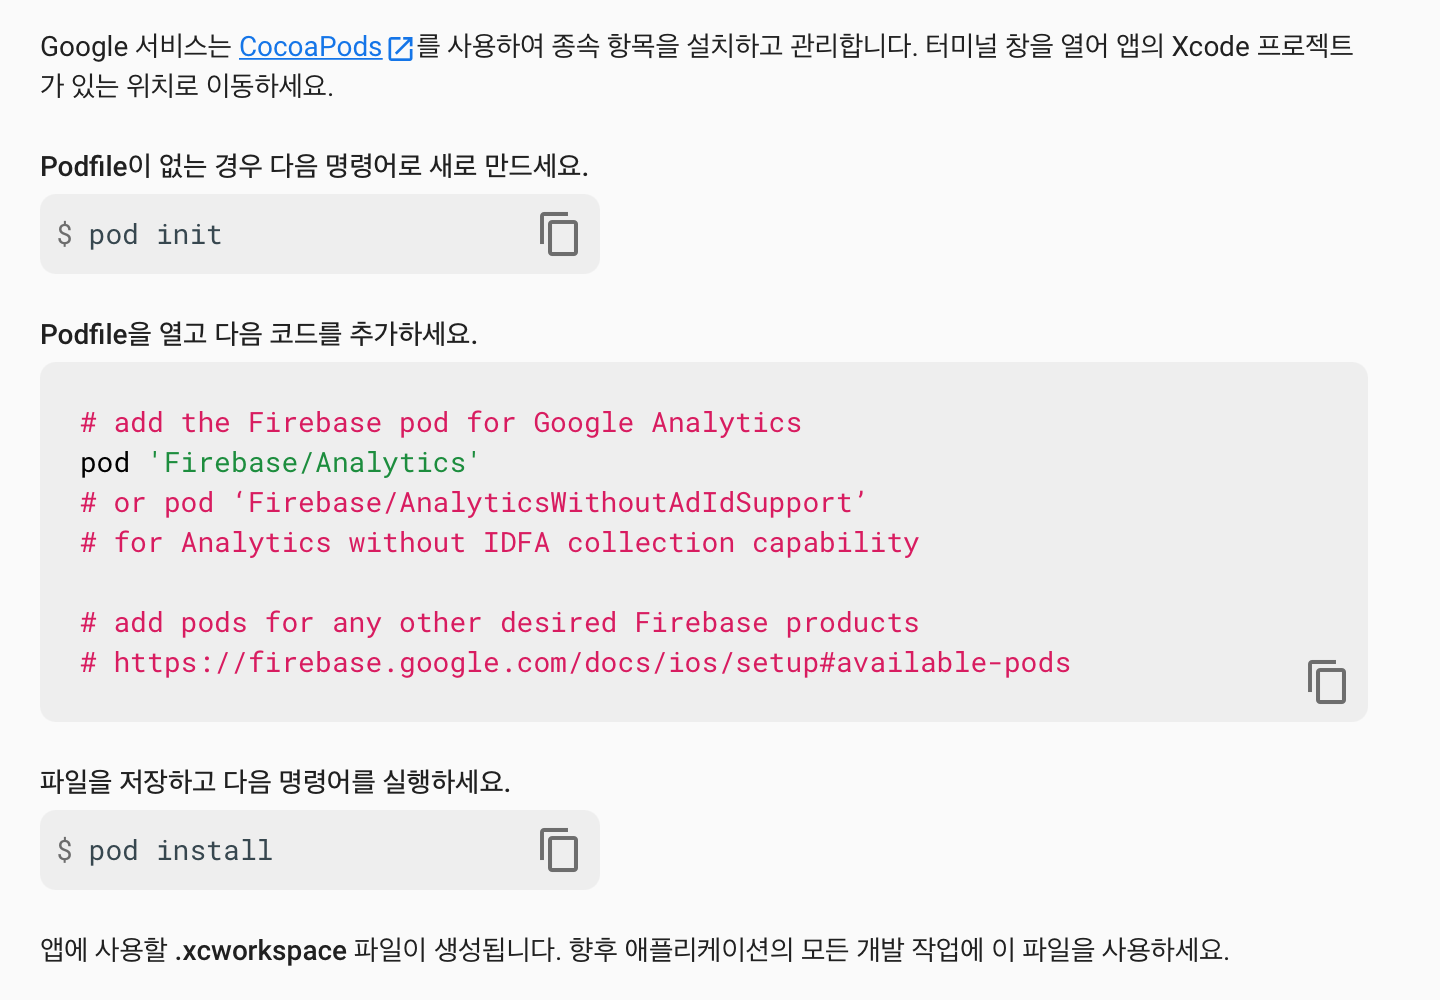
CocoaPods 설치
sudo gem install cocoapods

프로젝트 폴더로 이동 > pod init > oepn Podfile > pod 'Firebase/Analytics' 추가 및 저장 > pod install --repo-update

FingerGame.xcworkspace로 열기
AppDelegate.Swift
import UIKit
import Firebase // 추가

@main
class AppDelegate: UIResponder, UIApplicationDelegate {

    func application(_ application: UIApplication, didFinishLaunchingWithOptions launchOptions: [UIApplication.LaunchOptionsKey: Any]?) -> Bool {
        // Override point for customization after application launch.
        FirebaseApp.configure() // 추가
        return true
    }

    // MARK: UISceneSession Lifecycle

    func application(_ application: UIApplication, configurationForConnecting connectingSceneSession: UISceneSession, options: UIScene.ConnectionOptions) -> UISceneConfiguration {
        // Called when a new scene session is being created.
        // Use this method to select a configuration to create the new scene with.
        return UISceneConfiguration(name: "Default Configuration", sessionRole: connectingSceneSession.role)
    }

    func application(_ application: UIApplication, didDiscardSceneSessions sceneSessions: Set<UISceneSession>) {
        // Called when the user discards a scene session.
        // If any sessions were discarded while the application was not running, this will be called shortly after application:didFinishLaunchingWithOptions.
        // Use this method to release any resources that were specific to the discarded scenes, as they will not return.
    }
}
08. 광고 넣기
- AdMob은 앱을 제작하고 테스트할 때 운영 중인 광고가 아니라 테스트 광고를 사용하도록 하고 있다.
CocoaPods 업데이트
pod 'Firebase/AdMob'AppDelegate.swift 수정
import UIKit
import Firebase
import GoogleMobileAds // 추가

@main
class AppDelegate: UIResponder, UIApplicationDelegate {

    func application(_ application: UIApplication, didFinishLaunchingWithOptions launchOptions: [UIApplication.LaunchOptionsKey: Any]?) -> Bool {
        // Override point for customization after application launch.
        FirebaseApp.configure() // 추가

        GADMobileAds.sharedInstance().start(completionHandler: nil) //추가
        return true
    }
...
Info.plist 에 추가 (Open As > Source Code)
<key>GADApplicationIdentifier</key>
<string>ca-app-pub-3940256099942544~1458002511</string>
<key>SKAdNetworkItems</key>
<array>
    <dict>
        <key>SKAdNetworkIdentifier</key>
        <string>cstr6suwn9.skadnetwork</string>
    </dict>
</array>
<key>NSUserTrackingUsageDescription</key>
<string>This identifier will be used to deliver personalized ads to you.</string>
광고 준비하기
import UIKit
import Firebase
import GoogleMobileAds
import AppTrackingTransparency
import AdSupport

func requestIDFA() {
    ATTrackingManager.requestTrackingAuthorization(completionHandler: { status in
        let request = GADRequest()
        GADInterstitialAdBeta.load(withAdUnitID: "ca-app-pub-3940256099942544/4411468910",
                                       request: request) { (ad, error) in
            if error != nil {
                return
            }

            self.interstitial = ad
        }
    })
}
09. 앱스토어 출시
개발자 등록 필요 > 1 년에 99 달러 결제
Apple의 App Store 심사 지침
[ 출시 과정 ]
1. App Icon 넣기
2. Display Name 설정
3. Product 메뉴 > Archive
4. Organizer > Distribute App > 제출
5. 접속 후 + 버튼을 눌러 신규 앱 작성
6. App Store에 앱의 설명과 스크린샷을 자세히 추가 - 스크린샷 사양
7. 빌드 선택 및 추가
8. 저장 후 제출 > 심사 기다리기!