오늘 학습 내용
[블로그] 이미지 업로드 기능 만들기
리치 텍스트 편집기(Rich Text Editor)
- 사용자가 문서의 텍스트를 서식화하고 스타일링할 수 있도록 하는 도구
- 일반적으로 HTML 및 CSS를 기반으로 하며, 다양한 서식 옵션과 기능을 제공
- 사용자가 시각적으로 매력적인 콘텐츠를 작성할 수 있도록 돕는다.
summernote
summernote 공식 문서
summernote github
- 설치:
poetry add django-summernote
기본 설정
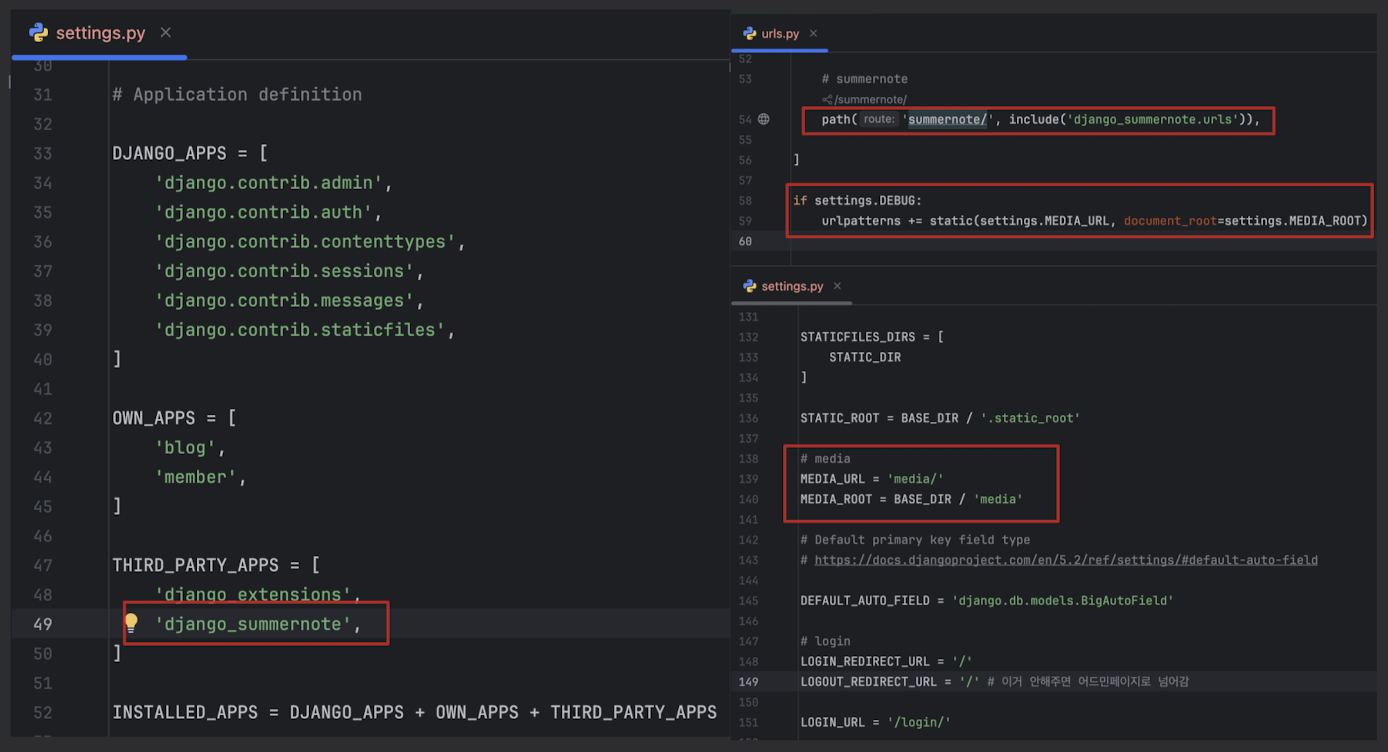
from config import settings
from django.conf import settings

if settings.DEBUG:
    urlpatterns += static(settings.MEDIA_URL, document_root=settings.MEDIA_ROOT)
from config import settingsfrom django.conf import settings- 두개 다 가능하지만 django.conf 를 사용하면 settings파일이 바뀌거나 경로가 변경되도
- 경로가 실행된 환경에 있는 settings를 가져오기 때문 = 훨씬 더 안전
- 두개 다 가능하지만 django.conf 를 사용하면 settings파일이 바뀌거나 경로가 변경되도
settings.DEBUG:가 있는 이유- 실제로 배포환경에서는 경로가 변경될것이기 때문에
주의 ⚠️
- summernote에 migrate 해야하는 파일이 존재하기 때문에 한번 migrate 해야함

기능 추가
-
admin.py 에서 SummernoteModelAdmin을 상속
- 이제 Summernote를 사용 가능
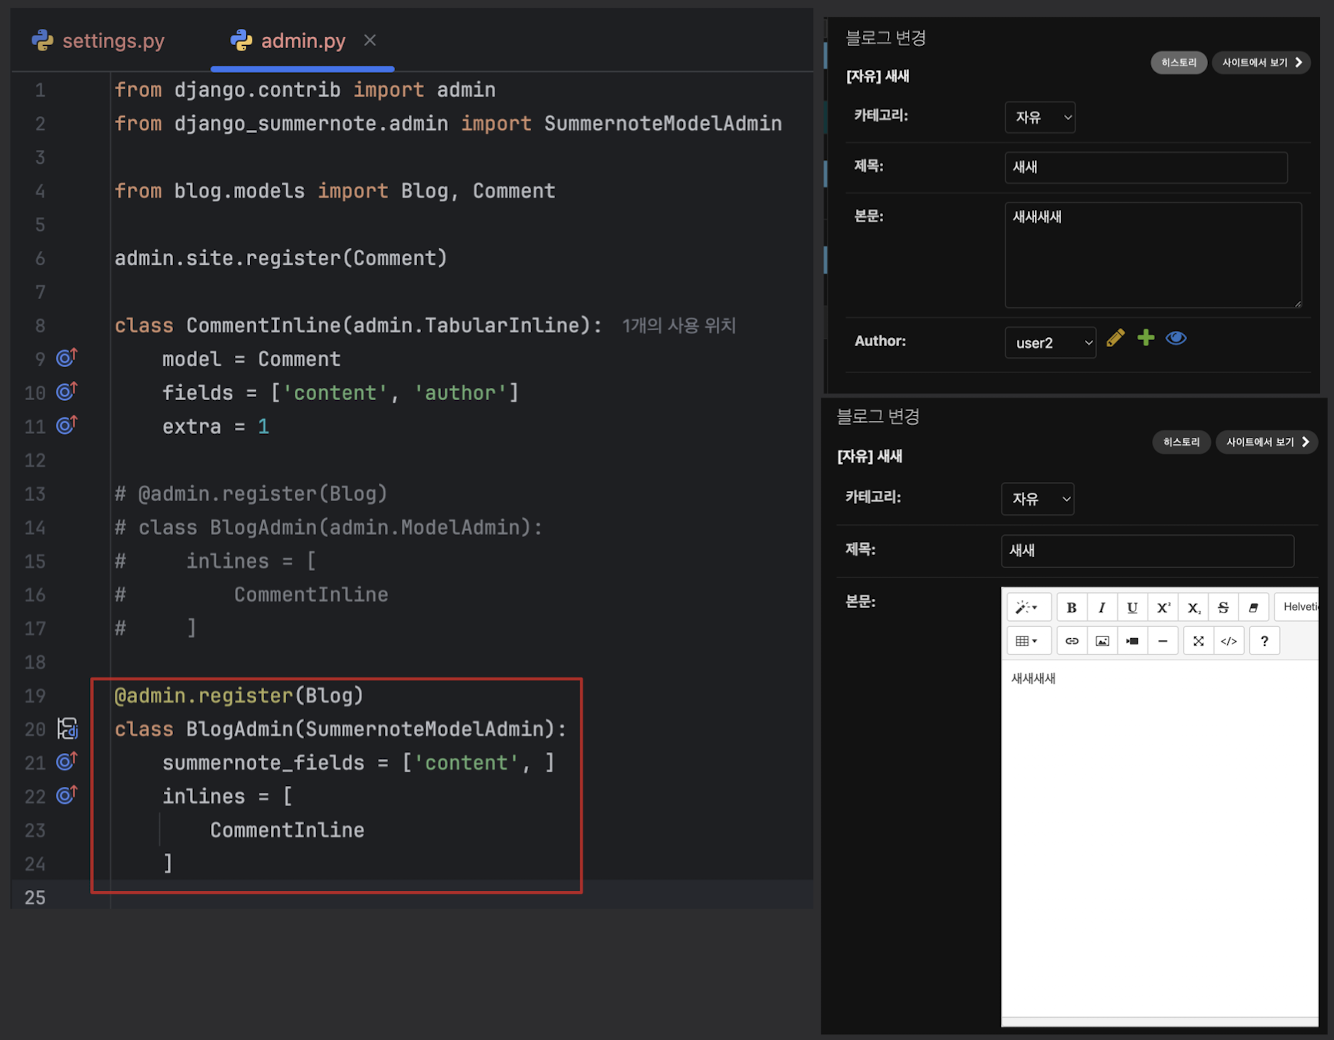
- 이제 Summernote를 사용 가능
-
이미지가 제대로 보이도록 blog_detail.html 코드를 수정
- 파일 선택으로 이미지를 업로드하면 media 디렉토리에 들어감
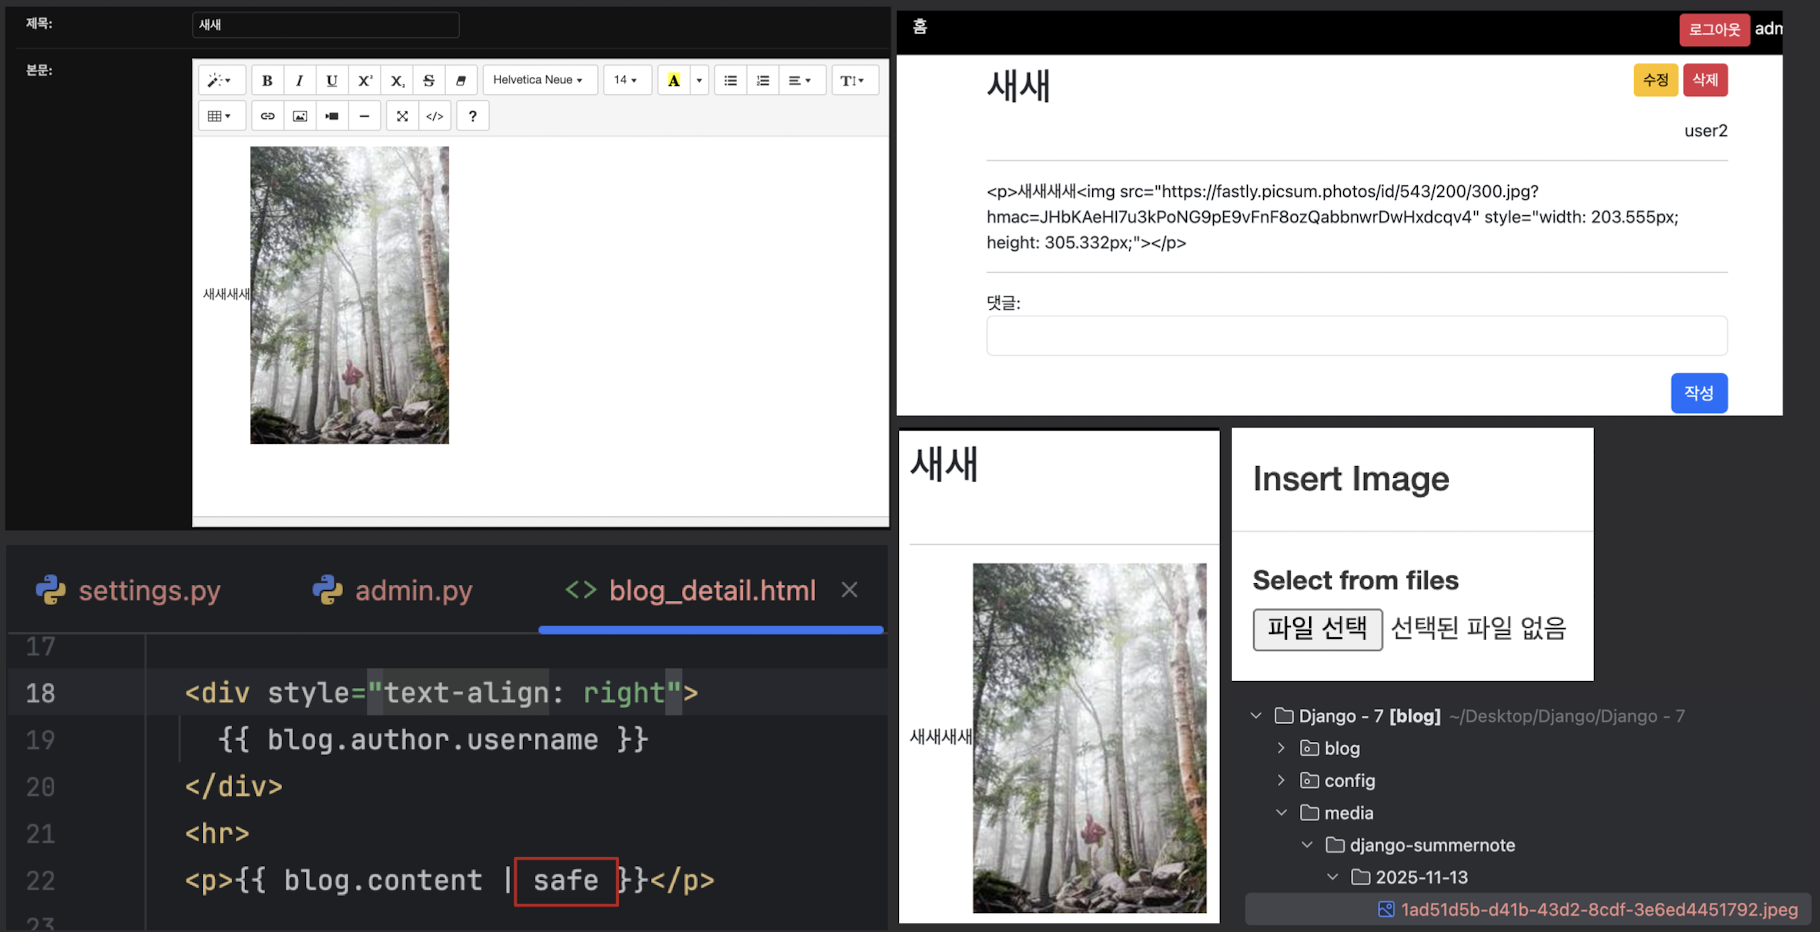
- 파일 선택으로 이미지를 업로드하면 media 디렉토리에 들어감
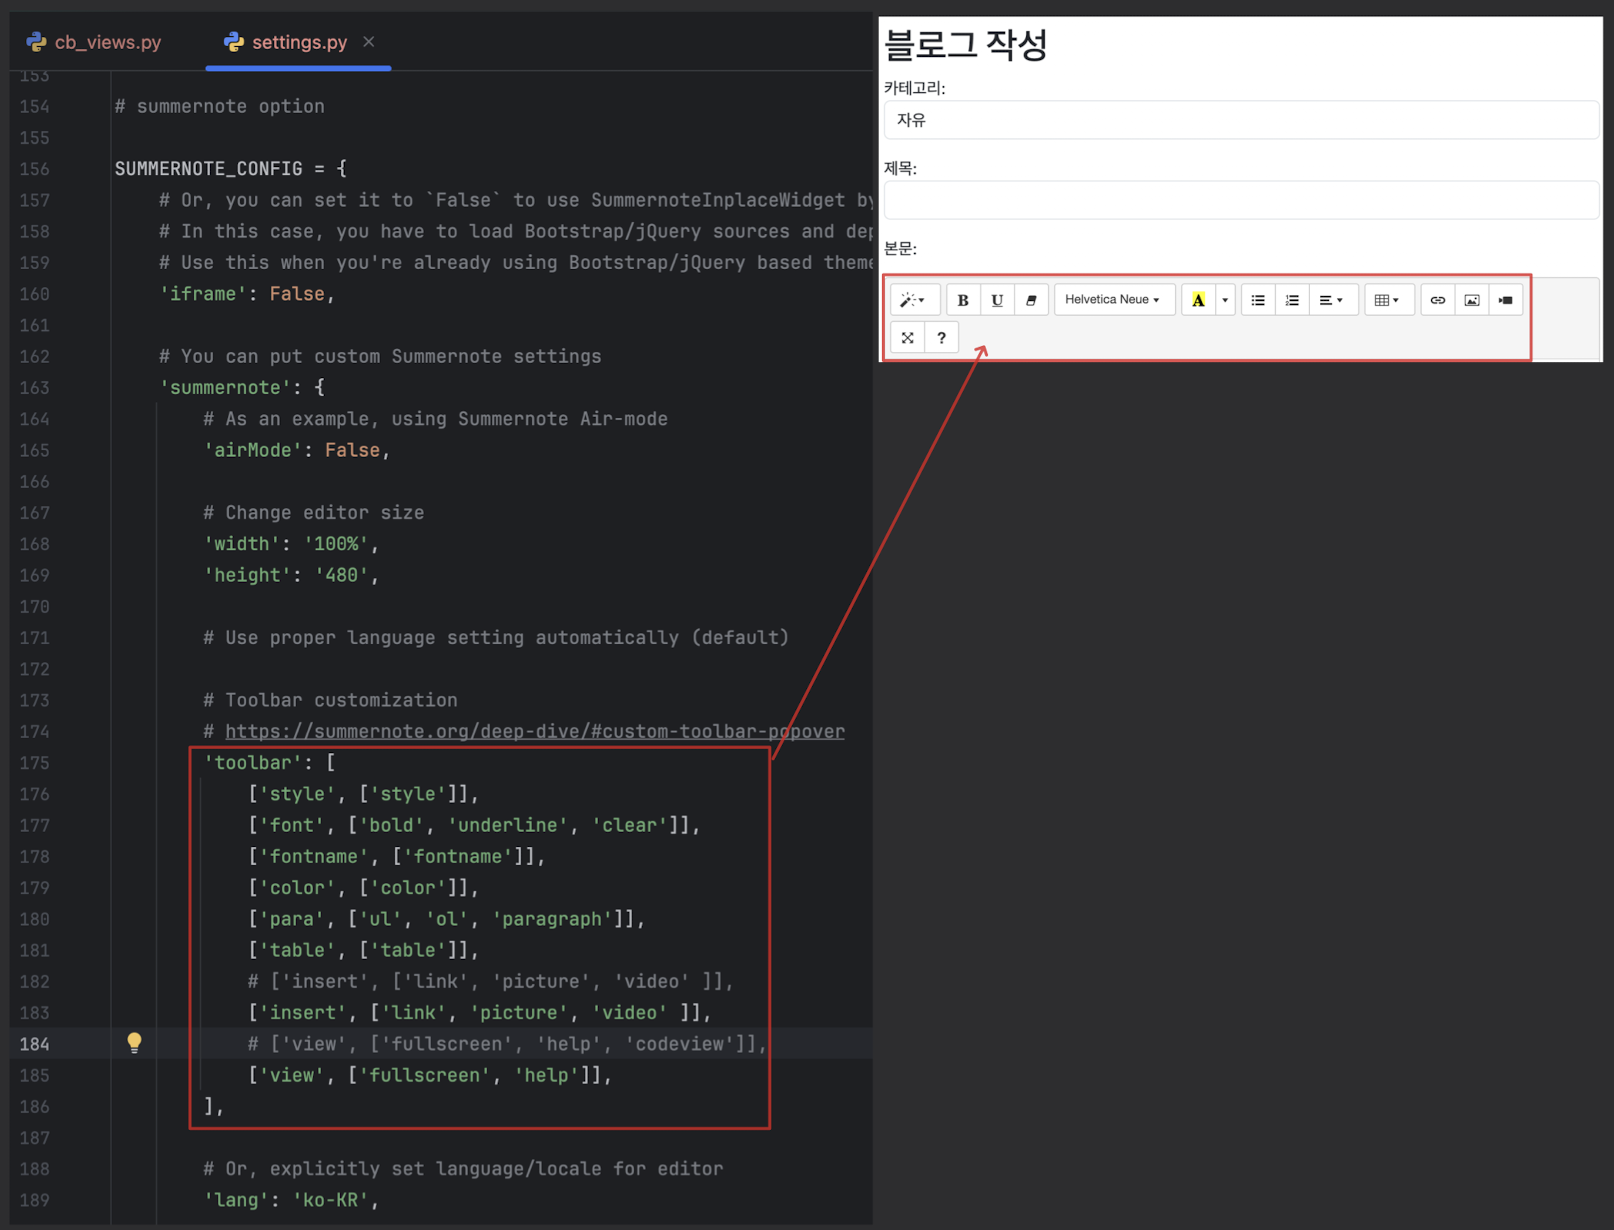
블로그 Form에 Summernote 붙이기
- admin에서는 summernote 사용이 가능하지만 localhost:8000에서는 아직 불가
- forms.py 에서 BlogForm 클래스를 수정
- cb_views.py 에서 BlogCreateView , BlogUpdateView 클래스를 수정
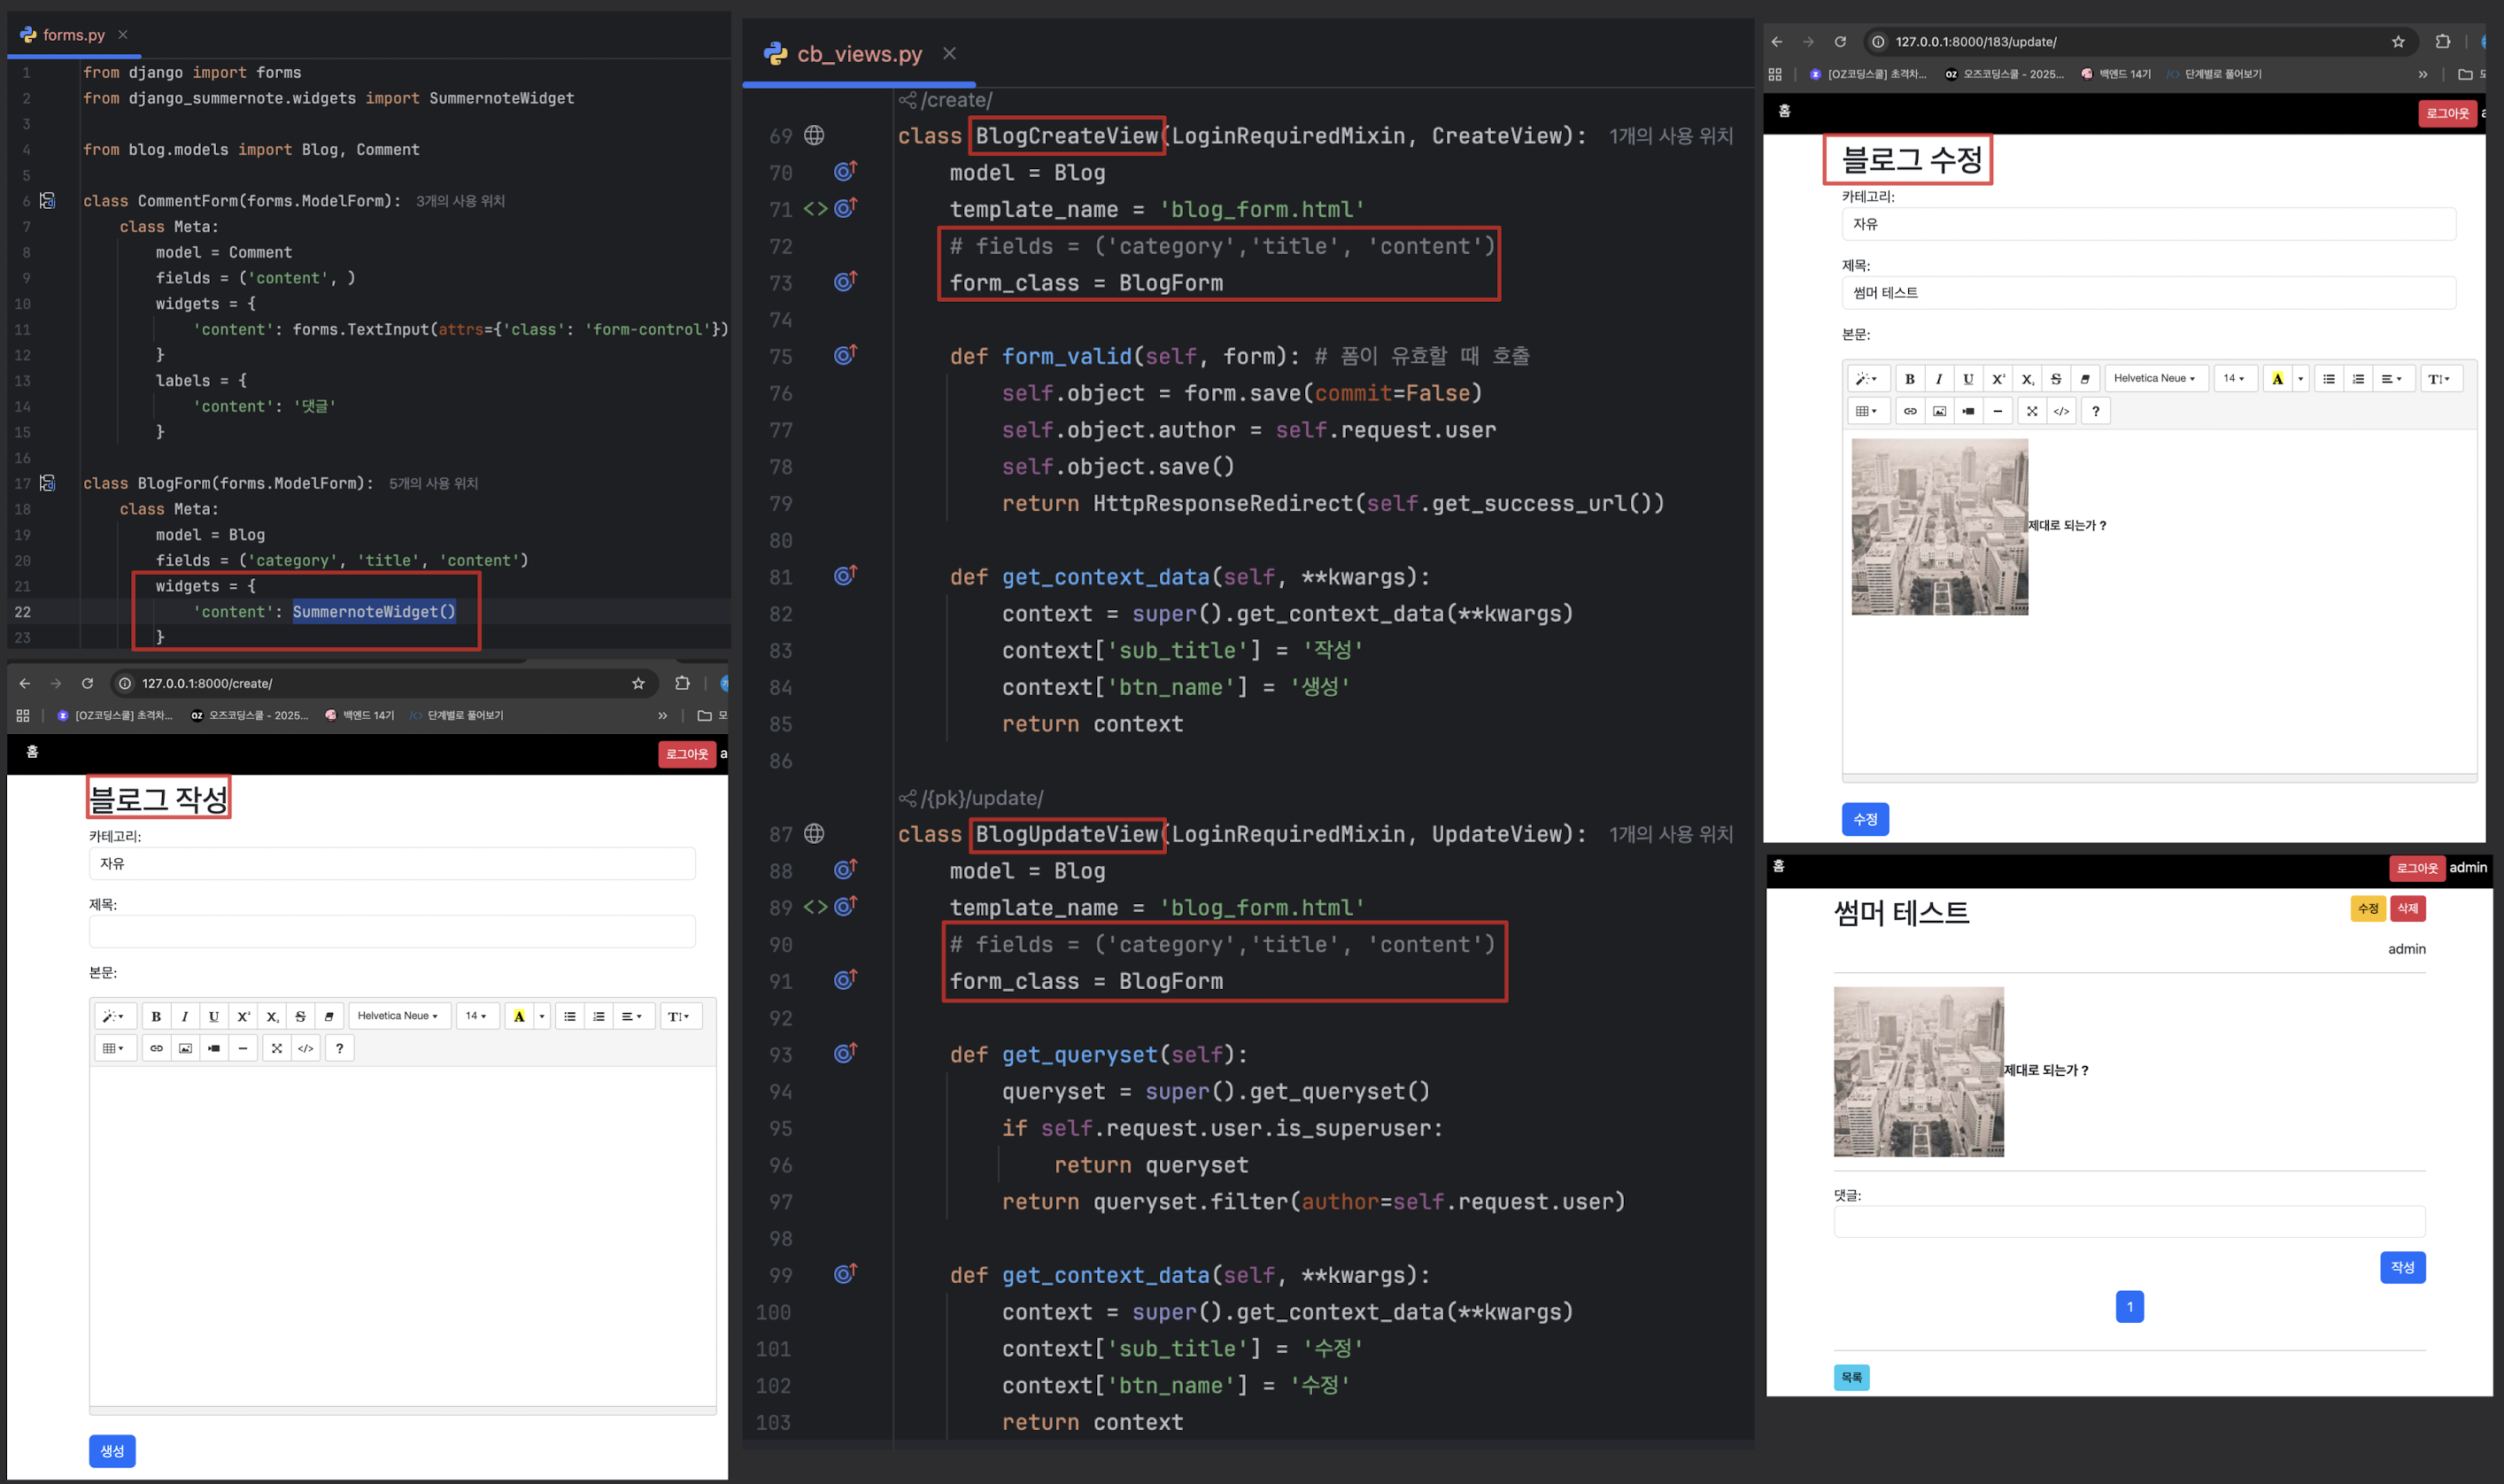
- cb_views.py 에서 BlogCreateView , BlogUpdateView 클래스를 수정
- OPTIONS 코드를 settings.py 최하단에 붙여넣기
- summernote github 여기서 밑으로 스크롤 하면 OPTIONS 나옴
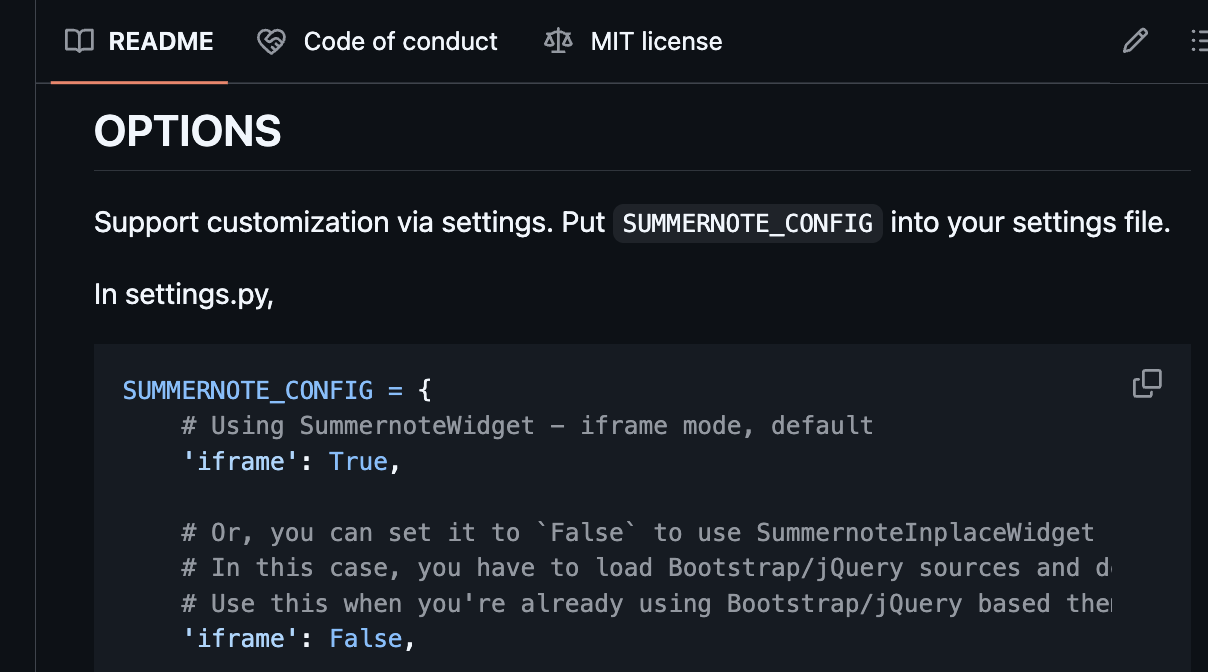
- summernote github 여기서 밑으로 스크롤 하면 OPTIONS 나옴
# summernote option (불필요한 부분 제거 )
SUMMERNOTE_CONFIG = {
    # Or, you can set it to `False` to use SummernoteInplaceWidget by default - no iframe mode
    # In this case, you have to load Bootstrap/jQuery sources and dependencies manually.
    # Use this when you're already using Bootstrap/jQuery based themes.
    'iframe': False,

    # You can put custom Summernote settings
    'summernote': {
        # As an example, using Summernote Air-mode
        'airMode': False,

        # Change editor size
        'width': '100%',
        'height': '480',

        # Use proper language setting automatically (default)

        # Toolbar customization
        # https://summernote.org/deep-dive/#custom-toolbar-popover
        'toolbar': [
            ['style', ['style']],
            ['font', ['bold', 'underline', 'clear']],
            ['fontname', ['fontname']],
            ['color', ['color']],
            ['para', ['ul', 'ol', 'paragraph']],
            ['table', ['table']],
            ['insert', ['link', 'picture', ]],
            ['view', ['fullscreen', 'help']],
        ],

        # Or, explicitly set language/locale for editor
        'lang': 'ko-KR',

        # You can also add custom settings for external plugins
        # 'print': {
        #     'stylesheetUrl': '/some_static_folder/printable.css',
        # },
        'codemirror': {
            'mode': 'htmlmixed',
            'lineNumbers': 'true',
            # You have to include theme file in 'css' or 'css_for_inplace' before using it.
            'theme': 'monokai',
        },
    },

    # Require users to be authenticated for uploading attachments.
    'attachment_require_authentication': True,


    # You can completely disable the attachment feature.
    'disable_attachment': False,

    # Set to `False` to return attachment paths in relative URIs.
    'attachment_absolute_uri': True,

    # test_func in summernote upload view. (Allow upload images only when user passes the test)
    # https://docs.djangoproject.com/en/2.2/topics/auth/default/#django.contrib.auth.mixins.UserPassesTestMixin

    # You can add custom css/js for SummernoteWidget.
}- option을 추가해서 사이트에 맞게 사이즈를 정해놓을 수 있음
toolbar
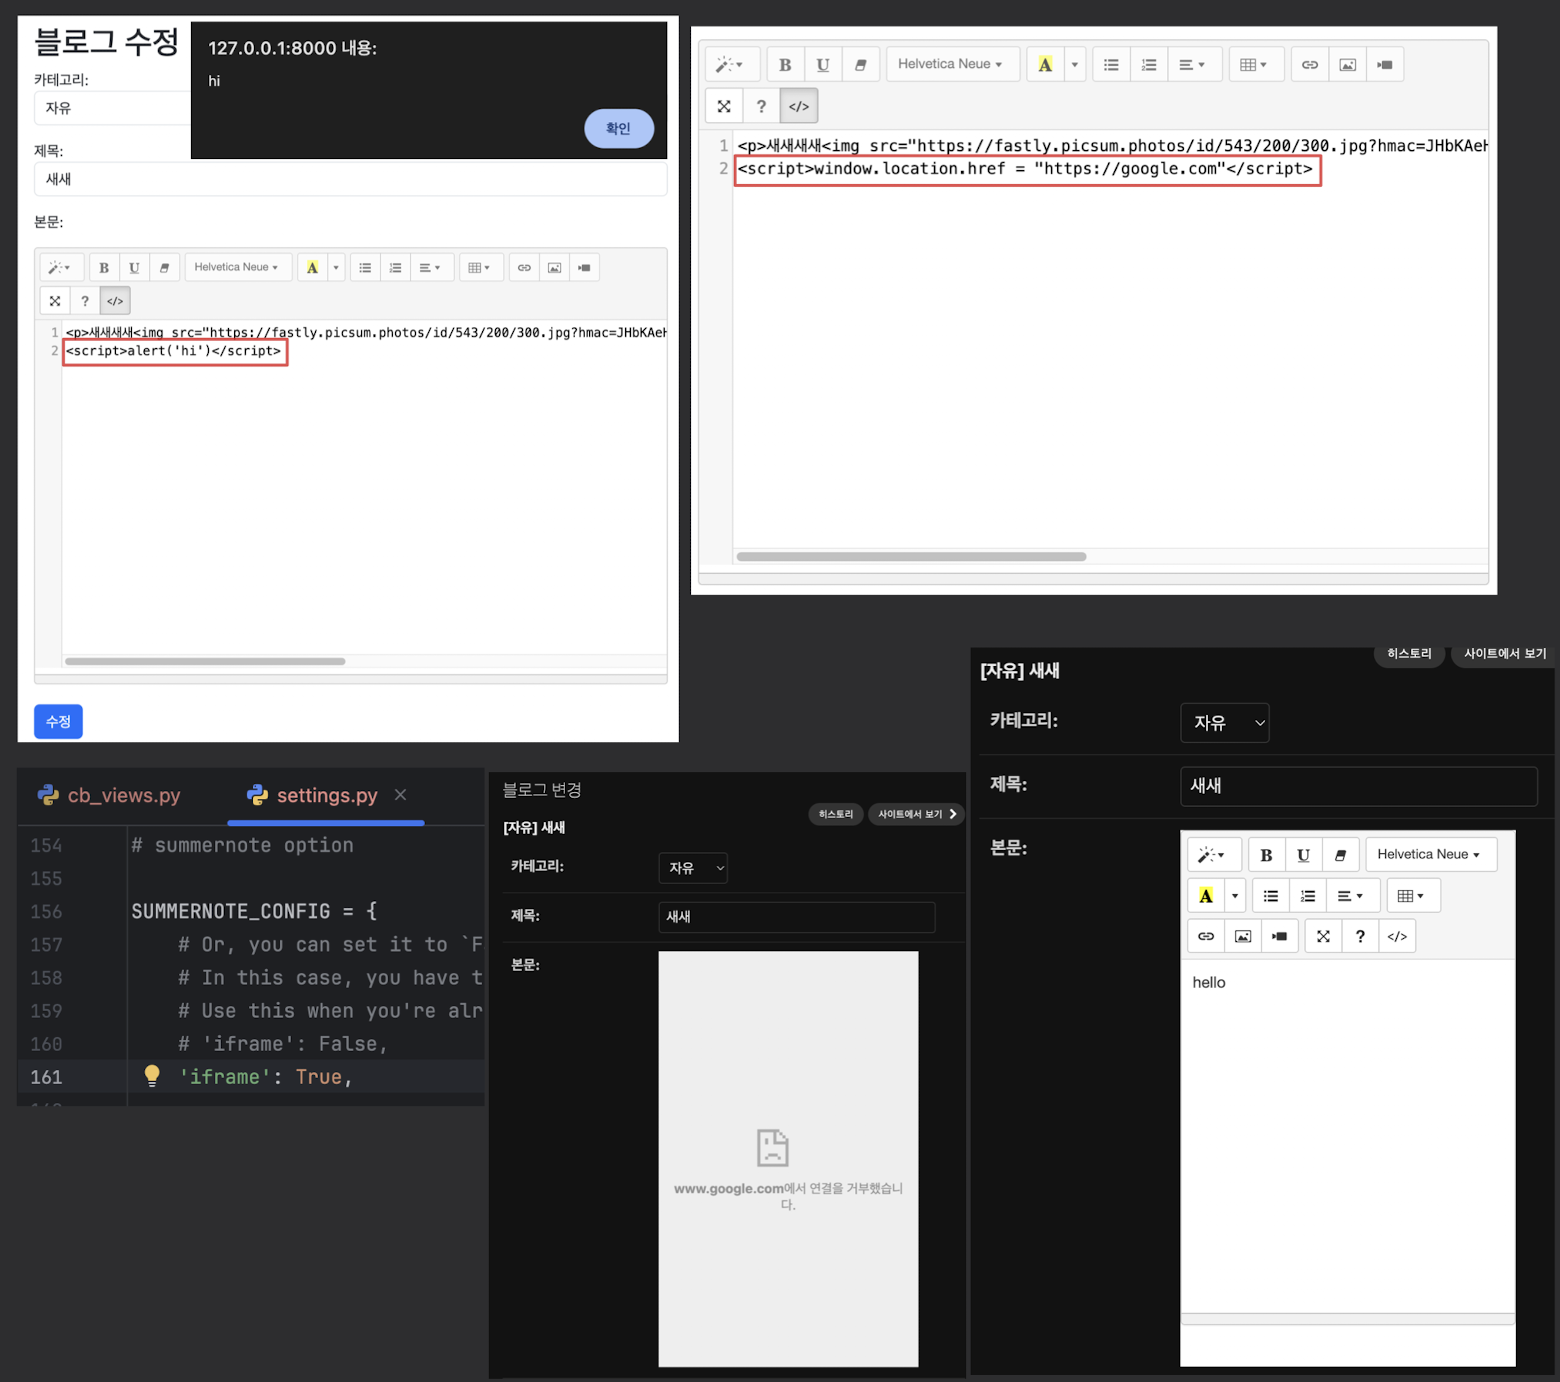
Rich Text Editor를 통해 들어오는 위험한 접근 막기
- codeview 를 이용해서 블로그를 들어가면 다른 위험한 사이트로 연결되도록 하는 것을 막기위함
- iframe = True 로 해야 admin페이지에서 보임
- 블로그 들어가면 바로 구글로 가버리기 때문에 망가져 버렸음
- iframe = True 로 해야 admin페이지에서 보임
- 해결
- blog = Blog.objects.get(id= 고쳐야할 블로그 id)
- blog.content
- id에 맞는 블로그 글이 나옴
- blog.content = '변경할 내용 적기'
- blog.save()
- 변경할 내용으로 id에 맞는 블로그의 내용이 변경됨
- codeview 는 막아두는게 좋음
유용한 라이브러리
블로그에 이미지 업로드하기 with Pillow
-
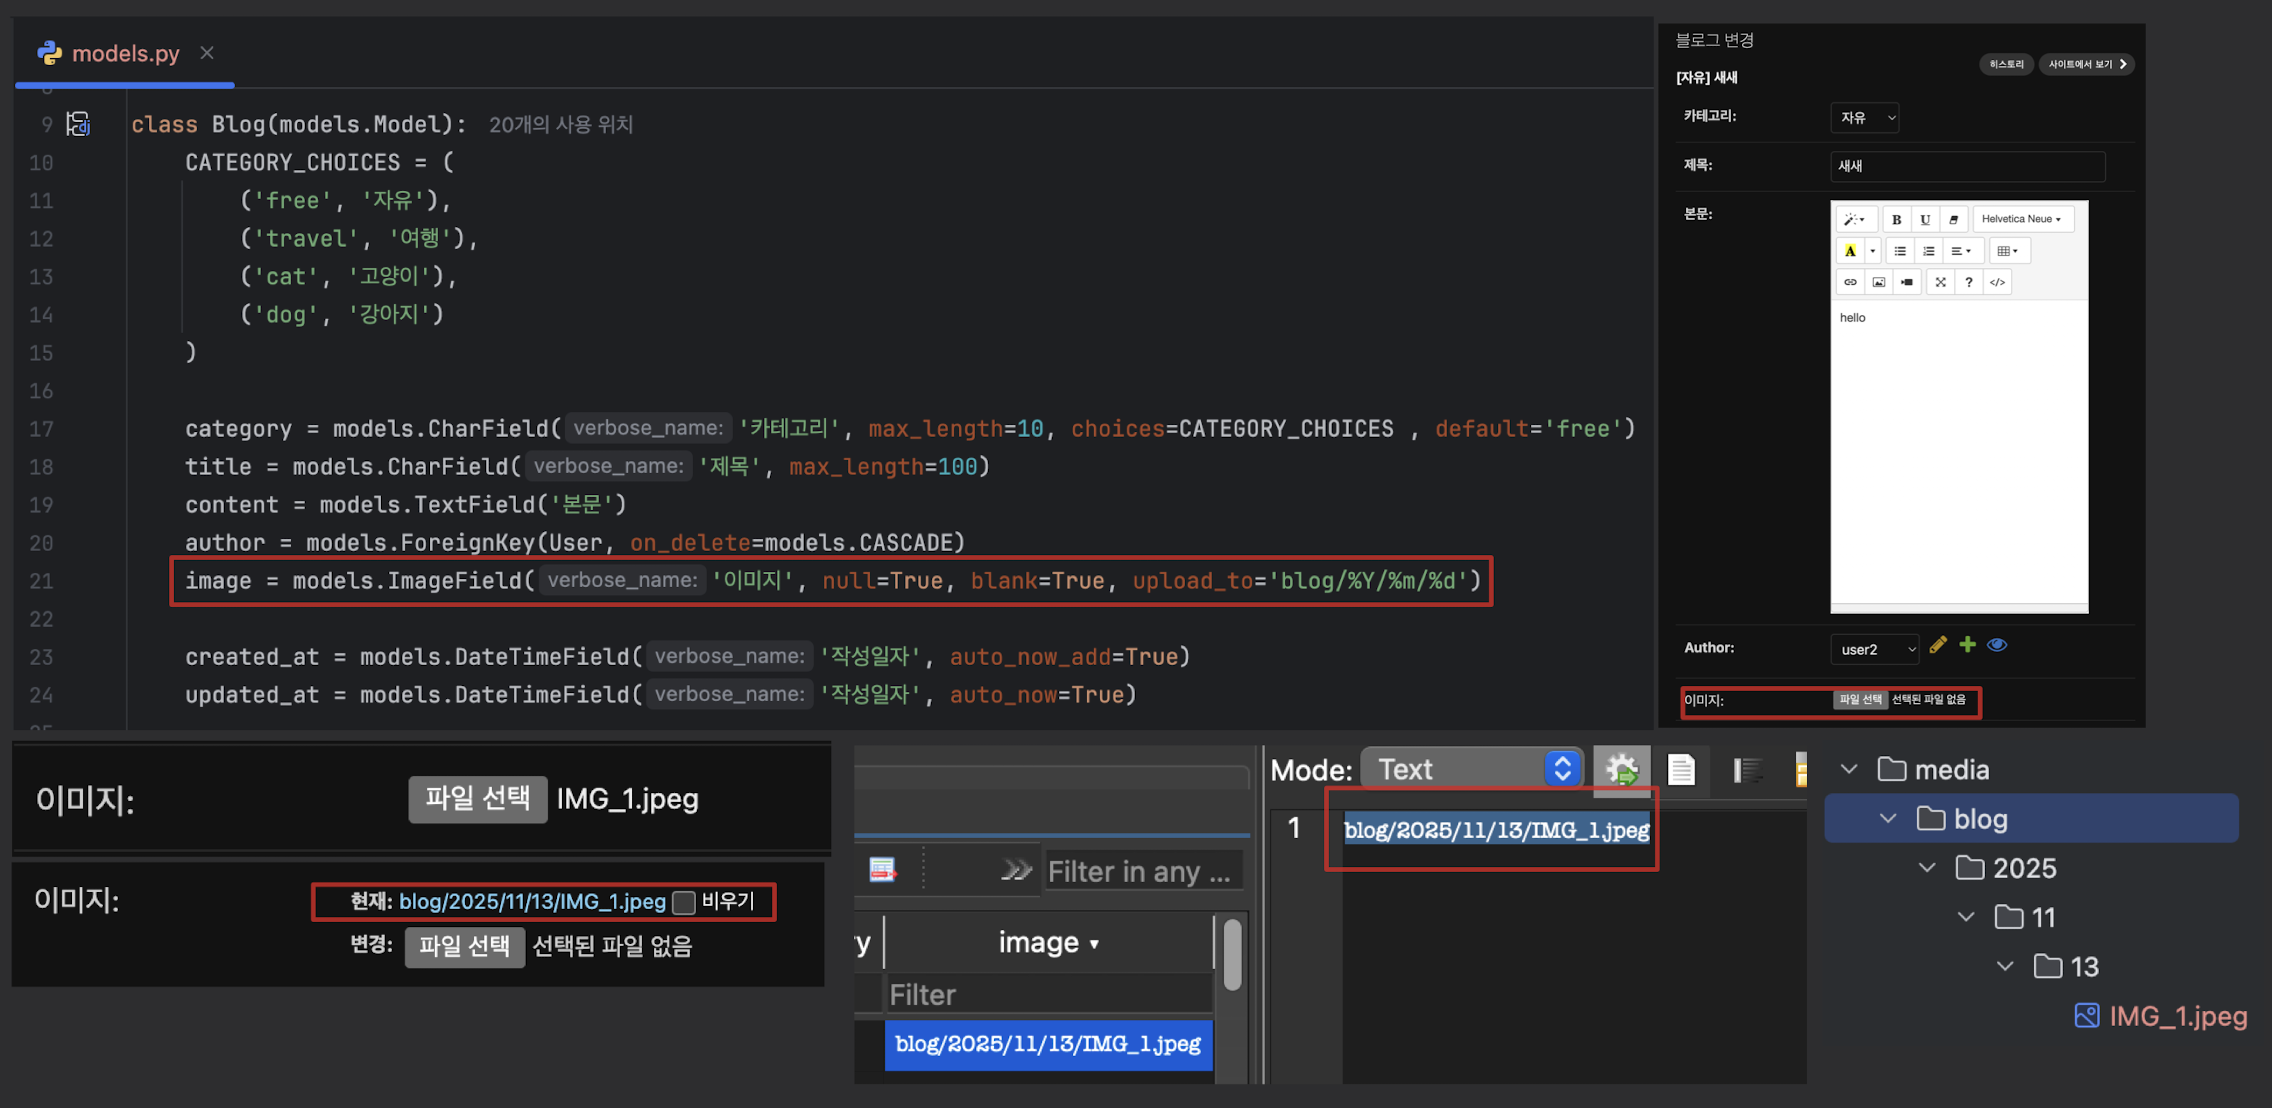
models.py 에 이미지 필드를 추가
- imageField
- FileField와 같지만 이미지 파일만 업로드하도록 되어있는 VARCHAR 필드
- 여기에는 이미지의 주소(경로)가 들어감
- upload_to 는 미디어 폴더 안의 경로를 설정
- upload_to='blog/%Y/%m/%d'
- blog/2025/11/13/이미지파일.jpeg 처럼 나옴
- imageField
-
Image를 사용하기 위한 Pillow 라이브러리를 설치 필요
poetry add pillow
-
모델을 수정했기때문에 마이그레이션 파일을 만들고 마이그레이트
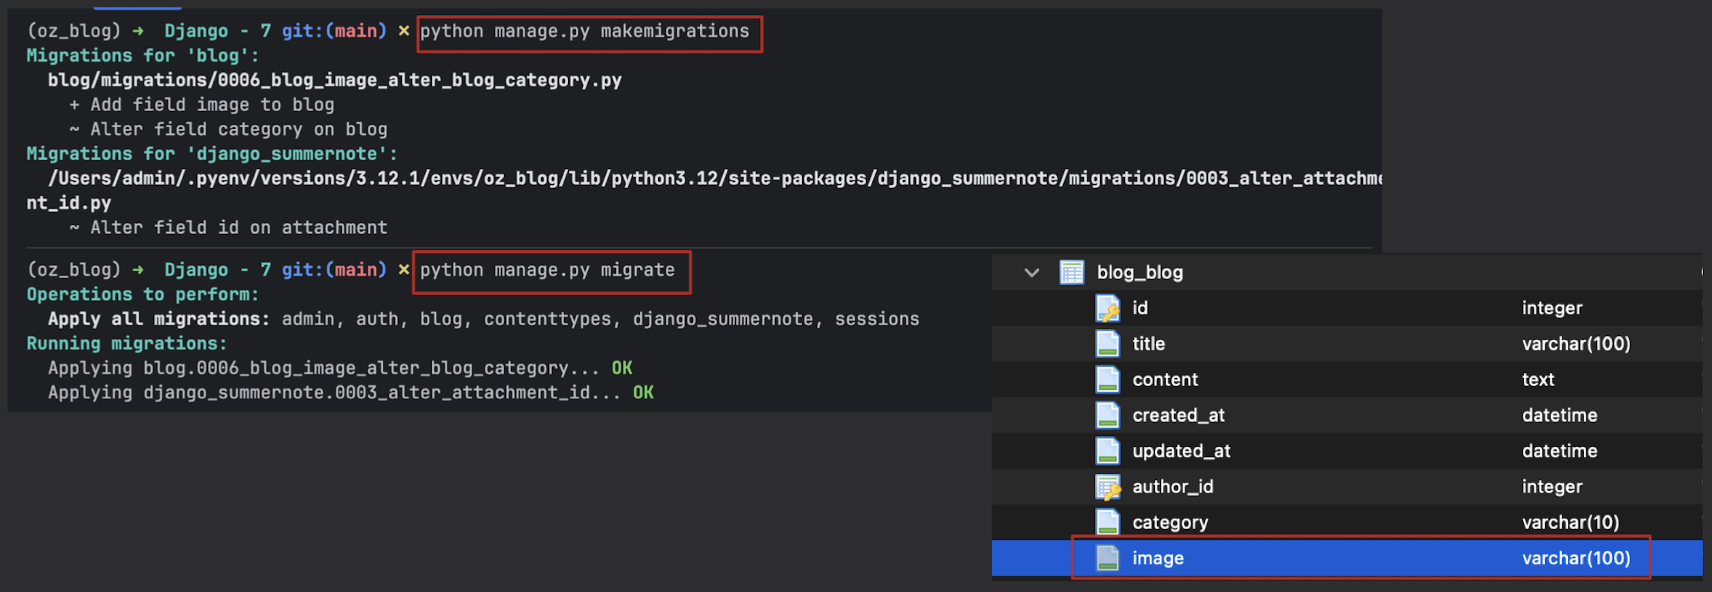
-
admin 페이지에서는 확인 완료
홈에서 이미지 업로드 실습
- 어드민에서는 가능했는데 아직 이미지 업로드가 안됨
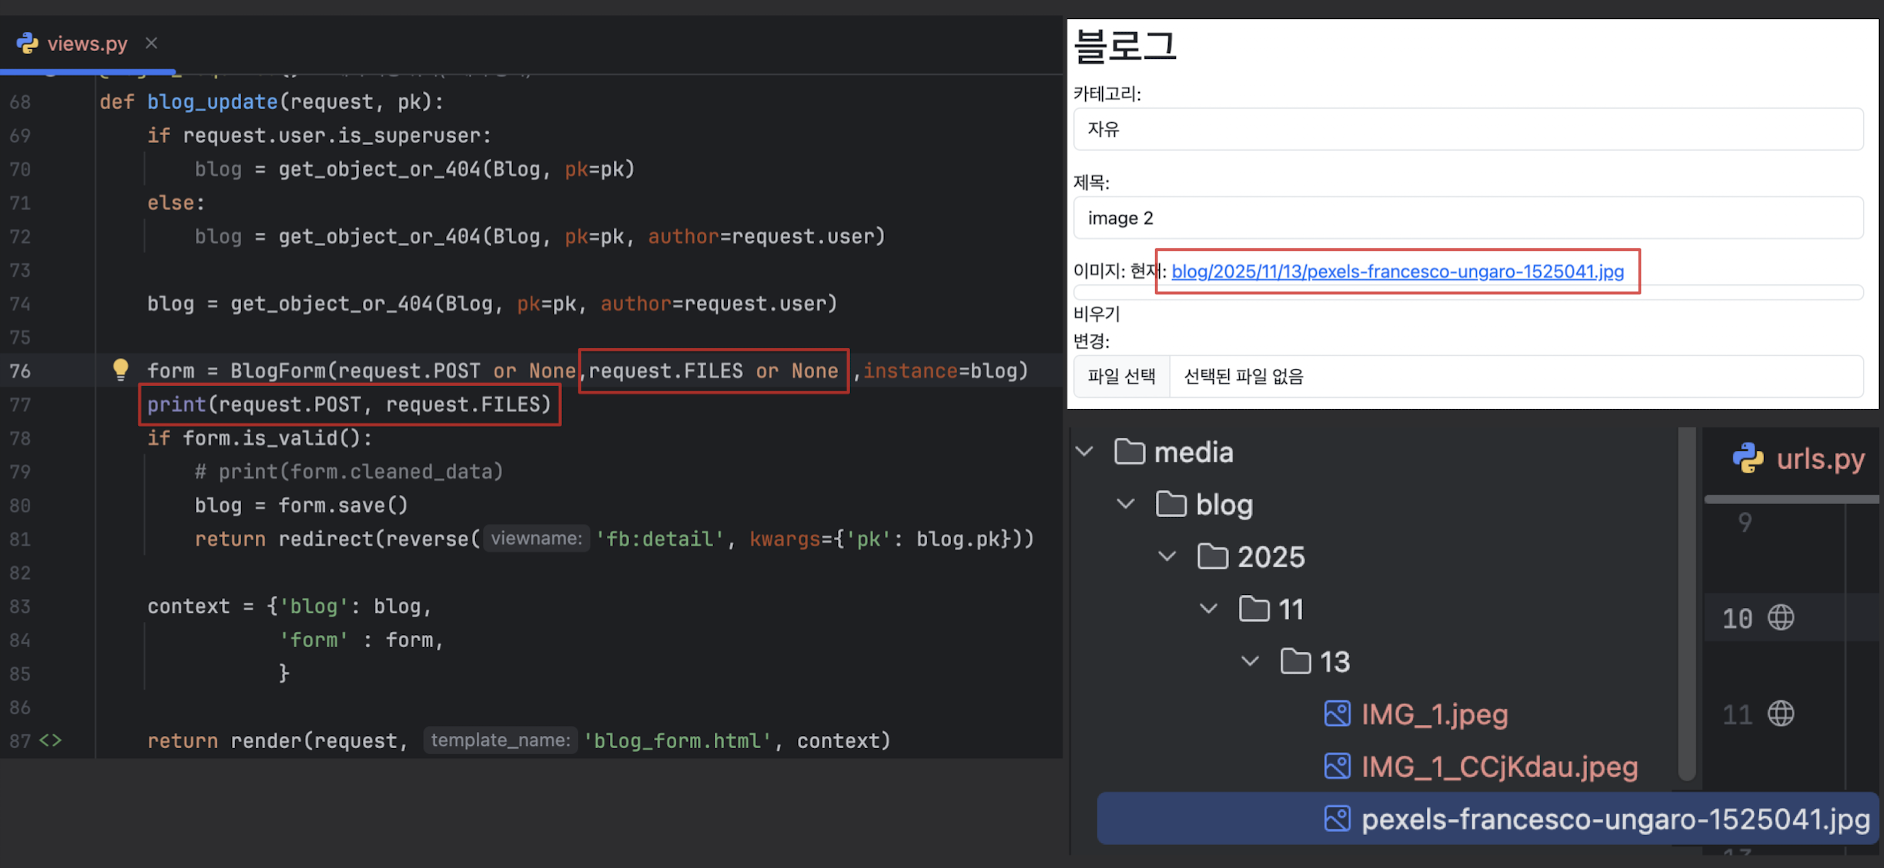
- BlogForm 에 이미지 필드를 추가
-fields = ('category', 'title', 'image', 'content')
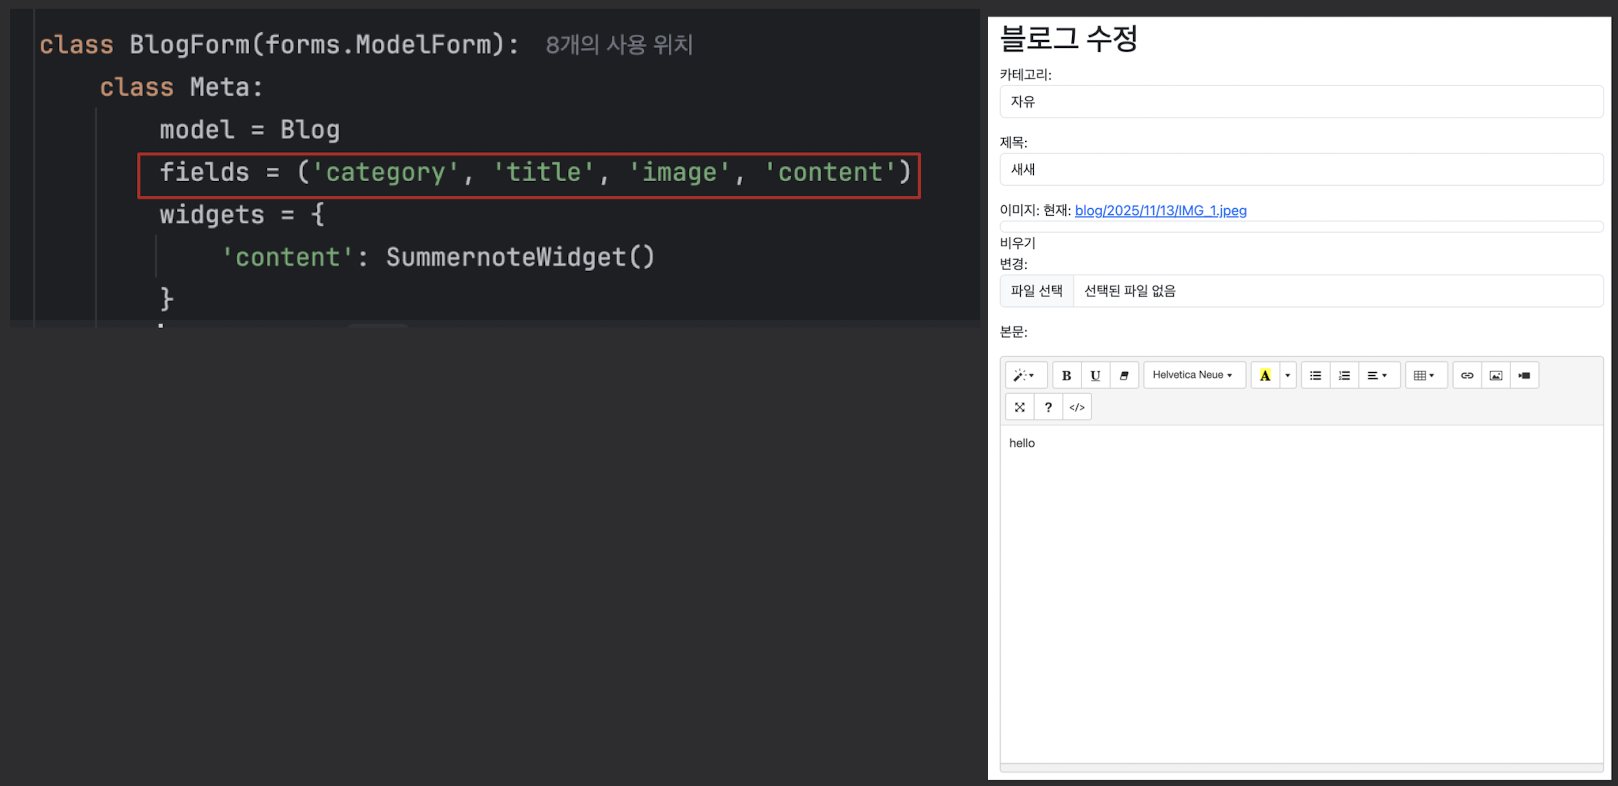
- 이미지 업로드는 가능하지만 아직 올라간 사진이 보이지는 않음 , 수정 페이지에서는 이름만
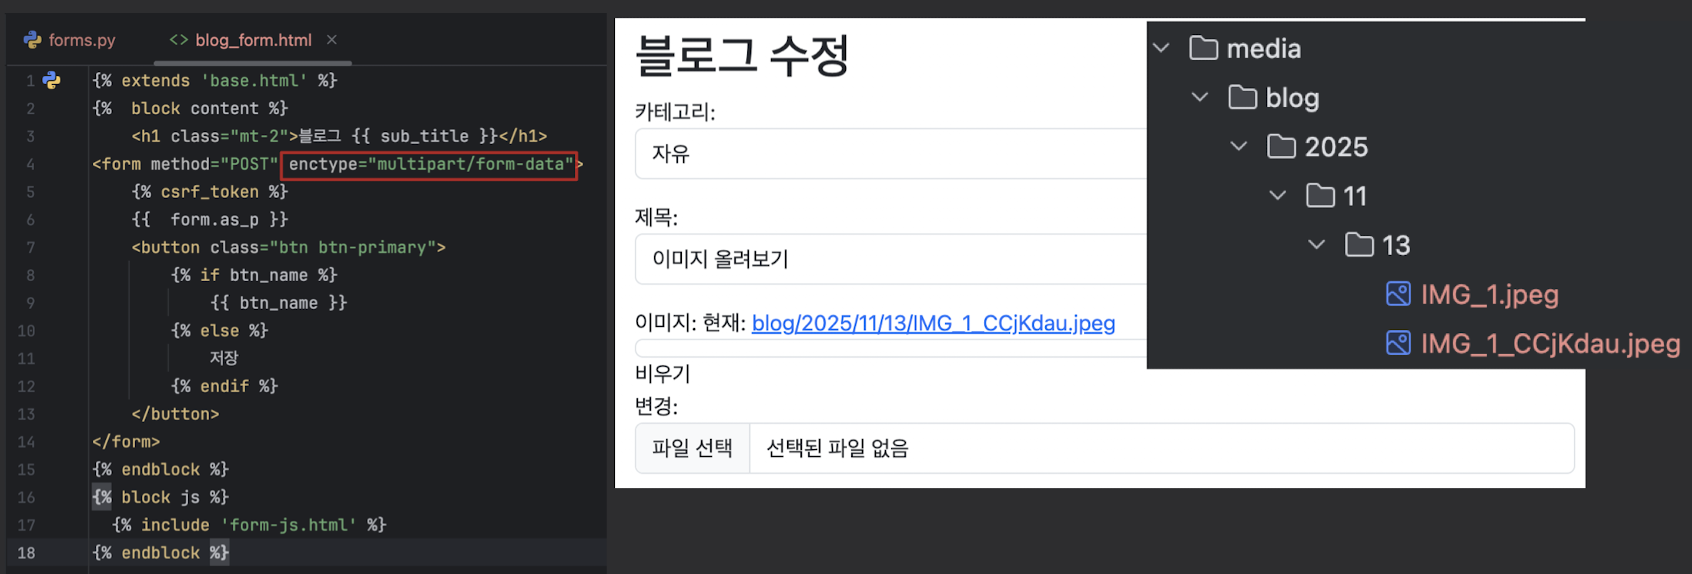
- blog_form.html 를 이미지가 들어가도록 수정(인코딩 타입 수정 )
- enctype="multipart/form-data"
- django 는 같은 이름의 사진을 업로드하면, 무작위 난수로 이름을 변경시킨다.
- 이미지가 잘 들어가는지 폼 검증 함수 추가
class BlogUpdateView(LoginRequiredMixin, UpdateView):
    model = Blog
    template_name = 'blog_form.html'
    form_class = BlogForm
	.
    .
    .

	# 추가
    def form_valid(self, form):
        print(form.cleaned_data)
        return super().form_valid(form)
	.
    .
.- 업로드한 이미지가 리스트와 상세페이지에서 보이게 하기
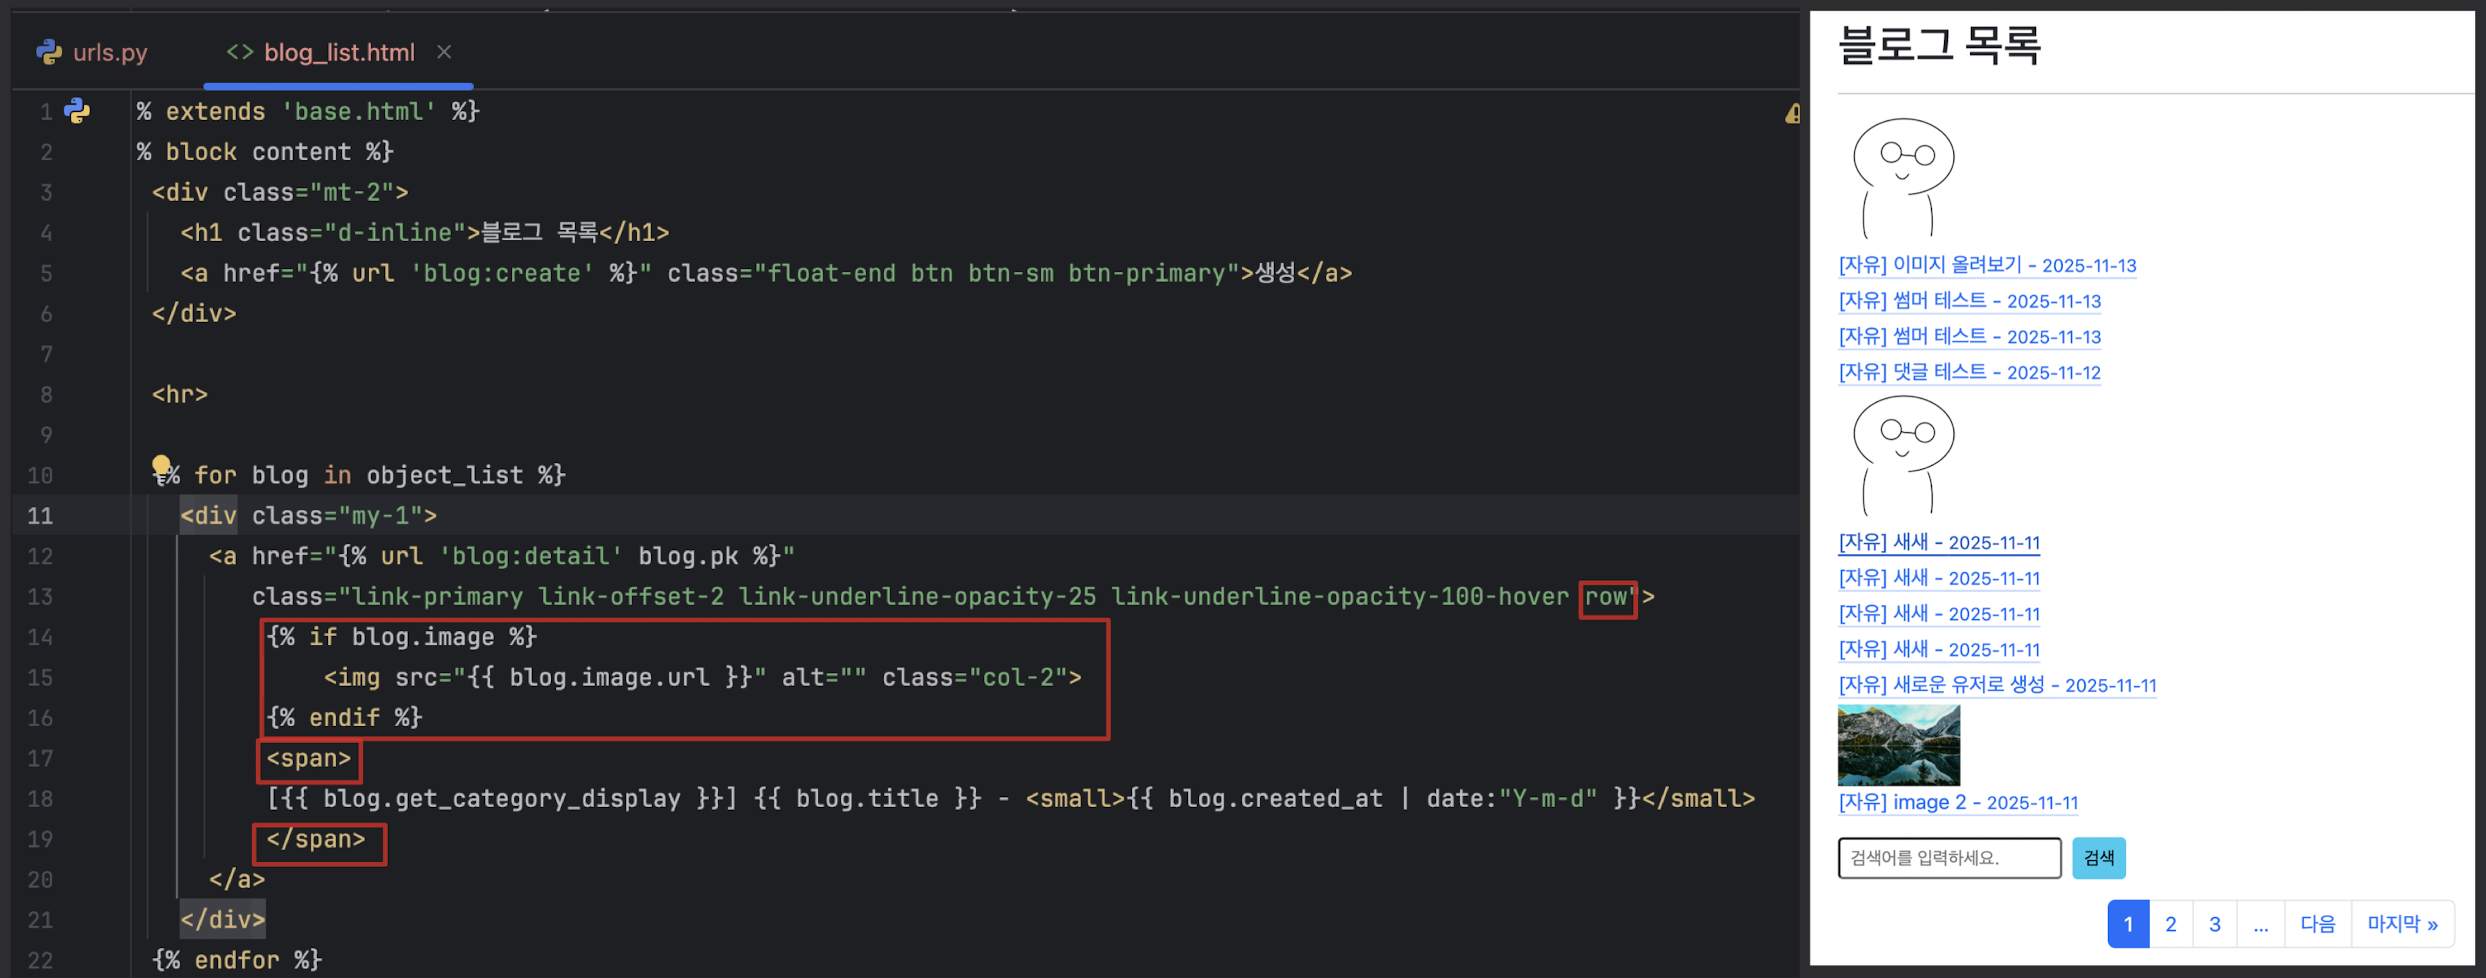
# blog_list.html
{% for blog in object_list %}
<div class="my-1">
{# 수정 #}
<a href="{% url 'blog:detail' blog.pk %}" class="link-primary link-offset-2 link-underline-opacity-25 link-underline-opacity-100-hover row">
{% if blog.image %}
<img src="{{ blog.image.url }}" alt="" class="col-2">
{% endif %}
<span class="col-10">
[{{ blog.get_category_display }}] {{ blog.title }} - <small>{{ blog.created_at | date:"Y-m-d" }}</small>
</span>
</a>
</div>
{% endfor %}
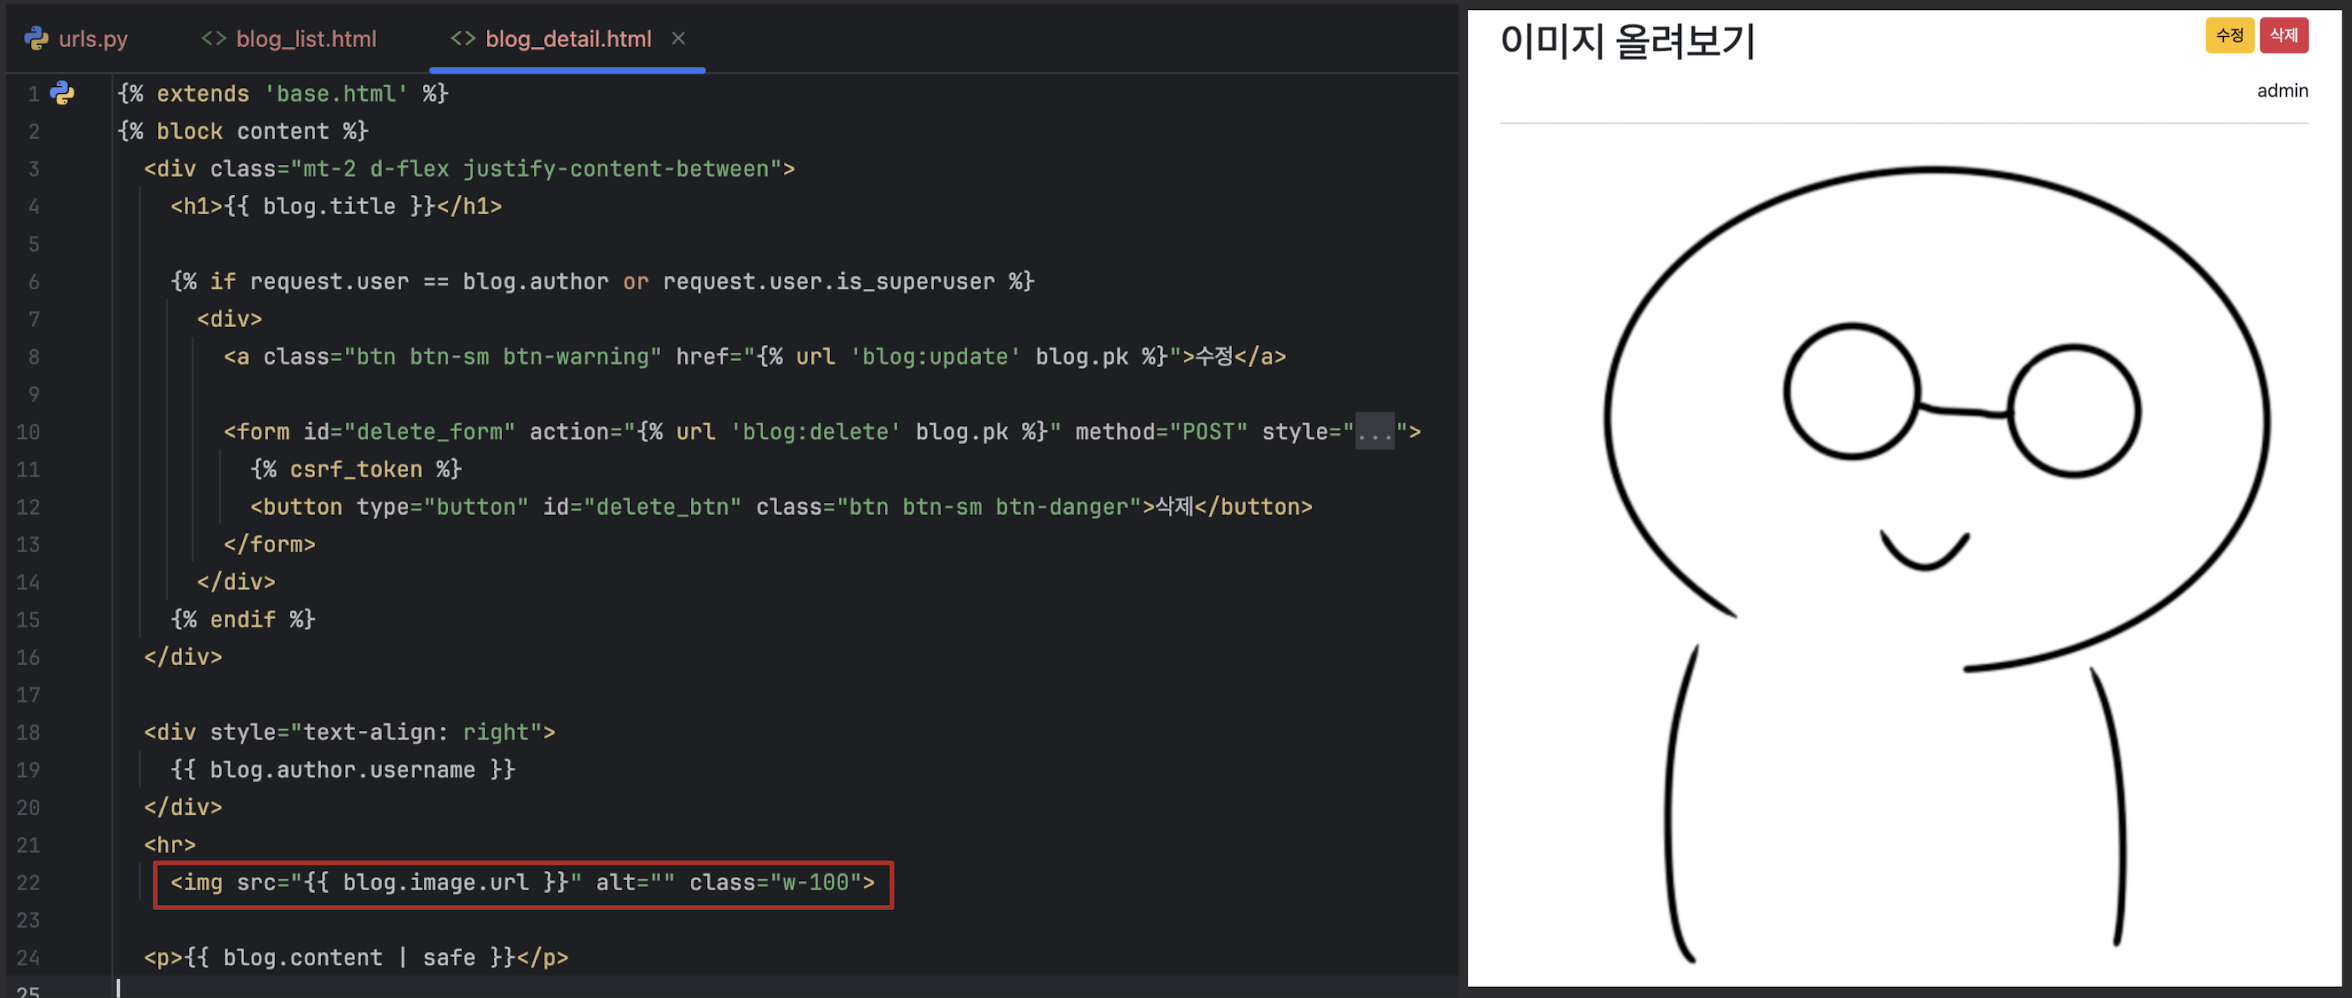
# # blog_detail.html
<div style="text-align: right">
{{ blog.author.username }}
</div>
<hr>
<img src="{{ blog.image.url }}" alt="" class="w-100"> {# 추가 #}FBV
CBV에서 FBV로 잠시 전환
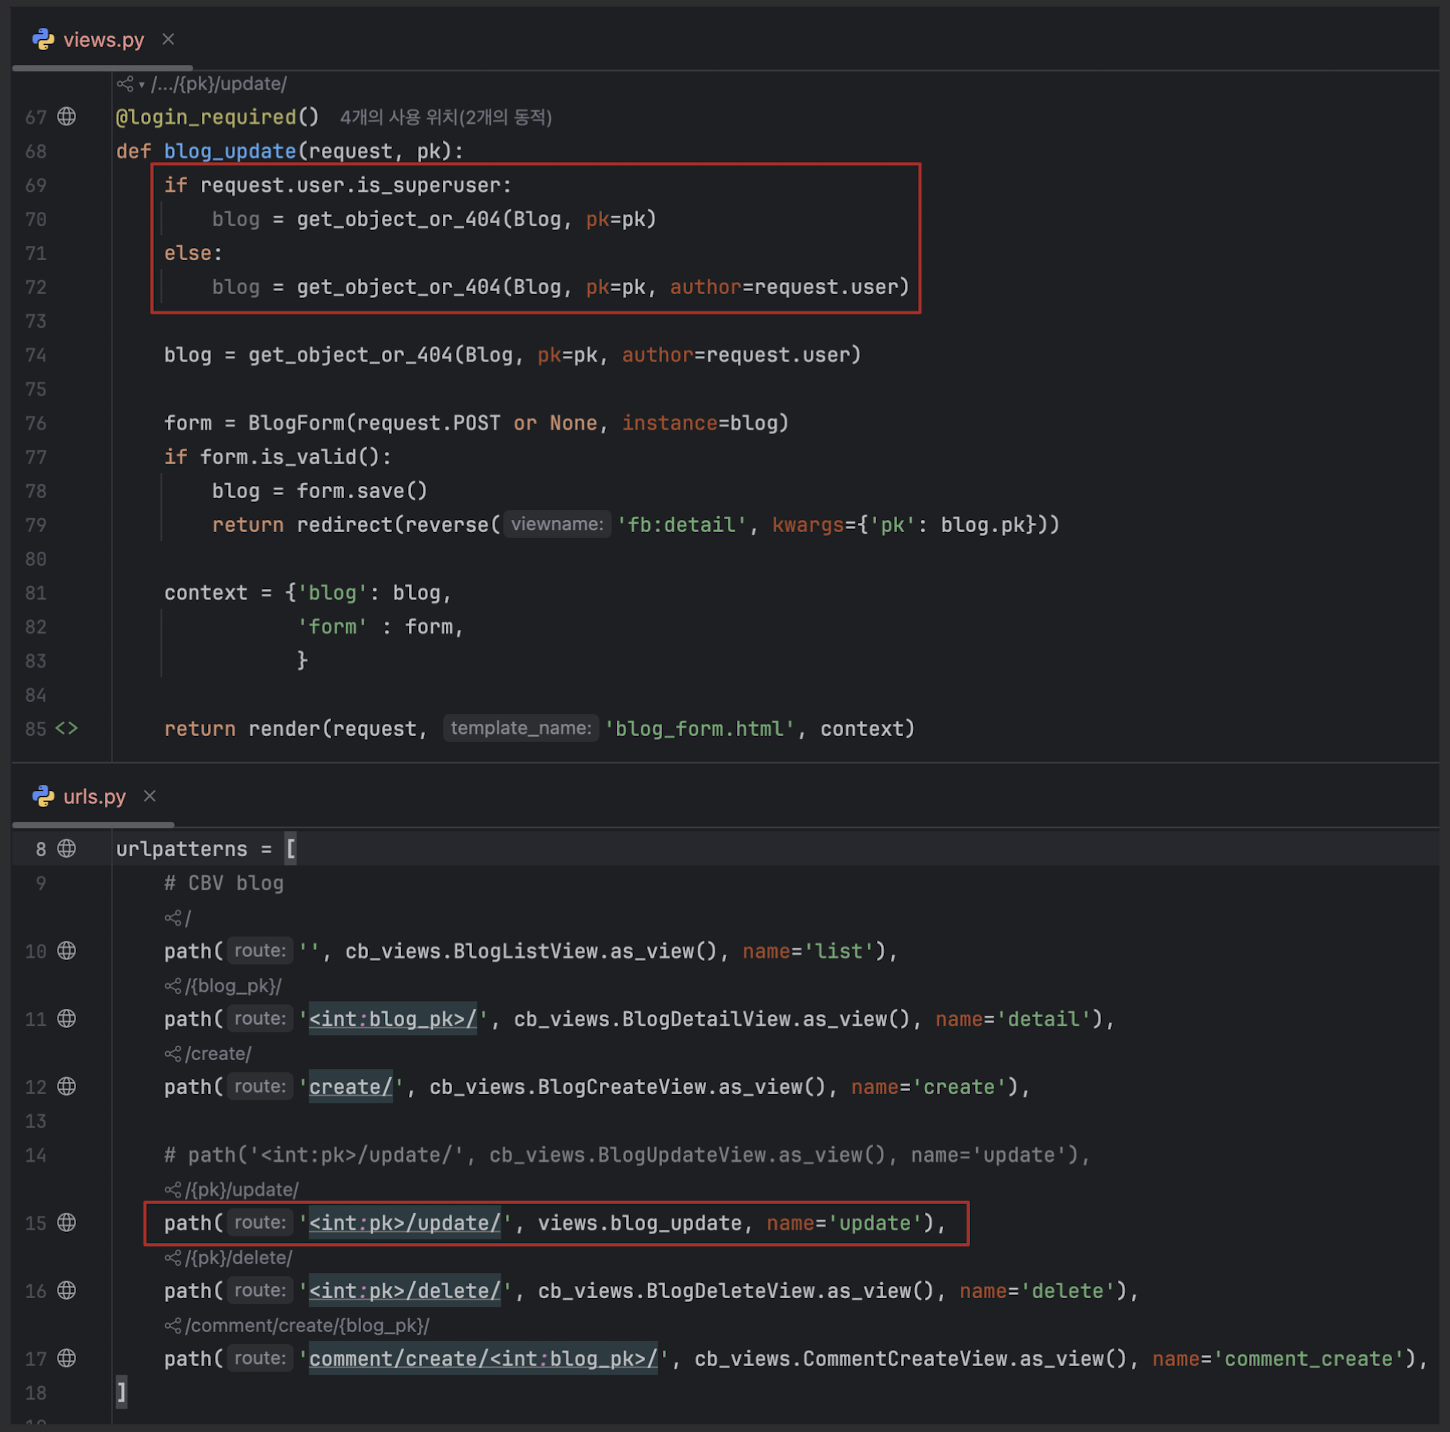
FBV 이미지 업로드 테스트
- CBV에서는 이미지업로드가 가능햇는데 FBV에서는 작동 안되는 중
# 이미지가 제대로 들어오는지 테스트
if form.is_vaild():
	print(form.cleaned_data)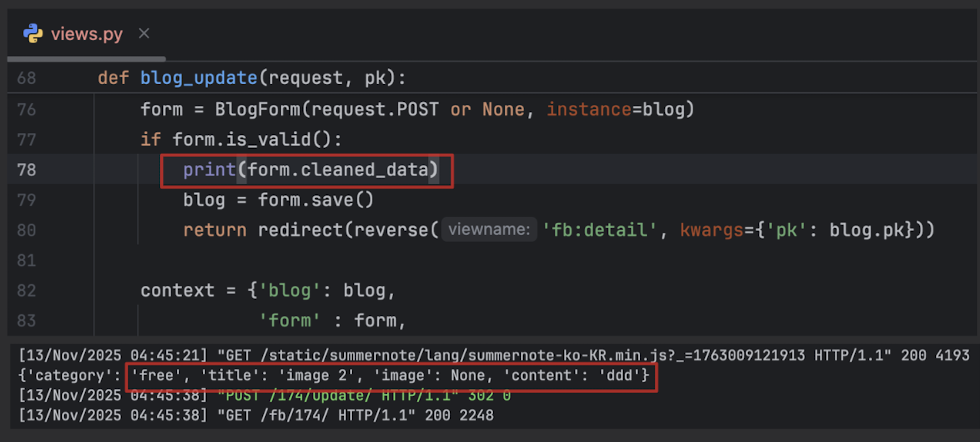
- 이미지 띄우기
- list / detail
- img src="{{ blog.image.url }}"
- image = models.py 의 ImageField 자체
- img src="{{ blog.image.url }}"
- detail
- class="w-100" 보여지는 이미지 크기 조절
- list / detail
코드 작성 후 이미지가 없는 블로그에 들어가면 오류발생
- 이미지가 없는 글의 상세페이지로 이동할 때 발생하는 오류를 해결
- blog_detail.html 에서 이미지가 있을 때만 이미지 주소를 렌더링 하도록 코드를 수정
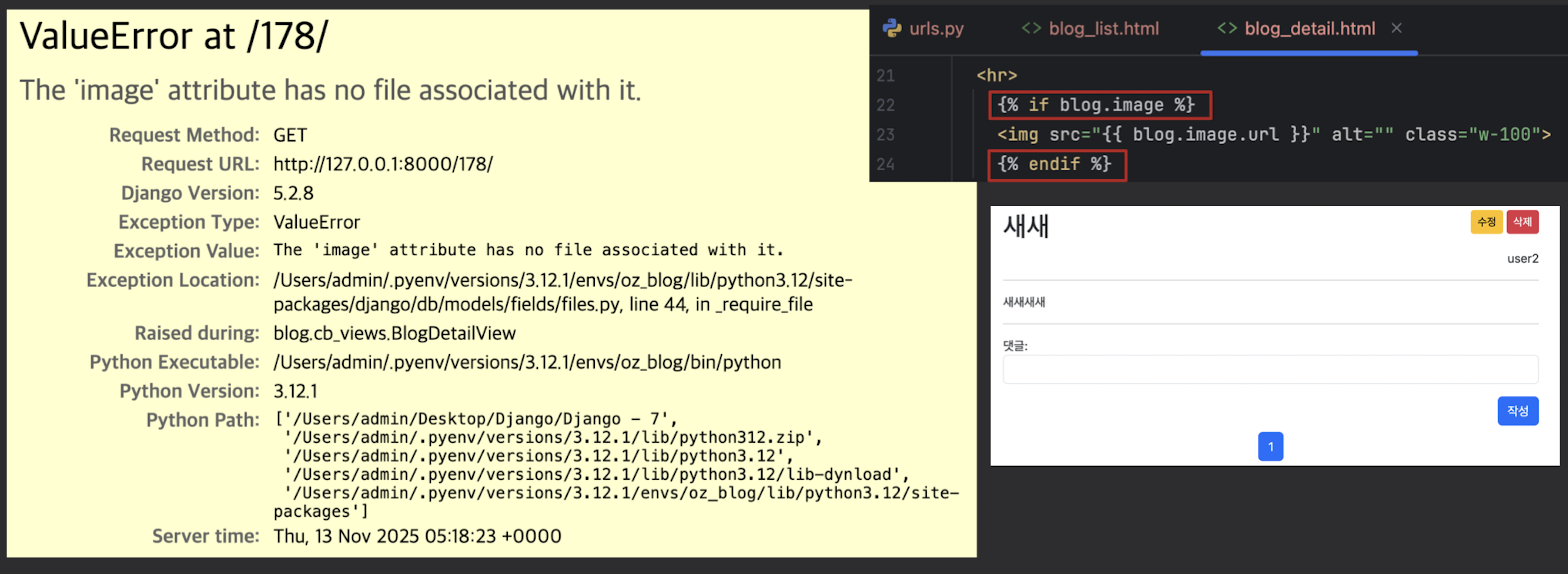
- blog_detail.html 에서 이미지가 있을 때만 이미지 주소를 렌더링 하도록 코드를 수정
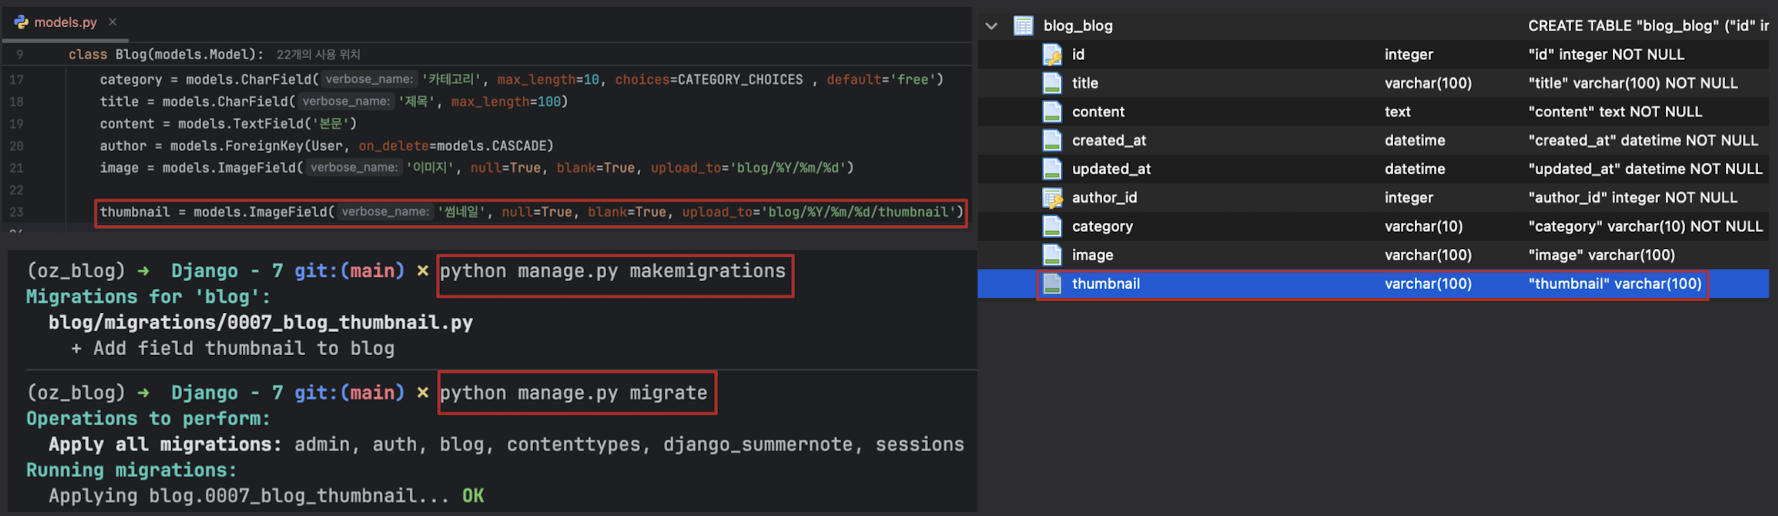
Thumbnail 이미지 저장하기
-
이미지가 포함된 게시글은 목록페이지에서 제목 옆에 이미지가 보이도록 만들기
- thum은 용량이 작아서 일반 사진보다 훨씬 빠르게 로드 가능
-
- thumbnail 필드를 추가하고 마이그레이션 파일을 만들고 마이그레이트
- thumbnail = models.ImageField
- ('썸네일', null=True, blank=True, upload_to='blog/%Y/%m/%d/thumbnail')
- blank=True : 홈에서 입력을 해도 되고 안해도 된다.
- null=True : DB에 null값이 들어갈 수 있다
-
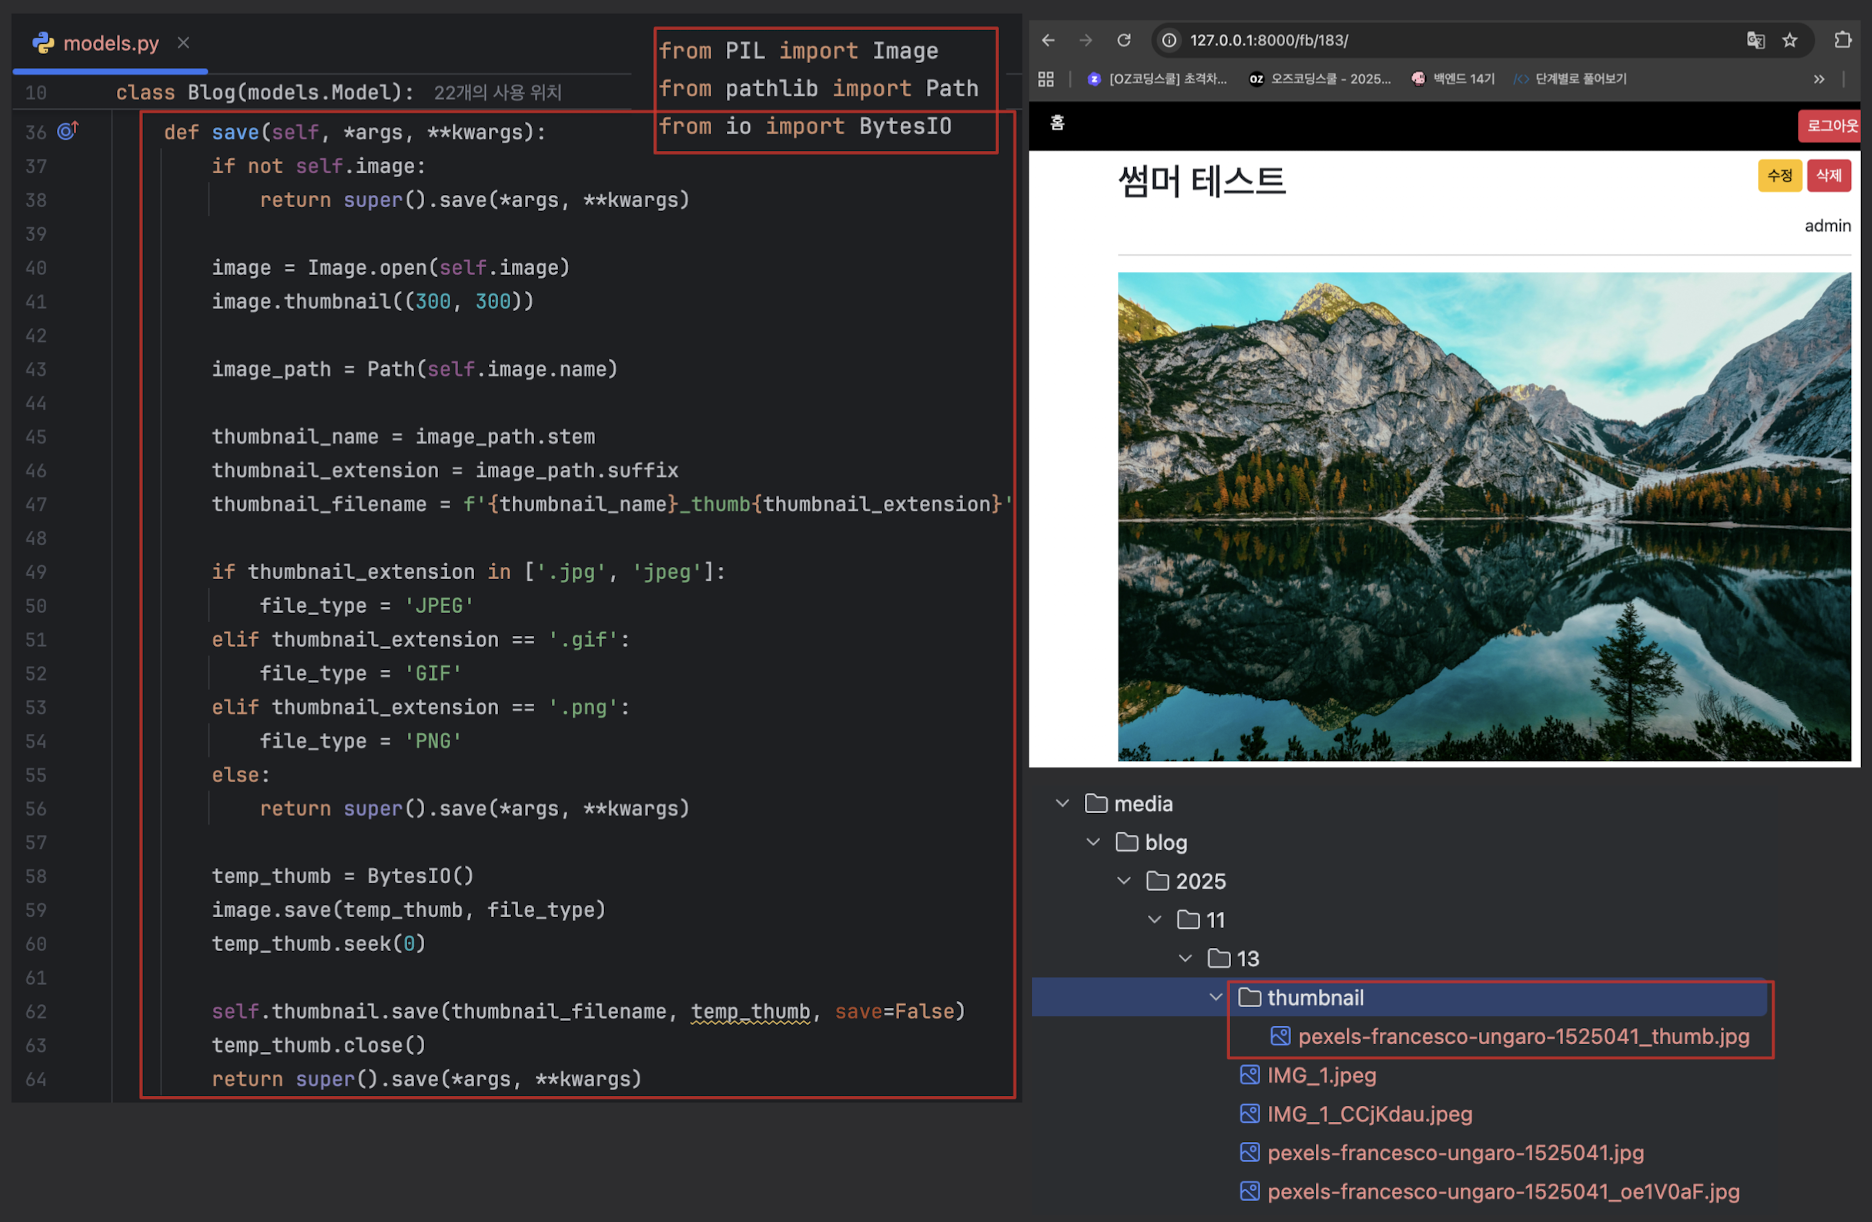
- models.py 에서 form.save() 를 오버라이드하는 코드를 작성
- 오버라이드
- 상속 관계에서 부모 클래스가 가진 메서드를 자식 클래스가
- “같은 이름으로 다시 정의해서 덮어쓰는 것”
- 요약: 부모가 준 기능이 있는데, 자식이 그 기능을 자기 방식대로 고쳐 쓰는 것
- image_path = Path(self.image.name)
- Path 라이브러리를 사용해 이미지 경로를 가져옴
- thumbnail_name = image_path.stem
- path 라이브러리를 통해 stem을 가져오면 마지막 확장자를 제외한 이름을 가져옴
- /blog/2024/8/13/database.png -> database
- thumbnail_extension = image_path.suffix
- .을 포함한 확장자를 가져옴
- /blog/2024/8/13/database.png -> .png
-
- blog_list.html에 썸네일을 적용
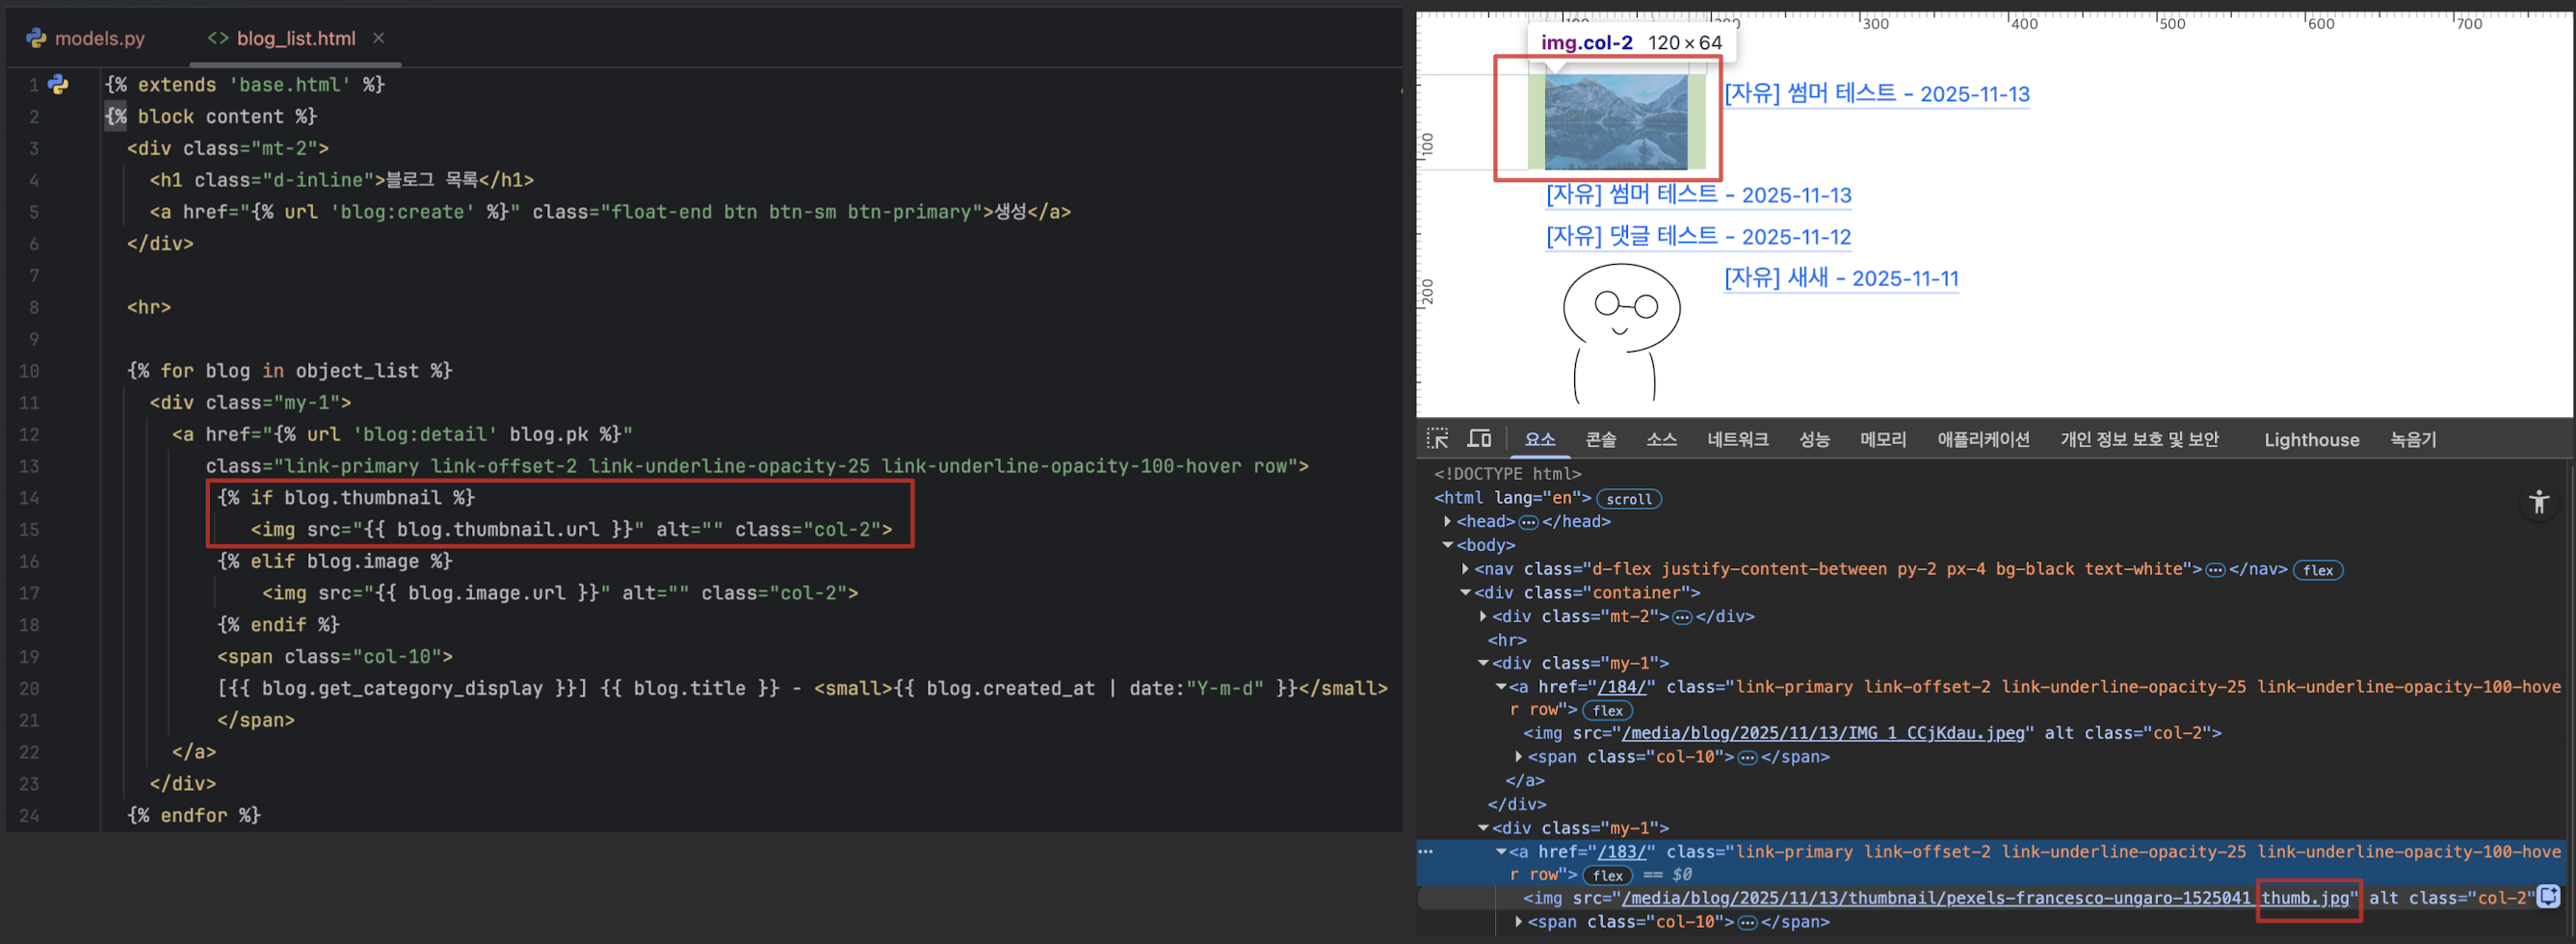
- blog_list.html에 썸네일을 적용
-
- Blog 모델을 이용해 썸네일 이미지 주소를 가져오는 방법도 가능
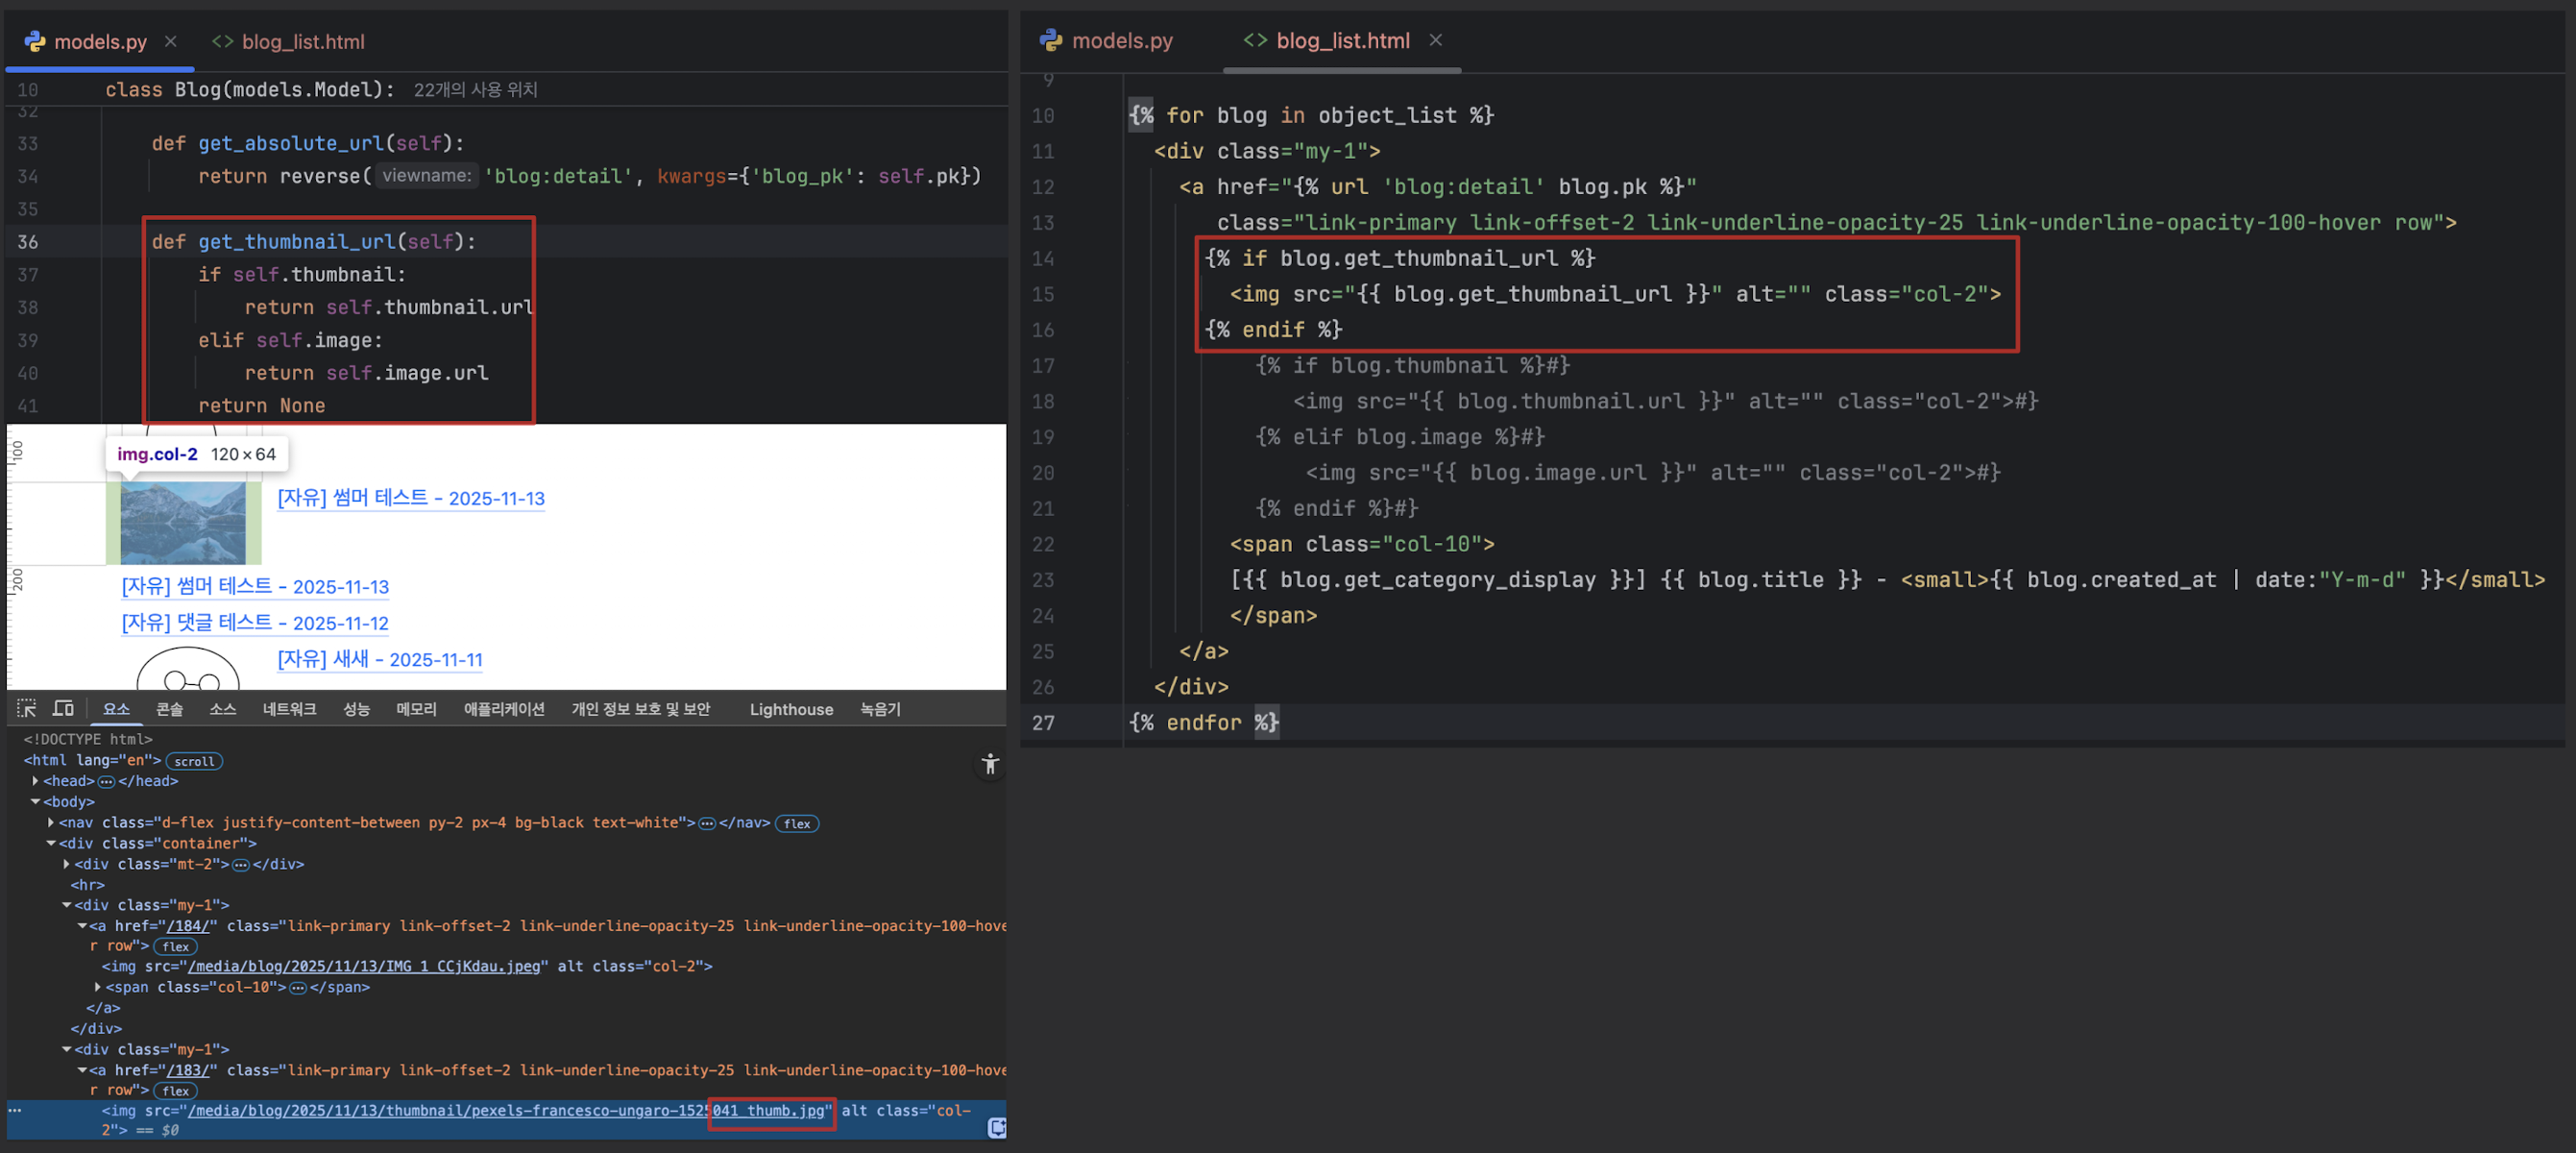
- Blog 모델을 이용해 썸네일 이미지 주소를 가져오는 방법도 가능
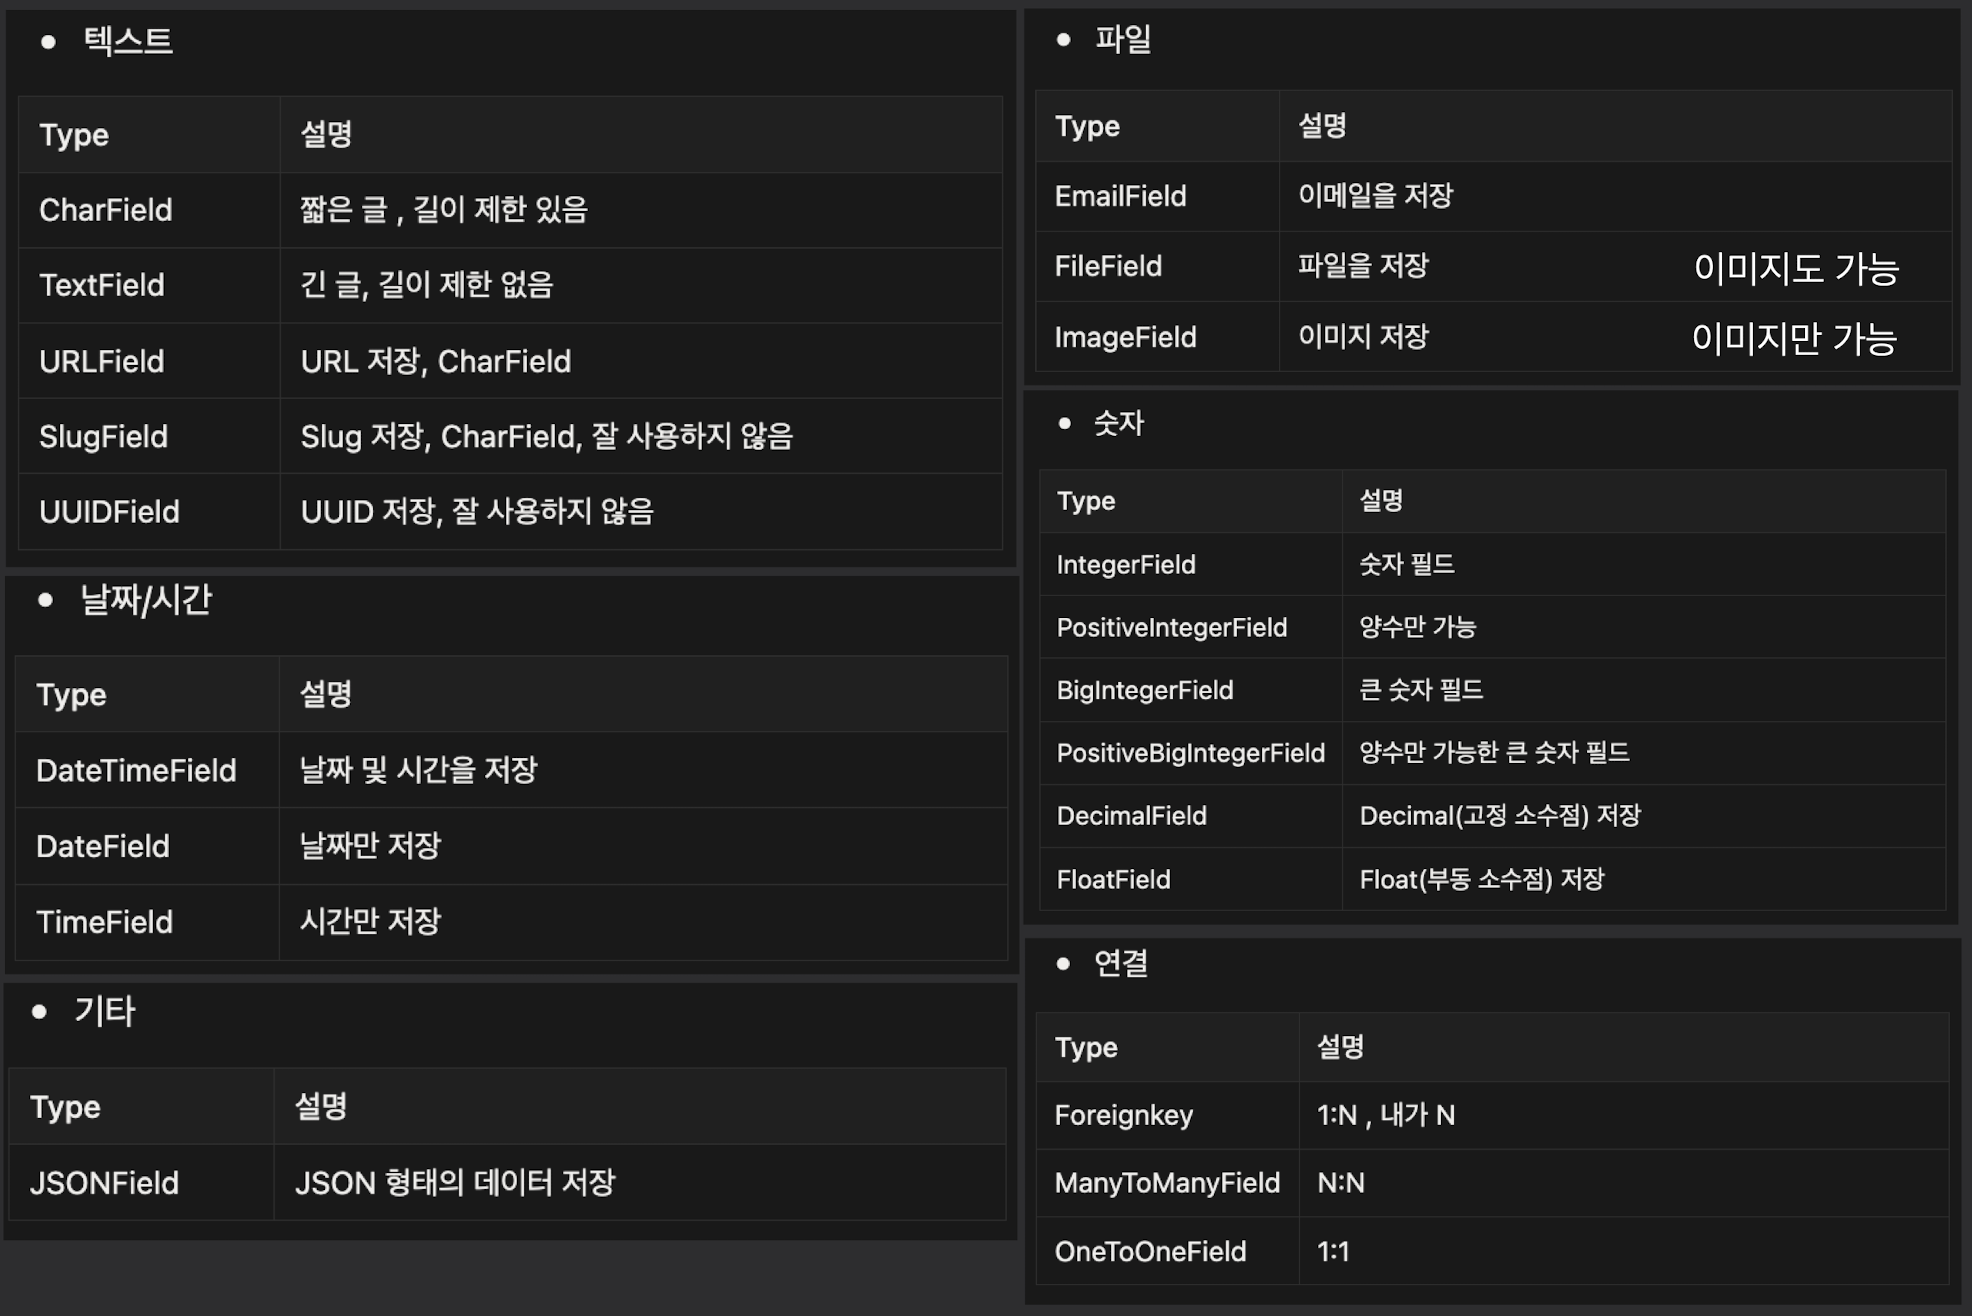
Django의 Field들과 DB 설계를 잘 하는 법
-
DB 설계 시에는, 중복 데이터를 최소한으로 하는 것이 가장 중요
-
FK 등을 적절히 활용해야 하며 텍스트보다는 숫자가 가볍기 때문에 숫자 데이터로 갖고 있는 것을 권장
-
숫자
- Float : 부동 소수점
- 조금 부정확하지만 큰 수
- Decimal : 고정 소수점
- 정확하지만 상대적으로 작은 수
- Decimal('1.1') 이런식으로 Decimal 안에는 ''를 붙여 텍스트 형식으로 넣어야 함
- 정확하지만 상대적으로 작은 수
- Float : 부동 소수점
새롭게 알게된 내용
- round(1.1+2.2,2): 3.3
- 소수점 둘째 자리에서 반올림
어려운 내용(추가 학습 필요)
오늘 발생한 문제(발생 했다면)

안녕하세요.