오늘 학습 내용 ✅
1단계. 함수형 View → 클래스형 View 전환 (CBV 완전 이해)
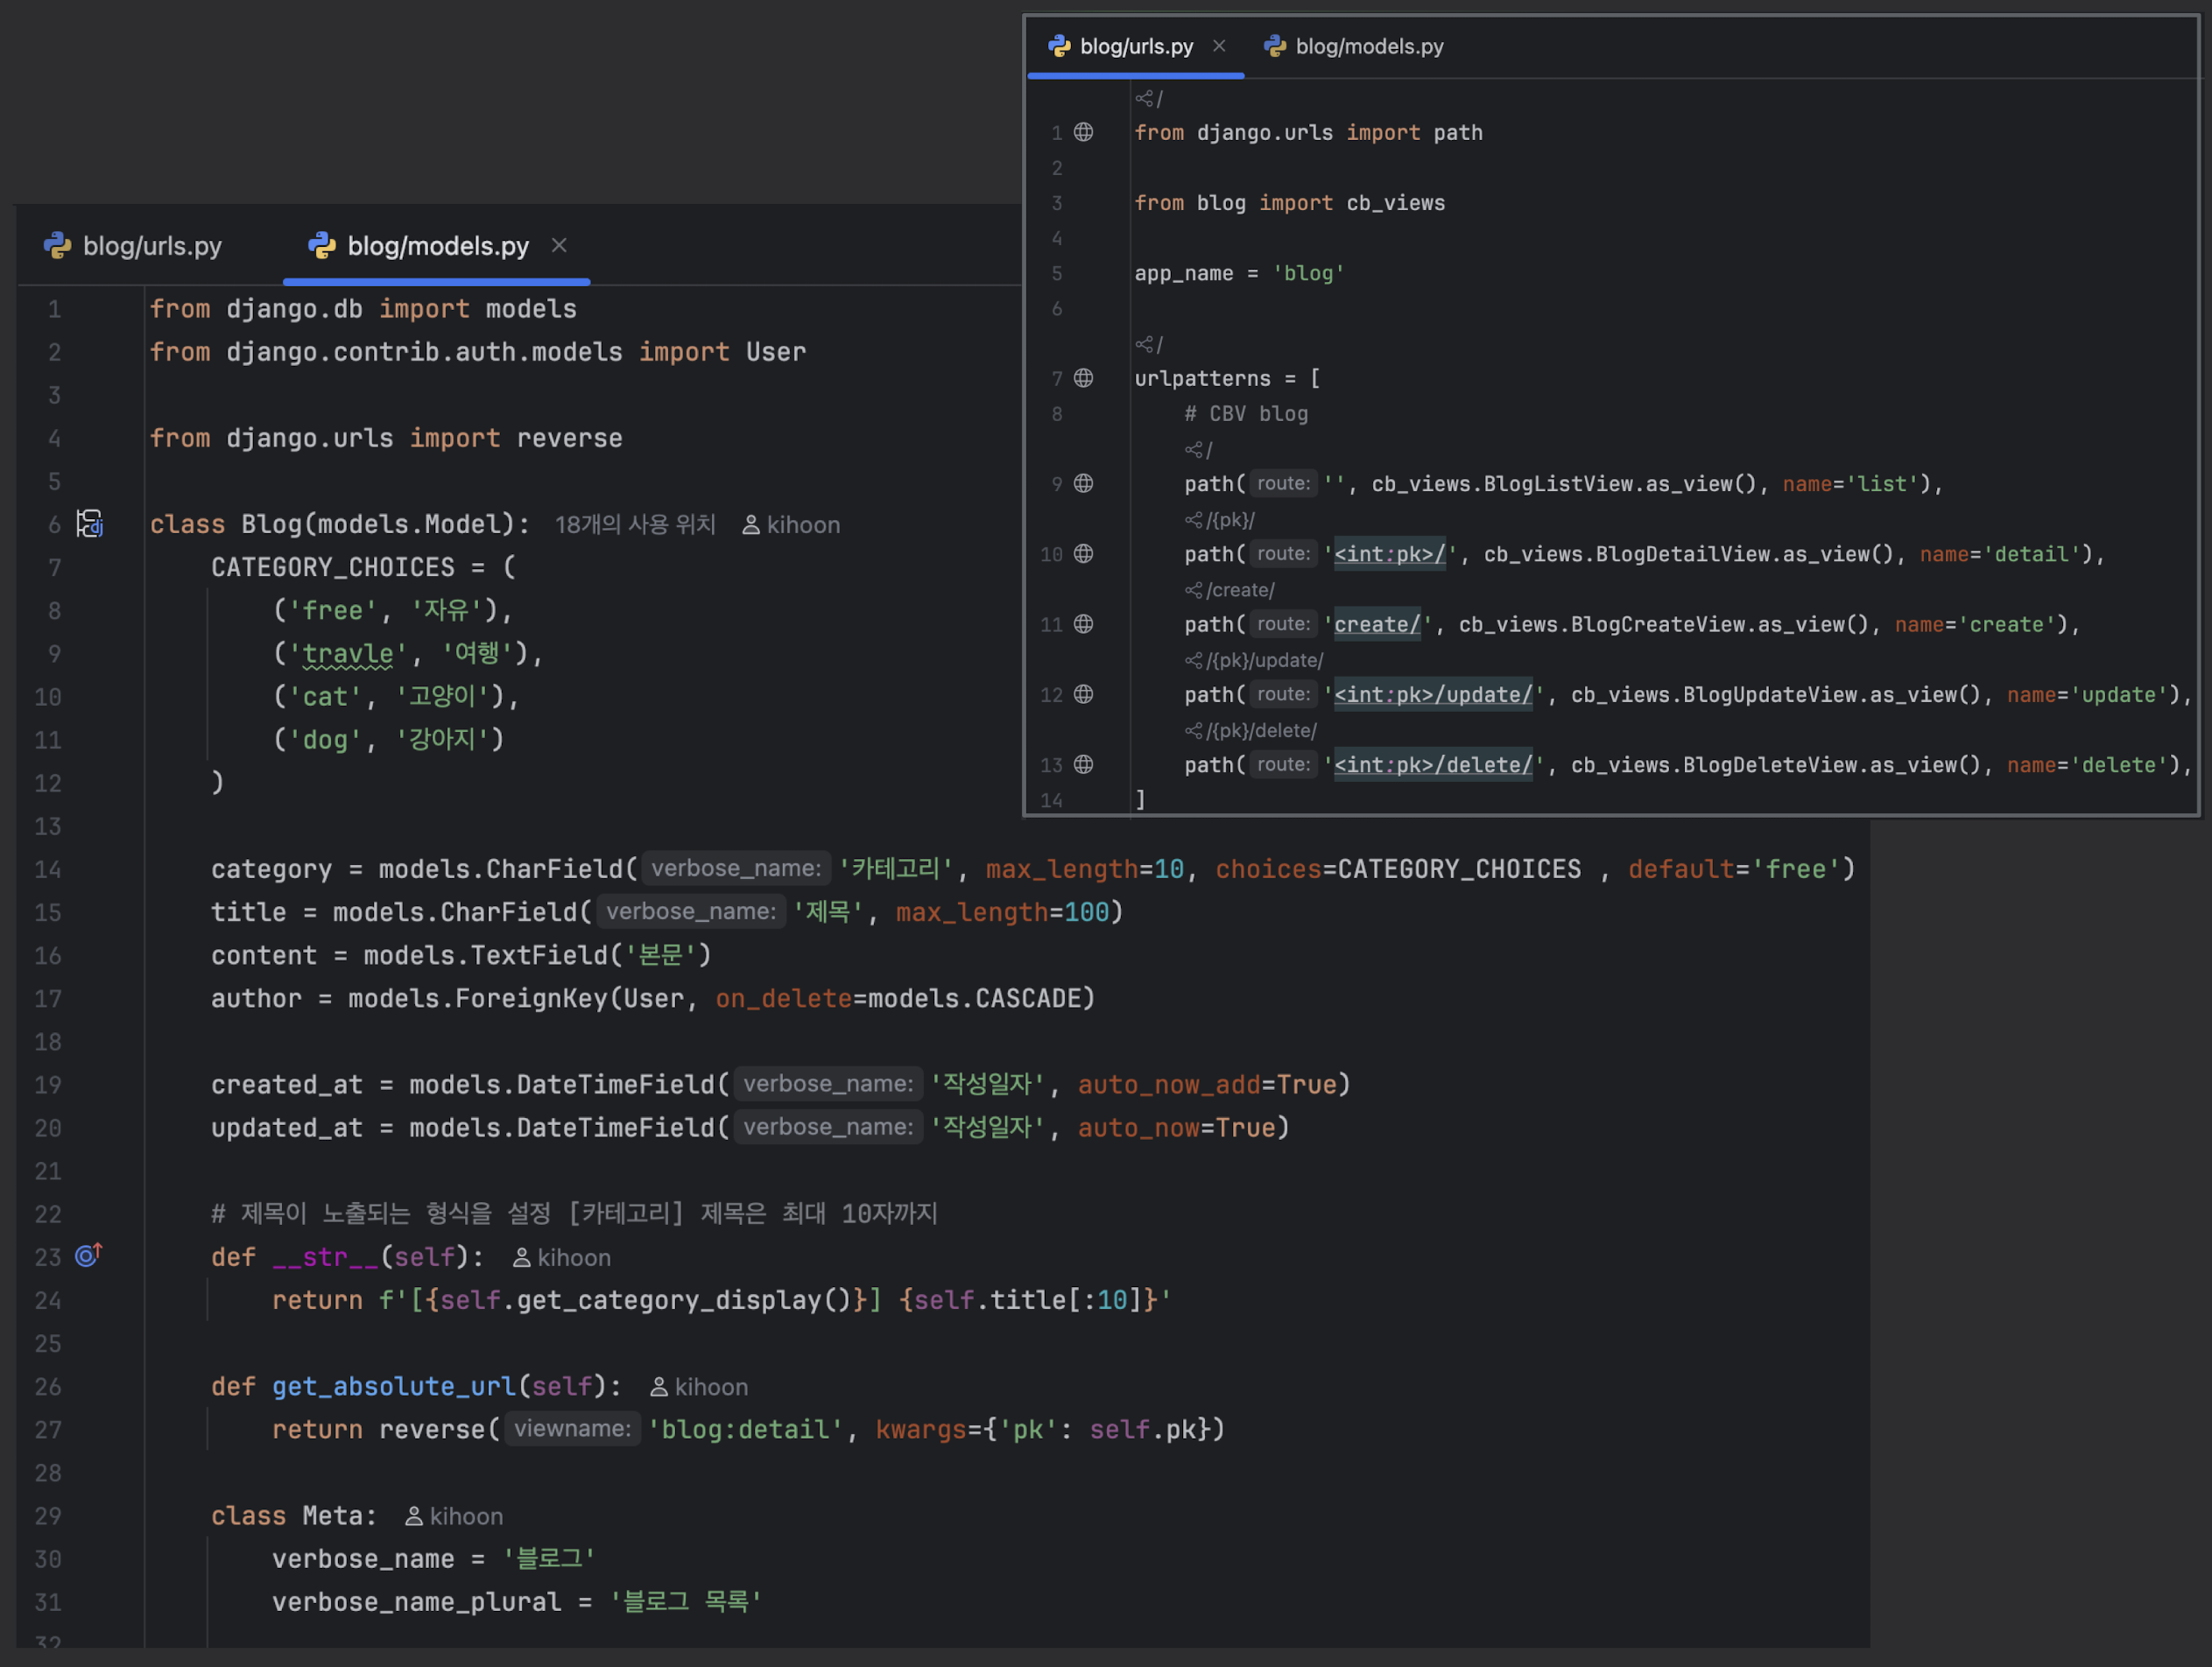
모델 & URL
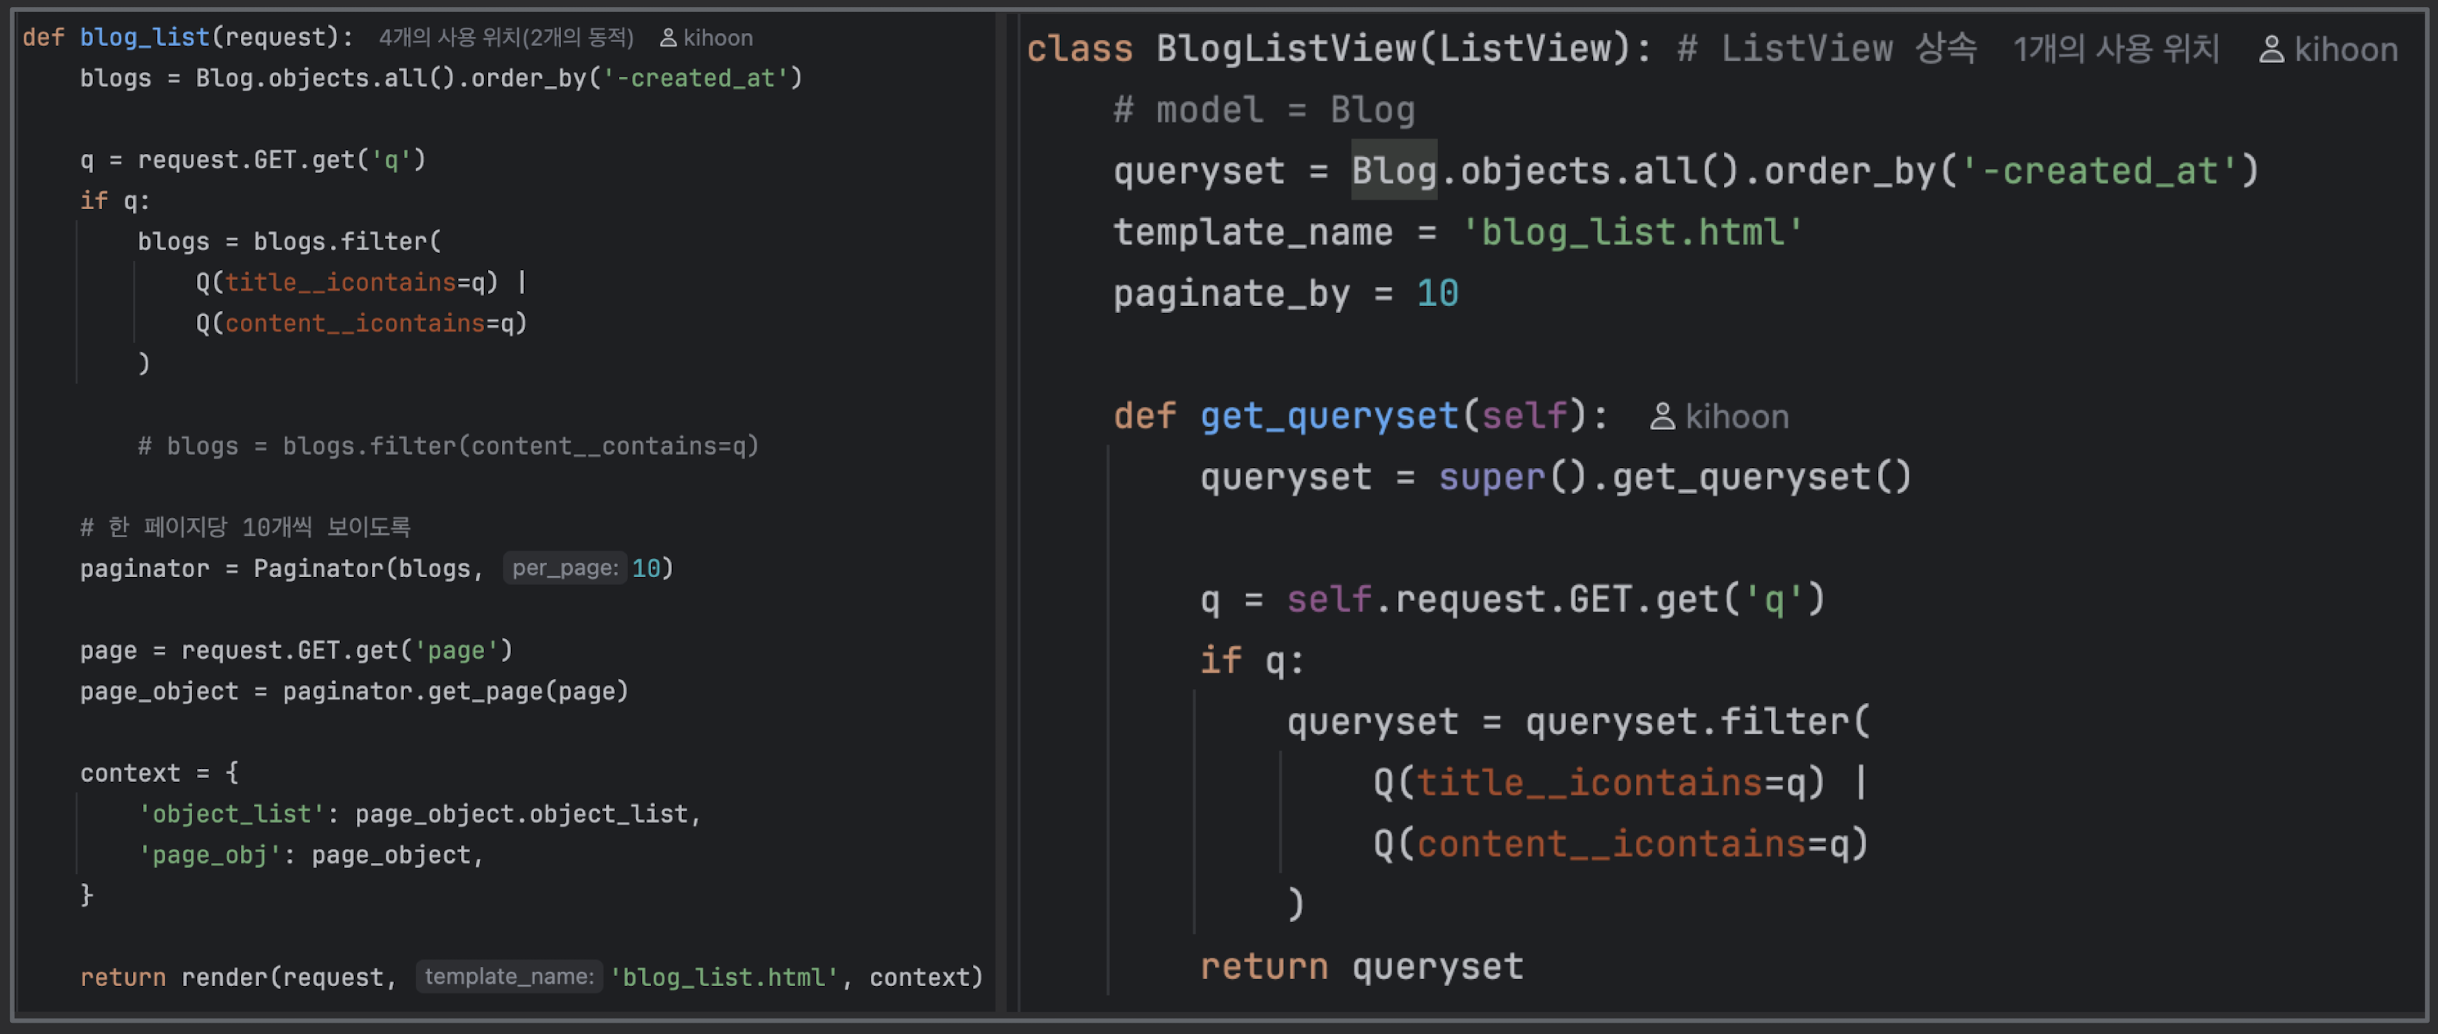
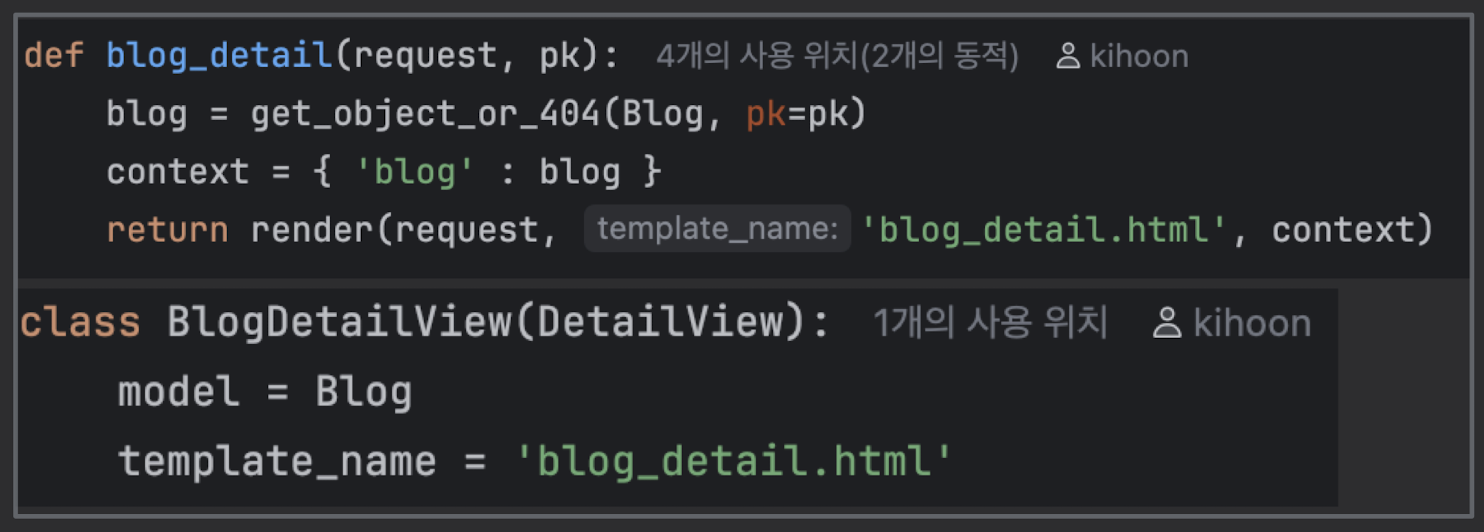
ListView / DetailView
{% extends "base.html" %}

{% block content %}
  <h2>게시글 목록</h2>

  <ul>
    {% for post in posts %}
      <li>
        <a href="{% url 'blog:detail' post.pk %}">
          {{ post.title }}
        </a>
        - {{ post.author }} / {{ post.created_at }}
      </li>
    {% empty %}
      <li>게시글이 없습니다.</li>
    {% endfor %}
  </ul>

  {# 페이지네이션 예시 #}
  {% if is_paginated %}
    <div>
      {% if page_obj.has_previous %}
        <a href="?page={{ page_obj.previous_page_number }}">이전</a>
      {% endif %}

      <span>{{ page_obj.number }} / {{ page_obj.paginator.num_pages }}</span>

      {% if page_obj.has_next %}
        <a href="?page={{ page_obj.next_page_number }}">다음</a>
      {% endif %}
    </div>
  {% endif %}
{% endblock %}
{% extends "base.html" %}

{% block content %}
  <h2>{{ post.title }}</h2>
  <p>작성자: {{ post.author }}</p>
  <p>작성일: {{ post.created_at }}</p>
  <hr>
  <p>{{ post.content|linebreaks }}</p>

  <a href="{% url 'blog:update' post.pk %}">수정</a> |
  <a href="{% url 'blog:delete' post.pk %}">삭제</a> |
  <a href="{% url 'blog:list' %}">목록으로</a>
{% endblock %}
CreateView / UpdateView / DeleteView
- LoginRequiredMixin 적용법
- LoginRequiredMixin을 항상 왼쪽에
- 로그인 안 된 유저가 CreateView 에 접근하면 알아서 LOGIN_URL로 리다이렉트
- LoginRequiredMixin 적용법
# config/settings.py
LOGIN_REDIRECT_URL = '/'
LOGOUT_REDIRECT_URL = '/'

LOGIN_URL = '/login/'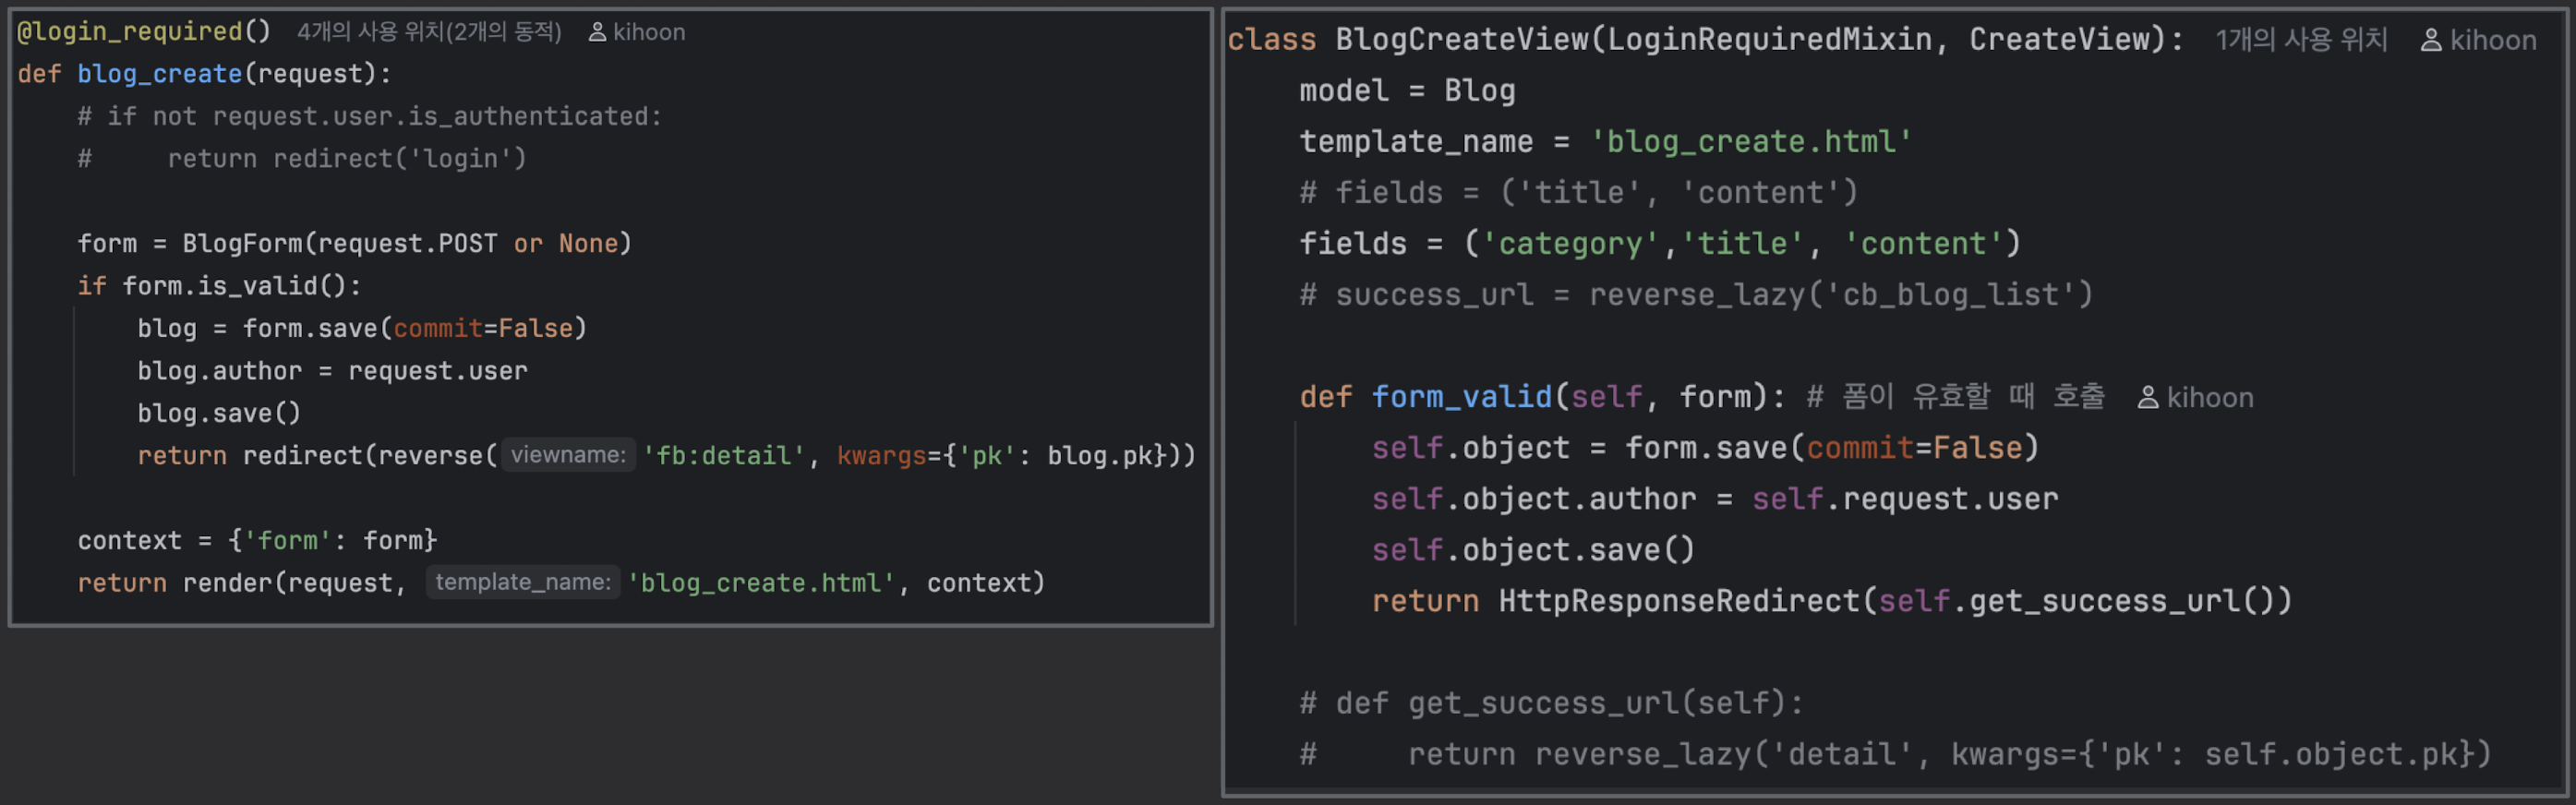
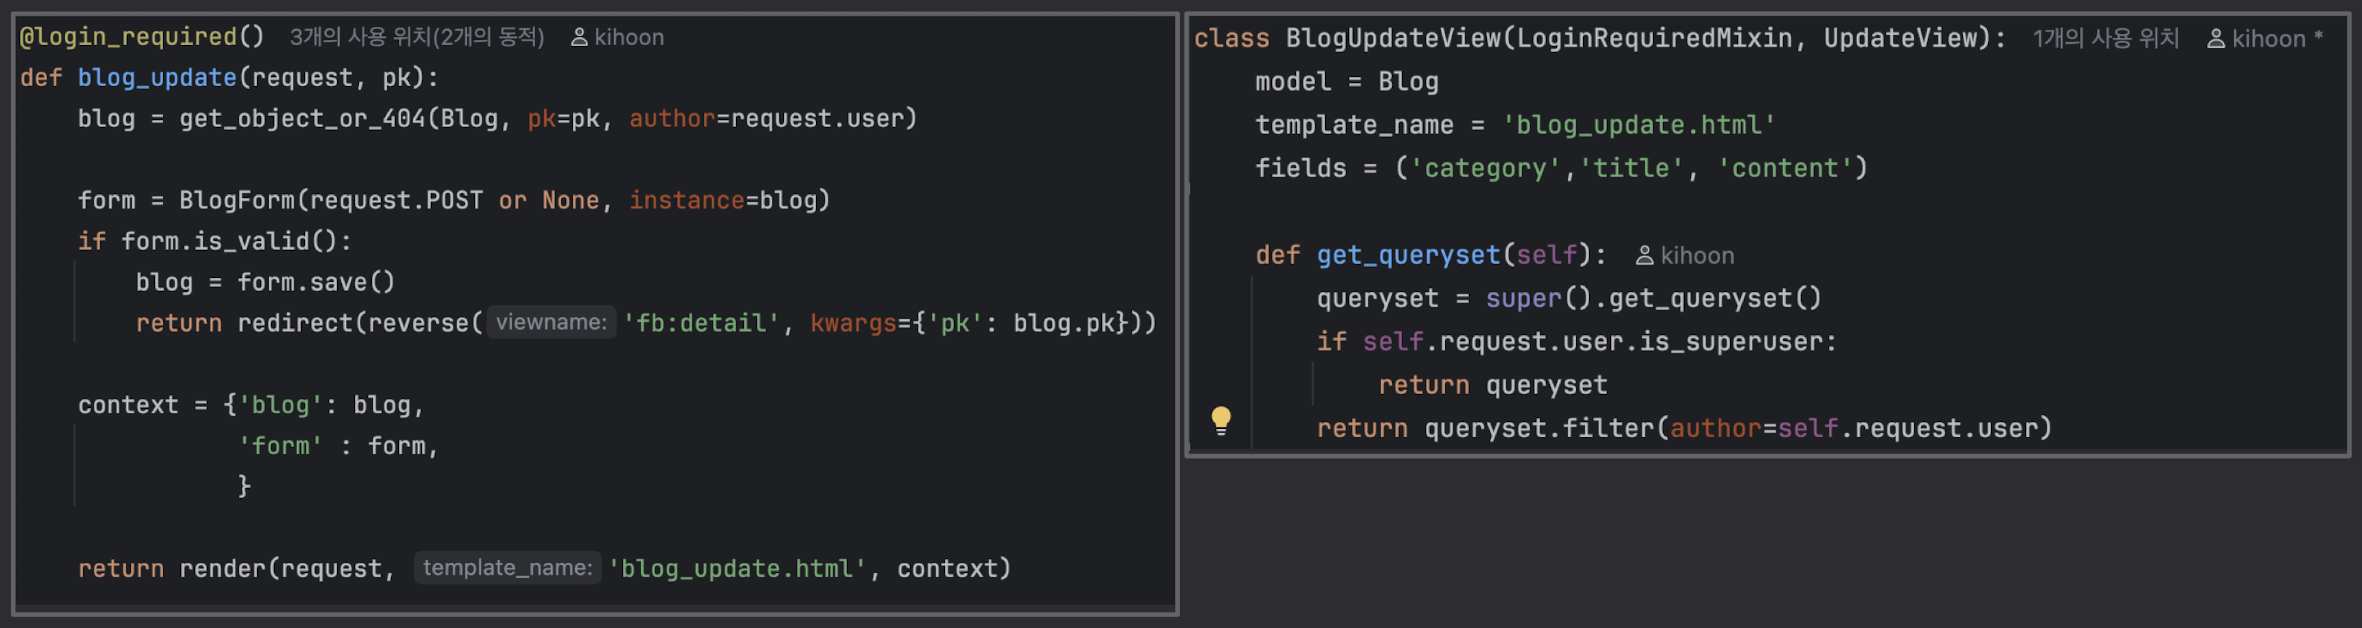
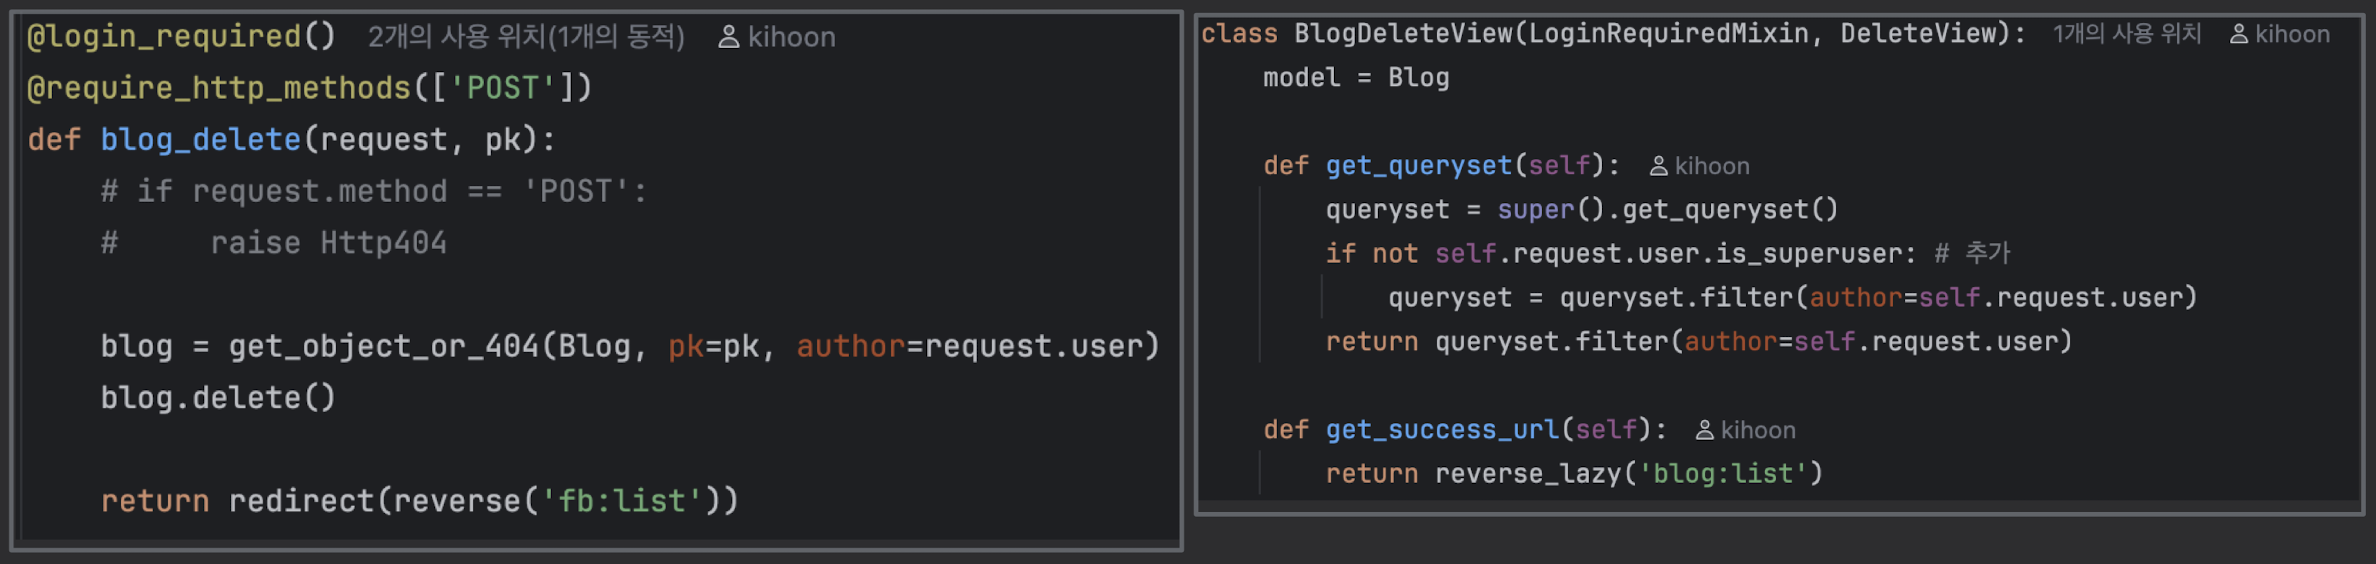
- get_queryset, get_context_data 커스텀하는 법
- get_queryset : "어떤 데이터 목록을 가져올지" 직접 제어
class MyPostListView(LoginRequiredMixin, ListView):
    model = Post
    template_name = "blog/my_post_list.html"
    context_object_name = "posts"

    def get_queryset(self):
        # 기본 queryset = Post.objects.all()
        qs = super().get_queryset()
        # 현재 로그인한 사람의 글만 필터링
return qs.filter(author=self.request.user)- get_context_data : 템플릿에 추가 데이터 넣기
from django.utils import timezone

class PostListView(ListView):
    model = Post
    template_name = "blog/post_list.html"
    context_object_name = "posts"
    ordering = "-created_at"

    def get_context_data(self, **kwargs):
        context = super().get_context_data(**kwargs)
        context["today"] = timezone.now().date()            # 오늘 날짜
        context["post_count"] = self.get_queryset().count() # 전체 글 수
        return context

# 템플릿에서 아래 내용 추가 됨
<p>오늘 날짜: {{ today }}</p>
<p>전체 글 수: {{ post_count }}개</p>- FormView / TemplateView
- TemplateView : 그냥 HTML만 보여줄 때
- “그냥 정적인 페이지(소개, 안내 등)” 만들 때 주로 사용
- TemplateView : 그냥 HTML만 보여줄 때
from django.views.generic import TemplateView

class AboutTemplateView(TemplateView):
    template_name = "blog/about.html"

    def get_context_data(self, **kwargs):
        context = super().get_context_data(**kwargs)
        context["title"] = "소개 페이지"
        context["description"] = "이 블로그는 Django 연습용입니다."
        return context

# blog/about.html
{% extends "base.html" %}
{% block content %}
  <h2>{{ title }}</h2>
  <p>{{ description }}</p>
{% endblock %}
- FormView : "DB랑 안 묶인 일반 폼" 처리할 때
- GET → 빈 폼 보여줌 / POST → 유효성 검사 후 form_valid() 호출
- ex. “문의하기” 폼 (이메일 보내거나, 그냥 메시지만 받는 용도)
# blog/forms.py
from django import forms

class ContactForm(forms.Form):
    name = forms.CharField(label="이름", max_length=50)
    email = forms.EmailField(label="이메일")
    message = forms.CharField(label="내용", widget=forms.Textarea)

# blog/views.py
from django.views.generic import FormView
from .forms import ContactForm

class ContactFormView(FormView):
    template_name = "blog/contact.html"
    form_class = ContactForm
    success_url = reverse_lazy("blog:post_list")

    def form_valid(self, form):
        # 여기서 이메일 보내기 / 슬랙 알림 보내기 / 로그 남기기 등
        name = form.cleaned_data["name"]
        email = form.cleaned_data["email"]
        message = form.cleaned_data["message"]

        print("새 문의:", name, email, message)  # 예시

        return super().form_valid(form)

# blog/contact.html
{% extends "base.html" %}
{% block content %}
  <h2>문의하기</h2>
  <form method="POST">
    {% csrf_token %}
    {{ form.as_p }}
    <button class="btn btn-dark">보내기</button>
  </form>
{% endblock %}
2단계. Django Form / ModelForm 완전 정복
- Form vs ModelForm 차이
- Form 유효성 검사 (clean / clean_field)
- form.save(commit=False)
- 사용자가 어떤 input을 보내도 안전하게 처리하는 법
- 이미지/파일 업로드(Form + Model + Media 설정)
- 지금 네 파일 업로드/리스트 프로젝트가 정확히 Form 학습에 딱 적합함.
3단계. Django ORM “응용” + Queryset 심화
- 중급 실력으로 넘어가기 위해서!
Q 객체 / F 객체 / annotate / aggregate
- filter(Q(조건1) | Q(조건2))
- annotate(sum, count)
- select_related / prefetch_related
- order_by, values, values_list
- 효율적인 쿼리 작성법
4단계. Django Auth 시스템 완전 이해
- 커스텀 User 모델
- 로그인/회원가입
- 세션과 쿠키
- Permission / Group
- 로그인 제한, 접근 제한
5단계. 프로젝트 구조 잡는 능력 키우기
- 아키텍처 감각을 익히기
- 앱을 분리해서 설계해보기
- service / repository 패턴 흉내내보기
- settings 분리(dev/prod)
- config 관리(.env)
6단계. Bootstrap을 활용한 “템플릿 실력” 키우기
- Bootstrap Grid System (row, col)
- 버튼 스타일링
- 카드 레이아웃
- Navbar + footer
- SweetAlert 같은 외부 JS 통합
- 템플릿 상속, include 구조화
7단계. 실전형 프로젝트 한 개 완성해 보기
- CRUD
- Auth
- 파일 업로드
- filtering + search
- 통계/그래프
- Celery
- API + HTML 분리
- 그래프 이미지 저장
- Bootstrap 디자인
- DB 조인/집계
- 관리자(admin 커스터마이징)
새롭게 알게된 내용 ✅
어려운 내용(추가 학습 필요) ✅
오늘 발생한 문제(발생 했다면) ✅

안녕하세요.