😂JQuery
😭 개념
- javascript와 다른 것이 아니라 이미 작성되어 사용하기 편리한 javascript!!
- 하지만 누군가 이미 만들어 둔 코드이기 때문에 javascript처럼 그냥 막 쓸 수 있는 것은 아님 (import 필수!)
<script src="https://ajax.googleapis.com/ajax/libs/jquery/3.5.1/jquery.min.js"></script>- css와 헷갈리는 점
- css는
class를 선택자로 사용 - jqeury는
id를 선택자로 사용!!! (항상 헷갈려하던 것)
- css는
😭 코드 연습
- 영화 URL 기록 박스 열고 닫기
<sytle>태그에.mypost에 대한 css(display: none;)를 적용해 처음 페이지에 들어가게 되면 박스가 닫혀 있도록 함- jquery의 show와 hide를 사용해 박스를
영화 기록하기버튼을 통해 열고닫기버튼을 통해 닫을 수 있음- 각 버튼에에 적용
<head>
  <script>
    function openbox() {
           $('#post-box').show()
        }
    function closebox() {
           $('#post-box').hide()
        }
    </script>
</head>

<body>
  <div class="mytitle">
       <h1>내 생애 최고의 영화들</h1>
       <button onclick="openbox()">영화 기록하기</button>
  </div>
  <div class="mypost" id="post-box">
        <div class="form-floating mb-3">
            <input type="url" class="form-control" id="floatingInput" placeholder="영화 URL">
            <label for="floatingInput">영화 URL</label>
        </div>
        <div class="input-group mb-3">
            <label class="input-group-text" for="inputGroupSelect01">별점</label>
            <select class="form-select" id="inputGroupSelect01">
                <option selected>--선택하기--</option>
                <option value="1">⭐</option>
                <option value="2">⭐⭐</option>
                <option value="3">⭐⭐⭐</option>
                <option value="3">⭐⭐⭐⭐</option>
                <option value="3">⭐⭐⭐⭐⭐</option>
            </select>
        </div>
        <div class="form-floating">
            <textarea class="form-control" placeholder="코멘트" id="floatingTextarea2"
                      style="height: 100px"></textarea>
            <label for="floatingTextarea2">코멘트</label>
        </div>
        <div class="mybtn">
            <button type="button" class="btn btn-dark">기록하기</button>
            <button type="button" class="btn btn-outline-dark" onclick="closebox()">닫기</button>
        </div>
    </div>
</body>- jquery 퀴즈
- q1( ) : 사용자가 input 박스에 입력한 내용을
val()을 통해 받아와 내용이 있다면alert를 통해 내용을 보여주고, 내용이 없다면입력하세요!메세지를 띄워줌 - q2( ) :
@의 여부를 통해 이메일인지 아닌지 파악해 사용자에게 도메인을 반환하는 기능- includes()를 사용해
@가 포함되는지 알 수 있으며, split()을 사용해 지정한 부분을 기준으로 입력값을 두 개로 나눌 수 있다는 아이디어를 통해 작성
- includes()를 사용해
- q3( ) : 입력값을 받아와
<body>태그 안에 있는 리스트에 값을 입력해줌- temp_html 이라는 변수를 생성해 리스트를 append하였고, 원래 있던 리스트들은 삭제해도 무방
- q3_remove( ) :
empty()함수를 통해 입력되어 있는 모든 값을 삭제
- q1( ) : 사용자가 input 박스에 입력한 내용을
<head>
    <script>
        function q1() {
            let input = $('#input-q1').val()
            if (input == '') {
                alert('입력하세요!')
            } else {
                alert(input)
            }
        }

        function q2() {
            let input = $('#input-q2').val()
            if (input.includes('@')) {
                alert(input.split('@')[1].split('.')[0])
            } else {
                alert('이메일이 아닙니다.')
            }
        }

        function q3() {
            let input = $('#input-q3').val()
            let temp_html = `<li>${input}</li>`
            $('#names-q3').append(temp_html)
        }

        function q3_remove() {
            $('#names-q3').empty()
        }

    </script>
</head>
😂 JSON
😭 구조
Key : Value의 구조로 이루어져 있으며, 자료형Dictionary와 유사!- JSONView를 설치하면 아래와 같이 JSON을 확인할 수 있음
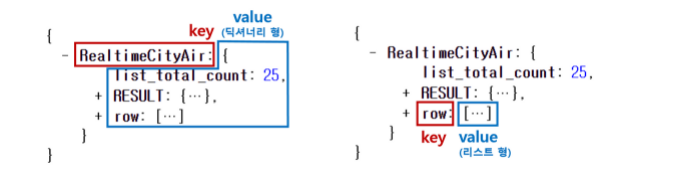
- JSONView를 설치하면 아래와 같이 JSON을 확인할 수 있음
😭 클라이언트 -> 서버
- 요청 유형
- GET 요청 :
데이터 조회(Read)요청
ex. 쇼핑 리스트 조회 - POST 요청 :
데이터 생성(Create), 변경(Update), 삭제(Delete)요청
ex. 쇼핑몰 회원가입 / 탈퇴, 비밀번호 수정
- GET 요청 :
- GET 요청
- url 해체
https://www.musinsa.com/brands/attentionrow?category3DepthCodes=&category2DepthCodes=&category1DepthCode=&colorCodes=&startPrice=&endPrice=&exclusiveYn=&includeSoldOut=&saleGoods=&timeSale=&includeKeywords=%EB%B8%94%EB%A1%9D%EB%B2%84%EC%8A%A4%ED%84%B0%EC%84%B8%EC%9D%BC&sortCode=discount_rate&tags=&page=1&size=90&listViewType=small&campaignCode=&groupSale=&outletGoods=false&boutiqueGoods= ?을 기준으로서버 주소와정보로 나뉘어짐- 즉,
?부터 전달할 데이터가 작성되며,&은 생긴 그대로 뭔가 할말이 더있다, 즉 전달할 데이터가 더 있다는 뜻!
- url 해체
😂 AJAX
😭 기본 구조
<head>
  <script>
    $.ajax({
  type: "GET", // 요청 타입 작성 (GET or POST)
  url: "요청할 url 주소",
  data: {}, // 요청하면서 함께 줄 데이터 (GET 요청시엔 비우기)
  success: function(response){ // 서버에서 준 결과를 response라는 변수에 담음
    코드작성
  }
})
  </script>
</head>
😭 ajax로 GET 요청
- 해당 실습들을 하면서 가장 중요했던 점은 하나씩 구현해나가면서
console.log()를 사용해 개발자 도구의 콘솔에 내용이 잘 나오는지, 어떻게 받아져 보여지는지 파악하는 것!
- 미세먼지 api를 사용한 실습
$('#id 입력').empty를 통해 새로고침할 때마다 페이지의 내용을 다 지워 요청한 정보들이 이전에 요청된 정보들과 겹치지 않게 해줌- ajax 콜이 성공한다면 JSON 형식으로 보여지는 api의 내용을
rows로 받아오고,for문을 사용해rows안에 들어 있는 각 열들을 하나씩 사용 if문을 사용해 조건을 걸어주고, 조건에 맞는 것들의 글씨 색을 다르게 설정- 마지막에
$('#id 입력').append를 통해 불러온 내용을 unordered list의 각 요소로 설정한 후, 사용자가 볼 수 있도록 제시
<head>
  <script>
        function q1() {
            $('#names-q1').empty()
            $.ajax({
                type: "GET",
                url: "http://spartacodingclub.shop/sparta_api/seoulair",
                data: {},
                success: function (response) {
                    let rows = response['RealtimeCityAir']['row']
                    for (let i = 1; i < rows.length; i++) {
                        let name = rows[i]['MSRSTE_NM']
                        let mise = rows[i]['IDEX_MVL']

                        let temp_html = ``
                        if (mise > 40) {
                            temp_html = `<li class="red">${name} : ${mise}</li>`
                        } else {
                            temp_html = `<li>${name} : ${mise}</li>`
                        }
                        $('#names-q1').append(temp_html)
                    }
                }
            })
        }
    </script>
</head>- 서울시 따릉이 데이터 활용 실습
- 데이터의 이름 매칭을 제대로 할 수 있도록 항상 주의 필요
- 위의 실습과 같은 GET 형식이므로
data는 입력할 필요 없음 - 파이썬을 공부하며
for문을 많이 활용했는데, 같은 아이디어로 list인rows의 데이터를 활용하여 어렵진 않지만 가끔 파이썬 문법으로 작성하는 경우가 있어 주의 필요 temp_html에 들어가는 값이 현 실습 이상으로 길어지는 경우도 있으므로 값 입력에 주의
<head>
	<script>
        function q1() {
             $('#names-q1').empty()
            $.ajax({
                type: "GET",
                url: "http://spartacodingclub.shop/sparta_api/seoulbike",
                data: {},
                success: function (response) {
                    let rows = response['getStationList']['row']
                    for (let i = 1; i < rows.length; i++) {
                        let name = rows[i]['stationName']
                        let rack = rows[i]['rackTotCnt']
                        let parking = rows[i]['parkingBikeTotCnt']

                        let temp_html = ``
                        if (parking < 5) {
                                temp_html = `<tr class="not_enough">
                                                <td>${name}</td>
                                                <td>${rack}</td>
                                                <td>${parking}</td>
                                            </tr>`
                        } else {
                            temp_html = `<tr>
                                            <td>${name}</td>
                                            <td>${rack}</td>
                                            <td>${parking}</td>
                                        </tr>`
                        }
                        $('#names-q1').append(temp_html)
                    }
                }
            })
        }
    </script>
</head>- 랜덤르탄이 실습
- 해당 실습의 경우 굉장히 간단하기도 하고, 간단하게 생각해야 하지만 오히려 꼬아서 생각해 좀 고민했었음
- api 파일에 있는
msg와url을 받아와르탄이나와버튼을 누를 때마다 이미지를 변경해 주는 실습 - 이미지를 변경할 때는
$('#id 이름').attr('src', url)을 사용하며, url의 경우 위에서 언급하였기 때문에 url만 입력 msg의 경우 텍스트 값을 반환해야 하기 때문에$('#id 이름').text()를 사용
<head>
	<script>
        function q1() {
            $.ajax({
                type: "GET",
                url: "http://spartacodingclub.shop/sparta_api/rtan",
                data: {},
                success: function (response) {
                    let msg = response['msg']
                    let url = response['url']

                    $('#img-rtan').attr('src', url)
                    $('#text-rtan').text(msg)
                }
            })
        }
    </script>
</head>
😂 2주차 숙제
😭 구현 기능
- 앞서 만들었던 팬명록에
날씨를 알려주는 기능을 추가 - 구현
- 로딩을 하자마자 함수를 불러와주는 기능 사용
<script> $(document).ready(function(){ alert('보여?') }); </script>- 해당 코드를 실행하게 되면 alert 창에
보여?라는 단어가 출력됨
- 해당 코드를 실행하게 되면 alert 창에
- ajax 콜이 성공하면 api에서 날씨를 뜻하는
temp에 대한 데이터를 불러와 텍스트로 넣어주도록 작성 - 현재기온 뒤에 쓰여있는
00.0에span태그를 사용하여 숫자가 로딩을 할 때마다 현재의 기온을 보여줄 수 있도록 변경
- 로딩을 하자마자 함수를 불러와주는 기능 사용
<head>
  <script>
        $(document).ready(function () {
            $.ajax({
                type: "GET",
                url: "http://spartacodingclub.shop/sparta_api/weather/seoul",
                data: {},
                success: function (response) {
                    let t = response['temp']
                    $('#temp').text(t)
                }
            })
        });
    </script>
</head>
<body>
    <div class="mytitle">
        <h1>팬명록</h1>
        <p>현재기온 : <span id="temp">00.0</span>도</p>
    </div>
</body>
😂 웹스크래핑(크롤링)
😭 requests
- 크롤링 과정에서 requests모듈을 이용해 웹 사이트의 소스코드를 가져온 후 파싱을 진행
- 기본 구조
import requests # requests 라이브러리 설치 필요

r = requests.get('http://spartacodingclub.shop/sparta_api/seoulair')
rjson = r.json()- 서울시 미세먼지의 값을 표시
- JSON을 통해 api의 구조를 파악한 후, 미세먼지 레벨을 불러오기 위해 각 구별 정보를 얻을 수 있는 단위인
gu_info를 설정 for문을 활용해 각 구별 정보를 불러온 후,if문의 조건에 맞는 각 구들의 이름과 미세먼지 레벨을 불러옴
- JSON을 통해 api의 구조를 파악한 후, 미세먼지 레벨을 불러오기 위해 각 구별 정보를 얻을 수 있는 단위인
import requests

r = requests.get('http://spartacodingclub.shop/sparta_api/seoulair')
rjson = r.json()

gu_info = rjson['RealtimeCityAir']['row']

for gu in gu_info:
	if gu['IDEX_MVL'] < 60:
		print(gu['MSRSTE_NM'], gu['IDEX_MVL'])
😭 bs4(beautifulsoup4)
- HTML 문서 가운데 찾고자 하는 데이터를 데이터별로 나눠(parsing) 가져오기 쉽게 해주는 파이썬 라이브러리
😭 웹 크롤링 기본 세팅
- 가장 중요한 점은!!! 하나씩 확인하며 맞는지 아닌지 판단하고, 한 번에 찾을 수 있을거란 기대를 버리는 것!!! 배운데로 하다보면 길이 보인다!
- requests와 bs4를 모두 사용하며, 하단에 있는
soup변수를 사용해 필요한 부분을 추출할 수 있음
import requests
from bs4 import BeautifulSoup

# 타겟 URL을 읽어서 HTML를 받아오고,
headers = {'User-Agent' : 'Mozilla/5.0 (Windows NT 10.0; Win64; x64)AppleWebKit/537.36 (KHTML, like Gecko) Chrome/73.0.3683.86 Safari/537.36'}
data = requests.get('https://movie.naver.com/movie/sdb/rank/rmovie.naver?sel=pnt&date=20210829',headers=headers)

# HTML을 BeautifulSoup이라는 라이브러리를 활용해 검색하기 용이한 상태로 만듦
# soup이라는 변수에 "파싱 용이해진 html"이 담긴 상태가 됨
# 이제 코딩을 통해 필요한 부분을 추출하면 된다.
soup = BeautifulSoup(data.text, 'html.parser')- (네이버 영화)영화의 순위, 제목, 평점을 긁어오기
movies변수는select기능을 활용해#old_content > table > tbody > tr에 해당하는 모든 정보를list의 형태로 저장함#old_content > table > tbody > tr는 추출하고자 하는 데이터가 위치하는 곳을오른쪽 클릭->DevTools->음영처리된 곳 오른쪽 클릭>-Copy->Copy Selector의 경로로 찾아낼 수 있으며, 현재 하나의 정보를 불러오는 것이 아닌 모든 정보를 불러오는 것이기 때문에 모든 정보를 포괄할 수 있는 단위만을 남겨놓아야 함
for문 안의title변수의 경우는 하나의 정보를 추출하는 것이고, 영화 제목 부분의Copy Selector를 복사하게 되면#old_content > table > tbody > tr:nth-child(2) > td.title > div > a이고, 앞서movies에서 변수의 내용으로 설정된 앞부분을 제외한td.title > div > a를 적용한 것!- 나머지 num과 star의 경우도 위와 같은 방식으로 진행했으며, 꼭 DevTools의 Elements를 확인해 원하는 정보가 어디에 담겨있는지 확인해야 함! (모든 정보가 같은 곳에 있지 않다!)
import requests
from bs4 import BeautifulSoup

headers = {'User-Agent' : 'Mozilla/5.0 (Windows NT 10.0; Win64; x64)AppleWebKit/537.36 (KHTML, like Gecko) Chrome/73.0.3683.86 Safari/537.36'}
data = requests.get('https://movie.naver.com/movie/sdb/rank/rmovie.naver?sel=pnt&date=20210829',headers=headers)

soup = BeautifulSoup(data.text, 'html.parser')

movies = soup.select('#old_content > table > tbody > tr')

for movie in movies:
    title = movie.select_one('td.title > div > a')
    if title is not None:
        num = movie.select_one('td:nth-child(1) > img')['alt']
        title = title.text
        star = movie.select_one('td.point').text
print(f'{num} {title} {star}')- select의 사용법
# 선택자를 사용하는 방법 (copy selector)
soup.select('태그명')
soup.select('.클래스명')
soup.select('#아이디명')

soup.select('상위태그명 > 하위태그명 > 하위태그명')
soup.select('상위태그명.클래스명 > 하위태그명.클래스명')

# 태그와 속성값으로 찾는 방법
soup.select('태그명[속성="값"]')

# 한 개만 가져오고 싶은 경우
soup.select_one('위와 동일')
😂 Mongodb Atlas
😭 Robo 3T와의 차이점
- Robo 3T와 다르게 나의 컴퓨팅 자원을 소모하지 않고 사용할 수 있는
원격 DB가 생김 - 기본 코드의 차이점
- Robo 3T
from pymongo import MongoClient client = MongoClient('localhost', 27017) db = client.dbsparta - Mongodb Atlas
	from pymongo import MongoClient
	client = MongoClient('URL')
	db = client.dbsparta

  # URL -> 아래의 방법으로 찾아서 입력
        -> mongodb+srv://<username>:<password>@cluster0.a2woz.mongodb.net/myFirstDatabase?retryWrites=true&w=majority
        -> <username>과 <password>에 앞서 설정한 test, sparta 입력
        -> myFirstDatabase?를 현재 데이터베이스 이름인 Cluster0?으로 변경
        -> 결과 : mongodb+srv://test:sparta@cluster0.a2woz.mongodb.net/Cluster0?retryWrites=true&w=majority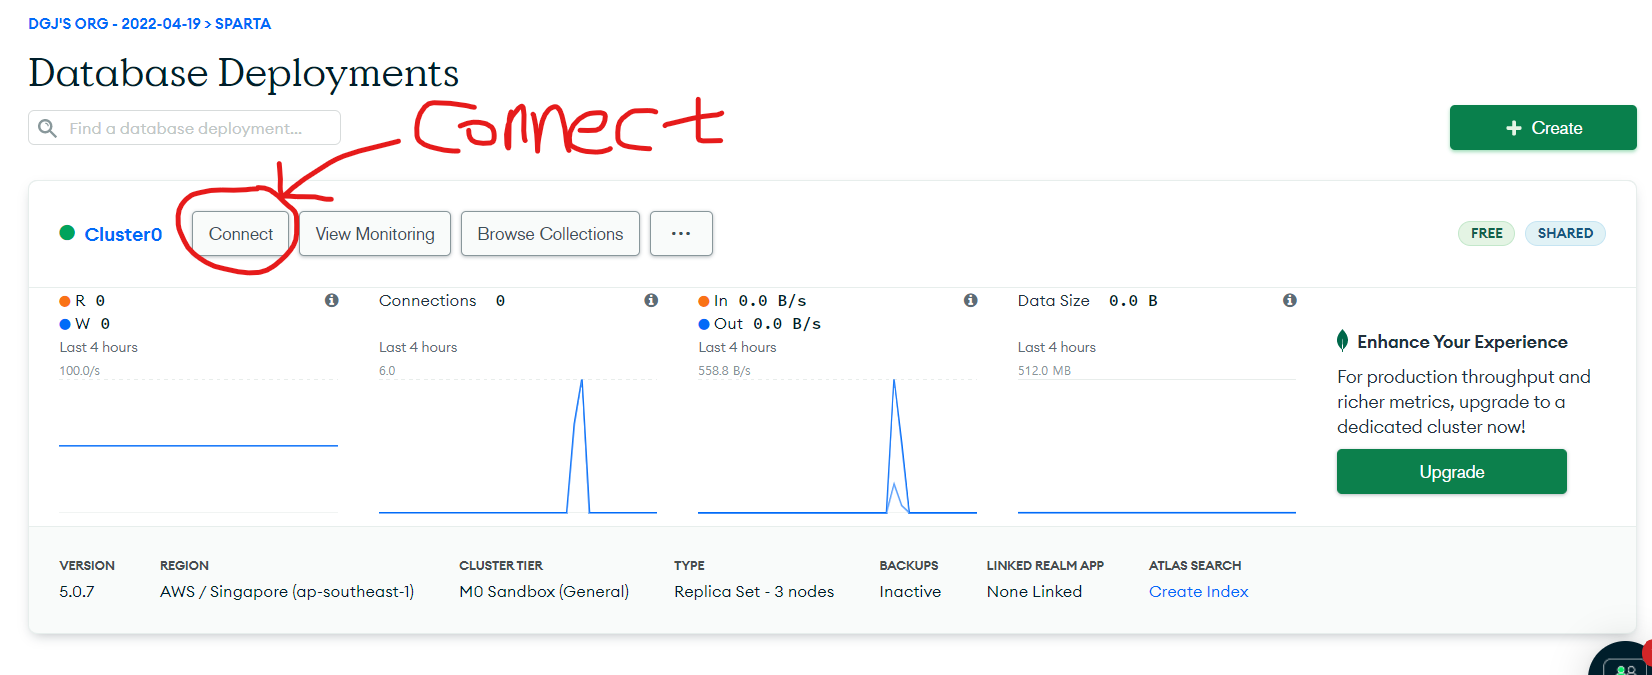

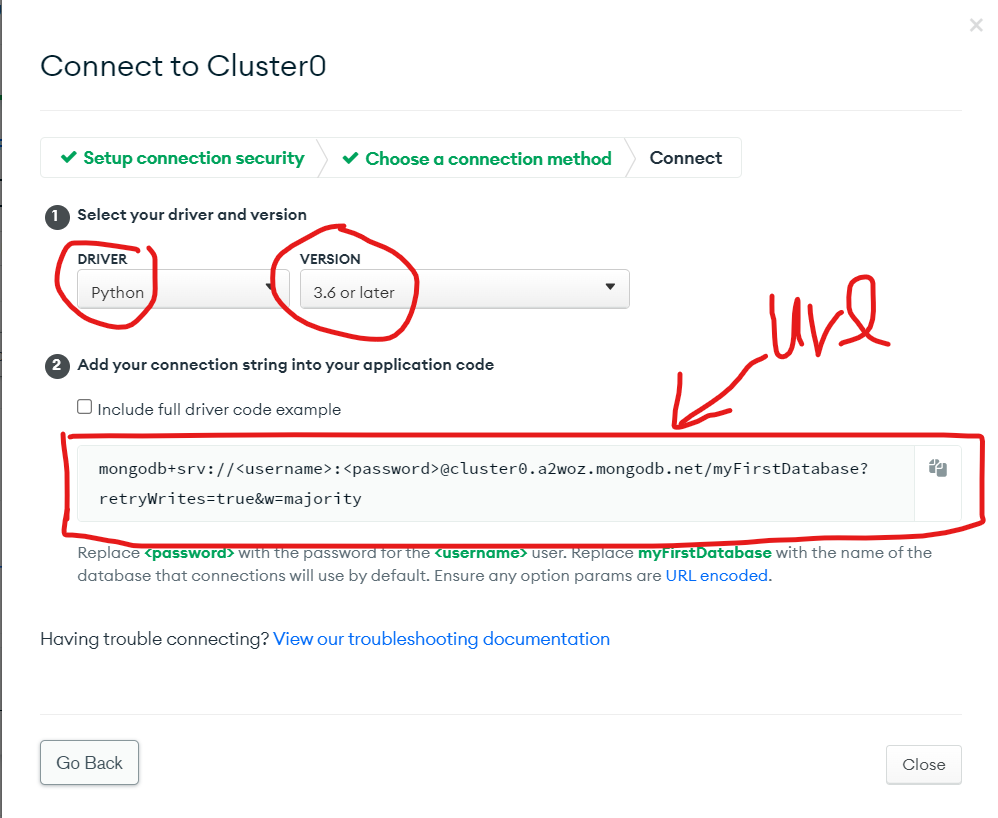
- Robo 3T
😭 데이터 활용
- 요약
# 저장 - 예시
doc = {'name':'bobby','age':21}
db.users.insert_one(doc)

# 한 개 찾기 - 예시
user = db.users.find_one({'name':'bobby'})

# 여러개 찾기 - 예시 ( _id 값은 제외하고 출력)
all_users = list(db.users.find({},{'_id':False}))

# 바꾸기 - 예시
db.users.update_one({'name':'bobby'},{'$set':{'age':19}})

# 지우기 - 예시
db.users.delete_one({'name':'bobby'})
- db에 하나의 정보를 입력
db.users.insert_one(doc)에서 users는 collection을 뜻하고, insert_one을 통해 하나의 정보를 데이터베이스에 저장
from pymongo import MongoClient
client = MongoClient('mongodb+srv://test:sparta@cluster0.a2woz.mongodb.net/Cluster0?retryWrites=true&w=majority')
db = client.dbsparta

doc = {
    'name' : 'Bob',
    'age': 27
}

db.users.insert_one(doc)
- db에 여러 데이터 한 번에 넣기 (보편적으로 사용하지는 않음)
from pymongo import MongoClient
client = MongoClient('mongodb+srv://test:sparta@cluster0.a2woz.mongodb.net/Cluster0?retryWrites=true&w=majority')
db = client.dbsparta

db.users.insert_one({'name' : 'Bobby','age': 27})
db.users.insert_one({'name' : 'park','age': 29})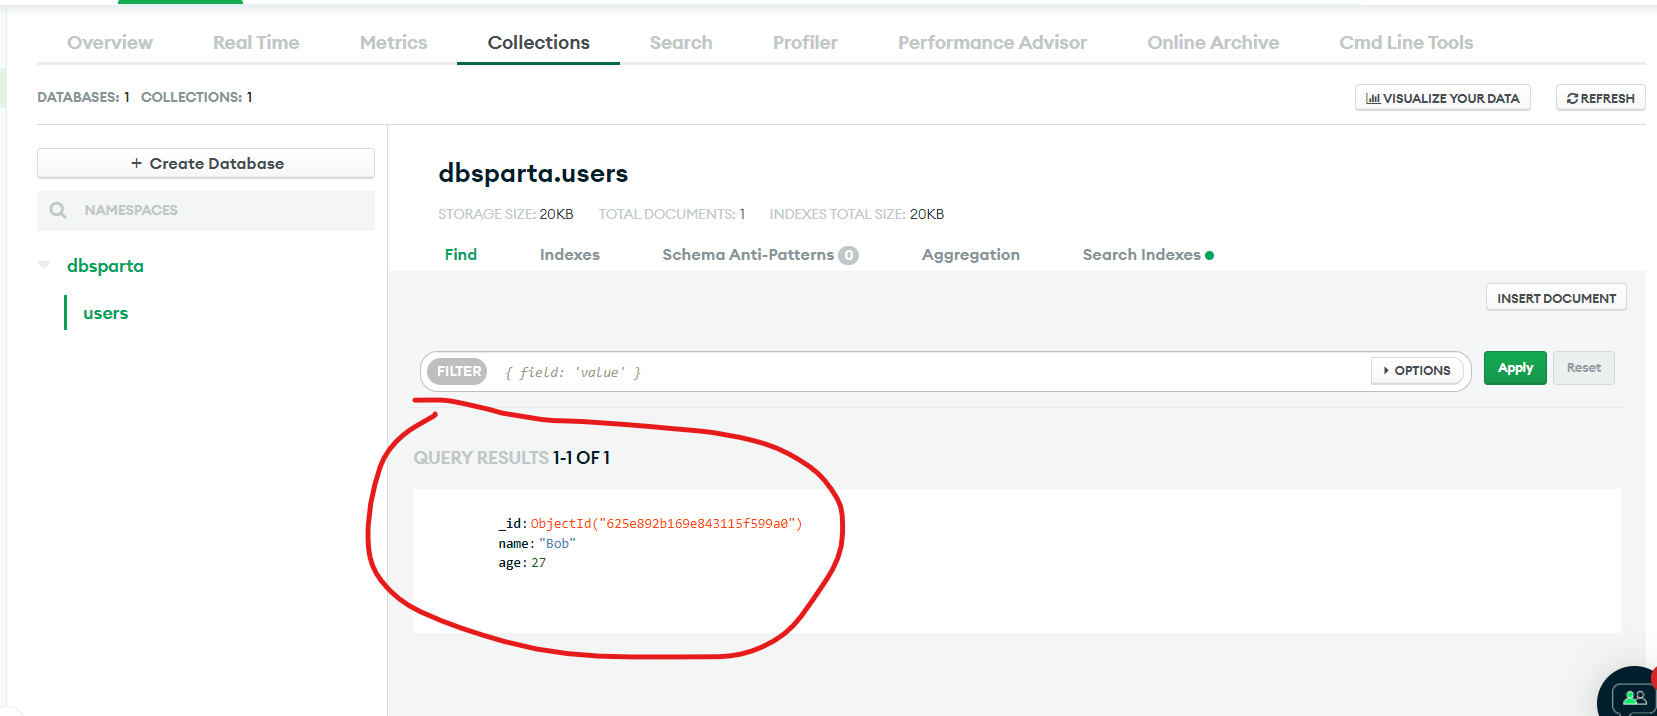
db.users.insert_one({'name' : 'messi','age': 20})- Mongodb의 데이터 한 번에 꺼내오기
- 모든 정보를
list의 형태로 가져왔으며,find({})의{}부분에는 조건이 들어가나 현재는 조건이 필요없어 기입하지 않음 for문을 활용해 모든 값을 출력하였고, 아래와 같은 결과가 나옴- 결과값 중
{'_id': ObjectId('625e892b169e843115f599a0')값은 몽고디비가 데이터를 넣을 때 스스로 생성하는 번호이므로 확인할 필요가 없음
- 결과값 중
- 모든 정보를
from pymongo import MongoClient
client = MongoClient('mongodb+srv://test:sparta@cluster0.a2woz.mongodb.net/Cluster0?retryWrites=true&w=majority')
db = client.dbsparta

all_users = list(db.users.find({}))

for user in all_users:
    print(user)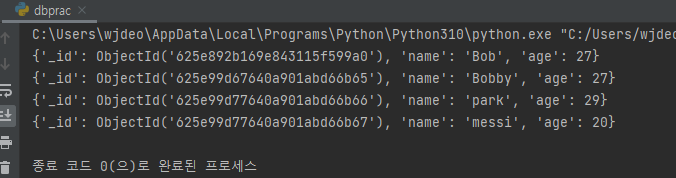
위의 '_id' 확인이 불필요하므로 코드를 다음과 같이 수정
from pymongo import MongoClient
client = MongoClient('mongodb+srv://test:sparta@cluster0.a2woz.mongodb.net/Cluster0?retryWrites=true&w=majority')
db = client.dbsparta

all_users = list(db.users.find({}, {'_id' : False}))

for user in all_users:
    print(user)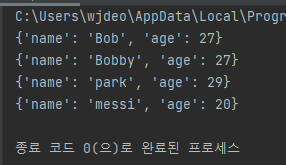
- 하나의 데이터 찾기
- 이름이 Bobby인 사람의 나이 출력
from pymongo import MongoClient
client = MongoClient('mongodb+srv://test:sparta@cluster0.a2woz.mongodb.net/Cluster0?retryWrites=true&w=majority')
db = client.dbsparta

user = db.users.find_one({'name' : 'Bobby'})
print(user['age'])- 데이터 업데이트
from pymongo import MongoClient
client = MongoClient('mongodb+srv://test:sparta@cluster0.a2woz.mongodb.net/Cluster0?retryWrites=true&w=majority')
db = client.dbsparta

db.users.update_one({'name':'Bobby'},{'$set':{'age':19}})
- 데이터 삭제
from pymongo import MongoClient
client = MongoClient('mongodb+srv://test:sparta@cluster0.a2woz.mongodb.net/Cluster0?retryWrites=true&w=majority')
db = client.dbsparta

db.users.delete_one({'name':'Bobby'})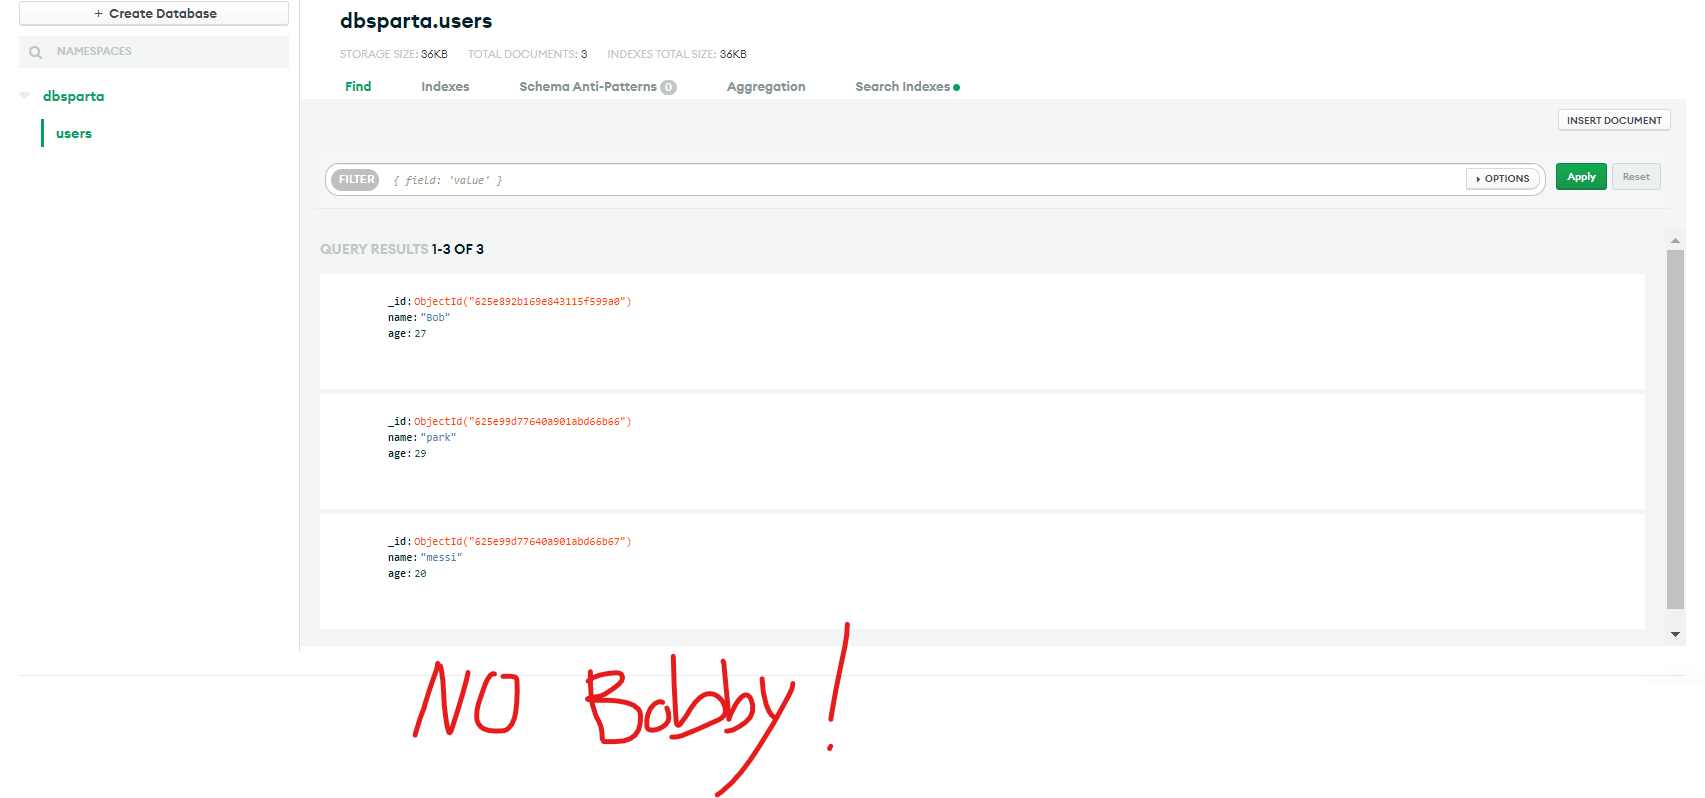
- 네이버 영화 순위, 제목, 평점을 db에 저장
- 앞서 bs4로 추출한 데이터를 doc에 저장하고,
inster_one기능을 통해 새로 만든moviesdb에 저장
- 앞서 bs4로 추출한 데이터를 doc에 저장하고,
import requests
from bs4 import BeautifulSoup

from pymongo import MongoClient
client = MongoClient('mongodb+srv://test:sparta@cluster0.a2woz.mongodb.net/Cluster0?retryWrites=true&w=majority')
db = client.dbsparta

headers = {'User-Agent' : 'Mozilla/5.0 (Windows NT 10.0; Win64; x64)AppleWebKit/537.36 (KHTML, like Gecko) Chrome/73.0.3683.86 Safari/537.36'}
data = requests.get('https://movie.naver.com/movie/sdb/rank/rmovie.naver?sel=pnt&date=20210829',headers=headers)

soup = BeautifulSoup(data.text, 'html.parser')

movies = soup.select('#old_content > table > tbody > tr')

for movie in movies:
    title = movie.select_one('td.title > div > a')
    if title is not None:
        num = movie.select_one('td:nth-child(1) > img')['alt']
        title = title.text
        star = movie.select_one('td.point').text
        doc = {
            'rank': num,
            'title': title,
            'star': star
        }
        db.movies.insert_one(doc)
😭 퀴즈
- 가버나움의 평점 조회
from pymongo import MongoClient
client = MongoClient('mongodb+srv://test:sparta@cluster0.a2woz.mongodb.net/Cluster0?retryWrites=true&w=majority')
db = client.dbsparta

movie_name = db.movies.find_one({'title': '가버나움'})
print(movie_name['star'])- 가버나움과 평점이 같은 영화 조회
from pymongo import MongoClient
client = MongoClient('mongodb+srv://test:sparta@cluster0.a2woz.mongodb.net/Cluster0?retryWrites=true&w=majority')
db = client.dbsparta

star = db.movies.find_one({'title': '가버나움'})['star']
target_movie = list(db.movies.find({'star': star}, {'_id': False}))
for target in target_movie:
print(target['title'])- 가버나움의 평점을 '0'(문자열)으로 변경
from pymongo import MongoClient
client = MongoClient('mongodb+srv://test:sparta@cluster0.a2woz.mongodb.net/Cluster0?retryWrites=true&w=majority')
db = client.dbsparta

db.movies.update_one({'title':'가버나움'},{'$set':{'star':"0"}})
😂 3주차 숙제
😭 첫 번째 코드
import requests
from bs4 import BeautifulSoup

headers = {'User-Agent' : 'Mozilla/5.0 (Windows NT 10.0; Win64; x64)AppleWebKit/537.36 (KHTML, like Gecko) Chrome/73.0.3683.86 Safari/537.36'}
data = requests.get('https://www.genie.co.kr/chart/top200?ditc=M&rtm=N&ymd=20210701',headers=headers)

soup = BeautifulSoup(data.text, 'html.parser')

musics = soup.select('#body-content > div.newest-list > div > table > tbody > tr')

for music in musics:
    rank = music.select_one('td.number').text[0:2].strip()
    title = music.select_one('td.info > a.title.ellipsis').text.strip()
    singer = music.select_one('td.info > a.artist.ellipsis').text.strip()
    print(f'({rank}) {title} ==> {singer}')
-
위와 같이 풀었고 아주 잘 풀렸다. 하지만 결과를 내리는 순간,,,
짜증나게 지니에서 쓸데없이 19금을 걸어 놓은 것이다...
그래서 양쪽 공백만 없애주는 strip() 말고 다른 친구를 찾아야 겠다 생각했다. -
그래서 나는 문자를 바꾸고 싶은 것과 바꿔주는
replace()를 기용해보기로 했다.
import requests
from bs4 import BeautifulSoup
headers = {'User-Agent' : 'Mozilla/5.0 (Windows NT 10.0; Win64; x64)AppleWebKit/537.36 (KHTML, like Gecko) Chrome/73.0.3683.86 Safari/537.36'}
data = requests.get('https://www.genie.co.kr/chart/top200?ditc=M&rtm=N&ymd=20210701',headers=headers)
soup = BeautifulSoup(data.text, 'html.parser')
musics = soup.select('#body-content > div.newest-list > div > table > tbody > tr')
for music in musics:
rank = music.select_one('td.number').text[0:2].strip()
title = music.select_one('td.info > a.title.ellipsis').text.replace('19금', '').strip()
singer = music.select_one('td.info > a.artist.ellipsis').text.strip()
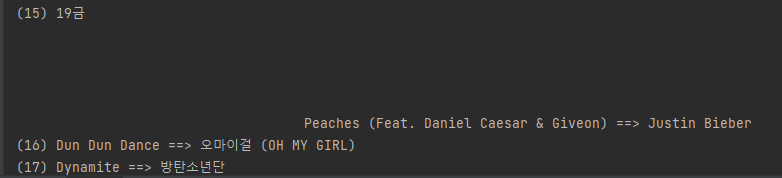
print(f'({rank}) {title} ==> {singer}')결과는,,,,

성공 ㅋㅋ
- 위의 코드를 좀 보자면
title = music.select_one('td.info > a.title.ellipsis').text.replace('19금', '').strip()나는 먼저 title을 html에서 파싱해와서 그 결과에 있는 text값만 취했다. 그리고 숨어있던 19금을 없애주기 위해 replace()를 사용해서 해당 글자들을 공백으로 바꾸어 주었다. 그리고 다른 곳에 남아있는 공백들을 strip()을 사용해서 싹 다 지워주었다.

https://github.com/nikevapormax

와 정리가 너무 잘돼있어서 읽으니까 저절로 공부가 되네요 ㅎㅎ