유화제작 프로젝트
Machine Learning
CBV 형태로 작성한 머신러닝
- 우선 머신러닝을 CBV 형태로 작성한 후, 어떻게 돌아가나 테스트해보았다.
- 원래는 git을 클론하여 진행해보려 했지만, 우리의 생각만큼 합성이 잘 되지 않았다. 사람 사진과 배경이 그려져 있는 명화 또는 배경 사진을 합성해보았는데 좀 징그럽게 나왔다.
- 물론 머신러닝적으로는 결과가 잘 나왔고, iteration이 돌면 돌수록 화질도 좋아져 나쁘지 않긴 했다. 하지만 사용자에게 제공할 서비스에서 내 몸통에 나무가 있다면 굉장히 좋지 않을 것이라 생각했다.
- 원래의 컨셉이었던 사계절을 당장은 녹일 수가 없어 많이 아쉬워 했지만, 일단 진행이 우선이어 아래의 모델을 가지고 프로젝트를 진행했다.
from datetime import datetime
import cv2
import numpy as np

from rest_framework.views import APIView
from rest_framework.response import Response
from rest_framework import status

class NstView(APIView):

    def post(self, request):
        user = request.user
        filestr = request.FILES['input'].read()
        # 변환 : string data to numpy array
        npimg = np.fromstring(filestr, np.uint8)
        # 변환 : numpy array to image
        input_img = cv2.imdecode(npimg, cv2.IMREAD_COLOR)

        style = request.data.get('style', '')
        style = cv2.dnn.readNetFromTorch(f'nst/models/{style}')

        h, w, c = input_img.shape
        input_img = cv2.resize(input_img, dsize=(500, int(h / w * 500)))
        MEAN_VALUE = [103.939, 116.779, 123.680]
        blob = cv2.dnn.blobFromImage(input_img, mean=MEAN_VALUE)
        style.setInput(blob)
        output = style.forward()
        output = output.squeeze().transpose((1, 2, 0))
        output += MEAN_VALUE
        output = np.clip(output, 0, 255)
        output = output.astype('uint8')

        time = datetime.now().strftime('%Y-%m-%d %H:%M')
        output_img = cv2.imwrite(f'nst/output/{time}.jpeg', output)

return Response({"output": output_img}, status=status.HTTP_200_OK)- 위의 코드를 실행하게 되면 사용자가 넣은
input_img와 우리가 보유하고 있는style을 섞어output_img를 만들어 내게 된다. output_img의 파일명을 가지고 고민을 조금 아주 잠깐 하였는데, 역시 이름이 겹치지 않으며 랜덤하게 부여할 수 있는 것은 당장에는datetime.now().strftime('%Y-%m-%d %H:%M')밖에 없었다.- 이 부분에서도 버그가 하나 발생하긴 했다.
- 같은 minute 값을 가지는 파일은 결과값이 덮어씌워 지는 일이 발생했다.
- 그래서 함수화를 진행하며
second를 추가해 주었다.
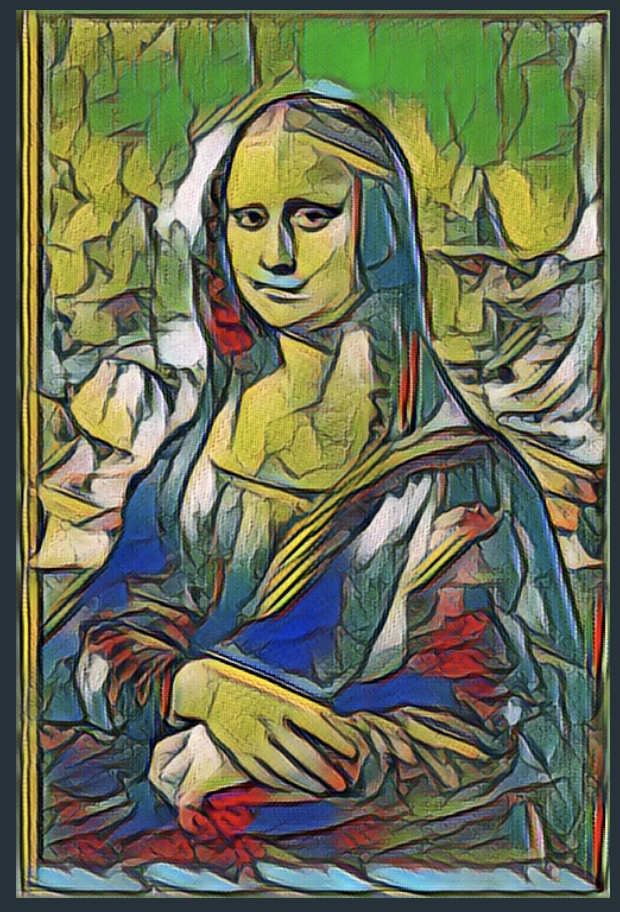
- 위 코드의 결과값이다. 넣은 사진을 명화 화풍으로 변경시켜 준다.
CBV -> function
- 우리는 함수화를 진행하기 위해, 사진을 변경하는 코드를 기존의 CBV에서 빼주었다.
- 함수화는 아래와 같이 진행하였다.
- 추가적으로 일단 db에 Image model에 있는 내용대로 추가해 주었다.
- 남은 과제는 사용자가 style 값을 고를 수 있도록 해주고, 고른 style 값이 제대로 저장되게 하는 것이다.
magic이라는 이름으로 함수를 생성하였다.- 사실 결과값을 json으로 불러다가 포스트맨에 찍어보고 싶었는데, 자꾸 json serialzable 하지 않다고 그래서 짜증나기도 하고 굳이 데이터베이스에 저장이 잘되기 때문에 볼 필요가 없어 success로 바꿨다.
from datetime import datetime
import cv2
import numpy as np

from rest_framework.views import APIView
from rest_framework.response import Response
from rest_framework import status

from nst.models import Style as StyleModel
from nst.models import Image as ImageModel

def magic(filestr, style):
    npimg = np.fromstring(filestr, np.uint8)
    input_img = cv2.imdecode(npimg, cv2.IMREAD_COLOR)

    style = cv2.dnn.readNetFromTorch(f'nst/models/{style}')

    h, w, c = input_img.shape
    input_img = cv2.resize(input_img, dsize=(500, int(h / w * 500)))
    MEAN_VALUE = [103.939, 116.779, 123.680]
    blob = cv2.dnn.blobFromImage(input_img, mean=MEAN_VALUE)
    style.setInput(blob)
    output = style.forward()
    output = output.squeeze().transpose((1, 2, 0))
    output += MEAN_VALUE
    output = np.clip(output, 0, 255)
    output = output.astype('uint8')

    time = datetime.now().strftime('%Y-%m-%d %H:%M:%s')

    cv2.imwrite(f'nst/output/{time}.jpeg', output)
    result = f'nst/output/{time}.jpeg'

    return result

class NstView(APIView):
    def post(self, request):
        user = request.user
        style_info = StyleModel.objects.get(category=request.data["style"])

        output_img = magic(
                filestr=request.FILES['input'].read(),
                style=request.data.get('style', '')
            )

        image_info = ImageModel.objects.create(style=style_info, user=user, output_img=output_img)
        image_info.save()

return Response({"msg": "success!!"}, status=status.HTTP_200_OK)- db에 저장된 결과이다.
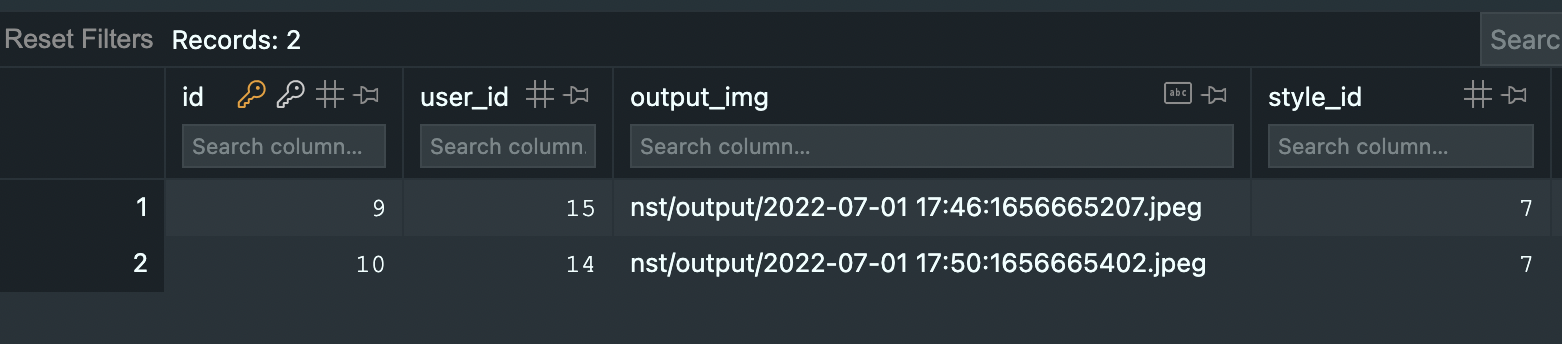
- db에 저장된 값을 불러다 호출하면 프론트 화면에서 잘 뜰지에 대해 빠르게 테스트를 진행해 봐야 할 것 같다.

https://github.com/nikevapormax