[LG CNS AM Inspire CAMP 1기] MSA (7) - kafka connect (source, sink)
LG CNS AM Inspire Camp 1기

INTRO
오늘은 카프카 Connect에 대한 학습 내용을 정리했습니다. 카프카 서비스를 다운받아 도커 환경에서 실행하고, postman에서 서비스에 접근하는 방식으로 실습을 진행했습니다.
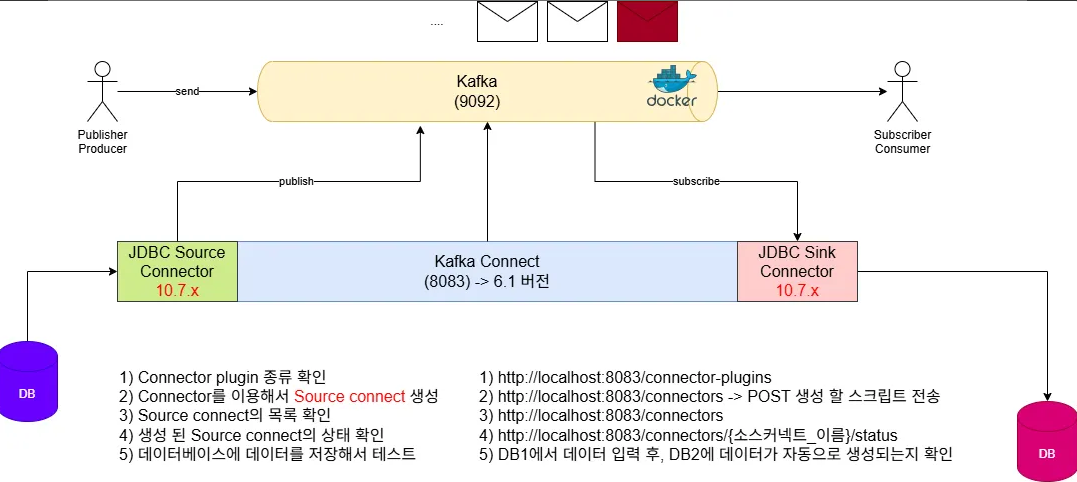
1. Kafka Connect
데이터를 보내고 받아오는 기능 (import/export)을 한다.
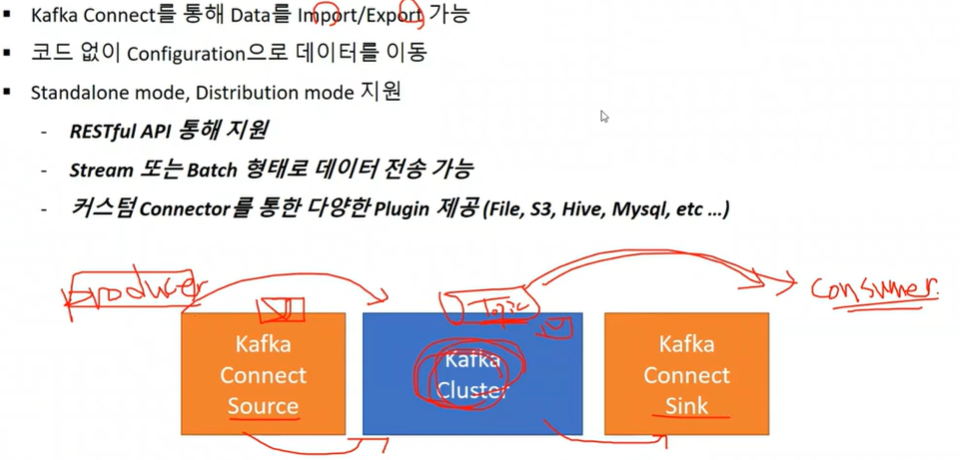
즉, connect 는 토픽을 주고 받는 역할에 따라 source 와 sink 역할로 나뉜다.
- docker 환경에서 kafka 연동 서비스 실행
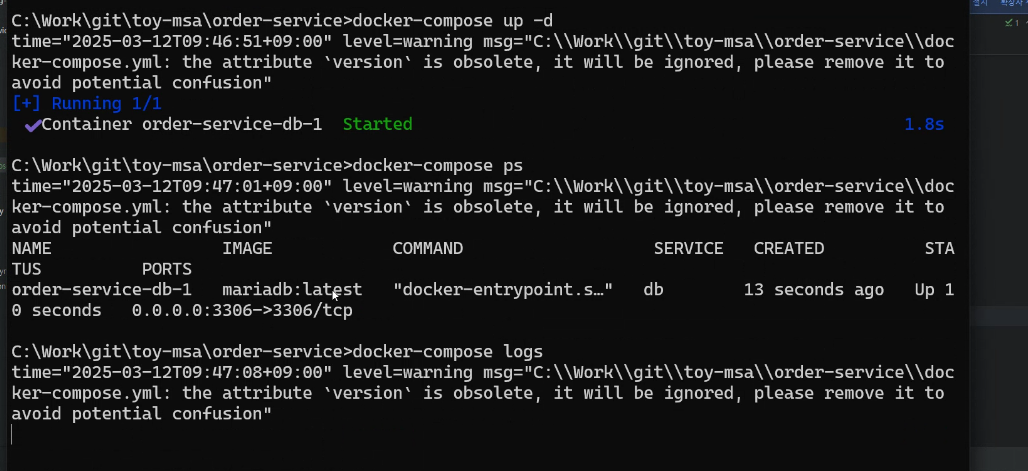
도커 네트워크 만든 후 서비스 실행
docker network create ecommerce-network
docker network inspect ecommerce-network
docker-compose logs
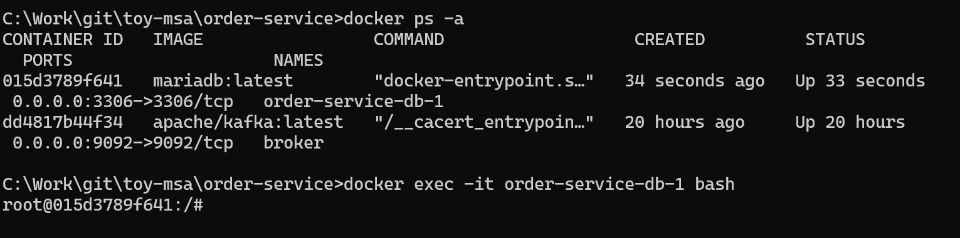
docker exec -it order-service-db-1 bash
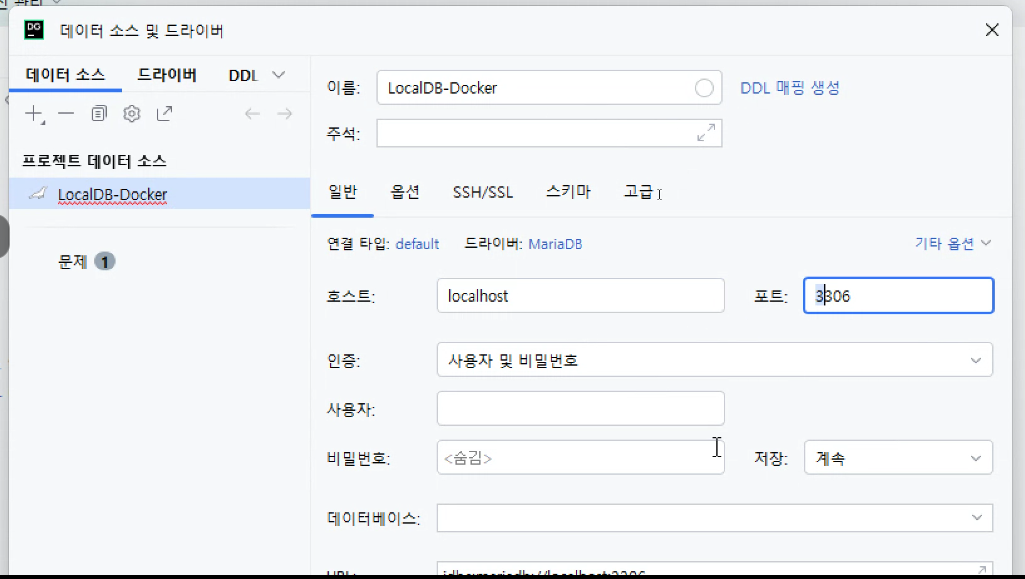
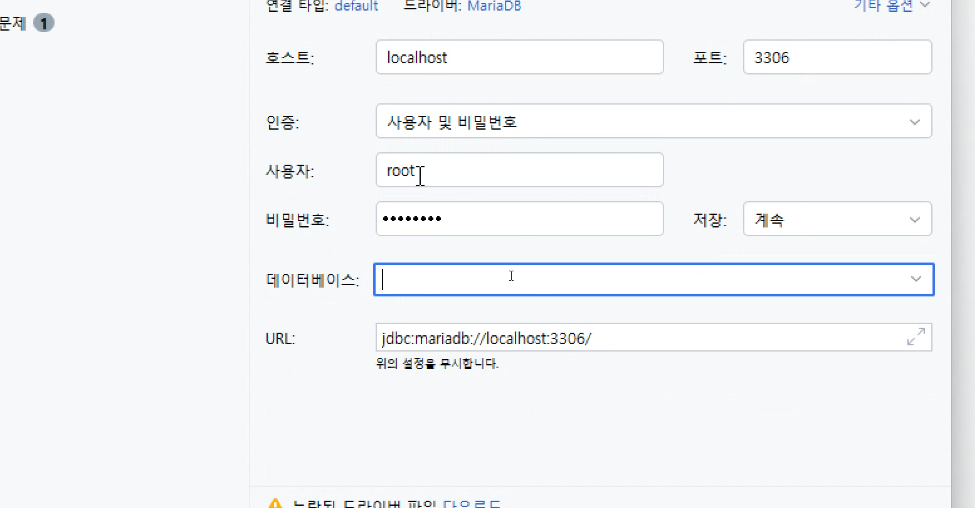
mariadb -h localhost -u root -p- mariaDB 셋팅
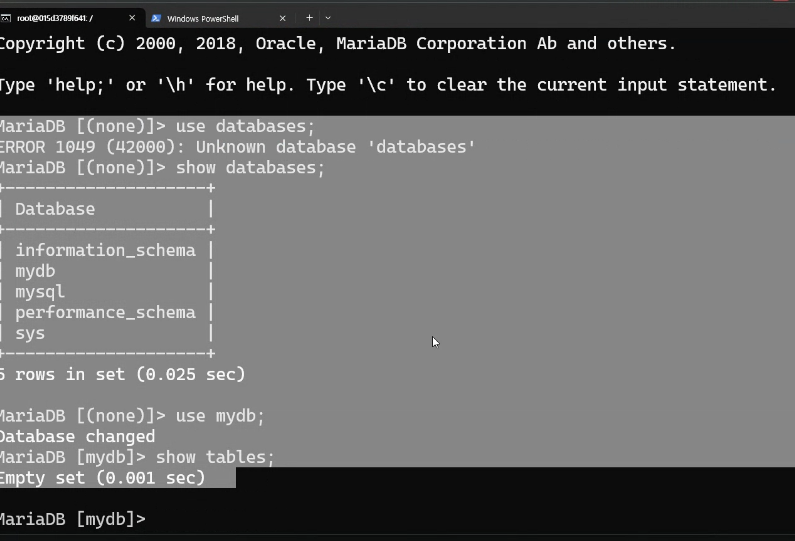
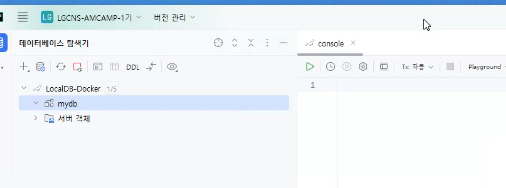
워크벤치를 통해 DB 확인 가능
테이블 생성
create table orders (id int auto_increment primary key,
user_id varchar(50) not null,
product_id varchar(20) not null,
order_id varchar(50) not null,
qty int default 0,
unit_price int default 0,
total_price int default 0,
created_at datetime default now()
);
- kafka connect 다운로드
#kafka 다운
curl -O http://packages.confluent.io/archive/6.1/confluent-community-6.1.0.tar.gz
tar xvf confluent-community-6.1.0.tar.gz
#vsCode
rem Classpath addition for LSB style path
if exist %BASE_DIR%\share\java\kafka\* (
call:concat %BASE_DIR%\share\java\kafka\*
)
#실행 (계속 띄워두기)
C:\Work\confluent-6.1.0>.\bin\windows\connect-distributed.bat .\etc\kafka\connect-distributed.properties
#topic확인
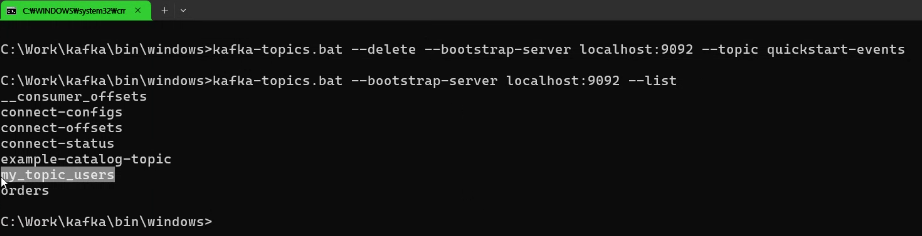
C:\Work\kafka\bin\windows>kafka-topics.bat --bootstrap-server localhost:9092 --list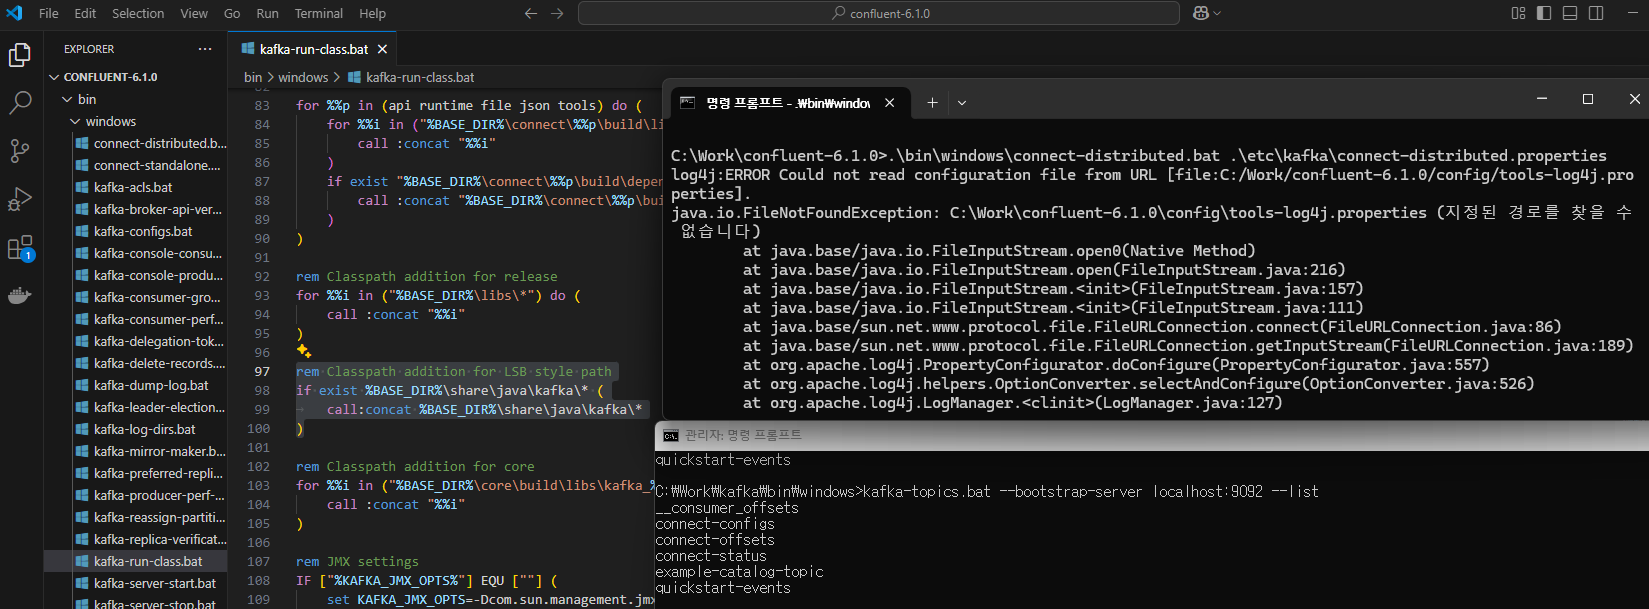
토픽 확인이 안되면
어제 기동한 kafka(broker)를 docker stop broker -> docker start broker -> 토픽 검색
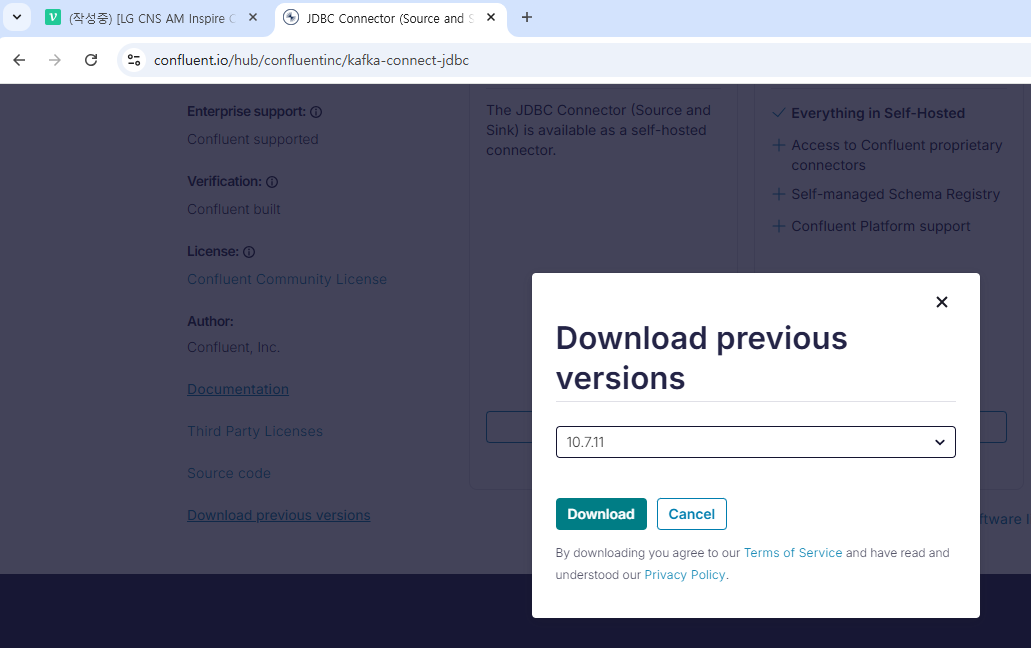
#kafka 커넥터 다운
https://www.confluent.io/hub/confluentinc/kafka-connect-jdbc

#C:\Work\kafka-connect-jdbc\lib 확인

#C:\Users\user\.m2\repository\org\mariadb\jdbc\mariadb-java-client\2.7.2 를
C:\Work\confluent-6.1.0\share\java\kafka 에 붙여넣음

#커넥터 플러그인 경로 수정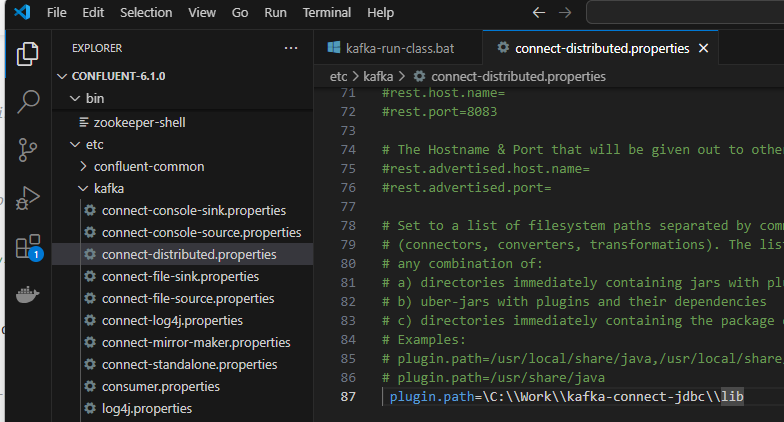
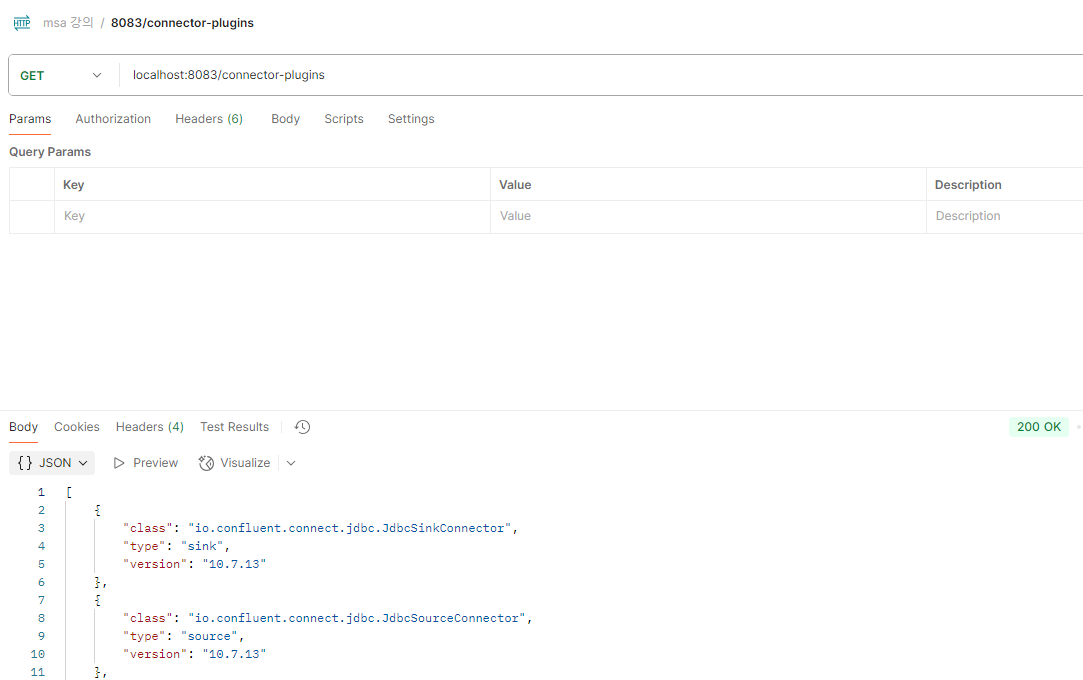
#정상 설치 확인
http://localhost:8083/connector-plugins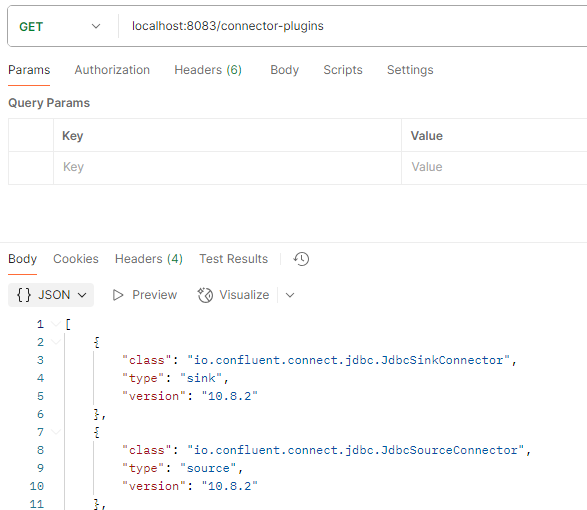
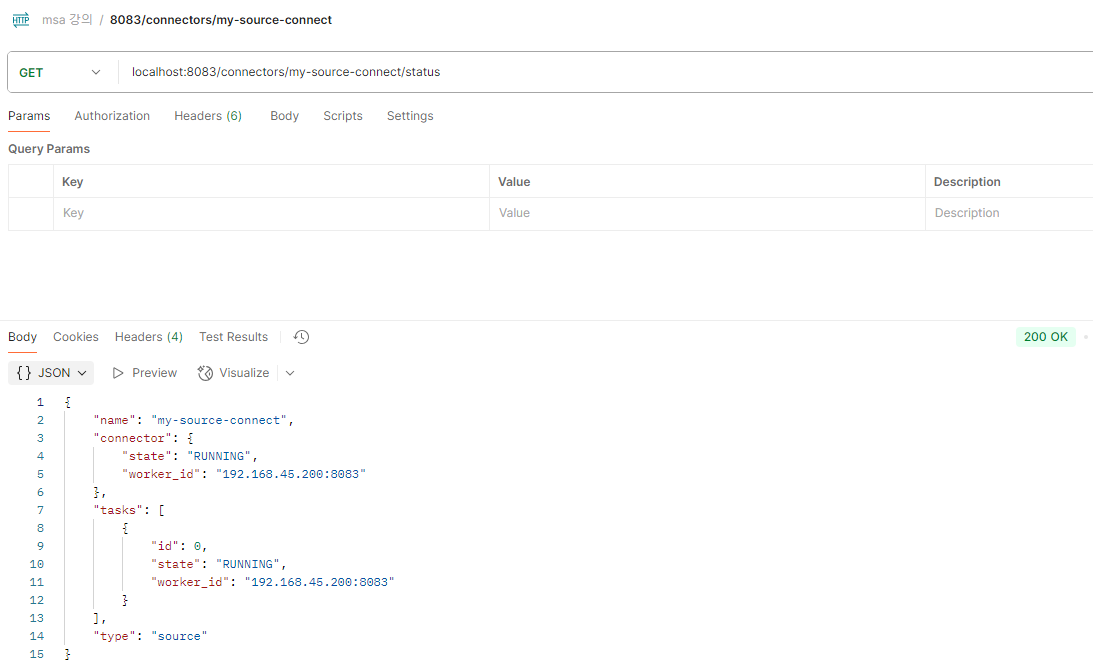
2. source connect
- 소스커넥터 연결
{
    "name": "my-source-connect",
    "config": {
      "connector.class": "io.confluent.connect.jdbc.JdbcSourceConnector",
      "connection.url": "jdbc:mysql://localhost:3306/mydb",
      "connection.user": "root",
      "connection.password": "test1357",
      "mode": "incrementing",
      "incremental.column.name": "id",
      "table.whitelist": "users",
      "topic.prefix": "my_topic_",
      "tasks.max": "1"
    }
}

# http://localhost:8083/connectors (POST)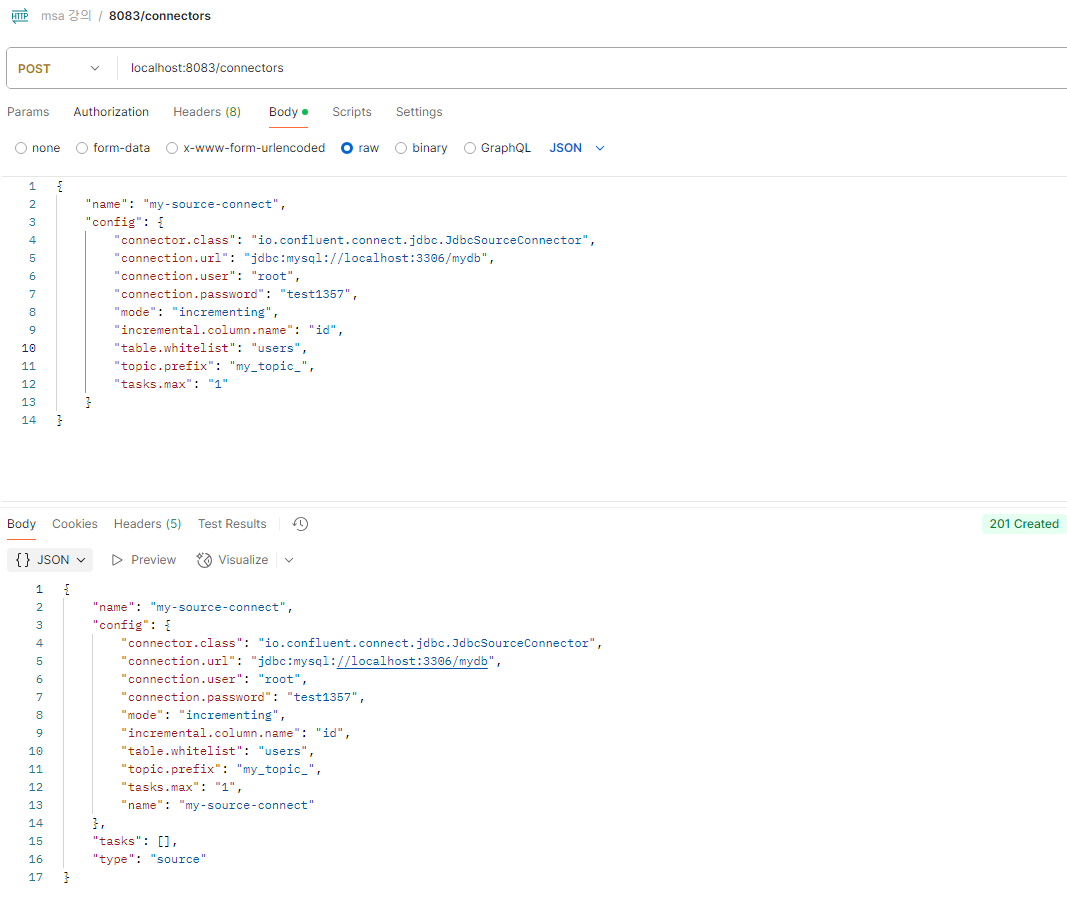
테이블 생성
CREATE TABLE users (
    id INT NOT NULL AUTO_INCREMENT PRIMARY KEY,
    user_id VARCHAR(256) DEFAULT NULL,
    name VARCHAR(256) DEFAULT NULL
);
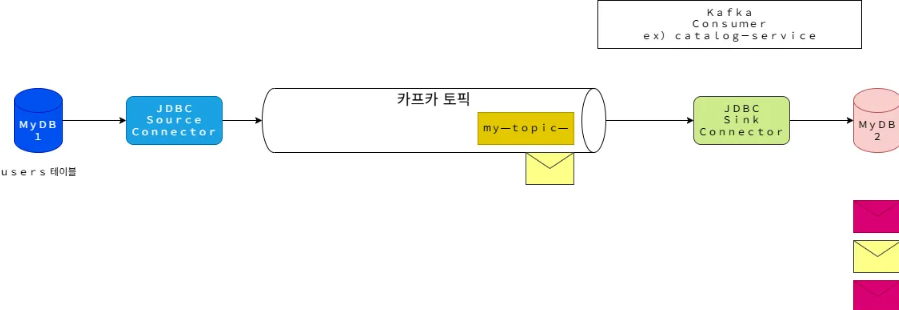
- 흐름 구성도 (요약)
- 환경 재설정
우선 안쓰는 토픽 삭제
사용할 토픽 리스트

버전을 맞추기 위해 커넥터 다시 다운로드
springboot3.2_student 브랜치에서 현재까지의 소스 확인...
- DB에서 INSERT
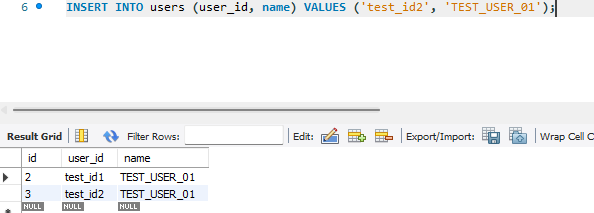
DB의 변화를 source connect가 감지하고 topic에 데이터를 저장함.
C:\Work\kafka\bin\windows>kafka-console-consumer.bat --bootstrap-server localhost:9092 --topic my_topic_users

- 흐름 구성도 (요약)
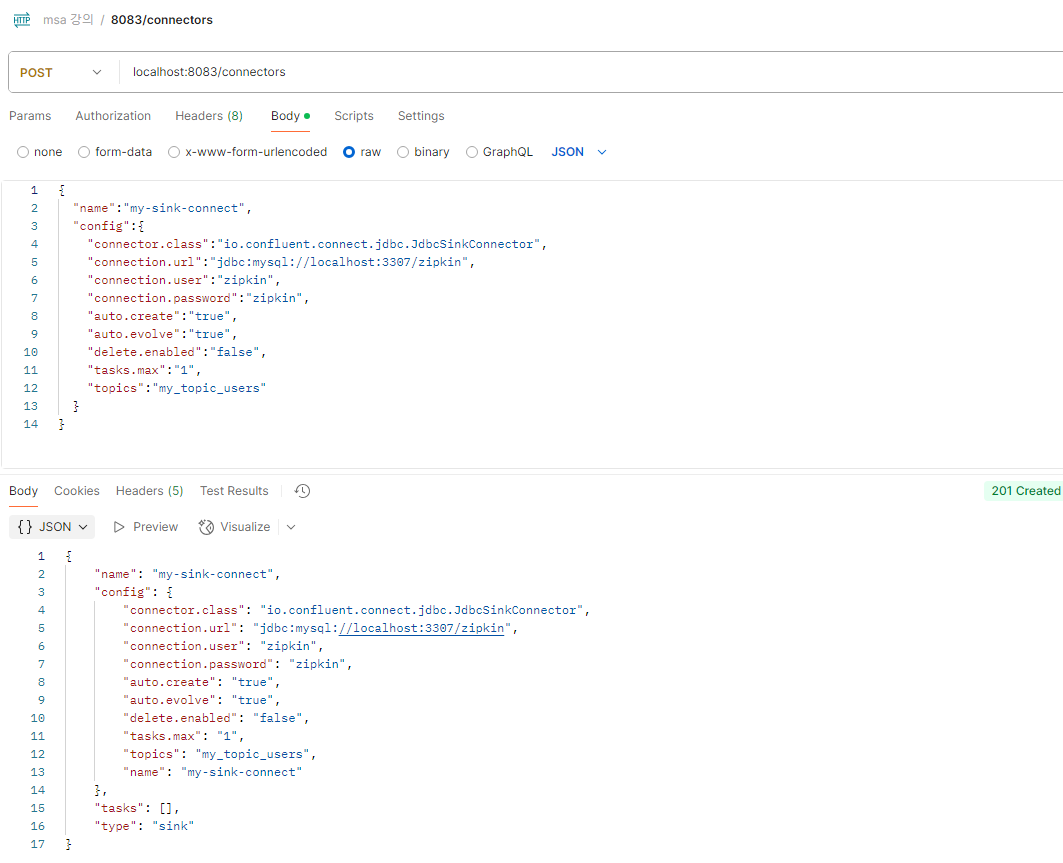
3. sink connect
- 커넥트 연결
소스 커넥트와 다른 db 를 쓰기 위해 전에 만들어놓은 zipkin db를 임시로 사용한다.
{
  "name":"my-sink-connect",
  "config":{
    "connector.class":"io.confluent.connect.jdbc.JdbcSinkConnector",
    "connection.url":"jdbc:mysql://localhost:3307/zipkin",
    "connection.user":"zipkin",
    "connection.password":"zipkin",
    "auto.create":"true",
    "auto.evolve":"true",
    "delete.enabled":"false",
    "tasks.max":"1",
    "topics":"my_topic_users"
  }
}
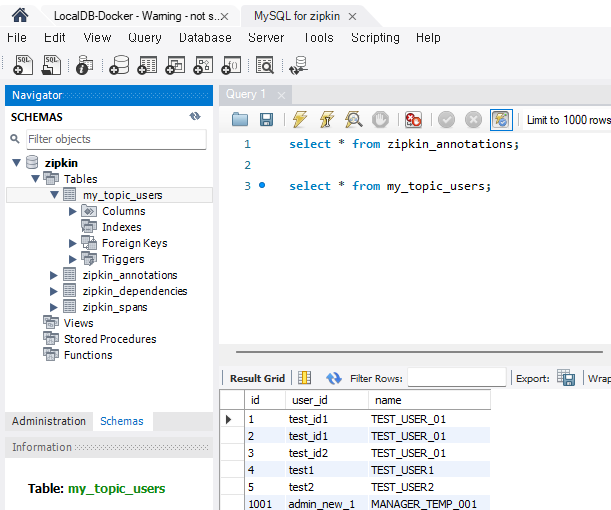
- DB 확인
-
1) DB1에서 insert query 실행
insert into users(user_id, name) values('test1', 'TEST_USER1'); -
2) DB2에서 select query 실행 (DB1과 같은지 확인)
select * from my_topic_uesrs;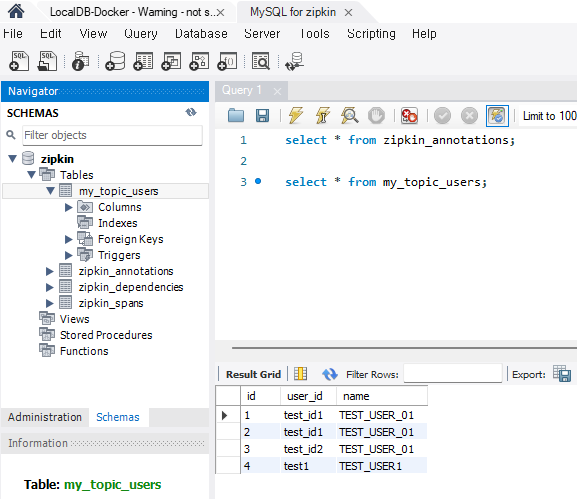
-
3) Topic에 insert 데이터가 저장되는지 실행
kafka-console-consumer.bat --bootstrap-server localhost:9092 --topic my_topic_users
-
4) kafka-console-producer 명령어로 Topic에 직접 메시지 발생했을 때, DB2에 데이터가 생기는지 확인
kafka-console-producer.bat --bootstrap-server localhost:9092 --topic my_topic_users
{"schema":{"type":"struct","fields":[{"type":"int32","optional":false,"field":"id"},{"type":"string","optional":true,"field":"user_id"},{"type":"string","optional":true,"field":"name"}],"optional":false,"name":"users"},"payload":{"id":1001,"user_id":"admin_new_1","name":"MANAGER_TEMP_001"}}
- 프로듀서
- 컨슈머
- 워크벤치 확인


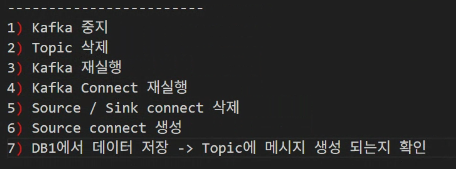
- 오류 발생 시 처리순서
4. 서비스 연동
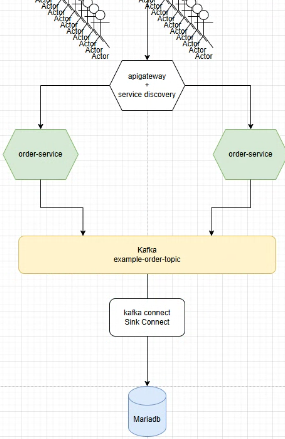
-
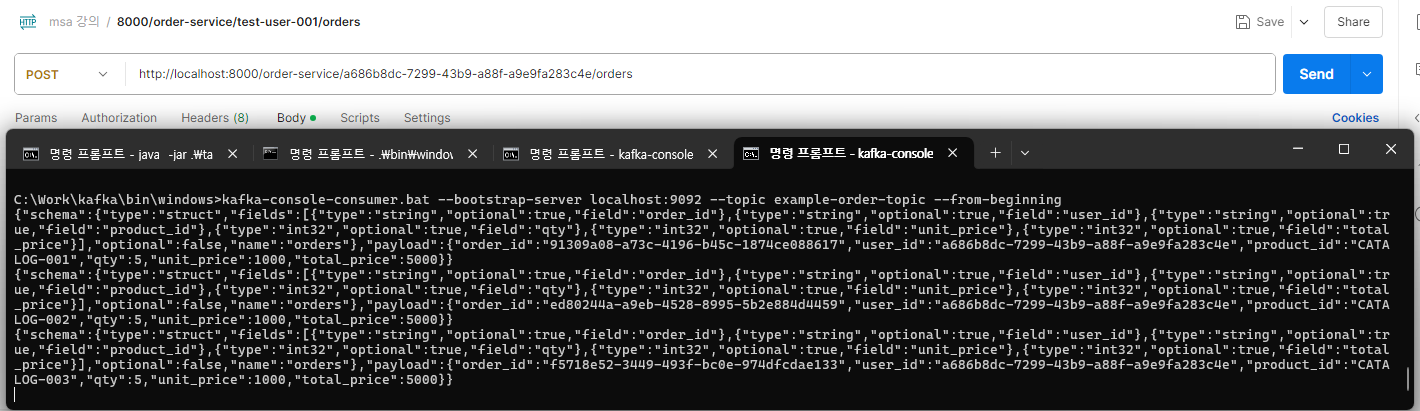
order-service를 IDE 터미널 및 cmd에서 jar파일 실행하여 여러 환경에서 가동하는 걸로 테스트.

-
post 할 때 터미널과 cmd 번갈아가며 로그가 쌓이고, 컨슈머를 보니 토픽에 잘 쌓이는 걸 알 수 있음.
-
DB에 쌓이는 것 테스트
-
order 싱크 커넥트 스크립트
{
  "name":"my-order-sink-connect",
  "config":{
    "connector.class":"io.confluent.connect.jdbc.JdbcSinkConnector",
    "connection.url": "jdbc:mysql://localhost:3306/mydb",
    "connection.user": "root",
    "connection.password": "test1357",
    "auto.create":"true",
    "auto.evolve":"true",
    "delete.enabled":"false",
    "tasks.max":"1",
    "topics":"example-order-topic"
  }
}
OUTRO
카프카 실행 명령어 모음
C:\Work\confluent-6.1.0>
.\bin\windows\connect-distributed.bat .\etc\kafka\connect-distributed.properties

C:\Work\kafka\bin\windows>
kafka-topics.bat --bootstrap-server localhost:9092 --list
kafka-console-consumer.bat --bootstrap-server localhost:9092 --topic my_topic_users --from-beginning
kafka-console-producer.bat --bootstrap-server localhost:9092 --topic my_topic_users
kafka-topics.bat --delete --bootstrap-server localhost:9092 --topic example-order-topic
수업 전 후 PC를 껐다 키는 게 비효율적인 것 같다는 생각이 들기 시작했습니다.... 서비스 가동을 위해 셋팅해놓아야할 것 들이 쌓이고 있지만 명령어를 잘 정리해두면 금방 실행시킬 수 있을 겁니다!
C:\Work\confluent-6.1.0>.\bin\windows\kafka-configs.bat --bootstrap-server localhost:9092 --alter --entity-type topics --entity-name connect-configs --add-config cleanup.policy=compact
Completed updating config for topic connect-configs.

C:\Work\confluent-6.1.0>.\bin\windows\kafka-topics.bat --describe --topic connect-configs --bootstrap-server localhost:9092
Topic: connect-configs  PartitionCount: 1       ReplicationFactor: 1    Configs: cleanup.policy=compact,segment.bytes=1073741824
        Topic: connect-configs  Partition: 0    Leader: 1       Replicas: 1     Isr: 1