INTRO
자바 문법 중 제네릭과 컬렉션에 대해 학습한 내용을 정리했습니다. 컬렉션에 대해 이해하고 있으면 알고리즘 공부에 매우 유용하기때문에 잘 익혀두면 좋습니다.
1. 제네릭
컴파일 타임에 타입을 지정해 타입 안정성을 보장하고, 코드 재사용성을 높이는 기능.
클래스, 인터페이스, 메서드에 사용이 가능 .
주로 타입을 명시하지 않고도 다양한 데이터 타입을 처리하는 데 사용.
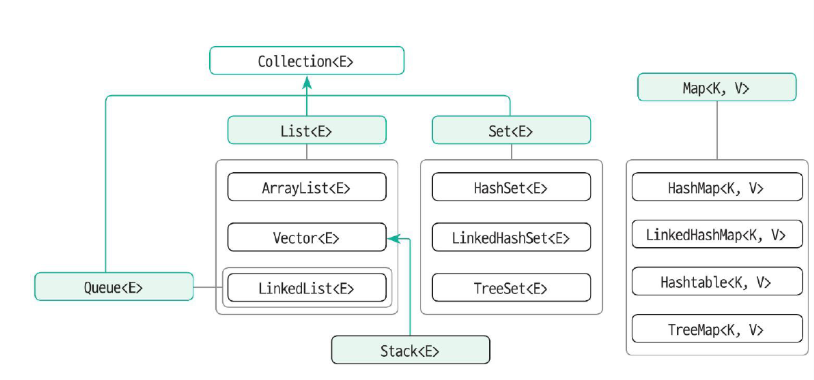
2. 컬렉션
데이터의 저장 용량(capacity, 저장할 수 있는 최대 데이터의 개수)을 동적으로 관리.
컬렉션 프레임워크 ⇒ 리스트, 스택, 큐, 트리 등의 자료구조에 정렬, 탐색 등의 알고리즘을 구조화해 놓은 프레임워크.
- 배열과 차이점
add, remove, size() 함수로 리스트 컨트롤.
import java.util.ArrayList;
import java.util.Arrays;
import java.util.List;

public class Test {
    public static void main(String[] args) {
        String[] strArr = new String[] { "가", "나", "다", "라" };
        System.out.println(strArr.length);
        strArr[2] = null;
        strArr[3] = null;
        System.out.println(strArr.length);
        System.out.println(Arrays.toString(strArr)); // [가, 나, null, null]

        List<String> arrList = new ArrayList();
        arrList.add("가");
        arrList.add("나");
        arrList.add("다");
        arrList.add("라");
        System.out.println(arrList.size());
        arrList.remove("라");
        arrList.remove(2);
        System.out.println(arrList.size());
        System.out.println(arrList); // [가, 나]
    }
}
3. List <E> 컬렉션 인터페이스
대표적인 클래스
- ArrayList<E> - 단일쓰레드. 단방향. 대체적으로 많이 사용.
- Vetor<E> - 멀티쓰레드에 활용
- LinkedList<E> - 양방향. 추가/삭제가 많은 경우.
public class Test {
    public static void main(String[] args) {
        List<Integer> list1 = new ArrayList<>();
        List<Integer> list2 = new ArrayList<>(30);

        List<Integer> vector1 = new Vector<>();
        List<Integer> vector2 = new Vector<>(30);

        List<Integer> linked1 = new LinkedList<>();
        // LinkedList는 capacity 지정이 불가능
        List<Integer> linked1 = new LinkedList<>(30);
    }
}
- Arrays.asList() 메서드를 이용해서 List 타입의 참조변수에 값을 할당
저장 공간의 크기를 변경할 수 없음
public class Test {
    public static void main(String[] args) {
        List<Integer> list = Arrays.asList(1, 2, 3, 4);
        System.out.println(list);   // [1, 2, 3, 4]

        list.set(1, 20);
        System.out.println(list);   // [1, 20, 3, 4]

        // java.lang.UnsupportedOperationException
        // list.add(50);
        // list.remove(0);
    }
}
- ArrayList<E> 구현 클래스
List<E> 인터페이스를 구현한 구현 클래스.
배열처럼 수집(collect)한 원소(element)를 인덱스(index)로 관리하며, 저장 용량(capacity)을 동적으로 관리.
사용 코드
import java.util.ArrayList;
import java.util.Arrays;
import java.util.List;

public class Test {
    public static void main(String[] args) {
        List<Integer> list = new ArrayList<>();

        // 데이터 추가 >>> add(value), add(index, value)
        list.add(3);
        list.add(4);
        list.add(5);
        System.out.println(list);               // [3, 4, 5]
        System.out.println(list.toString());    // [3, 4, 5]

        list.add(1, 40);
        System.out.println(list);               // [3, 40, 4, 5]


        List<Integer> list2 = new ArrayList<>();
        list2.add(100);
        list2.add(200);

        // 컬렉션 객체 추가 >>> addAll(values), addAll(index, values)
        list.addAll(list2);
        System.out.println(list);               // [3, 40, 4, 5, 100, 200]

        list.addAll(1, list2);
        System.out.println(list);               // [3, 100, 200, 40, 4, 5, 100, 200]

        // 데이터 변경 >>> set(index, value)
        list.set(1, 111);
        System.out.println(list);               // [3, 111, 200, 40, 4, 5, 100, 200]
        // java.lang.IndexOutOfBoundsException: Index 8 out of bounds for length 8
        // list.set(8, 8888);

        // 데이터 삭제 >>> remove(index), remove(value)
        list.remove(1);
        System.out.println(list);               // [3, 200, 40, 4, 5, 100, 200]
        list.remove(1);
        System.out.println(list);               // [3, 40, 4, 5, 100, 200]

        list.remove(Integer.valueOf(100));
        System.out.println(list);               // [3, 40, 4, 5, 200]

        list.add(40);
        System.out.println(list);               // [3, 40, 4, 5, 200, 40]
        list.remove(Integer.valueOf(40));
        System.out.println(list);               // [3, 4, 5, 200, 40]

        list.clear();
        System.out.println(list);               // []


        // 데이터 정보 조회
        System.out.println(list.isEmpty());     // true

        list.add(1);
        list.add(2);
        System.out.println("리스크의 크기 : " + list.size()); // 2
        System.out.println("1번째 : " + list.get(0));         // 1

        // 배열로 변환
        Object[] o = list.toArray();
        System.out.println(Arrays.toString(o));     // [1, 2]

        Integer[] i1 = list.toArray(new Integer[0]);
        System.out.println(Arrays.toString(i1));    // [1, 2]

        Integer[] i2 = list.toArray(new Integer[4]);
        System.out.println(Arrays.toString(i2));    // [1, 2, null, null]
    }
}
4. Set<E> 컬렉션 인터페이스
집합의 개념으로, 인덱스를 포함하지 않고, 데이터의 중복과 순서가 없다.
- Set<E>의 모든 데이터를 하나씩 가져오는 방법
- iterator() 메서드로 Iterator 객체로 반환 받아서 활용
- for-each 구문 이용
Set<E> 인터페이스를 상속받아 구현한 대표적인 구현 클래스
HashSet<E>, LinkedHashSet<E>, TreeSet<E>
사용 코드
import java.util.Arrays;
import java.util.HashSet;
import java.util.Iterator;
import java.util.Set;

public class Test {
  public static void main(String[] args) {
      // 데이터 추가
      Set<String> hset = new HashSet<>();
      hset.add("하나");
      hset.add("둘");
      hset.add("셋");
      System.out.println(hset);   // [둘, 하나, 셋]

      Set<String> hset2 = new HashSet<>();
      hset2.add("하나");
      hset2.add("가");
      hset2.add("나");

      hset.addAll(hset2);
      System.out.println(hset);   // [가, 둘, 나, 하나, 셋]

      // 데이터 삭제
      hset.remove("나");
      System.out.println(hset);   // [가, 둘, 하나, 셋]

      hset.clear();
      System.out.println(hset);   // []

      // 데이터 정보 추출
      System.out.println(hset.isEmpty());     // true

      hset.add("가");
      hset.add("나");
      hset.add("다");
      System.out.println(hset.contains("나")); // true
      System.out.println(hset.contains("너")); // false

      System.out.println(hset.size());        // 3

      Iterator<String> iterator = hset.iterator();
      while(iterator.hasNext()) {
          System.out.println(iterator.next());
      }

      for(String s : hset) {
          System.out.println(s);
      }

      // 배열로 변환
      Object[] objArr = hset.toArray();
      System.out.println(Arrays.toString(objArr));    // [가, 다, 나]

      String[] strArr1 = hset.toArray(new String[0]);
      System.out.println(Arrays.toString(strArr1));   // [가, 다, 나]

      String[] strArr2 = hset.toArray(new String[5]);
      System.out.println(Arrays.toString(strArr2));   // [가, 다, 나, null, null]]
  }
}- 해시 컬렉션은 두개의 메서드 오버라이딩 필요
-> 1. hashCode() 메서드의 반환값을 먼저 비교를 한 후 equals() 메서드의 반환값을 비교, 2. hashCode() 메서드를 오버라이딩
import java.util.HashSet;
import java.util.Objects;
import java.util.Set;

class A {
    int data;
    public A(int data) {
        this.data = data;
    }

    @Override
    public boolean equals(Object o) {
        if (o instanceof A) {
            if (this.data == ((A)o).data)
                return true;
        }
        return false;
    }

    @Override
    public int hashCode() {
        // return Objects.hash(this.data);
        // return (Integer.valueOf(this.data)).hashCode();
        return data;
    }
}

public class Test {
    public static void main(String[] args) {
        Set<A> hset1 = new HashSet<>();

        hset1.add(new A(3));
        hset1.add(new A(3));
        hset1.add(new A(3));

        System.out.println(hset1.size());

        for(A a : hset1) {
            System.out.println(a + " : " + a.data);
        }
    }
}
위의 코드를 실행하면 HashSet의 크기가 1이 되는 것을 확인할 수 있음
1
A@3 : 3
- LinkedHashSet<E> 구현 클래스
HashSet<E>을 상속한 클래스로, 연결 정보가 추가.
출력 순서와 입력 순서가 동일하다.
 public static void main(String[] args) {
        Set<Integer> iset = new LinkedHashSet<>();

        iset.add(100);
        iset.add(10);
        iset.add(2);
        iset.add(10);
        System.out.println(iset);   // [100, 10, 2]
    }
- TreeSet<E> 구현 클래스
크기에 따른 정렬 및 검색 기능이 추가된 컬렉션.
데이터 입력 순서와 상관없이 크기 순으로 정렬되어 출력.
 public static void main(String[] args) {
        Set<Integer> iset = new TreeSet<>();

        iset.add(100);
        iset.add(10);
        iset.add(2);
        iset.add(10);

        System.out.println(iset);   // [2, 10, 100]
    }
5. Map<K, V> 컬렉션 인터페이스
- Key, Value 한 쌍으로 데이터를 저장
- Key는 중복 저장 불가, Value는 중복이 가능
- 대표 구현 클래스
HashMap<K, V>, LinkedHashMap<K, V>, Hashtable<K, V>, TreeMap<K, V>
- HashMap<K, V> 구현 클래스
Key 값의 중복 여부를 확인하는 방법 : Key 객체의 hashCode() 값이 같고, equals() 메서드가 true를 반환하면 같은 객체로 인식하고, 그 외는 다른 객체로 간주.
import java.util.HashMap;
import java.util.Map;
import java.util.Map.Entry;
import java.util.Set;

public class Test {
    public static void main(String[] args) {
        Map<Integer, String> hmap = new HashMap<>();

        // 데이터 추가
        hmap.put(2, "두번째");
        hmap.put(1, "첫번째");
        hmap.put(3, "세번째");
        System.out.println(hmap);   // {1=첫번째, 2=두번째, 3=세번째}

        Map<Integer, String> hmap2 = new HashMap<>();
        hmap2.put(1, "FIRST");
        hmap2.put(4, "FOURTH");

        hmap.putAll(hmap2);
        System.out.println(hmap);   // {1=FIRST, 2=두번째, 3=세번째, 4=FOURTH}

        // 데이터 정보 조회
        System.out.println(hmap.get(1));
        System.out.println(hmap.get(4));

        System.out.println(hmap.containsKey(1));    // true
        System.out.println(hmap.containsKey(5));    // false

        System.out.println(hmap.containsValue("첫번째"));  // false
        System.out.println(hmap.containsValue("FIRST"));   // true

        Set<Integer> keySet = hmap.keySet();
        System.out.println(keySet);         // [1, 2, 3, 4]

        Set<Entry<Integer, String>> entrySet = hmap.entrySet();
        System.out.println(entrySet);       // [1=FIRST, 2=두번째, 3=세번째, 4=FOURTH]

        System.out.println(hmap.size());    // 4

        // 데이터 삭제
        hmap.remove(4);
        hmap.remove(40);                    // 존재하지 않는 키를 이용해서 삭제 => 동작하지 않음
        System.out.println(hmap);           // {1=FIRST, 2=두번째, 3=세번째}

        hmap.remove(2, "두번째");
        hmap.remove(1, "첫번째");           // 존재하지 않는 키, 값 쌍 => 동작하지 않음
        System.out.println(hmap);           // {1=FIRST, 3=세번째}

        hmap.clear();
        System.out.println(hmap);           // {}
    }
}
- Hashtable<K, V>
동기화 메서드로 구현되어 있으므로 멀티 쓰레드에서도 안전하게 동작.
- LinkedHashMap<K, V>
입력 순서대로 출력.
- TreeMap<K, V>
데이터를 Key 순으로 정렬해서 저장. (Key 객체는 크기를 비교하는 기준을 가지고 있어야 함)
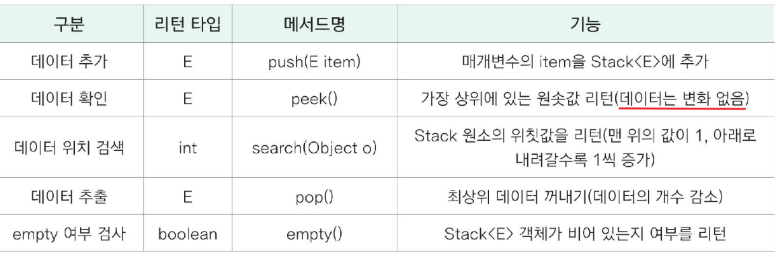
6. Stack<E> 컬렉션 클래스
후입선출(LIFO) 자료구조를 구현한 컬렉션.
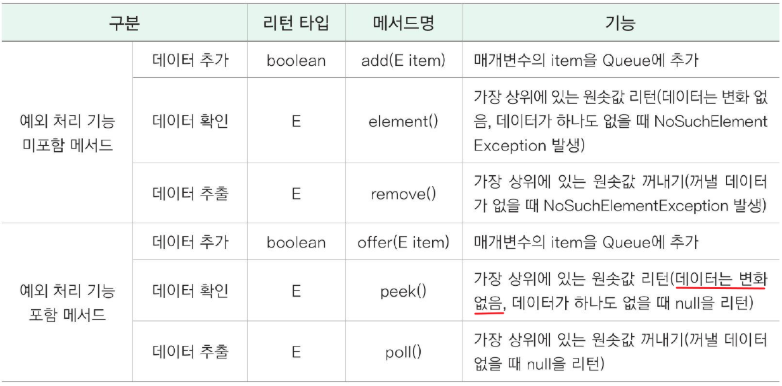
7. Queue<E> 컬렉션 인터페이스
선입선출(FIFO) 동작을 정의.
OUTRO
이전 회사에서 자바 코드를 볼때엔 제네릭과 컬렉션 메서드를 이렇게 자세히 쓰는 경우는 없었습니다. 많이 쓰는 것은 ArrayList 정도로 기억하는데, 요즘 알고리즘 공부하면서 알고 싶었던 내용을 배울 수 있어서 좋았습니다. 오늘의 과제는 ArrayList와 HashMap 이해하기!