조건문 분해하기
복잡한 조건문의 경우, 조건식과 그 조건식에 딸린 조건절 각각을 함수로 추출해주도록 한다.
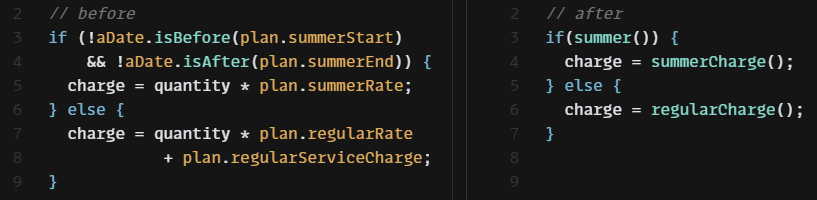
여름철이면 할인률이 달라지는 어떤 서비스의 요금을 계산하는 예제를 보자.
const getCharge = (plan, quantity, aDate) => {
  if (!aDate.isBefore(plan.summerStart) && !aDate.isAfter(plan.summerEnd)) {
    return quantity * plan.summerRate;
  }
  return quantity * plan.regularRate + plan.regularServiceCharge;
};
조건식과 조건이 만족했을 때의 로직들을 별도 함수로 추출한다.
const getCharge = (plan, quantity, aDate) => {
  if(summer(plan, aDate)) {
    return summerCharge(plan, quantity);
  } else {
    return regularCharge(plan, quantity);
  }
};

const summer = (plan, aDate) => {
  return !aDate.isBefore(plan.summerStart) && !aDate.isAfter(plan.summerEnd);
};

const summerCharge = (plan, quantity) => {
  return quantity * plan.summerRate;
};

const regularCharge = (plan, quantity) => {
  return quantity * plan.regularRate + plan.regularServiceCharge;
};
전체 조건문을 3항 연산자로 바꾼다.
const getCharge = (plan, quantity, aDate) => {
  return summer(plan, aDate) ? summerCharge(plan, quantity) : regularCharge(plan, quantity);
};
// ...조건식 통합하기

비교하는 조건은 다르지만 그 결과로 수행하는 동작이 똑같은 코드들이 있다면, 조건 검사를 하나로 통합하도록 한다.
📜 절차
- 해당 조건식들 모두에 부수효과가 없는지 확인한다. 있다면
질의 함수와 변경 함수 분리하기를 먼저 적용한다. - 조건문 두 개를 선택해 두 조건문의 조건식들을 논리 연산자로 결합한다. 조건이 하나만 남을 때까지 반복한다.
- 하나로 합쳐진 조건식을
함수로 추출할지 고려해본다.
다음의 예제를 보자.
const disabilityAmount = (anEmployee) => {
  if (anEmployee.seniority < 2) return 0;
  if (anEmployee.monthsDisabled > 12) return 0;
  if (anEmployee.isPartTime) return 0;
  // 장애 수당 계산
};
똑같은 결과로 이어지는 조건 검사가 순차적으로 진행되고 있다. 이 조건들을 하나의 식으로 통합하자.
const disabilityAmount = (anEmployee) => {
  if ((anEmployee.seniority < 2)
       || (anEmployee.monthsDisabled > 12)
       || (anEmployee.isPartTime)) {
    return 0;
  }
  // ...
};
최종 조건식을 함수로 추출할 수도 있다.
const disabilityAmount = (anEmployee) => {
  if (isNotEligibleForDisability(anEmployee)) {
    return 0;
  }
  // ...
};

const isNotEligibleForDisability = (anEmployee) => {
  return (
    anEmployee.seniority < 2 ||
    anEmployee.monthsDisabled > 12 ||
    anEmployee.isPartTime
  );
};중첩 조건문을 보호 구문으로 바꾸기
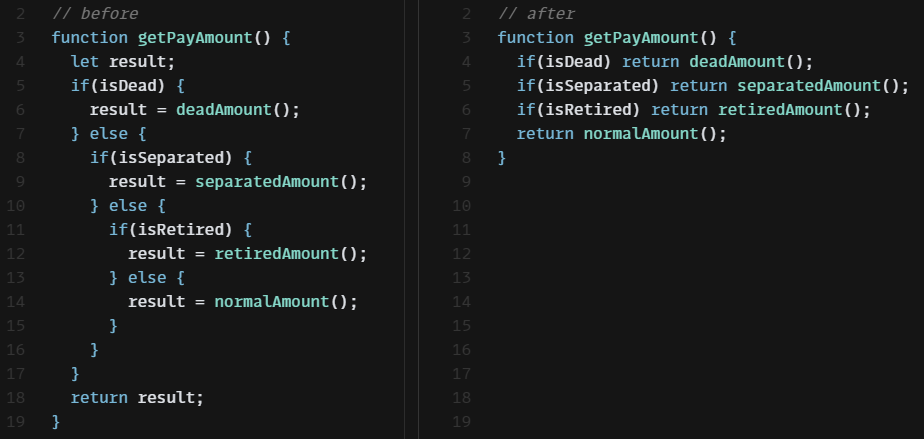
코드에서는 명확함이 핵심이다. 반환점이 하나일 때 함수의 로직이 더 명백하다면 그렇게 하되, 그렇지 않다면 하지않도록 한다.
조건문에서 참인 경로와 거짓인 경로가 모두 정상 동작으로 이어지는 형태라면 if와 else절을 사용한다.
그렇지 않고 한쪽만 정상이라면 비정상 조건을 if에서 검사한다음, 조건이 참이면(비정상이면) 함수에서 빠져나온다. 두 번째 검사 형태를 보호구문(guard clause) 이라고 한다.
핵심은 의도를 부각하는데 있다. 보호 구문은 이 일이 일어나면 무언가 조치를 취한 후 함수에서 빠져 나온다라는 의도를 갖는다.
📜 절차
- 교체해야 할 조건 중 가장 바깥 것을 선택해 보호 구문으로 바꾼다. 필요한 만큼 반복한다.
- 모든 보호 구문이 같은 결과를 반환한다면 보호 구문들의 조건식을 통합한다.
직원 급여를 계산하는 코드를 보자. payAmount 함수는 두 가지 조건을 검사하고 있다.
export const payAmount = (employee) => {
  let result;
  if (employee.isSeperated) {
    // 퇴사한 직원인가?
    result = { amount: 0, reasonCode: "SEP" };
  } else {
    // 은퇴한 직원인가?
    if (employee.isRetired) {
      result = { amount: 0, reasonCode: "RET" };
    } else {
      // 급여 계산 로직
      result = someFinalComputation();
    }
  }
  return result;
};

const someFinalComputation = () => { ... };
이 코드의 진짜 의도한 일은 모든 조건이 거짓일 때만 실행되기 때문에, 실제 중요한 일들이 중첩된 조건들에 가려 잘 보이지 않는다. 보호 구문을 사용해 의도가 잘 드러나도록 리팩터링 해보자.
조건들을 보호 구문으로 바꾸고 사용하지 않는 result 변수는 제거한다.
const payAmount = (employee) => {
  if (employee.isSeparated) return { amount: 0, reasonCode: "SEP" };
  if (employee.isRetired) return { amount: 0, reasonCode: "RET" };
  return someFinalComputation();
};

const someFinalComputation = () => { ... };
📚 조건 반대로 만들기
이 리팩터링을 수행할 때는 조건식을 반대로 만들어 적용하는 경우도 많다.
const adjustCapital = (anInstrument) => {
  let result = 0;
  if (anInstrument.capital > 0) {
    if (anInstrument.interestRate > 0 && anInstrument.duration > 0) {
      result = (anInstrument.income / anInstrument.duration) * anInstrument.adjustmentFactor;
    }
  }
  return result;
};
이번에는 보호 구문을 추가하면서 조건을 역으로 바꿔보자.
const adjustedCapital = (anInstrument) => {
  let result = 0;
  if (anInstrument.capital <= 0 ||
      anInstrument.interestRate <= 0 || anInstrument.duration <= 0) {
    return result;
  }
  result = (anInstrument.income / anInstrument.duration) * anInstrument.adjustmentFactor;
  return result;
};
result 변수를 제거하자.
const adjustedCapital = (anInstrument) => {
  if (anInstrument.capital <= 0 ||
      anInstrument.interestRate <= 0 || anInstrument.duration <= 0) {
    return 0;
  }
  return (anInstrument.income / anInstrument.duration) * anInstrument.adjustmentFactor;
};조건부 로직을 다형성으로 바꾸기
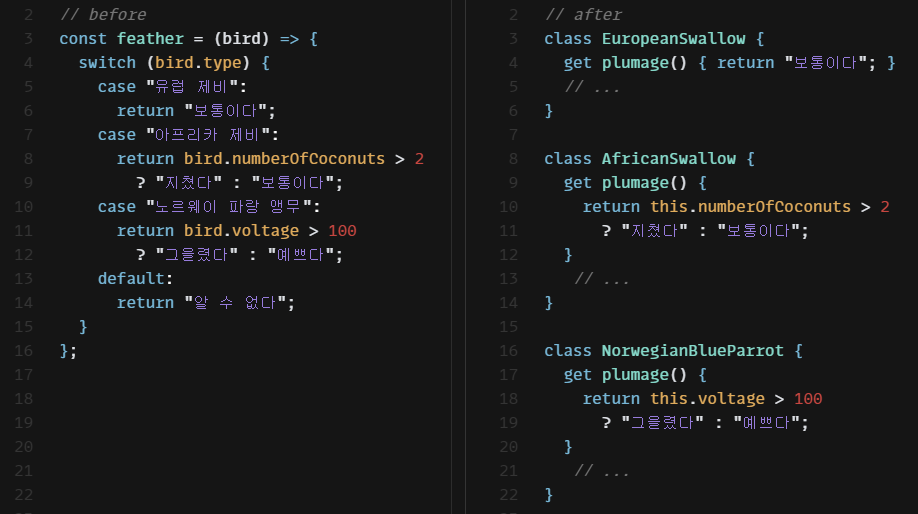
타입을 기준으로 분기하는 switch문이 포함된 함수가 여러 개 보인다면, case별로 클래스를 하나씩 만들어 공통 switch 로직의 중복을 없애도록 한다.
📜 절차
- 다형적 동작을 표현하는 클래스들이 아직 없다면 만든다. 이왕이면 적합한 인스턴스를 알아서 만들어 반환하는 팩토리 함수도 함께 만든다.
- 호출하는 코드에서 팩토리 함수를 사용하게 한다.
- 조건부 로직 함수를 수퍼클래스로 옮긴다.
- 서브클래스 중 하나를 선택해 서브클래스에서 수퍼클래스의 조건부 로직 메서드를 오버라이드한다. 조건부 문장을 서브클래스 메서드로 복사한다.
- 수퍼클래스 메서드에는 기본 동작 부분만 남긴다. 혹은 수퍼클래스가 추상 클래스여야 한다면, 이 메서드를 추상으로 선언하거나 서브클래스에서 처리해야 함을 알리는 에러를 던진다.
새의 종에 따른 비행 속도와 깃털 상태를 구하는 예제를 살펴보자.
const plumages = (birds) => {
  return new Map(birds.map((b) => [b.name, plumage(b)]));
};

const speeds = (birds) => {
  return new Map(birds.map((b) => [b.name, airSpeedVelocity(b)]));
};

const plumage = (bird) => { // 깃털 상태
  switch (bird.type) {
    case "유럽 제비":
      return "보통이다";
    case "아프리카 제비":
      return bird.numberOfCoconuts > 2 ? "지쳤다" : "보통이다";
    case "노르웨이 파랑 앵무":
      return bird.voltage > 100 ? "그을렸다" : "예쁘다";
    default:
      return "알 수 없다";
  }
};

const airSpeedVelocity = (bird) => { // 비행 속도
  switch (bird.type) {
    case "유럽 제비":
      return 35;
    case "아프리카 제비":
      return 40 - 2 * bird.numberOfCoconuts;
    case "노르웨이 파랑 앵무":
      return bird.isNailed ? 0 : 10 + bird.voltage / 10;
    default:
      return null;
  }
};
새 종류별 클래스를 만들어서 각각에 맞는 동작을 표현하자. Bird 클래스를 생성해 plumage 함수와 airSpeedVelocity 함수를 묶는다.
// ...
const plumage = (bird) => {
  return new Bird(bird).plumage;
};

const airSpeedVelocity = (bird) => {
  return new Bird(bird).airSpeedVelocity;
};

class Bird {
  constructor(birdObject) {
    Object.assign(this, birdObject);
  }

  get plumage() {
    switch (this.type) {
      case "유럽 제비":
        return "보통이다";
      case "아프리카 제비":
        return this.numberOfCoconuts > 2 ? "지쳤다" : "보통이다";
      case "노르웨이 파랑 앵무":
        return this.voltage > 100 ? "그을렸다" : "예쁘다";
      default:
        return "알 수 없다";
    }
  }

  get airSpeedVelocity() {
    switch (this.type) {
      case "유럽 제비":
        return 35;
      case "아프리카 제비":
        return 40 - 2 * this.numberOfCoconuts;
      case "노르웨이 파랑 앵무":
        return this.isNailed ? 0 : 10 + this.voltage / 10;
      default:
        return null;
    }
  }
}
종별 서브클래스를 만든다. 적합한 서브클래스의 인스턴스를 만들어줄 팩토리 함수도 만든다.
// ...
const plumage = (bird) => {
  return createBird(bird).plumage;
};

const airSpeedVelocity = (bird) => {
  return createBird(bird).airSpeedVelocity;
};

class Bird { ... }

class EuropeanSwallow extends Bird {}

class AfricanSwallow extends Bird {}

class NorwegianBlueParrot extends Bird {}

const createBird = (bird) => {
  switch (bird.type) {
    case "유럽 제비":
      return new EuropeanSwallow(bird);
    case "아프리카 제비":
      return new AfricanSwallow(bird);
    case "노르웨이 파랑 앵무":
      return new NorwegianBlueParrot(bird);
    default:
      return new Bird(bird);
  }
};
plumage 함수와 airSpeedVelocity 함수의 switch문의 절 하나를 선택해 해당 서브클래스에서 오버라이드한다. switch문이 제거될 때까지 이 과정을 반복한다.
const plumages = (birds) => {
  return new Map(birds.map((b) => [b.name, plumage(b)]));
};

const speeds = (birds) => {
  return new Map(birds.map((b) => [b.name, airSpeedVelocity(b)]));
};

// ...

class Bird {
  constructor(birdObject) { Object.assign(this, birdObject); }
  get plumage() { return "알 수 없다"; }
  get airSpeedVelocity() { return null; }
}

class EuropeanSwallow extends Bird {
  get plumage() { return "보통이다"; }
  get airSpeedVelocity() { return 35; }
}

class AfricanSwallow extends Bird {
  get plumage() {
    return this.numberOfCoconuts > 2 ? "지쳤다" : "보통이다";
  }
  get airSpeedVelocity() {
    return 40 - 2 * this.numberOfCoconuts;
  }
}

class NorwegianBlueParrot extends Bird {
  get plumage() {
    return this.voltage > 100 ? "그을렸다" : "예쁘다";
  }
  get airSpeedVelocity() {
    return this.isNailed ? 0 : 10 + this.voltage / 10;
  }
}

const createBird = (bird) => { ... };특이 케이스 추가하기

특정 값에 대해 똑같이 반응하는 코드가 여러 곳이라면 그 반응들을 한 곳으로 모아 사용하도록 한다.
📜 절차
- 컨테이너(속성을 담은 데이터 구조)에 특이 케이스인지를 검사하는 속성을 추가하고, false를 반환하게 한다.
- 특이 케이스 객체를 만든다. 이 객체는 특이 케이스인지를 검사하는 속성만 포함하며, 이 속성은 true를 반환하게 한다.
- 클라이언트에서 특이 케이스인지를 검사하는 코드를 함수로 추출한다. 모든 클라이언트가 방금 추출한 함수를 사용하도록 수정한다.
- 코드에 새로운 특이 케이스 대상을 추가한다. 함수의 반환 값으로 받거나 변환 함수를 적용하면 된다.
- 특이 케이스를 검사하는 함수 본문을 수정해 특이 케이스 객체의 속성을 사용하도록 한다.
여러 함수를 클래스로 묶기나여러 함수를 변환 함수로 묶기를 적용해 특이 케이스를 처리하는 공통 동작을 새로운 요소로 옮긴다.- 아직도 특이 케이스 검사 함수를 이용하는 곳이 남아 있다면 검사 함수를 인라인한다.
다음의 코드를 보자.
class Site {
  constructor(customer) { this._customer = customer; }
  get customer() { return this._customer; }
}

class Customer {
  constructor(name, billingPlan, paymentHistory) {
    this._name = name;
    this._billingPlan = billingPlan;
    this._paymentHistory = paymentHistory;
  }
  get name() { return this._name; }
  get billingPlan() { return this._billingPlan; }
  set billingPlan(arg) { this._billingPlan = arg; }
  get paymentHistory() { return this._paymentHistory; }
}

export const client1 = () => {
  const customer = new Site().customer;
  //...
  let customerName;
  if (customer === "미확인 고객") {
    customerName = "거주자";
  } else {
    customerName = customer.name;
  }
};

export const client2 = () => {
  const customer = new Site().customer;
  const registry = { billingPlans: { basic: "basic" } };
  const plan = customer === "미확인 고객" ? registry.billingPlans.basic : customer.billingPlan;
};

export const client3 = () => {
  const customer = new Site().customer;
  if (customer !== "미확인 고객") {
    customer.billingPlan = "new Plan";
  }
};

export const client4 = () => {
  const customer = new Site().customer;
  const weeksDelinquent =
    customer === "미확인 고객" ? 0 : customer.paymentHsitry.weeksDelinquentInLastYear;
};
위의 코드를 보면 미확인 고객을 처리해야 하는 클라이언트가 여러 개 보이고, 미확인 고객일 경우 고객 이름으로는 "거주자"로 하고 요금은 기본 요금제를 청구하고 연체기간은 0주로 처리했다.
이렇게 "미확인 고객"과 같은 특이 케이스 검사와 공통된 반응이 나타날 경우 특이케이스 객체를 도입하는 리팩터링을 진행해보자.
먼저 미확인 고객인지를 나타내는 메서드를 Customer 클래스에 추가하고, 미확인 고객 전용 클래스인 UnknownCustomer를 생성한다.
class Customer {
  // ...
  get isUnknown() {
    return false;
  }
}

class UnknownCustomer {
  get isUnknown() {
    return false;
  }
}
isUnknown 함수를 클라이언트에 적용한다. 또한 특이 케이스일 때 Site 클래스가 UnknownCustomer 객체를 반환하도록 수정한다.
class Site {
  // ...
  get customer() {
    return this._customer === "미확인 고객" ? new UnknownCustomer() : this._customer;
  }
}
각 클라이언트에서 수행하는 검사 코드들에 대해 여러 함수를 클래스로 묶기 기법을 적용한다.
// ...
// 또 다른 특이 케이스 객체 클래스 생성
class NullPaymentHistory {
  get weeksDelinquentInLastYear() { return 0; }
}

class UnknownCustomer {
  get name() {
    return "거주자";
  }

  get billingPlan() {
    return registry.billingPlans.basic;
  }

  set billingPlan(arg) {
    /* ignore */
  }

  get paymentHistory() {
    // 특이 케이스가 자신만의 속성을 갖는 또 다른 객체를 반환
    return new NullPaymentHistory();
  }
}

// client 1
export const customerName = (site) => {
  return site.customer.name;
};

//client 2
export const billingPlan = (site) => {
  return site.customer.billingPlan;
};

//client 3
export const changeBillingPlan = (site, newPlan) => {
  site.customer.billingPlan = newPlan;
  return site.customer;
};

//client 4
export const weeksDelinquent = (site) => {
  return site.customer.paymentHistory.weeksDelinquentInLastYear;
};어서션 추가하기

참이라고 가정하는 조건이 보이면 그 조건을 명시하는 어서션을 추가하는 것을 고려해본다.
제곱근 계산은 입력이 양수일 때만 정상 동작한다. 이렇게 특정 조건이 참일 때만 제대로 동작하는 코드가 있을 수 있다. 이런 가정이 코드에 항상 명시적으로 기술되어 있지는 않아서 코드를 보고 연역해서 알아내야 할 때도 있다. 이런 경우에 어서션을 코드 자체에 삽입해 소통 수단으로서 사용할 수 있다.
어서션은 항상 참이라고 가정하는 조건부 문장으로, 어서션이 있고 없고가 프로그램 기능의 정상 동작에 아무런 영향을 주지 않도록 작성돼야 한다.
할인에 대한 예제를 보자. 고객은 상품 구입 시 할인율을 적용받는다.
class Customer {
  constructor(discountRate) {
    this._discountRate = discountRate;
  }

  applyDiscount(aNumber) {
    return this._discountRate ? aNumber - this._discountRate * aNumber : aNumber;
  }
}
이 코드에는 할인율이 항상 양수라는 가정이 깔려 있다. 어서션을 이용해 이 가정을 명시해보자.
어서션 추가를 위해 applyDiscount 함수 내부의 3항 표현식을 if-then 문장으로 재구성하고, 입력 데이터가 잘못됐을 경우에 대한 어서션도 추가한다.
class Customer {
  // ...
  applyDiscount(aNumber) {
    if (!this._discountRate) {
      return aNumber;
    }
    assert(this._discountRate >= 0); // 어서션 추가
    return aNumber - this._discountRate * aNumber;
  }

  set discountRate(aNumber) {
    assert(aNumber === null || aNumber >= 0); // 어서션 추가
    this._discountRate = aNumber;
  }
}제어 플래그를 탈출문으로 바꾸기
코드의 동작을 변경하는 데 사용되는 변수를 발견한다면 제거하도록 한다.
📜 절차
- 제어 플래그를 사용하는 코드를
함수로 추출할지 고려한다. - 제어 플래그를 갱신하는 코드 각각을 적절한 제어문으로 바꾸고, 모두 수정했다면 제어 플래그를 제거한다.
다음은 악당을 찾는 코드다. 해당 함수에서found 변수는 제어 플래그다. 제어 플래그를 제거해보자.
const sendAlert = () => { ... };

const checkForMiscreants = (people) => {
  let found = false;
  for (const p of people) {
    if (!found) {
      if (p === "조커") {
        sendAlert();
        found = true;
      }
      if (p === "사루만") {
        sendAlert();
        found = true;
      }
    }
  }
};
제어 플래그가 참이면 반복문에서는 더 이상 할 일이 없기 때문에, break문으로 벗어나거나 return문을 써서 함수에서 아예 빠져나오도록 한다.
// ...
const checkForMiscreants = (people) => {
  for (const p of people) {
    if (p === "조커") {
      sendAlert();
      return;
    }
    if (p === "사루만") {
      sendAlert();
      return;
    }
  }
};
위 코드를 더 가다듬을 수도 있다.
const checkForMiscreants = (people) => {
  if (people.some((p) => ["조커", "사루만"].includes(p))) {
    sendAlert();
  }
};