모듈을 분리하는 가장 중요한 기준은 시스템에서 각 모듈이 자신을 제외한 다른 부분에 드러내지 않아야 할 부분을 얼마나 잘 숨기느냐에 있다.
레코드 캡슐화하기
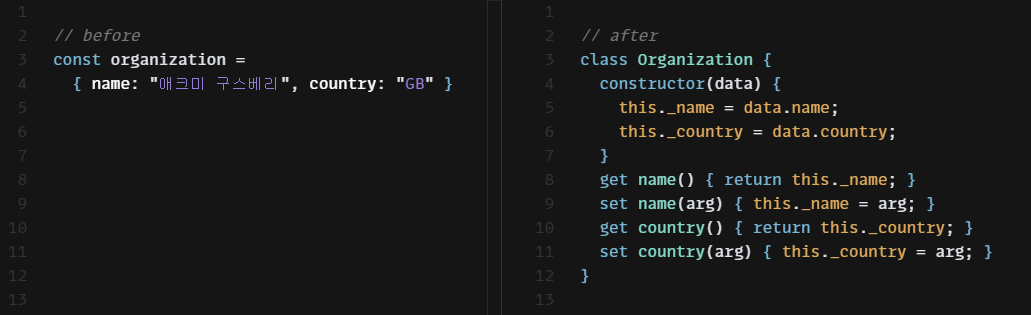
레코드를 캡슐화하는 이유는 변수 자체는 물론 그 내용을 조작하는 방식도 통제하기 위해서다.
📜 절차
- 레코드를 담은
변수를 캡슐화한다. - 레코드를 감싼 단순한 클래스로 해당 변수의 내용을 교체한다.
- 원본 레코드 대신 새로 정의한 클래스 타입의 객체를 반환하는 함수들을 새로 만들고, 이 함수를 사용하도록 바꾼다.
- 레코드의 필드도 데이터 구조인 중첩 구조라면
레코드 캡슐화하기와컬랙션 캡슐화하기를 재귀적으로 적용한다.
다음은 중첩 정도가 심한 읽기/쓰기 예제가 있다.
// 읽기 예
const compareUsage = (customerID, laterYear, month) => {
  const later = customerData[customerID].usages[laterYear][month];
  const earlier = customerData[customerID].usages[laterYear - 1][month];
  return { laterAmount: later, change: later - earlier }
}

// 쓰기 예
customerData[customerID].usages[laterYear][month] = amount;
중첩된 레코드의 경우에도 변수 캡슐화부터 시작해 전체 데이터 구조를 표현하는 클래스를 정의하고 이를 반환하는 함수를 만든다. 그리고 읽기/쓰기 예에서 봤던 코드를 게터/세터로 뽑아낸다.
class CustomerData {
  constructor(data) {
    this._data = data;
  }

  getUsage(customerID, year, month) {
    return this._data[customerID].usages[year][month];
  }

  setUsage(customerID, year, month, amount) {
    this._data[customerID].usages[year][month] = amount;
  }
}

let customerData;

const getCustomerData = () => {
  return customerData;
};

const getRawDataOfCustomers = () => {
  return customerData._data;
};

const setRawDataOfCustomers = (arg) => {
  customerData = new CustomerData(arg);
};
이렇게 게터/세터로 뽑아내면, 읽기/쓰기 예는 다음과 같이 바뀔 수 있다.
// 읽기 예
const compareUsage = (customerID, laterYear, month) => {
  const later = getCustomerData().getUsages(customerID, laterYear, month);
  const earlier = getCustomerData().getUsages(customerID, laterYear - 1, month);
  return { laterAmount: later, change: later - earlier }
}

// 쓰기 예
getCustomerData().setUsage(customerID, year, month, amount);컬렉션 캡슐화하기
컬렉션 관리를 책임지는 클래스라면, 컬렉션을 소유한 클래스를 통해서만 원소를 변경하도록 한다.
📜 절차
- 아직 컬렉션을 캡슐화하지 않았다면
변수 캡슐화하기부터 한다. - 컬렉션에 원소를 추가/제거하는 함수를 추가한다.
- 컬렉션을 참조하는 부분을 모두 찾아, 추가한 함수를 호출하도록 수정한다.
- 컬렉션 게터를 수정해서 내부 컬렉션의 복제본을 반환하게 한다.
다음은 Course 클래스와 수업 목록 courses을 필드로 지니고 있는 Person 클래스다.
class Course {
  constructor(name, isAdvanced) {
    this._name = name;
    this._isAdvanced = isAdvanced;
  }
  get name() { return this._name; }
  get isAdvanced() { return this._isAdvanced; }
}

class Person {
  constructor(name) {
    this._name = name;
    this._courses = [];
  }
  get name() { return this._name; }
  get courses() { return this._courses; }
  set courses(aList) { this._courses = aList; }
}

// No...!
for (const name of readBasicCourseNames(filename)) {
  aPerson.courses.push(new Course(name, false));
}
Person 클래스는 데이터를 캡슐화는 필드를 참조하는 과정만 캡슐화했을 뿐, 필드에 담긴 내용은 캡슐화되지 않았다. 이렇게 캡슐화한다면 세터를 이용해서 Course 컬렉션을 통째로 설정할 수 있어 컬렉션을 마음대로 수정할 수 있다.
제대로 캡슐화하기 위해서는 addCourse, removeCourse 라는 이름의 컬렉션 변경자 메서드를 Person 클래스에 추가해보자.
class Person {
  // ...

  addCourse(course) {
    this._courses.push(course);
  }

  removeCourse(aCourse, fnIfAbsent = () => { throw new RangeError(); }) {
    const index = this._courses.indexOf(aCourse);
    if (index === -1) fnIfAbsent();
    else this._courses.splice(index, 1);
  }
}

// addCourse 메서드로 바꾼다.
for (const name of readBasicCourseNames(filename)) {
  aPerson.addCourse(new Course(name, false));
}
이때 제거 메서드에는 컬렉션에 없는 원소를 제거하려할 때의 무시하거나 에러를 던지거나 하는 등의 대응방식을 정하도록 한다.
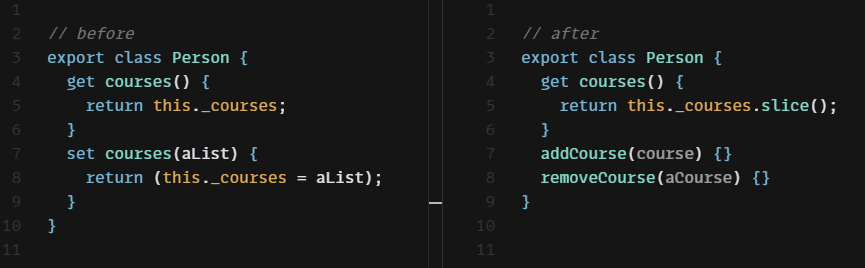
그리고나서 setCourses는 제거하되, 만약 세터를 제공해야할 특별한 이유가 있다면 컬렉션의 복제본을 필드에 저장하도록 한다.
 set courses(courses) {
    return (this._courses = courses.slice());
 }
또한 컬렉션 게터가 원본 컬렉션을 반환하지 않게 만들어서, 실수로 컬렉션을 바꿀 가능성을 차단하도록 한다.
 get courses() {
    return this._courses.slice();
}기본형을 객체로 바꾸기

단순한 출력 이상의 기능이 필요해지는 순간 그 데이터를 표현하는 전용 클래스를 정의한다.
📜 절차
- 아직 변수를 캡슐화하지 않았다면
캡슐화한다. - 단순한 값 클래스를 만든다. 기존 값을 인수로 받아서 저장하고, 이 값을 반환하는 게터를 추가한다.
- 새로 만든 클래스를 사용하도록 기존 클래스의 접근자들을 수정한다.
다음의 Order 클래스를 기본형을 객체로 바꾸기 기법을 사용해 리팩터링해보자.
class Order {
  constructor(data) {
    this._priority = data.priority;
  }
  // ...
}

const orders = [
  new Order({ priority: "normal" }),
  new Order({ priority: "high" }),
  new Order({ priority: "rush" })
];

const highPriorityCount = orders.filter(
  (o) => o.priority === "high" || o.priority === "rush"
).length;
priority 속성을 표현하는 값 클래스를 생성한다. 이 클래스는 표현할 값을 받는 생성자와 그 값을 문자열로 반환하는 변환 함수로 구성된다.
class Priority {
  constructor(value) {
      this._value = value;
  }
  toString() {
    return this._value;
  }
}
그런 다음 Priority 클래스를 사용하도록 접근자들을 수정한다. 이때 원본 접근자의 동작을 더 잘 나타낼 수 있는 이름이 있다면, 함수 이름을 바꾼다.
class Order {
  constructor(data) {
    this._priority = new Priority(data.priority);
  }
  get priority() {
    return this._priority;
  }
  get priorityString() {
    return this._priority.toString();
  }
  set priority(aString) {
    this._priority = new Priority(aString);
  }
}
더 나아가서 우선순위 값을 비교하는 로직을 추가한다.
class Priority {
  // ...
  get _index() {
    return Priority.legalValues().findIndex((s) => s === this._value);
  }
  higherThan(other) {
    return this._index > other._index;
  }
}
이처럼 동작을 추가해 앞의 예제를 더 의미있게 작성할 수 있다.
const highPriorityCount = orders.filter((o) =>
  o.priority.higherThan(new Priority("normal"))
).length;임시 변수를 질의 함수로 바꾸기
복잡한 코드 덩어리에서 변수가 여러 차례 다시 대입하는 경우라면, 변수를 질의 함수로 추출한다.
특히 길이가 너무 긴 함수를 쪼개는 데 유용하다.
📜 절차
- 변수가 사용되기 전에 값이 확실히 결정되는지, 변수를 사용할 때마다 계산 로직이 매번 다른 결과를 내지는 않는지 확인한다.
- 읽기전용으로 만들 수 있는 변수는 읽기전용으로 만든다.
- 변수 대입문을 함수로 추출하고,
변수 인라인하기로 임시 변수를 제거한다.
다음의 Order 클래스의 basePrice와 discountFactor 변수를 함수로 바꿔보자.
class Order {
constructor(quantity, item) {
this._quantity = quantity;
this._item = item;
}
get price() {
const basePrice = this._quantity * this._item.price;
let discountFactor = 0.98;
if (basePrice > 1000) {
discountFactor -= 0.03;
}
return basePrice * discountFactor;
}
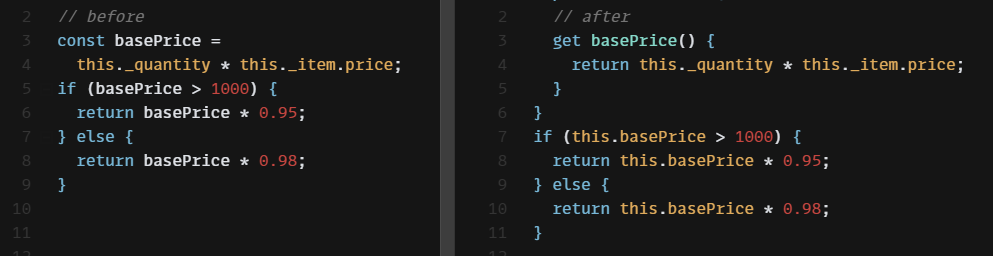
}먼저 basePrice 변수를 게터로 추출하고 변수를 인라인한다.
class Order {
  get price() {
    let discountFactor = 0.98;
    if (this.basePrice > 1000) {
      discountFactor -= 0.03;
    }
    return this.basePrice * discountFactor;
  }
  get basePrice() {
    return this._quantity * this._item.price;
  }
}
discountFactor 변수 또한 게터로 추출하고 변수를 인라인한다.
class Order {
  get price() {
    return this.basePrice * this.discountFactor;
  }
  get basePrice() {
    return this._quantity * this._item.price;
  }
  get discountFactor() {
    let discountFactor = 0.98;
    if (this.basePrice > 1000) {
      discountFactor -= 0.03;
    }
    return discountFactor;
  }
}클래스 추출하기
메서드와 데이터가 너무 많은 클래스는 적절히 분리하도록 한다.
클래스는 반드시 명확하게 추상화하고 소수의 주어진 역할만 처리해야 한다.
📜 절차
- 클래스의 역할을 분리할 방법을 정하고, 분리될 역할을 담당할 클래스를 새로 만든다.
- 원래 클래스의 생성자에서 새로운 클래스의 인스턴스를 생성하여 필드에 저장한다.
- 분리될 역할에 필요한 필드와 메서드들을 새 클래스로 옮긴다.
- 양쪽 클래스에서 불필요한 메서드를 제거하고 이름도 새로운 환경에 맞게 바꾼다.
- 새 클래스를 외부로 노출할 지 정한다. 노출하려거든
새 클래스에 참조를 값으로 바꾸기를 적용할지 고민해본다.
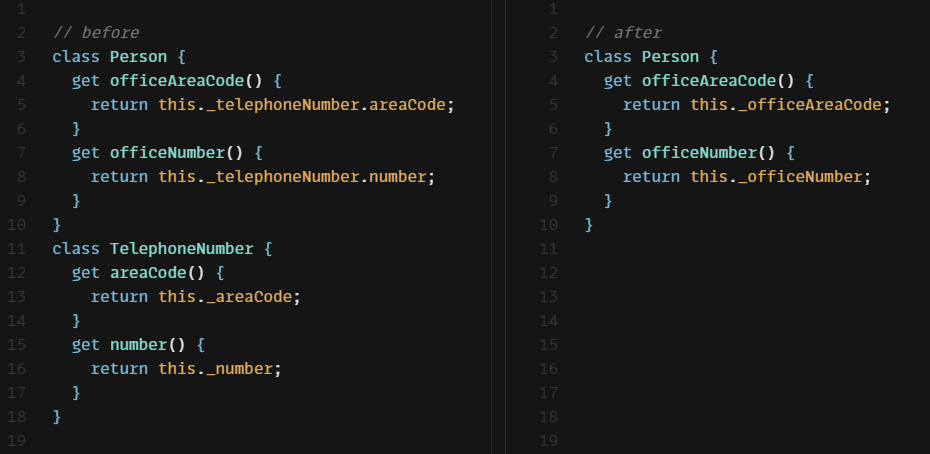
다음의 Person 클래스에서, 전화번호 관련 동작을 별도 클래스로 뽑아보자.
class Person {
  constructor(name, officeAreaCode, officeNumber) {
    this._name = name;
    this._officeAreaCode = officeAreaCode;
    this._officeNumber = officeNumber;
  }
  get name() {return this._name;}
  set name(arg) {this._name = arg;}
  get officeAreaCode() {return this._officeAreaCode;}
  set officeAreaCode(arg) {this._officeAreaCode = arg;}
  get officeNumber() {return this._officeNumber;}
  set officeNumber(arg) {this._officeNumber = arg;}
  get telephoneNumber() {return `(${this.officeAreaCode}) ${this.officeNumber}`;}
}
TelephoneNumber 클래스를 생성하고, 원래 클래스인 Person의 생성자에서 TelephoneNumber 인스턴스를 생성해 저장한다.
class TelephoneNumber {}
class Person {
constructor(name, officeAreaCode, officeNumber) {
// ...
this._telephoneNumber = new TelephoneNumber();
}
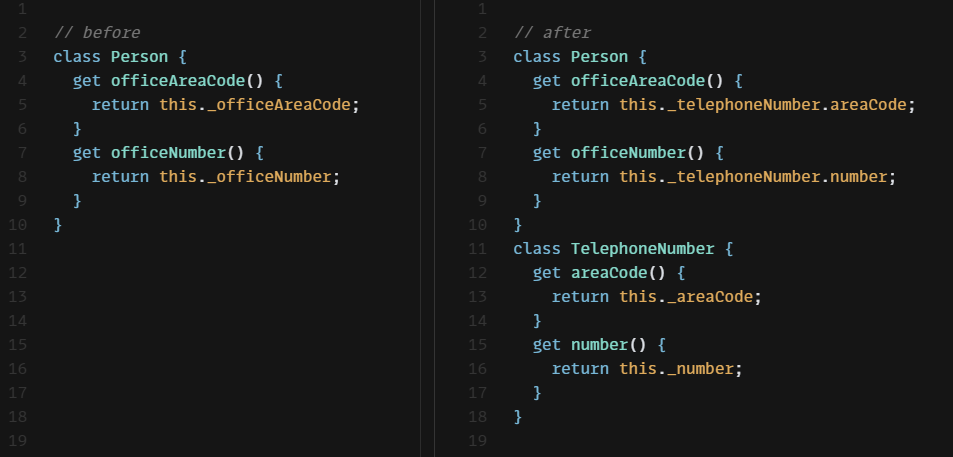
}각 필드들을 TelephoneNumber 클래스로 옮기고, 이름도 TelephoneNumber 클래스에 맞게 바꾼다.
class TelephoneNumber {
  constructor(areaCode, number) {
    this._areaCode = areaCode;
    this._number = number;
  }
  get areaCode() {return this._areaCode;}
  set areaCode(arg) {this._areaCode = arg;}
  get number() {return this._number;}
  set number(arg) {this._number = arg;}
}

class Person {
  constructor(name, areaCode, number) {
    // ...
    this._telephoneNumber = new TelephoneNumber(areaCode, number);
  }
  // ...
  get officeAreaCode() {return this._telephoneNumber.areaCode;}
  get officeNumber() {return this._telephoneNumber.number;}
}
마지막으로 전화번호 포맷으로 출력하는 역할도 TelephoneNumber으로 옮긴다.
class TelephoneNumber {
  // ...
  get toString() {
    return `(${this._areaCode}) ${this._number}`;
  }
}

class Person {
  // ...
  get telephoneNumber() {
    return this._telephoneNumber.toString;
  }
}클래스 인라인하기
더 이상 제 역할을 못하는 클래스는 인라인하도록 한다.
📜 절차
- 소스 클래스의 각 public 메서드에 대응하는 메서드들을 타겟 클래스에 생성한다. 이 메서드들은 단순히 작업을 소스 클래스로 위임해야 한다.
- 소스 클래스의 메서드를 사용하는 코드를 모두 타겟 클래스의 위임 메서드를 사용하도록 바꾼다.
- 소스 클래스의 메서드와 필드를 모두 타겟 클래스로 옮기고, 소스 클래스를 삭제한다.
위임 숨기기
위임 객체의 존재를 숨기는 위임 메서드를 생성해, 위임 객체의 의존성을 없애도록 한다.
📜 절차
1. 위임 객체의 각 메서드에 해당하는 위임 메서드를 서버에 생성한다.
2. 클라이언트가 위임 객체 대신 서버를 호출하도록 모두 수정한다.
3. 서버로부터 위임 객체를 얻는 접근자를 제거한다.
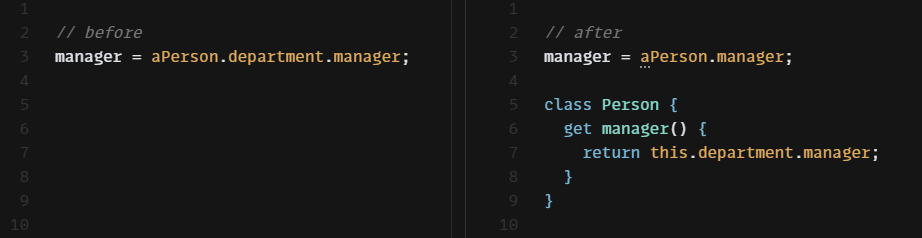
어떤 사람이 속한 부서의 관리자를 알고 싶다고 하자. 그러기 위해서는 부서 객체부터 얻어와야 한다.
manager = aPerson.department.manager;이러한 의존성을 줄이기 위해, Person 클래스에 간단한 위임 메서드를 만든다.
class Person {
  constructor(name, department) {
    this._name = name;
    this._department = department;
  }
  get name() { return this._name; }
  get department() { return this._department; }
  set department(arg) { this._department = arg; }
  // 위임 메서드 추가
  get manager() {
    return this._department.manager;
  }
}
또한 Person 클래스에서 Department 클래스를 볼 수 없도록 department 접근자를 제거한다.
class Person {
  constructor(name, aDepartment) {
    this._name = name;
    this._department = aDepartment;
  }
  get name() { return this._name; }
  get manager() { return this._department.manager; }
  get chargeCode() { return this._department.chargeCode; }
}중개자 제거하기
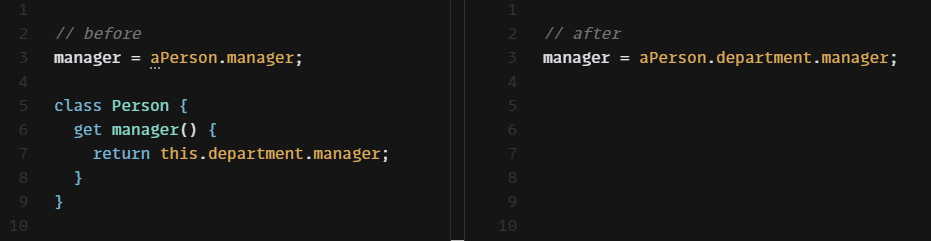
서버 클래스가 단순히 전달만 하는 중개자 역할만 수행한다면, 중개자를 제거한다.
📜 절차
- 위임 객체를 얻는 게터를 만든다.
- 위임 메서드를 호출하는 클라이언트가 모두 이 게터를 거치도록 모두 수정하고, 위임메서드를 삭제한다.
알고리즘 교체하기
문제를 더 확실히 이해하고 쉽게 해결하는 방법을 발견했다면, 복잡한 기존의 코드를 간결한 방식으로 고치도록 한다.
거대하고 복잡한 알고리즘을 교체하는 것은 어려운 작업이다. 메서드를 가능한 잘게 나누는 등의 간소화하는 작업부터 해야 교체가 쉽다.