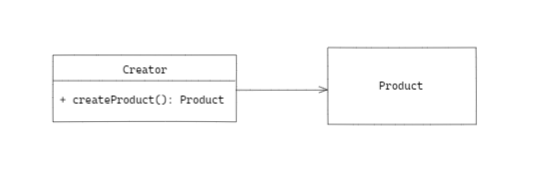
Factory Method Pattern?
- 구체적으로 어떤 instance를 만들지 정하는건 sub class에서 정하는 것
- 구현체(Product)가 있고, 구현체를 만들 수 있는 팩토리(Creator)를 제공합니다.
처음에는 이렇게 만들었습니다.
- client가 로봇 제작을 요청합니다.
- factory에선 model과 email을 확인 후 로봇을 만듭니다.
public class Client {
    public static void main(String[] args) {
        Client client = new Client();
        client.print("HomeRobot", "nnagman@mail.com");
        client.print("FactoryRobot", "nnagman@mail.com");
    }

    private void print(String model, String email) {
        RobotFactory robotFactory = configure(model);
        if (robotFactory != null) {
            System.out.println(robotFactory.orderRobot(model, email));
            System.out.println();
        }
    }

    private RobotFactory configure(String model) {
        if (model.equals("HomeRobot")) {
            return new HomeRobotFactory();
        } else if (model.equals("FactoryRobot")) {
            return new FactoryRobotFactory();
        }
        return null;
    }
}
public class Robot {
    private String model;
    private String email;
    private String program;

    public void setModel(String model) {
        this.model = model;
    }

    public void setEmail(String email) {
        this.email = email;
    }

    public void setProgram(String program) {
        this.program = program;
    }
}
public class RobotFactory {
public static Robot orderRobot(String model, String email) {
if (model == null || model.isBlank()) {
throw new IllegalArgumentException("모델명을 입력해주세요.");
}
if (email == null || email.isBlank()) {
throw new IllegalArgumentException("이메일을 입력해주세요.");
}
Robot robot = new Robot();
robot.setModel(model);
robot.setEmail(email);
if (model.equalsIgnoreCase("factoryRobot")) {
robot.setProgram("factory");
} else if (model.equalsIgnoreCase("homeRobot")) {
robot.setProgram("home");
}
return robot;
}
}
위 구조의 문제점
- 만약 로봇에 대한 요구사항이 추가된다면 Robot의 코드를 직접 수정해야 합니다.
- 이런 행위는 객체지향 원칙 중 하나인 OCP(Open Closed Principle)에 위배가 됩니다.
- 확장에는 열려있지만 변화에는 닫혀있어야 합니다.
Factory Method Pattern 적용
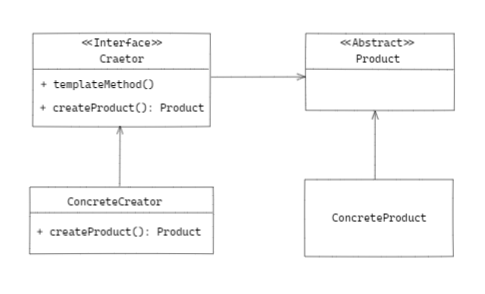
- 공통적인 동작을 하는 로직은 interface(RobotFactory)에 넣어두고 로봇의 종류에 따른 동작은 interface를 구현하는 class(HoemRobotFactory)에서 하게합니다.
- ConcreteProduct(HomeRobot), ConcreteCreator(HomeRobotFactory)를 추가 할 때, 기존의 코드를 수정하지 않아도 됩니다.
- 여기서 쓰인 default method는 자바 8부터 추가된 기능으로 interface에서도 구현부를 작성 할 수 있게 해준다. 또 한, 자바 9부터 추가된 기능인 interface의 private method도 비슷한 맥락이다.
public class Client {
    public static void main(String[] args) {
        Client client = new Client();
        client.print(new HomeRobotFactory(), "HomeRobot", "nnagman@mail.com");
        client.print(new FactoryRobotFactory(), "FactoryRobot", "nnagman@mail.com");
    }

    private void print(RobotFactory robotFactory, String model, String email) {
        System.out.println(robotFactory.orderRobot(model, email));
    }
}
public interface RobotFactory {
    default Robot orderRobot(String model, String email) {
        validate(model, email);
        prepareFor(model);
        Robot robot = createRobot();
        sendEmailTo(email, robot);
        return robot;
    }

    private void sendEmailTo(String email, Robot robot) {
        System.out.println("To." + email + " " + robot.getModel() + "을 다 만들었습니다.");
    }

    Robot createRobot();

    private void validate(String model, String email) {
        if (model == null || model.isBlank()) {
            throw new IllegalArgumentException("모델명을 입력해주세요.");
        }

        if (email == null || email.isBlank()) {
            throw new IllegalArgumentException("이메일을 입력해주세요.");
        }
    }

    private void prepareFor(String model) {
        System.out.println(model + " 준비 중");
    }
}
public class HomeRobotFactory implements RobotFactory {
@Override
public Robot createRobot() {
return new HomeRobot();
}
}
public class Robot {
    private String model;
    private String email;
    private String program;

    public void setModel(String model) {
        this.model = model;
    }

    public void setEmail(String email) {
        this.email = email;
    }

    public void setProgram(String program) {
        this.program = program;
    }

    public String getModel() {
        return model;
    }

    public String getEmail() {
        return email;
    }

    public String getProgram() {
        return program;
    }

    @Override
    public String toString() {
        return "Robot{" +
                "model='" + model + '\'' +
                ", email='" + email + '\'' +
                ", program='" + program + '\'' +
                '}';
    }
}
public class HomeRobot extends Robot {
public HomeRobot() {
setModel("homeRobot");
setProgram("home");
}
}
실제로는 이렇게 씁니다
- 들어오는 값에 따라 다른 instance를 제공하는 역할로 사용합니다.
public class SimpleFactory {
    public Object createProduct(String name) {
        if (name.equals("homeRobot")) {
            return new HomeRobotFactory();
        } else if (name.equals("factoryRobot")) {
            return new FactoryRobot();
        }
        throw new IllegalArgumentException();
    }
}- spring에서 bean을 찾는 method에도 사용됩니다.
public class SpringBeanFactoryExample {
    public static void main(String[] args) {
        BeanFactory xmlFactory = new ClassPathXmlApplicationContext("config.xml");
        String hello = xmlFactory.getBean("hello",String.class);
        System.out.println(hello);

        BeanFactory javaFactory = new AnnotationConfigApplicationContext(Config.class);
        String hi = javaFactory.getBean("hello",String.class);
        System.out.println(hi);
    }
}- java.util.Calendar도 국가별 달력을 지원하는 용도로 쓰입니다.
public class CalendarExample {
    public static void main(String[] args) {
        System.out.println(Calendar.getInstance().getClass());
        System.out.println(Calendar.getInstance(Locale.forLanguageTag("th-TH-x-lvariant-TH")).getClass());
        System.out.println(Calendar.getInstance(Locale.forLanguageTag("ja-JP-x-lvariant-JP")).getClass());
    }
}
장점
- 기존의 코드를 수정하지 않고 새로운 기능을 구현하는 코드를 추가 할 수 있다.
- OCP 원칙을 지킬 수 있다. ( product와 creator의 결합도가 느슨하기 때문 )
단점
- creator나 product와 같이 factory method pattern을 구현하기 위해 구현하는 로직이 많아져 구조가 복잡해 질 수 있다.
출처
- 코딩으로 학습하는 GoF의 디자인 패턴 ( 기선님 강의 정말 좋아요 )

이타적인 기회주의자
잘 읽었습니다~ 근데 깃헙 아이콘 누르면 에러 페이지 나와요 ㅠ