지난 게시글들에서 서버리스의 개념을 학습해보고, AWS Lambda를 이용한 실습을 진행하며 LangChain 프레임워크를 통해 뉴스 요약 API를 작성해봤다.
하지만 이 과정에서 테스트와 버전 관리의 필요성을 느꼈고, 본 게시물에서는 SAM을 이용해 해결하고자 한다.
SAM이란?
AWS의 공식 문서 What is sam에서는 SAM을 이렇게 소개한다.
AWS Serverless Application Model(AWS SAM)은 인프라를 코드로 작성하는IaC(Infrastructure as Code)를 사용하여 서버리스 애플리케이션을 구축하는 오픈 소스 프레임워크입니다.AWS SAM의 간결한 문법을 통해 개발자는 AWS CloudFormation 리소스와 배포 중에 인프라로 변환되는 특화된 서버리스 리소스를 선언할 수 있습니다.
이 프레임워크에는 두 가지 주요 구성 요소가 포함되어 있습니다.
AWS SAM CLI와AWS SAM 프로젝트입니다.AWS SAM 프로젝트는
sam init명령을 실행할 때 생성되는 애플리케이션 프로젝트 디렉터리로, 템플릿 사양(리소스를 선언하기 위해 사용하는 간결한 문법)이 포함된 AWS SAM 템플릿과 같은 파일들이 포함됩니다.
SAM을 이용한다면, Lambda 뿐 아니라 API Gateway를 통한 배포나 DynamoDB와의 연결도 쉽게 진행할 수 있다.
실습을 시작하기 전에, SAM을 구동하기 위해서는 Docker가 필요함에 유의하자.
SAM 설치
아마존의 공식문서 Install the SAM CLI를 참고하여 SAM CLI를 설치해보자.

각 운영체제와 CPU에 맞는 파일을 다운로드 받은 후 설치해주면 간단하게 끝난다.
 잘 설치된 것을 확인할 수 있다.
프로젝트 생성
본 게시글에서는 PyCharm을 이용한다.
VSCode의 AWS 플러그인을 사용하거나, 상개발자들이라면 터미널에서도 충분히 사용 가능하다.
sam init --name mySummarizeFunction위 명령어를 통해 mySummarizeFunction 프로젝트를 생성해준다.
Which template source would you like to use?
        1 - AWS Quick Start Templates
        2 - Custom Template Location
위와 같은 메세지를 볼 수 있는데, 우리는 AWS에서 친절히 제공해주는 템플릿을 사용하도록 하자.
Choose an AWS Quick Start application template
        1 - Hello World Example
        2 - Data processing
        3 - Hello World Example with Powertools for AWS Lambda
        4 - Multi-step workflow
        5 - Scheduled task
        6 - Standalone function
        7 - Serverless API
        8 - Infrastructure event management
        9 - Lambda Response Streaming
        10 - GraphQLApi Hello World Example
        11 - Full Stack
        12 - Lambda EFS example
        13 - Serverless Connector Hello World Example
        14 - Multi-step workflow with Connectors
        15 - DynamoDB Example
        16 - Machine Learning
그렇다면 AWS에서 다양한 템플릿을 추천해주는데, 우리는 1번을 사용하겠다.
Use the most popular runtime and package type? (python3.13 and zip) [y/N]: y런타임 정보를 물어본다. 우리는 Python3.13을 사용할 예정이니 동의해주자.
그 뒤로도 몇 가지 잡다한 질문들을 하는데, 무지성 YES를 대답해주면 프로젝트가 생성된다.
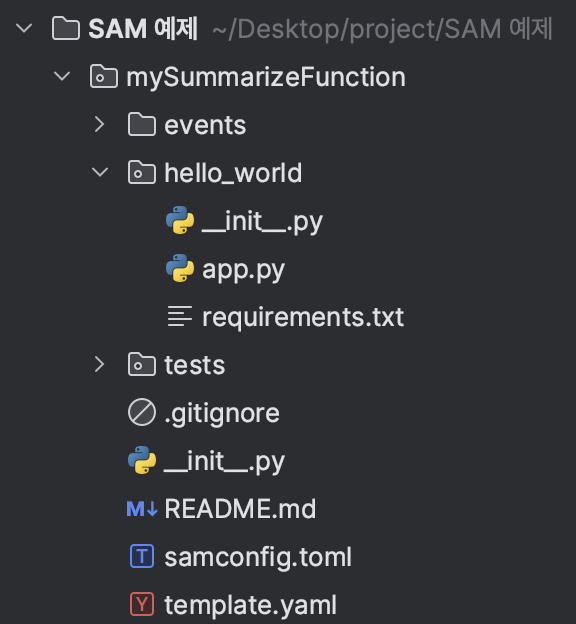
파일 구조는 다음과 같다.
API Gateway 설정
본격적으로 함수를 작성하기 전에, template.yaml 파일을 확인해보자.
template.yaml은 람다 프로젝트를 배포할 때 필요한 정보들이 담긴 파일이다.
AWSTemplateFormatVersion: '2010-09-09'
Transform: AWS::Serverless-2016-10-31
Description: >
  mySummarizeFunction

  Sample SAM Template for mySummarizeFunction

# More info about Globals: https://github.com/awslabs/serverless-application-model/blob/master/docs/globals.rst
Globals:
  Function:
    Timeout: 3

    Tracing: Active
    # You can add LoggingConfig parameters such as the Logformat, Log Group, and SystemLogLevel or ApplicationLogLevel. Learn more here https://docs.aws.amazon.com/serverless-application-model/latest/developerguide/sam-resource-function.html#sam-function-loggingconfig.
    LoggingConfig:
      LogFormat: JSON
  Api:
    TracingEnabled: true

Resources:
  HelloWorldFunction:
    Type: AWS::Serverless::Function # More info about Function Resource: https://github.com/awslabs/serverless-application-model/blob/master/versions/2016-10-31.md#awsserverlessfunction
    Properties:
      CodeUri: hello_world/
      Handler: app.lambda_handler
      Runtime: python3.13
      Architectures:
      - x86_64
      Events:
        HelloWorld:
          Type: Api # More info about API Event Source: https://github.com/awslabs/serverless-application-model/blob/master/versions/2016-10-31.md#api
          Properties:
            Path: /hello
            Method: get

  ApplicationResourceGroup:
    Type: AWS::ResourceGroups::Group
    Properties:
      Name:
        Fn::Sub: ApplicationInsights-SAM-${AWS::StackName}
      ResourceQuery:
        Type: CLOUDFORMATION_STACK_1_0
  ApplicationInsightsMonitoring:
    Type: AWS::ApplicationInsights::Application
    Properties:
      ResourceGroupName:
        Ref: ApplicationResourceGroup
      AutoConfigurationEnabled: 'true'
여기서 배포하고자 하는 정보들의 값들을 수정하거나 추가해주자.
Global.Function.Timeout: 람다 함수의 타임아웃 시간
Resources.HelloWorldFunction.Properties.Events.helloWorld.Properties.Path: 테스트시 사용할 경로
Resources.HelloWorldFunction.Properties.Events.helloWorld.Properties.Method: 테스트시 사용할 Method
Resources.BasicAWSApiGateway: 배포 시 사용할 API Gateway의 정보
Resources.BasicAWSApiGateway.Properties.Name: 배포 시 사용할 API Gateway의 이름
Resources.BasicAWSApiGateway.Properties.StageName: 배포 시 사용할 API Gateway 스테이지의 이름
Resources.HelloWorldFunction.Properties.Environment.Variables.{name}: 사용할 환경 변수
Resources:
  BasicAWSApiGateway:
   Type: AWS::Serverless::Api
   Properties:
    Name: summarizeApiGateway
    StageName: prod
  HelloWorldFunction:
    Type: AWS::Serverless::Function # More info about Function Resource: https://github.com/awslabs/serverless-application-model/blob/master/versions/2016-10-31.md#awsserverlessfunction
    Properties:
      CodeUri: hello_world/
      Handler: app.lambda_handler
      Runtime: python3.13
      Architectures:
      - x86_64
      Events:
        HelloWorld:
          Type: Api # More info about API Event Source: https://github.com/awslabs/serverless-application-model/blob/master/versions/2016-10-31.md#api
          Properties:
            RestApiId: !Ref BasicAWSApiGateway
            Path: /summarize
            Method: post
      Environment:
        Variables:
          OPENAI_API_KEY: !Ref OPENAI_API_KEY
최종적으로는 이런 식으로 수정했다.
환경 변수 설정
위 yaml 파일을 확인했을 때, OPENAI_API_KEY를 참조해 옴을 알 수 있다.
루트 폴더에 환경변수들을 저장할 env.json 파일을 작성해주자. 이후 invoke 하거나 start-api 할 때 주입해 줄 수 있다.
{
    "Parameters": {
      "OPENAI_API_KEY": "API KEY"
    }
}
물론 해당 파일은 Git에 올리지 않도록 주의하자.
App.py 작성
requests
langchain
openai
langchain_openai
우선 requirements.txt에 사용할 라이브러리를 작성해준다.
이제 App.py에는 람다의 메인 함수를 작성해주면 되는데, 저번 게시물에서 사용한 랭체인 코드를 그대로 복붙해주도록 하자.
from langchain_core.prompts import PromptTemplate
from langchain_openai import ChatOpenAI
from langchain_core.output_parsers import JsonOutputParser
from langchain_core.pydantic_v1 import BaseModel, Field

model = ChatOpenAI(model="gpt-3.5-turbo-0125", temperature=0, max_tokens=4096)


class Response(BaseModel):
    title: str = Field(description="Title of an Article")
    content: str = Field(description="Summarization of an Article")


output_parser = JsonOutputParser(pydantic_object=Response)

format_instructions = output_parser.get_format_instructions()

prompt = PromptTemplate(
    template="""Answer the user query in JSON format.
    {format_instructions}
    Write a concise summary of the following article in Korean, and include a 'title':
    Return the response in valid JSON format with 'title' and 'content' fields:
    {text}
    CONSICE SUMMARY:""",
    input_variables={"text"},
    partial_variables={"format_instructions": format_instructions}
)

chain = prompt | model | output_parser


def lambda_handler(event, context):
    return chain.invoke({"text": event["article"]})
다음은 테스트용 json 파일을 만들어주자.
events/event.json에 테스트하고자 하는 기사를 넣어줬다. 나는 맨체스터 형제의 비극이 담긴 슬픈 기사가 눈에 보여 선택해봤다.
{
  "article" : "잉글랜드 프로축구 프리미어리그(EPL) 맨체스터 시티와 맨체스터 유나이티드가 나란히 추락하고 있다. 맨시티는 지난 26일(한국시각) 영국 맨체스터의 에티하드 스타디움에서 열린 에버턴과의 2024~2025시즌 EPL 18라운드 홈 경기에서 1-1로 비겼다. 이날 무승부로 맨시티는 승점 28(8승 4무 6패)로 7위에 머물렀다. 펩 과르디올라 감독이 지휘하는 맨시티는 2020~2021시즌부터 2023~2024시즌까지 4시즌 연속 리그 우승을 달성하는 등 EPL 최강자로 군림했다. 하지만 최근 흐름이 심상치 않다. 핵심 미드필더 로드리가 부상으로 이탈한 뒤 부진이 계속되고 있다. 맨시티는 지난 10월31일 잉글랜드 카라바오컵(리그컵) 8강 토트넘 홋스퍼전(1-2 패)부터 시작해 최근 공식전 13경기 동안 단 1승(3무 9패) 밖에 거두지 못하고 있다. 오늘 에버턴을 상대로는 전반 14분 베르나르두 실바의 이른 선제골에도 불구하고 동점골을 내주며 흔들렸고, 후반전 엘링 홀란이 페널티킥을 실축한 끝에 비겼다. 맨시티는 오는 29일 레스터 시티와의 EPL 19라운드 원정 경기에서 다시 승리를 노린다. 이튿날 맨유는 축구 국가대표 황희찬이 속한 울버햄튼에 0-2로 무릎을 꿇었다. 이날 패배로 맨유는 승점 22(6승 4무 8패)로 14위까지 내려앉았다. 후벵 아모림이 새로 부임한 맨유 또한 지난 20일 리그컵 4강 토트넘전(3-4 패) 패배 후 본머스전(0-3 패)에 이어 울버햄튼전까지 공식전 3연패에 빠졌다. 후반전 시작 이후 얼마 지나지 않아 주장 브루노 페르난데스가 경고 누적으로 퇴장을 당했고, 마테우스 쿠냐와 황희찬에게 연속 실점을 내주며 고배를 마셨다. 에릭 텐하흐 감독 경질 후 발탁한 아모림 감독은 현재까지 10경기 4승(1무 5패)을 기록 중이다. 과거 알렉스 퍼거슨 감독 시절 영국을 넘어 세계를 지배했던 맨유의 위상이 계속 추락하고 있다. 맨유는 오는 31일 뉴캐슬 유나이티드를 안방으로 불러들일 예정이다."
}
빌드
sam build 명령어를 통해 SAM 프로젝트를 빌드할 수 있다.
Error: PythonPipBuilder:Validation - Binary validation failed for python, searched for python in following locations : ['/opt/anaconda3/bin/python', '/opt/anaconda3/bin/python3', '/opt/homebrew/bin/python3', '/Library/Frameworks/Python.framework/Versions/3.12/bin/python3', '/Library/Frameworks/Python.framework/Versions/3.11/bin/python3', '/usr/local/bin/python3', '/usr/bin/python3'] which did not satisfy constraints for runtime: python3.13. Do you have python for runtime: python3.13 on your PATH?
빌드 과정에서 위와 같은 오류를 마주칠 수 있는데, 런타임에 해당되는 Python3.11을 찾지 못하여 생기는 오류다.
내 로컬 머신에는 Python3.9가 설치되어 있었고, 이를 업데이트 해주니 쉽게 해결할 수 있었다.
로컬 테스트
sam local invoke --event events/event.json --env-vars env.json 명령어를 통해 작성한 이벤트를 테스트해볼 수 있다.
-event 옵션을 이용해 테스트할 이벤트를 지정할 수 있고, --env-vars 옵션으로 환경변수를 주입해줄 수 있다.
{
  "title": "맨체스터 시티와 맨체스터 유나이티드, EPL 추락세",
  "content": "맨체스터 시티와 맨체스터 유나이티드가 최근 EPL에서 좋지 않은 성적을 보이고 있다. 맨시티는 최근 경기에서 승점을 거의 얻지 못하고 있으며, 맨유도 연패를 기록하며 순위가 하락하고 있다. 두 팀의 감독들도 압력을 받고 있는 상황이다."
}
배포
테스트를 완료했으니 배포를 진행해보자.
sam deploy -g 명령어를 이용해 배포를 진행한다. 배포를 위해 aws credential이 등록되어야 함에 유의하자.
또한 template.yml에 테스트를 위해 환경변수 값을 참조하여 사용했는데, 배포 시에는 실제 값으로 바꿔주자.
사실은 배포 시에도 환경변수를 외부에서 주입해주는 방식을 찾고자 했는데, 자료가 쉽게 나오지 않아 포기했다. 배포 시 사용하는 템플릿 파일과, 로컬 환경의 템플릿 파일을 나누거나 환경변수는 AWS 웹 페이지에서 추가해주는 방법도 고려할 수 있겠다.
Configuring SAM deploy
======================

        Looking for config file [samconfig.toml] :  Found
        Reading default arguments  :  Success

        Setting default arguments for 'sam deploy'
        =========================================
        Stack Name [mySummarizeFunction]:
        AWS Region [ap-northeast-2]:
        #Shows you resources changes to be deployed and require a 'Y' to initiate deploy
        Confirm changes before deploy [Y/n]:
        #SAM needs permission to be able to create roles to connect to the resources in your template
        Allow SAM CLI IAM role creation [Y/n]:
        #Preserves the state of previously provisioned resources when an operation fails
        Disable rollback [y/N]:
        HelloWorldFunction has no authentication. Is this okay? [y/N]: y
        Save arguments to configuration file [Y/n]:
        SAM configuration file [samconfig.toml]:
        SAM configuration environment [default]:
위와 같은 절차가 끝난다면, 무사히 배포를 완료할 수 있다.

재미있게 잘 읽었습니다
감사합니다