이전 게시글에서는 컨트롤러 레이어의 단위 테스트를 작성하고 이에 따른 테스트 커버리지를 측정해보았다.
이번 게시글에서는 컨트롤러 레이어의 단위 테스트를 작성하는 과정에서 발생하는 다양한 이슈들과 이에 대한 트러블 슈팅 과정을 기록해 보려고 한다.
실제 클래스 호출하기
@Test
void tokenTest() throws Exception {

    // given
    given(userService.verifyUser(any())).willReturn(new BaseUser("010-0000-0000", Role.USER));

    // when
    String token = getToken("010-0000-0000");

	// then
    assertThat(token).isNotEmpty();
}

private String getToken(String phoneNumber) throws Exception {
    String requestBody = String.format("""
            {
                "phoneNumber": "%s"
            }
            """, phoneNumber);

    ResultActions perform = mockMvc.perform(post("/event/auth")
            .contentType(MediaType.APPLICATION_JSON)
            .content(requestBody))
            .andDo(print());

    String jsonString = perform.andReturn().getResponse().getContentAsString();
    String tokenPrefix = "\"accessToken\":\"";

    int start = jsonString.indexOf(tokenPrefix) + tokenPrefix.length();
    int end = jsonString.indexOf("\"", start);

    return "Bearer " + jsonString.substring(start, end);
}
위 코드는 RushEventController 클래스에서 토큰 생성 로직을 테스트하는 단위 테스트 코드이다.
유의할 점으로는 /event/auth 엔드포인트에 요청을 전송하더라도 이 요청은 Controller 레이어에서 처리되지 않고, 그 이전의 ChainFilter를 통해 처리된다.
사실 엄밀히 말하자면 Controller의 단위 테스트 영역 밖의 일이지만, JWT를 생성하고 검증하는 과정은 우리가 임의로 모킹하기 까다롭다.
또한 인증 토큰은 다른 엔드포인트들에서 필수적으로 요구하는 경우가 잦기 때문에 보안 로직을 모킹하지 않고, 실제 로직을 사용하고 싶다.
하지만 위 테스트 코드는 @WebMvcTest(RushEventController.class) 어노테이션으로 인해 RushEventController 관련 컴포넌트만 로딩되므로 JWT 관련 컴포넌트는 로딩되지 않는다.
실제로 위 테스트 코드를 실행한다면 정상적으로 실행되지 않는 것을 알 수 있다.
그렇다면 이러한 이슈를 어떻게 해결해야 할까?
@SpringBootTest 어노테이션
@SpringBootTest 어노테이션은 테스트 환경에서 모든 컴포넌트를 로딩한다.
즉, JWT 관련 컴포넌트들도 로딩하여 정상적인 테스트를 수행할 수 있을 것이다.
다만, @SpringBootTest는 근본적으로 단위 테스트가 아닌 통합 테스트를 위한 환경을 조성하며, 이는 우리의 목적에 맞지 않는다.
@SpringBootTest 어노테이션을 사용한다는 것은 우리가 의도한 행동이 아니다.
@Import 어노테이션
해당 코드를 실행했을 때의 오류 메시지를 잘 살펴보자.
org.springframework.beans.factory.UnsatisfiedDependencyException:
Error creating bean with name 'jwtFilter' defined in class path resource [JGS/CasperEvent/global/config/WebConfig.class]: Unsatisfied dependency expressed through method 'jwtFilter' parameter 0: No qualifying bean of type 'JGS.CasperEvent.global.jwt.util.JwtProvider' available: expected at least 1 bean which qualifies as autowire candidate. Dependency annotations: {}
복잡해 보이지만 자세히 보면 오류의 원인을 알 수 있다.
jwtFilter에JwtProviderBean이 존재하지 않음.
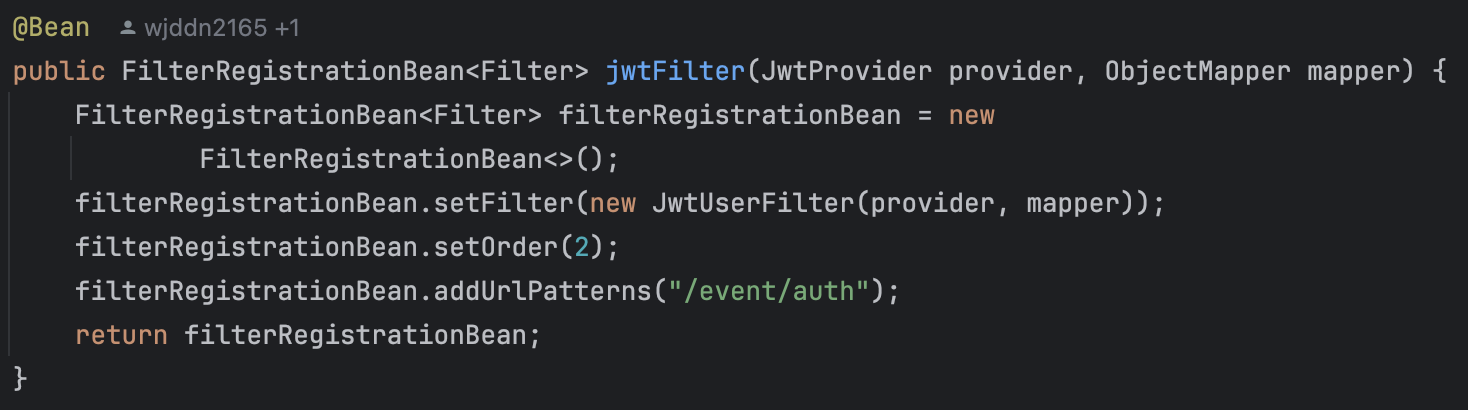
해당 오류가 발생하는 지점이다.
jwtFilter Bean이 생성될 때, JwtProvider가 주입되지 않아 생겨난 문제다.
그 원인은 WebMvcTest 어노테이션에 있는데, WebMvcTest 어노테이션은 웹 계층 컴포넌트(Controller, Filter 등) 만을 로드한다.
따라서 JwtProvider는 로드되지 않았기 때문에 빈 컨테이너에 존재하지 않았던 것이다.
이 때, @Import 어노테이션을 통해 실제 객체를 로딩할 수 있다.
@WebMvcTest(RushEventController.class)
@Import(JwtProvider.class)
class RushEventControllerTest {

    @Autowired
    private MockMvc mockMvc;

    @MockBean
    private RushEventService rushEventService;

    @MockBean
    private AdminService adminService;

    @MockBean
    private UserService userService;

    @Test
    void tokenTest() throws Exception {
        // given
        given(userService.verifyUser(any())).willReturn(new BaseUser("010-0000-0000", Role.USER));

        // when
        String token = getToken("010-0000-0000");

		// then
        assertThat(token).isNotEmpty();
    }

    private String getToken(String phoneNumber) throws Exception {
        String requestBody = String.format("""
                {
                    "phoneNumber": "%s"
                }
                """, phoneNumber);

        ResultActions perform = mockMvc.perform(post("/event/auth")
                .contentType(MediaType.APPLICATION_JSON)
                .content(requestBody))
                .andDo(print());

        String jsonString = perform.andReturn().getResponse().getContentAsString();
        String tokenPrefix = "\"accessToken\":\"";
        int start = jsonString.indexOf(tokenPrefix) + tokenPrefix.length();
        int end = jsonString.indexOf("\"", start);

        return "Bearer " + jsonString.substring(start, end);
    }
}
토큰이 정상적으로 생성되는 것을 알 수 있다.
보안 문제점
@Import를 통해 실제 객체를 주입했고, 단위 테스트를 성공적으로 수행할 수 있었다.
하지만 프로젝트에 아직 중대한 보안 문제점이 있다.
다만 이는 단위 테스트의 문제가 아니라 프로젝트 자체의 보안 문제점이다.
아래는 JwtProvider 의 코드 중 일부분이다.
private static final byte[] secret = "jwtSecretKey_jwtSecretKey_jwtSecretKey_jwtSecretKey_jwtSecretKey_".getBytes();
private final Key jwtKey = Keys.hmacShaKeyFor(secret);
해당 부분은 JWT의 시크릿 키를 생성하는 과정이다.
시크릿 키가 하드코딩되어 있어 외부에 노출될 우려가 있으므로 이는 바람직하지 못하다.
따라서 해당 코드는 다음과 같이 바꾸어야 한다.
@Configuration
public class SecurityConfig {

    @Value("${spring.jwt.secretKey}")
    private String jwtSecretKey;

    @Bean
    public Key jwtKey(){
        System.out.println("jwtSecretKey = " + jwtSecretKey);
        byte[] secret = jwtSecretKey.getBytes();
        return Keys.hmacShaKeyFor(secret);
    }
}
@Component
@RequiredArgsConstructor
public class JwtProvider {
private final Key jwtKey;
// JWT 관련 로직
}SecurityConfig에서 설정 파일을 통해 jwtSecretKey를 가져와 jwtKey를 Bean으로 등록 후, JwtProvider에서 해당 Bean을 사용하도록 했다.
그렇다면 테스트 코드를 다음과 같이 수정하면 어떨까?
@WebMvcTest(RushEventController.class)
@Import({SecurityConfig.class, JwtProvider.class})
class RushEventControllerTest {

    // 테스트 코드

}
얼핏 생각해 봤을 때, 꽤 그럴듯하다.
하지만 이 테스트 코드를 실행한다면, 다음과 같은 오류가 발생한다.
io.jsonwebtoken.security.WeakKeyException:
The specified key byte array is 184 bits which is not secure enough for any JWT HMAC-SHA algorithm. The JWT JWA Specification (RFC 7518, Section 3.2) states that keys used with HMAC-SHA algorithms MUST have a size >= 256 bits (the key size must be greater than or equal to the hash output size).
뜬금없게도 발생하는 오류는 WeakKeyException다.
정확하게는 키의 길이가 너무 짧아서 생기는 예외였다.
하지만 키의 길이는 충분히 길었고, 키를 확인해 봤을 때 다음과 같은 결과를 확인할 수 있었다.

원인은 또 다시 WebMvcTest에 있었는데, WebMvcTest는 테스트에 필요한 최소한의 컨텍스트만을 로드하기 때문에, 해당 프로퍼티가 존재하는 application.yml 파일이 로드되지 않았던 것이다.
그렇다면 이를 어떻게 해결해야 할까?
@SpringBootTest
우리의 목적에 맞지는 않지만 여전히 유효한 후보다.
하지만 통합 테스트 환경에서는 메서드나 객체를 모킹할 수 없기 때문에 단위 테스트 환경에서 이미 테스트 코드를 많이 작성해놓았다면 이를 전부 수정해야하는 수고로움이 발생할 수 있다.
@TestPropertySource
@TestPropertySource 어노테이션을 통해 테스트 프로퍼티를 직접 설정해줄 수 있다.
@WebMvcTest(RushEventController.class)
@Import({SecurityConfig.class, JwtProvider.class})
@TestPropertySource(properties = "spring.jwt.secretKey=chltnduswngywjdqowjddnrlatjdwlschltnduswngywjdqowjddnrlatjdwls")
class RushEventControllerTest {

    // 테스트 코드

}
직접 프로퍼티를 설정해줌으로서 정상적으로 단위 테스트를 작성할 수 있다.
@TestConfiguration
@TestConfiguration 어노테이션으로 테스트에 필요한 빈을 직접 정의할 수 있다.
@WebMvcTest(RushEventController.class)
class RushEventControllerTest {

    @TestConfiguration
    static class TestConfig{
        @Bean
        public JwtProvider jwtProvider(){
            String secretKey = "chltnduswngywjdqowjddnrlatjdwlschltnduswngywjdqowjddnrlatjdwls";
            byte[] secret = secretKey.getBytes();
            return new JwtProvider(Keys.hmacShaKeyFor(secret));
        }
    }

    // 테스트 코드

}
외부에서 정의된 빈이나 클래스를 테스트 컨텍스트에 직접 추가할 수 있는 @Import와 달리 @TestConfiguration은 직접 정의하여 추가할 수 있다.
@TestConfiguration로 정의된 빈은 테스트 클래스와 함께 로드되어 해당 테스트 클래스 내에서만 유효하다.