prisma 는 ORM 중 하나이다.
기업 과제를 중 graphql + prisma를 이용하며 새로 알게된 prisma에 대해 정리해 보았다.
프리스마 생성
프리즈마를 설치하고 다음과 같은 명령어를 실행하면 프리즈마가 생성된다.
npx prisma init
초기설정
prisma라는 폴더가 생성되고, schema.prisma라는 파일이 생성된다.
generator client {
  provider = "prisma-client-js"
}

datasource db {
  provider = "mysql"
  url      = env("DATABASE_URL")
}
나는 mysql과 prisma를 연동할 것이므로 provider에 mysql을 적어주었다.
PostgreSQL이 아마 기본 설정이었던 것으로 기억한다.
.env 파일에 디비 접속 정보를 적어주면 연결이 완료된다.
DATABASE_URL="mysql://사용자>:<비밀번호>@localhost:3306/<DB이름>"스키마 생성
schema.prisma 에는 설정과 더불어 모델을 정의할 수 있다.
나는 다음과 같이 user, post를 작성했다.
각 테이블은 user 1 : N post 의 관계를 가지고 있다.
model User {
  id        Int      @id @default(autoincrement())
  email     String   @unique
  password  String
  name      String
  createdAt DateTime @default(now())
  posts     Post[]
}

model Post {
  id        Int        @id @default(autoincrement())
  title     String
  content   String
  published Boolean   @default(false)
  author    User      @relation(fields: [authorId], references: [id])
  authorId  Int
  createdAt DateTime   @default(now())
  comments  Comment[]
}
@id 테이블의 기본 키 기능을 한다.
@default 필드의 디폴트 값을 설정할 수 있다. autoincrement()로 자동 증가값을 설정해주었다.
autoincrement() 대신 uuid()등을 설정 할 수 있다.
이 외에도 [] 로 필드를 목록으로 만들 수 있다.
favoriteColors String[] @default(["red", "blue", "green"])
@relation을 통해 테이블과의 관계를 명시할 수 있다.
참고 : relation
post에 있는 authorId는 @relation을 통해 참조되는 것으로 post와 user를 연결하는 외래키 역할을 한다.
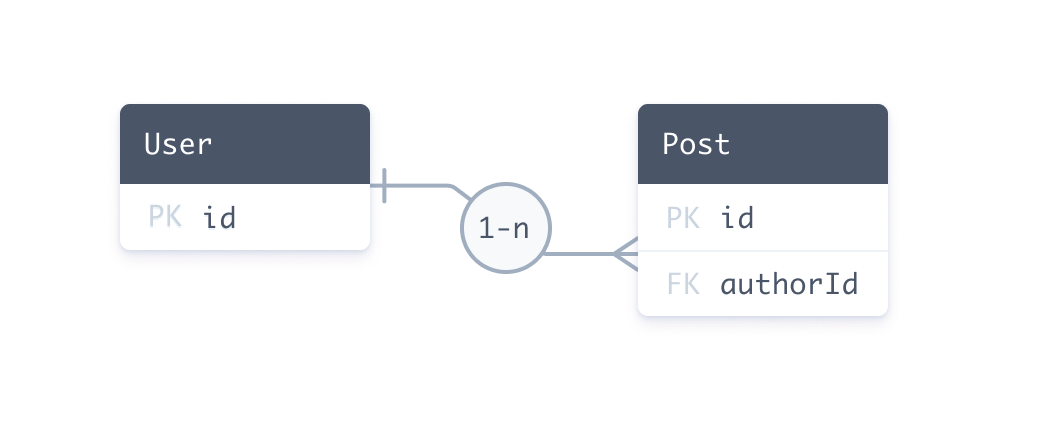
정리하자면 post의 외래키인 authorId는 user의 기본키인 id를 참조하게 된다.
프리즈마 클라이언트가 값을 조회할 때는 다음과 같이 조회할 수 있다.
const getAuthor = await prisma.user.findUnique({
  where: {
    id: "20",
  },
  include: {
    posts: true,
  },
});
아이디 20인 유저를 찾고, post 테이블에서 authorId가 20인 게시글을 찾아오게된다.
다음은 중첩 쿼리를 통해서 게시글의 작성자를 업데이트하는 쿼리이다.
const updateAuthor = await prisma.user.update({
  where: {
    id: 20,
  },
  data: {
    posts: {
      connect: {
        id: 4,
      },
    },
  },
})
20번인 유저를 찾고, 게시글의 아이디가 4번인 게시글의 authorId를 20으로 수정할 수 있다.
서버에서는 다음과 같이 작성할 수 있다. 아래는 게시글을 작성하는 뮤테이션이다.
    createPost: async (
      _: any,
      { input: { title, content, authorId, published } }
    ) => {
      try {
        const newPost = {
          title,
          content,
          published,
          author: { connect: { id: authorId } },
          createdAt: new Date().toISOString(),
        };

        return await prisma.post.create({ data: newPost });
      } catch (error) {
        throw new ApolloError(
          "게시글 생성 중 에러가 발생했습니다.",
          "USER_CREATION_ERROR"
        );
      }
    },
게시글 작성 정보를 input으로 받아온다.
input의 authorId는 게시글 작성자이다.
connect를 통해 post의 author의 authorId를 인자로 받아온 authorId로 설정해 게시글을 작성하도록 했다.
마이그레이션
위에서 작성한 테이블을 바탕으로 mySql 데이터베이스에 실제 테이블을 생성해야한다.
npx prisma migrate dev --name create_categories
create_categories를 함께 실행하면 prisma/migrations폴더에 마이그레이션 히스토리 폴더가 생성된다.

프리즈마 클라이언트
프리즈마로 데이터 베이스를 관리하기위해 프리즈마 클라이언트를 사용해야한다.
프리즈마 클라이언트를 설치하고 다음과 같이 사용할 수 있다.
import { Prisma, PrismaClient } from "@prisma/client";
import { ApolloError } from "apollo-server";

const prisma = new PrismaClient({ log: ["query", "info", "warn", "error"] });
쿼리의 내용을 콘솔에 출력하기위해서 위와 같은 옵션을 추가했다.
사용 방법
const prisma = new PrismaClient({ log: ["query", "info", "warn", "error"] });

export const resolvers = {
  Query: {
    postsByUser: async (_: any, { userId }) => {
        return await prisma.post.findMany({
          where: {
            authorId: userId,
            published: true,
            content: { contains: "hi" },
          },
        });
    },
  },
생성한 프리즈마 클라이언트로 게시글을 조회할 수 있다.
contains 는 게시글의 내용 중 'hi' 라는 문자열을 포함한 게시글만 출력하게 된다.
