일반적으로 로그인한 사용자의 정보가 필요하면 컨트롤러에서
@AuthenticationPrincipal CustomUserDetails userDetails를 인자로 받아 사용한다.
근데 내가 실제로 사용해봤을 땐 번거롭기도하고 코드복잡도도 올라간다고 느껴서 편리하게 사용 가능한 어노테이션을 직접 만들어보겠다.
우선 어노테이션 선언 파일을 하나 만들어준다
@Target(ElementType.METHOD)
@Retention(RetentionPolicy.RUNTIME)
public @interface Auth {

	boolean includeUserIdx() default true;

}
그리고 이 어노테이션을 사용해 데이터를 담거나 꺼내올수있는 holder를 하나 만들어줄거다
AuthHolder.class
public class AuthHolder {

	private static final ThreadLocal<Long> userIdxHolder = new ThreadLocal<>();

	public static void setUserId(Long userId) {
		userIdxHolder.set(userId);
	}

	public static Long getUserId() {
		return userIdxHolder.get();
	}

	public static void clearUserIdx() {
		userIdxHolder.remove();
	}

}
ThreadLocal을 통해 관리를 하도록 하겠다.
이제 매번 복잡한 코드를 생략하고, 인증절차를 미리 컨트롤러에 도달하기전에 미리 하기 위해 인터셉터를 만들어주자
@RequiredArgsConstructor
@Component
public class AuthInterceptor implements HandlerInterceptor {


    @Override
    public boolean preHandle(HttpServletRequest request, HttpServletResponse response, Object handler) throws Exception {


        try{
            if (handler instanceof HandlerMethod handlerMethod) {
				Auth authAnnotation = handlerMethod.getMethodAnnotation(Auth.class);

                if (authAnnotation != null) {
                    boolean includeUserIdx = authAnnotation.includeUserIdx();
                    if (includeUserIdx) {

                        if (!request.getHeader("Authorization").startsWith("Bearer ")) {
                            throw new CustomException(UserException.HANDLE_ACCESS_DENIED);
                        }
                        String token = request.getHeader("Authorization").split(" ")[1];

                        Long userId = TokenProvider.getUserIdFromToken(token);
                        request.setAttribute("userId", userId);
                        AuthHolder.setUserId(userId);
                    }
                    return true;
                }
            }

            return HandlerInterceptor.super.preHandle(request, response, handler);
        } catch (NullPointerException e) {
            throw new CustomException(UserException.HANDLE_ACCESS_DENIED);
        }

    }

}
간단한 토큰 검증 후 TokenProvider에서 userId를 꺼내 AuthHolder에 넣어주는 코드이다.
이제 이 인터셉터를 mvcConfig에 인터셉터로 사용합니다~ 하고 명시해준다
@Configuration
@RequiredArgsConstructor
public class WebMvcConfig implements WebMvcConfigurer {

    private final AuthInterceptor authInterceptor;

    @Override
    public void addInterceptors(InterceptorRegistry registry) {
        registry.addInterceptor(authInterceptor);
    }

}
이제 @Auth가 컨트롤러 메서드에 들어가면 이 api는 인증정보가 반드시 필요하게된다.
    @Auth
    @GetMapping("success")
    public Response<Long> hello() {
        return Api.success(200, "성공 메시지", AuthHolder.getUserId());
    }
이런 테스트용 api를 하나 만들어주고 호출해보면
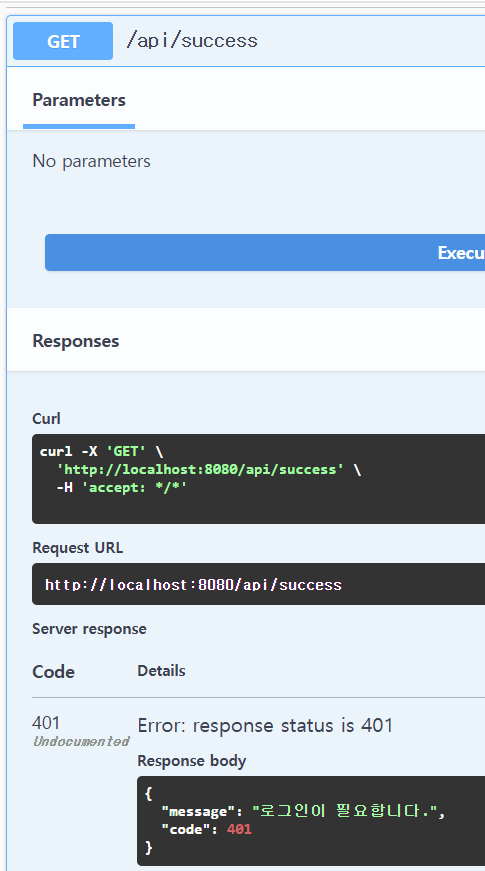
실제로 /api/**/auth/** 과 상관없는 api 인데도 인증절차를 거치게 된다.
또한 성공데이터에 유저번호를 가져오는 코드를 통해
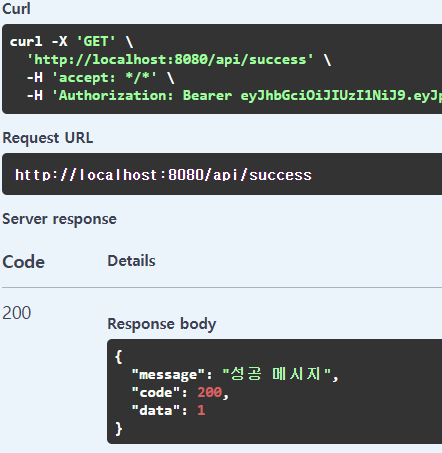
현재 로그인한 유저의 유저번호를 가져올 수 있고
비즈니스 코드에 사용할 땐 이 유저번호를 통해 유저를 db에서 조회해서 사용할 수 있다!

이렇게 짜면 요구사항이나 기획이 변경됐을 때 불편하지 않을까? 라는 생각부터 시작해 설계를 해나가는 개발자