일단 만들고 보자 Javascript
코드라이언과 함께하는 5일
멋사에서 짜준 커리큘럼을 따라가지 않고 마음대로 이수해버렸다. 조금 후회중이다. HTML/CSS, Javascript,Python 시리즈로 들을 걸! 뭐 그래도 말 안듣는 건 매한가지다. 재밌는 건 Javascript를 듣고 나니 익숙해지면 넷상의 창조자가 될 것 같은 전능함을 엿보게 된 느낌이랄까. 신난다. 문제는 전능함을 가지기 위해 코딩에 익숙해져야한다는 점이다. 나는 사업을 하고 싶어서 개발자랑 친해지고 싶었을 뿐인데, 약간 이 세계는 또 다르구나를 경험하게 되는 기분에 설레기도 한다.
Javascript 를 먼저 배우면 확실한 건, 조금은 즐겁게 무언가를 생상할 수 있는 여력이 되는 것 같다. 인간은 역시 생산성의 동물이다. 오늘 강의는 조코딩님과의 수업. 닉네임 하나 걸출하시게 잘 만드신 것 같다. 찹찹 붙는 어감. 일단 4가지 프로덕트를 만들며 배운다는 목적에 맞게 따라서 만들어 보았다.
고학생은 느려서 오늘도 완강하는 데 시간이 걸렸는데, 완주한게 대단하다 싶었다. 스스로에게 칭찬 한사발, 그리고 뭐가 문제인지 봐보기.
TIL(Today I Learned)😀
자바스크립트로는 내용, 로직을 구성하고 HTML/CSS 는 로직을 화려하게 꾸며주는 역할이라고 이해했다.
- 로또 번호 추첨기
이름 그대로 숫자를 랜덤하게 중복되지 않게 추출하는 기능을 가진 걸 만드는 것인데 (...) 포인트는 숫자범위, 랜덤, 중복되지 않게 추출이다. script 사이에 있는 내용이 포인트인데, var 는 변수명을 의미. lotto 라는 변수를 만드는데, 이때, while 를 통해 가정한다. lotto.length 로또에 길이는 6 미만이라고 표시지만, 컴퓨터는 0부터 셈하므로 실째로 의미하는 것은 자리수로는 6자리가 들어가게 된다(0, 1, 2, 3, 4, 5,(6개)).
parseInt → parse 문법적으로 분석을 의미, Int 정수 integer 니까, 정수로 변환한다는 의미이다.
Math.random() → 랜덤하게 추출
indexOf() → () 내에 있는 문자열의 문자 위치인 index 값을 가져 오는 것
if (lotto.indexOf(num) == -1) {
lotto.push(num); }}
이거 이해를 못했다. 로또 숫자의 위치 값이 같다(==) ...? -1 과 같다. 인데... 앞에 if 가 있으니까 만약 같으면 로또 번호로 넣는다? 근데 왜 -1 하지? 질문 남겨야 하나 조금만 더 생각해봐야겠다.
<!DOCTYPE html>
<html lang="ko">
<head>
    <meta charset="UTF-8">
    <meta name="viewport" content="width=device-width, initial-scale=1.0">
    <title>로또 번호 추첨기</title>
    <link rel="stylesheet" href="style.css">
</head>
<body>
    <h1>로또 번호 추첨기</h1>
    <script>
        var lotto = [];
        while (lotto.length < 6) {
            var num = parseInt(Math.random() * 45 + 1);
            if (lotto.indexOf(num) == -1) {
                lotto.push(num);
            }
        }
        lotto.sort((a,b)=>a-b);
        document.write("<div class='ball ball1'>" + lotto[0] + "</div>");
        document.write("<div class='ball ball2'>" + lotto[1] + "</div>");
        document.write("<div class='ball ball3'>" + lotto[2] + "</div>");
        document.write("<div class='ball ball4'>" + lotto[3] + "</div>");
        document.write("<div class='ball ball5'>" + lotto[4] + "</div>");
        document.write("<div class='ball ball6'>" + lotto[5] + "</div>");
    </script>
</body>
</html>
- 글자수 계산기
글자수 계산기이다. 진짜 말 그대로 여러 채용사이트나 흔히 보는 인터넷에서 글자수 계산기를 검색하면 나오는 그것. Javascript를 배우는 시간임으로 script 이하를 뜯어 보았다.
getElementById → Id 기반으로 요소를 추출
content.length > 200 → 200자 이하로 글자 길이 확인
content.substring(0,200); → 어떤 문자열에서 앞부분이나 뒷부분을 제거함으로써 얻어지는, 문자열의 일부분 국어사전에도 나온다. 즉, (시작, 끝) 내에서 해결하겠다는 이야기.
innerHTML = '(' + content.length + '/200)'; → 글의 길이를 제한하는 구문
<!DOCTYPE html>
<html lang="ko">
<head>
    <meta charset="UTF-8">
    <meta name="viewport" content="width=device-width, initial-scale=1.0">
    <title>자소서 글자수 계산기</title>
    <link rel="stylesheet" href="https://stackpath.bootstrapcdn.com/bootstrap/4.5.2/css/bootstrap.min.css" integrity="sha384-JcKb8q3iqJ61gNV9KGb8thSsNjpSL0n8PARn9HuZOnIxN0hoP+VmmDGMN5t9UJ0Z" crossorigin="anonymous">
    <style>
        h1 {
            margin-top: 30px;
        }
        #count {
            float: right;
        }
    </style>
</head>
<body class='container'>
    <h1>자기소개</h1>
    <textarea class="form-control" rows="3" id="jasoseol" onkeydown="counter();">저는 인성 문제가 없습니다.</textarea>
    <span id="count">(0/200)</span>
    <script>
        function counter() {
            var content = document.getElementById('jasoseol').value;
            if (content.length > 200) {
                content = content.substring(0,200);
                document.getElementById('jasoseol').value = content;
            }
            document.getElementById('count').innerHTML = '(' + content.length + '/200)';
        }
        counter();
    </script>
</body>
</html>- 미니게임, 그리고 jQuery
미니게임을 만들기 전 jQuery를 소개하였다. 학구파인 나는 말보다 글로 봐야 곱씹으면서 이해가 됨으로... 검색을 하였다. 위키백과에 작성된 내용에 의하면 아래와 같다. 사실 조코딩님이 강의해준 내용과 같다. 그냥 뭐가 더 있나 궁금해서 들어가 봤음.
HTML의 클라이언트 사이드 조작을 단순화 하도록 설계된 크로스 플랫폼의 자바스크립트 라이브러리다. 존 레식이 2006년 뉴욕 시 바캠프(Barcamp NYC)에서 공식적으로 소개하였다. jQuery는 MIT 라이선스를 가진 자유 오픈 소프트웨어이다.[1] jQuery의 문법은 코드 보기, 문서 객체 모델 찾기, 애니메이션 만들기, 이벤트 제어, Ajax 개발을 쉽게 할 수 있도록 디자인되었다. 또한, jQuery는 개발자가 플러그인을 개발할 수 있는 기능을 제공한다.
jQuery 저장소
https://github.com/jquery/jquery
$ 통화만 표기하는 줄 알았더니 jQuery에서도 사용된다.
여기서 배운 포인트는 function(){} 의 내용! 함수 기능을 만들 수 있다는 것이 인상적이다. 주의해야할 점은 기능은 모두 쓰여진 순서로 작동됨으로 특정 기능 이후에 연동을 원할 경우, 적절하게 {} 중괄호를 사용하여 하위처리할 수 있도록 해야 실행의 기능성이 올라간다는 점이다.
<!DOCTYPE html>
<html lang="ko">
<head>
    <meta charset="UTF-8">
    <title>스타크래프트</title>
    <style>
        .background {
            position: relative;
            background-image: url('background.png');
            background-size: 500px 330px;
            width: 500px;
            height: 330px;
        }
        #drone {
            position: absolute;
            width: 100px;
            height: 100px;
            top: 100px;
            left: 60px;
        }
        #bunker {
            position: absolute;
            width: 150px;
            height: 150px;
            top: 80px;
            right: 20px;
        }
        #spit {
            display: none;
            position: absolute;
            top: 140px;
            left: 150px;
            width: 50px;
            height: 30px;
            z-index: 2;
        }
    </style>
</head>
<body>
    <h1 id='hp'>HP: 3</h1>
    <div class='background'>
        <img id='drone' src="drone.png" alt="drone">
        <img id='spit' src="spit.png" alt="spit">
        <img id='bunker' src="bunker.png" alt="bunker">
    </div>
    <script
  src="https://code.jquery.com/jquery-3.5.1.js"
  integrity="sha256-QWo7LDvxbWT2tbbQ97B53yJnYU3WhH/C8ycbRAkjPDc="
  crossorigin="anonymous"></script>
    <script>
        var hp = 3;
        $('#drone').click(function() {
            $('#spit').fadeIn();
            $('#spit').animate({'left': '+=250px'});
            $('#spit').fadeOut(function(){
                hp = hp - 1;
                $('#hp').text('HP: ' + hp);
                if (hp == 0) {
                    $('#bunker').fadeOut();
                }
            });
            $('#spit').css({left: 150});
        });
    </script>
</body>
</html>- 디데이 계산기
참고자료로 알려준 사이트
https://developer.mozilla.org/ko/docs/Web/JavaScript/Reference/Global_Objects/Date
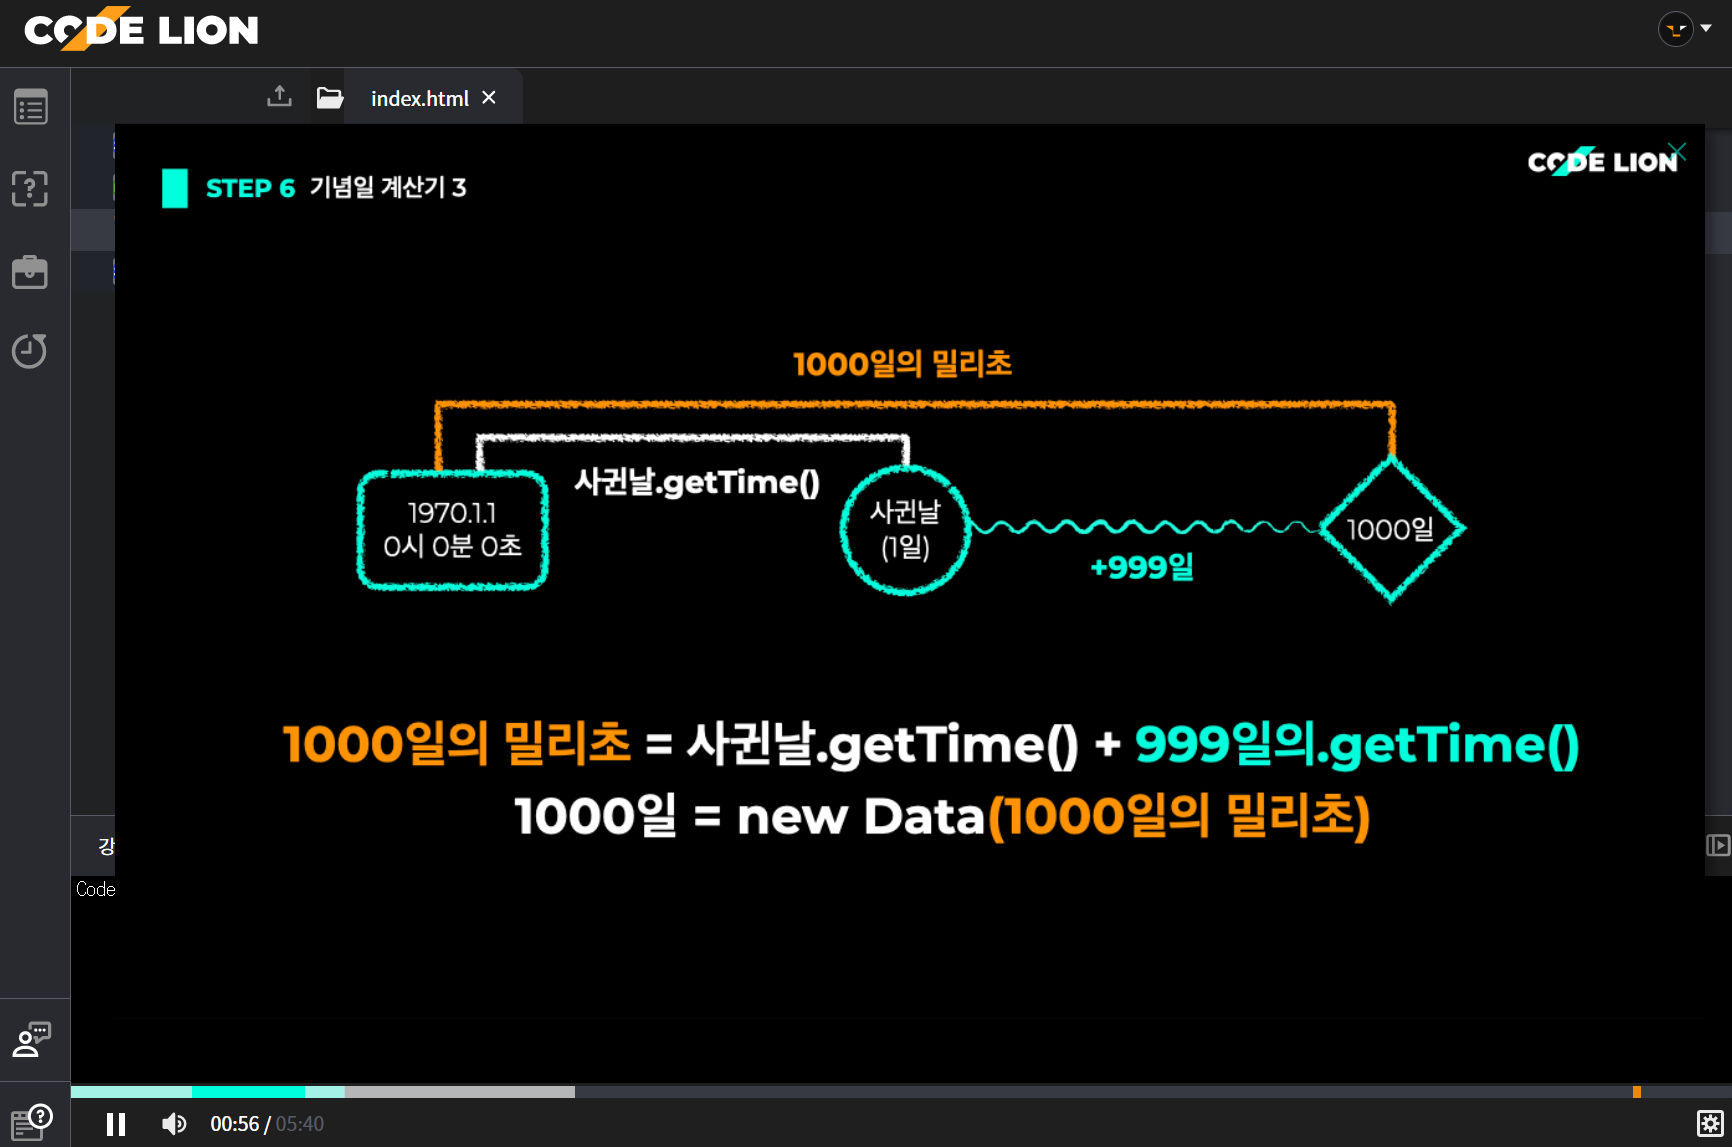
script 내에서 포인트를 잡자면 역시나 이것이 포인트 .getTime 와 Math.floor
var timeDiff = now.getTime() - start.getTime();
시간 계산하는 거에 약한 건 어쩔 수 없다. 그냥 눈으로 익히고 필요할 때 긁어쓰자.
<!DOCTYPE html>
<html lang="ko">
<head>
    <meta charset="UTF-8">
    <meta name="viewport" content="width=device-width, initial-scale=1.0">
    <link rel="stylesheet" href="https://stackpath.bootstrapcdn.com/bootstrap/4.5.2/css/bootstrap.min.css" integrity="sha384-JcKb8q3iqJ61gNV9KGb8thSsNjpSL0n8PARn9HuZOnIxN0hoP+VmmDGMN5t9UJ0Z" crossorigin="anonymous">
    <title>기념일 계산기</title>
    <style>
        * {
            color: #333333;
        }
        p {
            margin-bottom: 1px;
        }
        .photos {
            margin-top: 50px;
            display: flex;
            justify-content: center;
            align-items: center;
        }
        #duhee {
            width:150px;
            height:150px;
            object-fit:cover;
            border-radius:50%;
            margin-right: 30px;
        }
        #jisook {
            width:150px;
            height:150px;
            object-fit:cover;
            border-radius:50%;
            margin-left: 30px;
        }
        #heart {
            width:50px;
            height:50px;
        }
        .gray {
            color: #a0a0a0;
        }
        .special-day {
            display: flex;
            justify-content: space-between;
        }
        .title {
            display: flex;
            align-items: center;
        }
        .days-left {
            text-align: right;
        }
        .date {
            text-align: right;
            color: #a0a0a0;
        }
    </style>
</head>
<body class="container">
    <section class='photos'>
        <img id='duhee' src="duhee.jpeg" alt="duhee">
        <img id='heart' src="heart.png" alt="heart">
        <img id='jisook' src="jisook.jpeg" alt="jisook">
    </section>
    <div class='container d-flex flex-column justify-content-center align-items-center mt-3'>
        <h3>두희♥지숙</h3>
        <h3 id='love'>0일째</h3>
        <h4 class="date">2020.6.30</h4>
    </div>
    <hr/>
    <section class='special-day'>
        <h3 class='title'>발렌타인 데이</h3>
        <div class='date-box'>
            <p id='valentine' class='days-left'>0일 남음</p>
            <p class='date'>2021.2.14</p>
        </div>
    </section>
    <hr/>
    <section class='special-day'>
        <h3 class='title'>1000일</h3>
        <div class='date-box'>
            <p id='thousand' class='days-left'>0일 남음</p>
            <p id='thousand-date' class='date'>0000.00.00</p>
        </div>
    </section>
    <hr/>
    <script
  src="https://code.jquery.com/jquery-3.5.1.min.js"
  integrity="sha256-9/aliU8dGd2tb6OSsuzixeV4y/faTqgFtohetphbbj0="
  crossorigin="anonymous"></script>
    <script>
        var now = new Date();
        var start = new Date('2020-06-30');

        //우리 몇 일째?
        var timeDiff = now.getTime() - start.getTime();
        var day = Math.floor(timeDiff / (1000 * 60 * 60 * 24) + 1);
        $('#love').text(day + '일째');

        //기념일까지 남은 날짜는?
        var valentine = new Date('2021-02-14');
        var timeDiff2 = valentine.getTime() - now.getTime();
        var day2 = Math.floor(timeDiff2 / (1000 * 60 * 60 * 24) + 1);
        $('#valentine').text(day2 + '일 남음');

        //천일은 언제인가?
        var thousand = new Date(start.getTime() + 999 * (1000 * 60 * 60 * 24));
        var thousandDate = thousand.getFullYear() + '.' + (thousand.getMonth()+1) + '.' + thousand.getDate();
        $('#thousand-date').text(thousandDate);

        //기념일까지 남은 날짜는?
        var timeDiff3 = thousand.getTime() - now.getTime();
        var day3 = Math.floor(timeDiff3 / (1000 * 60 * 60 * 24) + 1);
        $('#thousand').text(day3 + '일 남음');
    </script>
</body>
</html>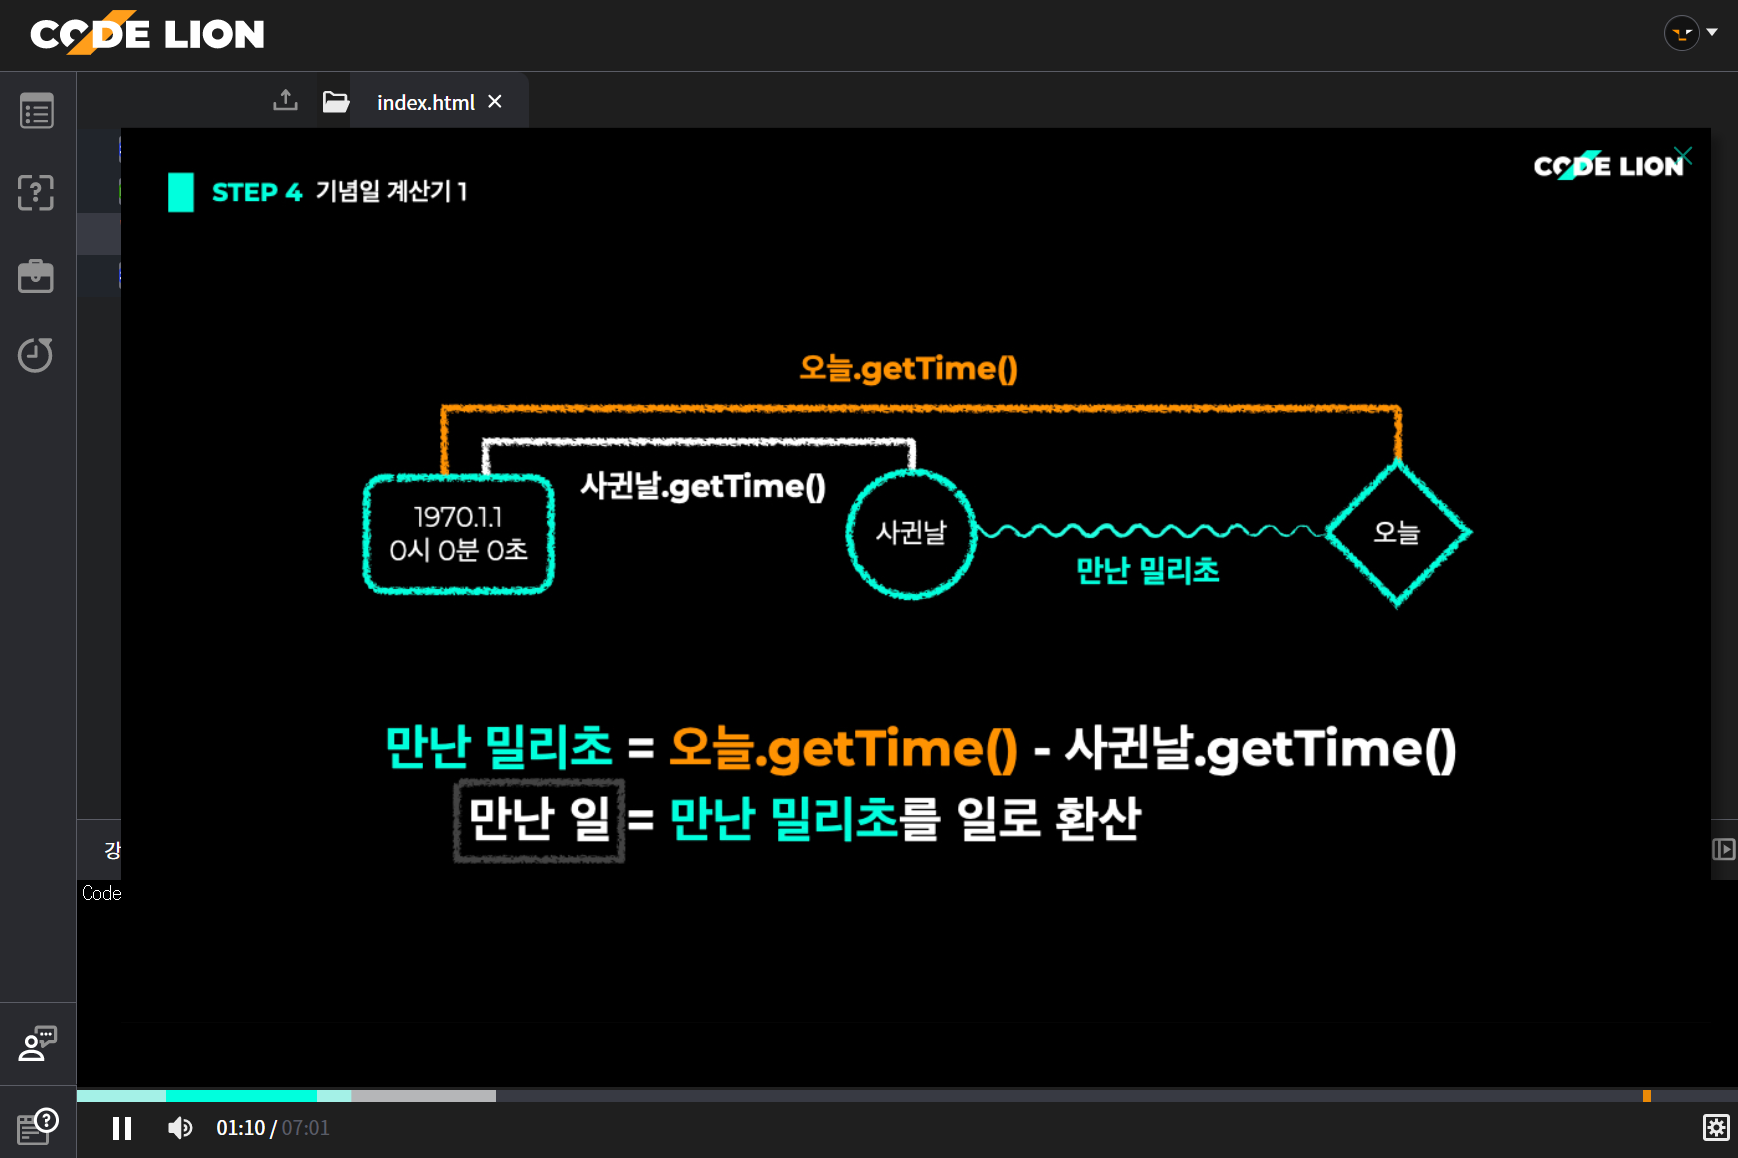
-
깃허브 가입
!!! 왜 깃허브를 가입하는지 알았다. 이렇게 공유하는 군. 굉장히 업무 효율적인 시스템인 것 같다. 개발자들만의 커뮤니티라니. 심지어 netlify 라는 것도 있구나. 정말 다른 세상의 문을 연 기분이다.이건 코딩한 것 업로드할 때 필요한 것
// 시작하기: git init
// 유저 이름 설정: git config --global user.name "codelion-jocoding"
// 이메일 등록: git config --global user.email #####@gmail.com
// 파일 추가: git add .
// 메세지 입력: git commit -m "first commit"
// 보낼 곳 등록: git remote add origin https://github.com/codelion-jocoding/myrepo.git
// 보낼 곳으로 코드 전송: git push origin master
아니 근데, 터미널 기능이 없으면 명령어 프롬프트로 하는 건가? 이 프로그램을 깔아서 가야하는 건가. 뭐였지. 까먹었다.