Android Studio With Kotlin 파해치기
MVVM 패턴
Model, View, ViewModel
- Model (Data 왔다갔다) DB랑 가까운애
- View (Client가 보는애)
- ViewModel (Service 로직 같은놈이다)
이해를 해보자
- manifests에 있는 AndroidManifest.xml에서 각 Activity가 선언된거 보고 Activity 들어감
- activity에 여기서 onCreate를 통해서 setContentView에 선언되어있는 xml(layout)을 띄움
- xml에서 동작을 하면 (ex)버튼클릭) ViewModel로 바로 보내버림
- ViewModel에서 비지니스 로직을 만듦 (Service처럼) 여기서 Model 호출 해서 가공
- 여기서 MutuableLiveData로 데이터를 담고, Activity에서 이걸 Observer로 ViewModel의 데이터가 바뀌는지 본다음 데이터를 xml에 다시 뿌림
3줄 요약
- Layout xml (html,css 합쳐진 느낌)이 ViewModel로 데이터 던지면
- ViewModel이 받아서 Model을 불러다가 데이터 가져오고
- Activity에서 받아가지고 xml에 다시 뿌림
View : Activity + xml (1쌍)
Model : DAO
ViewModel : Service같은놈 (javascript랑 비슷한거같음)
1. AndroidManifest.xml
activity 태그의 android:name=""만 잘보면 됨
맨위에 .member.activity.LoginActivity 있으니 LoginActivity 소환
<?xml version="1.0" encoding="utf-8"?>
<manifest xmlns:android="http://schemas.android.com/apk/res/android"
    xmlns:tools="http://schemas.android.com/tools">

    <uses-permission android:name="android.permission.INTERNET" />
    <application
        android:allowBackup="true"
        android:dataExtractionRules="@xml/data_extraction_rules"
        android:fullBackupContent="@xml/backup_rules"
        android:icon="@mipmap/ic_launcher"
        android:label="@string/app_name"
        android:roundIcon="@mipmap/ic_launcher_round"
        android:supportsRtl="true"
        android:theme="@style/Theme.Tp02"
        tools:targetApi="31">
        <!-- Login Activity -->
        <activity
            android:name=".member.activity.LoginActivity"
            android:exported="true">
            <intent-filter>
                <action android:name="android.intent.action.MAIN" />

                <category android:name="android.intent.category.LAUNCHER" />
            </intent-filter>
        </activity>
        <!-- Register Activity -->
        <activity
            android:name=".member.activity.RegisterActivity"
            android:exported="true"/>
        <activity
            android:name=".board.activity.BoardMainActivity"
            android:exported="true"/>
        <activity android:name=".board.activity.BoardModifyActivity"
            android:exported="true"/>
        <activity android:name=".board.activity.BoardDetailActivity"
            android:exported="true"/>
        <activity android:name=".board.activity.BoardWriteActivity"
            android:exported="true"/>
    </application>

</manifest>
LoginActivity.kt
activity_login.xml이랑 한쌍이라 보면 된다.
package com.example.tp02.member.activity

//view
class LoginActivity : AppCompatActivity() {
    private lateinit var binding: ActivityLoginBinding
    private lateinit var memberViewModel: MemberViewModel

    override fun onCreate(savedInstanceState: Bundle?) { // 맨처음 동작
        super.onCreate(savedInstanceState)
        binding = DataBindingUtil.setContentView(this, R.layout.activity_login)

        // Retrofit 클라이언트 생성
        val retrofit = Retrofit.Builder()
            .baseUrl("http://10.0.2.2:8080/")
            .addConverterFactory(GsonConverterFactory.create())
            .build()
        // MemberApiService 인스턴스 생성
        val memberApiService = retrofit.create(MemberApiService::class.java)

        // LoginViewModel 인스턴스 생성 및 MemberApiService 주입
        memberViewModel = MemberViewModel(memberApiService)

        // DataBinding 설정
        binding.memberViewModel = memberViewModel
        // 로그인 결과를 관찰하여 UI 업데이트
        memberViewModel.loginResult.observe(this, Observer { success ->
            if (success) { //로그인 성공시 로직
                showToast("로그인 성공")
                goBoardMainActivity()
            } else {
                showToast("로그인 실패")
            }
        })
        binding.buttonRegister.setOnClickListener {
            goRegisterActivity()
        }
    }
    private fun showToast(message: String) {
        Toast.makeText(this,message, Toast.LENGTH_SHORT).show()
    }

    private fun goRegisterActivity() {
        val intent = Intent(this, RegisterActivity::class.java)
        startActivity(intent)
    }

    private fun goBoardMainActivity() {
        val intent = Intent(this, BoardMainActivity::class.java)
        startActivity(intent)
    }
}
- Intent는 다른 Activity 호출
- Toast는 alert같이 화면에 메시지 띄움
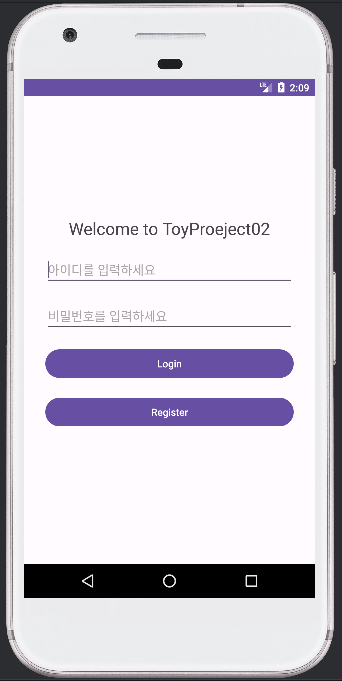
activity_login.xml
Data 태그는 DataBinding이라고 하는데 Gradle에서 추가 필요
여기서 입력한 데이터를 컨트롤러로 보내듯 ViewModel로 보내기 위함
<?xml version="1.0" encoding="utf-8"?>
<layout xmlns:android="http://schemas.android.com/apk/res/android">

    <data>
        <import type="android.view.View"/>
        <variable
            name="memberViewModel"
            type="com.example.tp02.member.viewmodel.MemberViewModel" />
    </data>

    <LinearLayout
        android:layout_width="match_parent"
        android:layout_height="match_parent"
        android:orientation="vertical"
        android:gravity="center">
        <!-- 로그인 화면 제목 -->
        <TextView
            android:id="@+id/text_title"
            android:layout_width="wrap_content"
            android:layout_height="wrap_content"
            android:text="Welcome to ToyProeject02"
            android:textSize="24sp"
            android:layout_centerHorizontal="true" />

        <!-- 이메일 입력란 -->
        <EditText
            android:id="@+id/edit_user_id"
            android:layout_width="match_parent"
            android:layout_height="wrap_content"
            android:hint="아이디를 입력하세요"
            android:inputType="text"
            android:layout_marginTop="20dp"
            android:layout_marginStart="30dp"
            android:layout_marginEnd="30dp" />

        <!-- 비밀번호 입력란 -->
        <EditText
            android:id="@+id/edit_password"
            android:layout_width="match_parent"
            android:layout_height="wrap_content"
            android:hint="비밀번호를 입력하세요"
            android:inputType="textPassword"
            android:layout_marginTop="20dp"
            android:layout_marginStart="30dp"
            android:layout_marginEnd="30dp" />

        <!-- 로그인 버튼 -->
        <Button
            android:id="@+id/button_login"
            android:layout_width="match_parent"
            android:layout_height="wrap_content"
            android:text="Login"
            android:onClick="@{() -> memberViewModel.clickLoginBtn(editUserId.getText().toString(), editPassword.getText().toString())}"
            android:layout_marginTop="20dp"
            android:layout_marginStart="30dp"
            android:layout_marginEnd="30dp" />

        <!-- 회원가입 링크 -->
        <Button
            android:id="@+id/button_register"
            android:layout_width="match_parent"
            android:layout_height="wrap_content"
            android:text="Register"
            android:layout_marginTop="20dp"
            android:layout_marginStart="30dp"
            android:layout_marginEnd="30dp" />

        <TextView
            android:id="@+id/message_fail"
            android:layout_width="wrap_content"
            android:layout_height="wrap_content"
            android:text="로그인 실패"
            android:visibility="invisible" />
    </LinearLayout>
</layout>
- 시연 화면
RegisterActivity.kt
- 회원가입 버튼 (Register)를 누르면 goRegisterActivity() 가 동작함
package com.example.tp02.member.activity
class RegisterActivity : AppCompatActivity() {
private lateinit var binding : ActivityRegisterBinding
private lateinit var memberViewModel: MemberViewModel
override fun onCreate(savedInstanceState: Bundle?) {
super.onCreate(savedInstanceState)
binding = DataBindingUtil.setContentView(this, R.layout.activity_register)
// Retrofit 클라이언트 생성 (API 관련 옵션)
val retrofit = Retrofit.Builder()
.baseUrl("http://10.0.2.2:8080/")
.addConverterFactory(GsonConverterFactory.create())
.build()
// MemberApiService 인스턴스 생성
val memberApiService = retrofit.create(MemberApiService::class.java)
memberViewModel = MemberViewModel(memberApiService)
//binding 설정
binding.memberViewModel = memberViewModel
memberViewModel.checkIdResult.observe(this, Observer {success ->
if(success) {
showToast("사용가능한 아이디입니다")
binding.buttonSignup.isEnabled = true
binding.buttonIdCheck.isEnabled = false
} else {
showToast("아이디 중복체크 실패")
binding.buttonSignup.isEnabled = false
binding.buttonIdCheck.isEnabled = true
}
})
memberViewModel.registerResult.observe(this, Observer { success ->
if(success) {
showToast("회원가입 성공")
goLoginActivity()
} else {
showToast("회원가입 실패")
}
})
}
private fun showToast(message: String) {
Toast.makeText(this,message, Toast.LENGTH_SHORT).show()
}
private fun goLoginActivity() {
val intent = Intent(this, LoginActivity::class.java)
startActivity(intent)
}
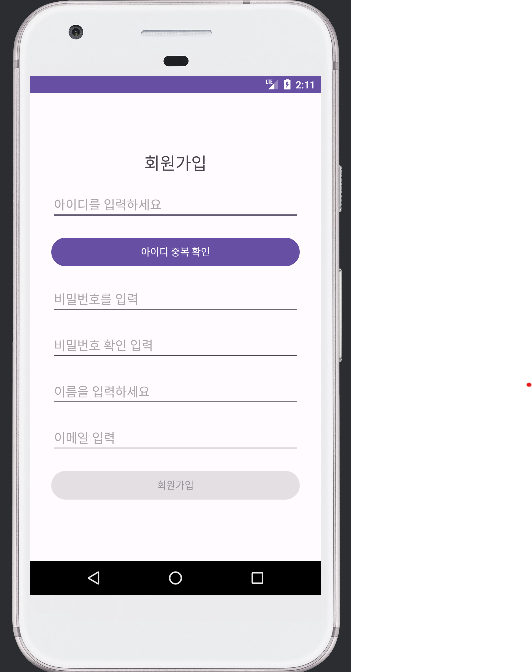
}activity_register.xml
- 눈치챈 사람도 있겠지만 여러 xml과 Activity에서 같은ViewModel을 호출하는데
한꺼번에 여러개를 받아서 처리 하도록 하는게 MVP와 가장 큰 차이인 MVVM 패턴이다.
<?xml version="1.0" encoding="utf-8"?>
<layout xmlns:android="http://schemas.android.com/apk/res/android">

    <data>
        <import type="android.view.View"/>
        <variable
            name="memberViewModel"
            type="com.example.tp02.member.viewmodel.MemberViewModel" />
    </data>

    <LinearLayout
        android:layout_width="match_parent"
        android:layout_height="match_parent"
        android:orientation="vertical"
        android:gravity="center">

        <TextView
            android:id="@+id/text_title"
            android:layout_width="wrap_content"
            android:layout_height="wrap_content"
            android:text="회원가입"
            android:textSize="24sp"
            android:layout_centerHorizontal="true" />

        <EditText
            android:id="@+id/edit_user_id"
            android:layout_width="match_parent"
            android:layout_height="wrap_content"
            android:maxLength="10"
            android:hint="아이디를 입력하세요"
            android:inputType="text"
            android:layout_marginTop="20dp"
            android:layout_marginStart="30dp"
            android:layout_marginEnd="30dp" />

        <Button
            android:id="@+id/button_id_check"
            android:layout_width="match_parent"
            android:layout_height="wrap_content"
            android:text="아이디 중복 확인"
            android:onClick="@{() -> memberViewModel.clickIdCheckBtn(editUserId.getText().toString())}"
            android:layout_marginTop="20dp"
            android:layout_marginStart="30dp"
            android:layout_marginEnd="30dp"
            android:enabled="true"/>
        <!-- 비밀번호 입력란 -->
        <EditText
            android:id="@+id/edit_password"
            android:layout_width="match_parent"
            android:layout_height="wrap_content"
            android:maxLength="10"
            android:hint="비밀번호를 입력"
            android:inputType="textPassword"
            android:layout_marginTop="20dp"
            android:layout_marginStart="30dp"
            android:layout_marginEnd="30dp" />

        <EditText
            android:id="@+id/edit_password_check"
            android:layout_width="match_parent"
            android:layout_height="wrap_content"
            android:maxLength="10"
            android:hint="비밀번호 확인 입력"
            android:inputType="textPassword"
            android:layout_marginTop="20dp"
            android:layout_marginStart="30dp"
            android:layout_marginEnd="30dp" />

        <EditText
            android:id="@+id/edit_user_name"
            android:layout_width="match_parent"
            android:layout_height="wrap_content"
            android:maxLength="10"
            android:hint="이름을 입력하세요"
            android:inputType="text"
            android:layout_marginTop="20dp"
            android:layout_marginStart="30dp"
            android:layout_marginEnd="30dp" />

        <EditText
            android:id="@+id/edit_user_email"
            android:layout_width="match_parent"
            android:layout_height="wrap_content"
            android:maxLength="30"
            android:hint="이메일 입력"
            android:inputType="textEmailAddress"
            android:layout_marginTop="20dp"
            android:layout_marginStart="30dp"
            android:layout_marginEnd="30dp" />

        <Button
            android:id="@+id/button_signup"
            android:layout_width="match_parent"
            android:layout_height="wrap_content"
            android:text="회원가입"
            android:onClick="@{() -> memberViewModel.clickRegisterBtn(editUserId.getText().toString(),editPassword.getText().toString(),editUserName.getText().toString(),editUserEmail.getText().toString())}"
            android:layout_marginTop="20dp"
            android:layout_marginStart="30dp"
            android:layout_marginEnd="30dp"
            android:enabled="false" />
    </LinearLayout>
</layout>
MemberViewModel.kt
원래 Model과 연동을 하지만 기존에 SpringBoot에서 개발했던 RESTAPI와 결합을 하여 API를 주고 받는 형태이다.
package com.example.tp02.member.viewmodel

//Service같은 놈
class MemberViewModel(private val memberApiService: MemberApiService) {

    private val _loginResult = MutableLiveData<Boolean>()
    val loginResult:LiveData<Boolean>get() = _loginResult

    private val _checkIdResult = MutableLiveData<Boolean>()
    val checkIdResult:LiveData<Boolean>get() = _checkIdResult

    private val _registerResult = MutableLiveData<Boolean>()
    val registerResult:LiveData<Boolean>get() = _registerResult

    //xml에서 다이렉트로 들어옴
    fun clickLoginBtn(userId: String, userPasswd: String) {
        val memberDTO = MemberDTO(ur_id = userId, ur_passwd = userPasswd)
        callLoginApi(memberDTO)
    }

    fun clickIdCheckBtn(userId: String) {
        val ur_id = userId
        callCheckIdDuplicationApi(ur_id)
    }

    fun clickRegisterBtn(userId: String, userPasswd: String, userEmail:String, userName:String) {
        val memberDTO = MemberDTO(ur_id = userId, ur_passwd = userPasswd, ur_email = userEmail, ur_name = userName)
        callRegisterMemberApi(memberDTO)
    }

    //로그인 성공여부 API
    private fun callLoginApi(memberDTO: MemberDTO) {
        CoroutineScope(Dispatchers.IO).launch {
            val result = runCatching {
                val response = memberApiService.loginApi(memberDTO)
                if (response.isSuccessful) {
                    val responseBody = response.body()
                    if (responseBody != null) {
                        val loginResult = responseBody["result"] as String
                        if (loginResult == "success") {
                            println("로그인 성공!!!")
                            Log.d("result","로그인 성공!!!")
                            _loginResult.postValue(true)
                            // 로그인 성공 시 처리할 로직
                        } else {
                            println("로그인 실패: ${responseBody["message"]}")
                            Log.d("result","로그인 실패!!!")
                            _loginResult.postValue(false)
                            // 로그인 실패 시 처리할 로직
                        }
                    } else {
                        println("API 응답이 올바르지 않습니다.")
                        Log.d("result","API 응답이 올바르지 않습니다.!!!")
                        // API 응답이 올바르지 않은 경우 처리할 로직
                        _loginResult.postValue(false)
                    }
                } else {
                    println("API 호출 실패: ${response.message()}")
                    Log.d("result","API 호출 실패!!!")
                    _loginResult.postValue(false)
                    // API 호출 실패 시 처리할 로직
                }
            }
            result.onFailure { e ->
                println("네트워크 오류 발생: ${e.message}")
                // 네트워크 오류 등 예외 발생 시 처리할 로직
                _loginResult.postValue(false)
            }
        }
    }

    //아이디 중복체크 API
    private fun callCheckIdDuplicationApi(ur_id : String) {
        CoroutineScope(Dispatchers.IO).launch {
            val result = runCatching {
                val response = memberApiService.checkIdDuplicationApi(ur_id)
                if (response.isSuccessful) {
                    val responseBody = response.body()
                    if (responseBody != null) {
                        val loginResult = responseBody["result"] as String
                        if (loginResult == "success") {
                            Log.d("result","사용가능한 아이디입니다.")
                            _checkIdResult.postValue(true)
                            // 로그인 성공 시 처리할 로직
                        } else {
                            Log.d("result","${response.message()}")
                            _checkIdResult.postValue(false)
                            // 로그인 실패 시 처리할 로직
                        }
                    } else {
                        Log.d("result","API 응답이 올바르지 않습니다.!!!")
                        // API 응답이 올바르지 않은 경우 처리할 로직
                        _checkIdResult.postValue(false)
                    }
                } else {
                    Log.d("result","API 호출 실패!!! ${response.message()}")
                    _checkIdResult.postValue(false)
                    // API 호출 실패 시 처리할 로직
                }
            }
            result.onFailure { e ->
                Log.d("네트워크 오류 발생:", "${e.message}")
                // 네트워크 오류 등 예외 발생 시 처리할 로직
                _checkIdResult.postValue(false)
            }
        }
    }

    private fun callRegisterMemberApi(memberDTO : MemberDTO) {
        CoroutineScope(Dispatchers.IO).launch {
            val result = runCatching {
                val response = memberApiService.registerMember(memberDTO)
                if (response.isSuccessful) {
                    val responseBody = response.body()
                    if (responseBody != null) {
                        val loginResult = responseBody["result"] as String
                        if (loginResult == "success") {
                            Log.d("result","회원가입 성공!!!")
                            _registerResult.postValue(true)
                            // 로그인 성공 시 처리할 로직
                        } else {
                            Log.d("result","${response.message()}")
                            _registerResult.postValue(false)
                            // 로그인 실패 시 처리할 로직
                        }
                    } else {
                        Log.d("result","API 응답이 올바르지 않습니다.!!!")
                        // API 응답이 올바르지 않은 경우 처리할 로직
                        _registerResult.postValue(false)
                    }
                } else {
                    Log.d("result","API 호출 실패!!!")
                    _registerResult.postValue(false)
                    // API 호출 실패 시 처리할 로직
                }
            }
            result.onFailure { e ->
                Log.d("네트워크 오류 발생:", "${e.message}")
                // 네트워크 오류 등 예외 발생 시 처리할 로직
                _registerResult.postValue(false)
            }
        }
    }
}
MemberDTO.kt
DTO 쯤은 Easy
package com.example.tp02.member.dto

import java.sql.Date

data class MemberDTO(
    val ur_no: Int? = 0,
    val ur_id: String? = null,
    val ur_passwd: String? = null,
    val ur_name: String? = null,
    val ur_email: String? = null,
    val ur_birth_date: Date? = null,
    val ur_reg_date: Date? = null
)
MemberApiService.kt
- 왠지 Mapper와 비슷하지 않은가? (MyBatis) 기존에 개발했던 SpringBoot쪽에 연동시키기 위함이다.
package com.example.tp02.member.api

import com.example.tp02.member.dto.MemberDTO

interface MemberApiService {

    @POST("/api/member/login")
    suspend fun loginApi(@Body memberDTO: MemberDTO): Response<Map<String, Object>>

    @GET("/api/member/duplication")
    suspend fun checkIdDuplicationApi(@Query("ur_id") ur_id : String): Response<Map<String,Object>>

    @POST("/api/member/register")
    suspend fun registerMember(@Body memberDTO: MemberDTO):Response<Map<String, Object>>
}
MVVM의 패턴의 핵심은 역시 ViewModel이 꽃인것 같다.

BackEnd 개발자