
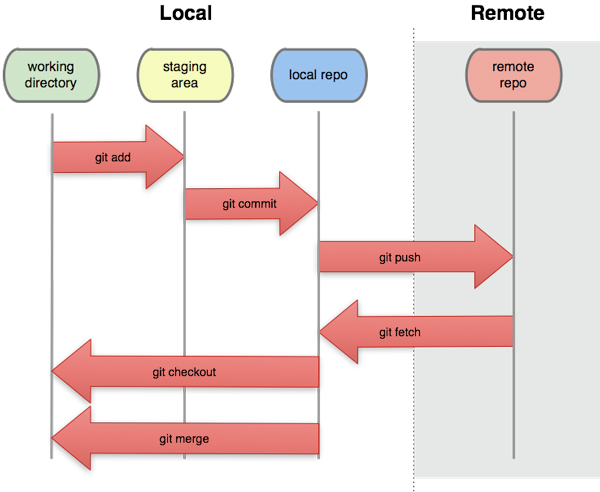
0. git process flow
1. git clone
$git clone repository주소
e.g) git clone https://github.com/noogoolgga/shipsa.git
$git remote -v로 원격저장소에 연결이 되어있는지 확인하자.- 연결이 안되어 있다면
$git remote add <repositoryname> <repositoryrurl>- e.g)
$git remote add origin https://github.com/noogoolgga/shipsa.git을 통해 원격 저장소와 연결할 수 있다.
- e.g)
$git remote remove origin을 통해 연결되어있는 원격저장소를 끊을 수 있다.
2. branch
2-1. 현재 branch 확인하기
$git branch 로컬 브랜치 목록 조회
$git branch -r 원격 브랜치 목록 조회
$git branch -a 모든 브랜치 목록 조회
2-2. branch 생성하기
$git branch branch이름으로 branch 생성
e.g) $git branch noogoolggabranch1
$mkdir foldername와 비슷한 맥락
2-3. branch 이동하기
$git checkout branch branch이름
e.g) $git checkout noogoolggabranch1
$cd noogoolggabranch1과 비슷한 맥락
3.폴더에 파일을 만들어 넣어준 후
4. add
4-1. working directory의 변경 내용의 일부만 스테이징 영역에 넘기고 싶을때
(스테이징이란? - working directory와 Git repository 사이의 징검다리 역할)
$git add <파일이름/디렉토리경로>
4-2. 현재 디렉토리의 모든 변경 내용을 스테이징 영역으로 싶을때
$git add .
4-3. working directory 내의 모든 변경 내용을 전부 스테이징 영역으로 넘기고 싶을때
$git add -A
4-4. 변경된 코드들의 파일을 하나씩 보여주고 해당 파일을 스테이지에 올릴 것인지, 올리지 않을것인지 선택하고 싶을때
$git add -p
5. commit
메세지는 상세할수록 좋다
$git commit -m "메세지"
6. push
$git push <저장소이름> <branch이름>
e.g) $git push origin noogoolggabranch1
origin이라는 원격 저장소에 올라가게 된다.