

참고자료 : https://reflectoring.io/getting-started-with-spring-webflux/
https://spring.io/guides/gs/reactive-rest-service/
Webflux란 무엇인가?
The original web framework included in the Spring Framework, Spring Web MVC, was purpose-built for the Servlet API and Servlet containers. The reactive-stack web framework, Spring WebFlux, was added later in version 5.0. It is fully non-blocking, supports Reactive Streams back pressure, and runs on such servers as Netty, Undertow, and Servlet containers.
공식 홈페이지에 따르면 Webflux는 non-blocking, reactive streams back pressure를 지원하는 스프링 프레임워크이다.
non-blocking 즉 비동기 방식을 지원한다는 것은 개념적으로 어렵지 않으나,
reactive streams back pressure는 도대체 무슨말일까?
Reactive
리액티브는 하나의 프로그래밍 패러다임이라고 볼 수 있다. non-blocking, 비동기, 이벤트 기반, 메시지 기반의 데이터 처리를 한다.
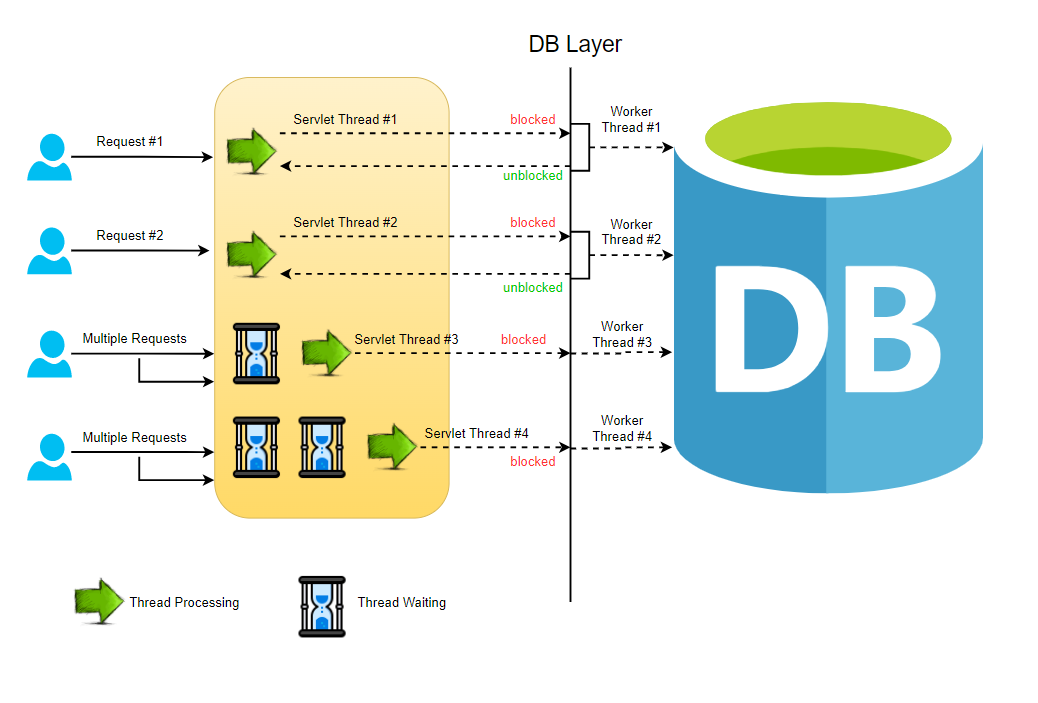
기존의 Blocking 형식의 리퀘스트는 서버에 리퀘스트가 전송될 때 마다, 서블릿 스레드가 생성되고, 워커(worker) 스레드에 작업을 위임한다. 워커 스레드가 처리를 하는동안 서블릿 스레드는 응답을 기다린다.
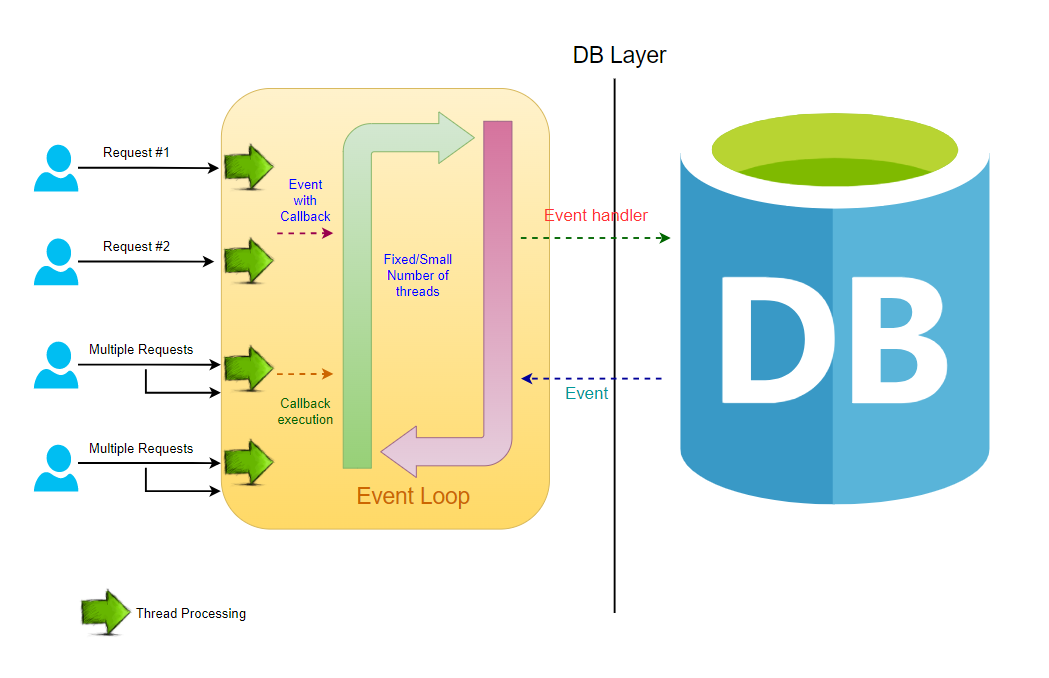
하지만 Non-Blockiing 리퀘스트의 경우 이벤트 핸들러와 콜백을 모든 요청에 포함한다. 요청 스레드는 스레드풀에 요청을 위임하고 다음 요청을 처리하는데 바로 사용될 수 있다. 핸들러 함수를 통해 요청이 완료되면 콜백함수에 전달한다.
Stream
스트림은 시스템으로 전송되는 일련의 데이터라고 할 수 있다. java8에서도 stream API가 등장하였고, 배열이나 컬렉션같은 일련의 데이터를 순차적으로 처리할 수 있게 해준다.
Back Pressure
사전적인 의미는 "흐름에 반대하는 저항 또는 힘"이다. 프로그래밍에서는 데이터 전송을 규제하는 메커니즘이다. Reactive Stream에서는 publisher에서 subscriber로 데이터를 전송할 때 pub -> sub으로 데이터를 push하는 것이 아닌, sub -> pub으로 구독자가 요청한 만큼씩 pull하는 방식이다.
예를 들어 서버 A에서 B로 1000개의 초당 요청을 보낸다고 할 때, B가 처리할 수 있는 최대는 800이다. 그러면 200에 대한 데이터를 처리하지 못하기에 서버 메모리 부족으로 요청이 실패가 될 것이다.
하지만 Back Pressure 전략을 사용하면 이러한 처리를 제어할 수 있다.
종합해보면 reactive streams back pressure 이란?
: Pub/Sub 구조로 연속된 데이터(요청)을 비동기적으로 처리하는 방식
위 개념을 염두해두고 정말 간단한 Reactive RESTful Web Service를 만들어보자.
간단한 Reactive Web Service 만들어보기
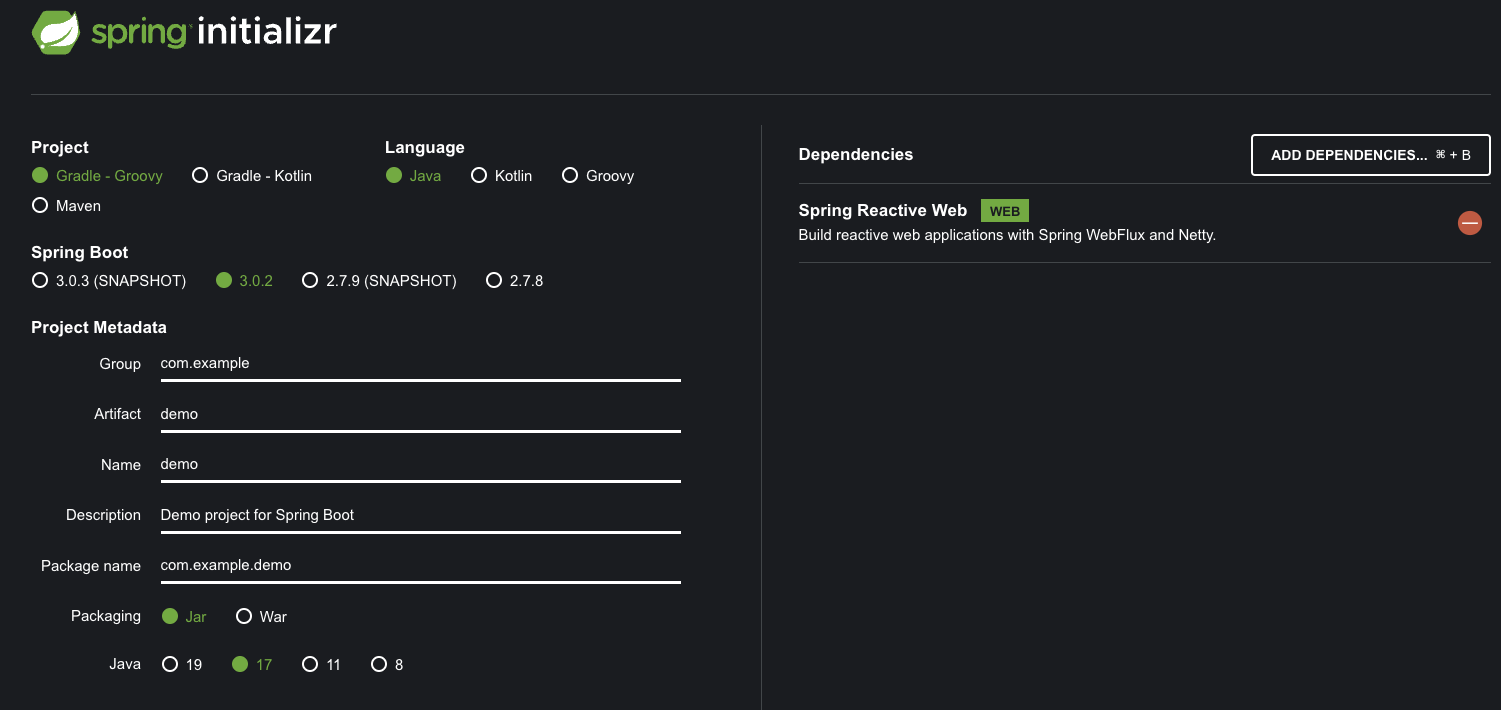
먼저 https://start.spring.io/ 에서 Spring Reactive Web 디펜던시를 추가하여 프로젝트를 하나 만들자.
먼저 POJO형식의 데이터 객체를 하나 만든다.
참고로 POJO(Plained Old Java Object) 란?
:getter, setter와 같은 기본적인 기능만 갖고 있는 가벼운 객체를 말한다.
package hello;


public class Greeting {

  private String message;

  public Greeting() {
  }

  public Greeting(String message) {
    this.message = message;
  }

  public String getMessage() {
    return this.message;
  }

  public void setMessage(String message) {
    this.message = message;
  }

  @Override
  public String toString() {
    return "Greeting{" +
        "message='" + message + '\'' +
        '}';
  }
}
그리고 요청을 처리할 핸들러를 만든다.
핸들러는 요청이 왔을 때 요청을 처리하는 역할을 한다.
package hello;

import org.springframework.http.MediaType;
import org.springframework.stereotype.Component;
import org.springframework.web.reactive.function.BodyInserters;
import org.springframework.web.reactive.function.server.ServerRequest;
import org.springframework.web.reactive.function.server.ServerResponse;

import reactor.core.publisher.Mono;

@Component
public class GreetingHandler {

  public Mono<ServerResponse> hello(ServerRequest request) {
    return ServerResponse.ok().contentType(MediaType.APPLICATION_JSON)
      .body(BodyInserters.fromValue(new Greeting("Hello, Spring!")));
  }
}
그리고 Router를 만든다.
라우터는 URI상의 path를 listen하고 핸들러에서 제공하는 값을 리턴한다.
package hello;

import org.springframework.context.annotation.Bean;
import org.springframework.context.annotation.Configuration;
import org.springframework.http.MediaType;
import org.springframework.web.reactive.function.server.RouterFunction;
import org.springframework.web.reactive.function.server.RouterFunctions;
import org.springframework.web.reactive.function.server.ServerResponse;

import static org.springframework.web.reactive.function.server.RequestPredicates.GET;
import static org.springframework.web.reactive.function.server.RequestPredicates.accept;

@Configuration(proxyBeanMethods = false)
public class GreetingRouter {

  @Bean
  public RouterFunction<ServerResponse> route(GreetingHandler greetingHandler) {

    return RouterFunctions
      .route(GET("/hello").and(accept(MediaType.APPLICATION_JSON)), greetingHandler::hello);
  }
}
그리고 spring boot application을 실행할 어플리케이션 객체를 만들어서 실행한다.
package hello;

import org.springframework.boot.SpringApplication;
import org.springframework.boot.autoconfigure.SpringBootApplication;
import org.springframework.context.ConfigurableApplicationContext;

@SpringBootApplication
public class Application {

  public static void main(String[] args) {
    ConfigurableApplicationContext context = SpringApplication.run(Application.class, args);
  }
}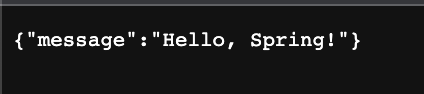
"Hello, Spring!"을 출력하는 Reactive WebService가 만들어졌다.
구조적으로 @Controller의 역할이 Router, Handler로 분리되었다고도 볼 수 있다.
그리고 Handler에서 Mono타입으로 값을 return 하는데, 이 Mono 타입이 webflux의 주요한 기능이라고 볼 수 있다.