지난 글에서는 ffmpeg로 영상의 규격과 포멧에 대해 다뤄봤습니다.
이번에는 영상 자체를 분석해야 하는 기능이 생겨, Google Video Intelligence API를 활용한 과정을 정리해 보려고 합니다.
상황
광고를 생성할 때 문구나 이미지를 입력하거나, 영상 자체를 업로드받아 광고를 제작합니다. 이 과정에서 유해성 검사나 소재 적합성 검사가 필수로 요구됩니다.
Google Video Intelligence API
구글에서 재공 API중에 영상을 검사해주는 API가 존재해서 사용하기 정했다.
Google에서 사용하기 때문에 Google Storage에 저장되어있는 영상 또는 이미지를 사용해서 객체 검사, 유해성 검사, 텍스트 검사를 할수있다.
해당 API에는 여러가지 기능이 존재하지만 이번에 사용할 기능은
- Explicit Detection (유해성 검사)
- Label Detection (객체 검사)
- Text Detection (텍스트 검사)
이렇게 3가지의 검사를 토대로 검사를 진행하고 결과를 보고서 형식으로 구현을 진행했습니다.
Explicit Detection
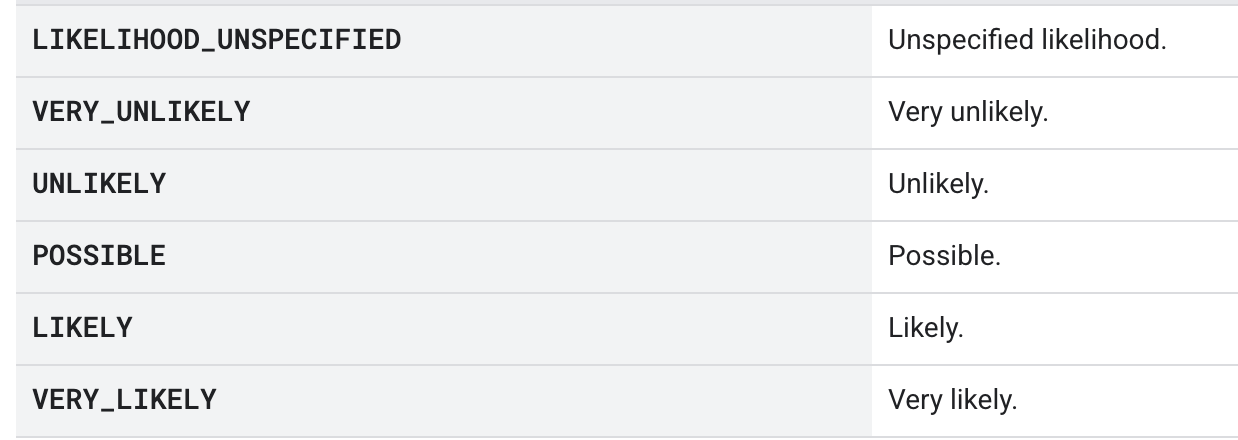
유해성 검사(Explicit Detection) 유해성 콘텐츠 여부를 확인하기 위해 사용합니다. 성인용 영상일 가능성을 6단계 Enum 값으로 반환하며, 각 프레임별로 그 확률을 제공합니다.
가능성의 값은 Enum으로 총 6 단계가 존재한다.
Label Detection
라벨 인식(Label Detection)은 단순히 영상 구간이나 장면에 어떤 객체·행동·개념이 등장하는지를 경계 상자 없이 라벨로만 제공하는 반면, 객체 추적(Object Tracking)은 동일한 객체 인스턴스를 시간축 전반에 걸쳐 프레임별 경계 상자와 함께 추적하며 라벨을 부여한다는 차이가 있습니다.
Text Detection
텍스트 감지(Text Detection)은 OCR(광학 문자 인식, Optical Character Recognition) 기술을 활용해 영상 속 자막, 간판, 문서 등에 나타나는 텍스트를 프레임 단위로 탐지·인식하고, 그 텍스트의 내용과 위치 좌표를 함께 제공합니다.
다만 프레임 단위로 감지되다 보니 같은 텍스트가 중복 탐지되는 경우가 많습니다. 이를 해결하기 위해 Levenshtein 알고리즘을 적용해 유사한 텍스트를 묶고, 대표 텍스트만 남기는 방식으로 개선했습니다.
코드 설명
우선 사용자의 정보를 인증 정보를 설정하고 사용할 기능을 추가해야한다, 해당 기능을 사용하기 위해서는 google의 API키를 발급받아서 사용해야한다.
const client = new VideoIntelligenceServiceClient();

  const request: protos.google.cloud.videointelligence.v1.IAnnotateVideoRequest =
      {
        inputUri: gcsUri,
        features: [
          protos.google.cloud.videointelligence.v1.Feature
            .EXPLICIT_CONTENT_DETECTION,
          protos.google.cloud.videointelligence.v1.Feature.LABEL_DETECTION,
          protos.google.cloud.videointelligence.v1.Feature.TEXT_DETECTION,
        ],
      };
다음 Google Cloud Video Intelligence API에 비디오 분석 요청을 보낸다
비동기(long-running) 작업으로 동작하기 때문에, 바로 결과를 주지 않고 operation 객체를 반환함
operation은 이 작업이 지금 돌고 있고, 나중에 결과를 받을 수 있는 promis 핸들러
operation이 끝날 때까지 기다린 뒤, 실제 결과(operationResult)들을 가져온다
    // Execute the request
    const [operation] = await client.annotateVideo(request);

    console.log('Waiting for video analysis to complete...');

    const [operationResult] = await operation.promise();
다음 각각 기능들에서 결과값들을 가져온다.
const explicitContentResults =
      operationResult.annotationResults?.[0]?.explicitAnnotation;

    const labelContentAnnotation =
      operationResult.annotationResults?.[0].segmentLabelAnnotations;

    const textContentAnnotation =
      operationResult.annotationResults?.[0].textAnnotations;
이제 원하는 값들을 가져오면되는데, explicit 유해성 검사에서는 해당 frame의 시간과 가능성 값을 출력한다.
 const explicitResults = explicitContentResults.frames.map((frame) => {
      const seconds = frame.timeOffset?.seconds ?? 0;
      const nanos = frame.timeOffset?.nanos ?? 0;

      const likelihood =
        typeof frame.pornographyLikelihood === 'number'
          ? likelihoods[frame.pornographyLikelihood]
          : 'UNKNOWN';

      return {
        time: `${seconds}.${(nanos / 1e6).toFixed(0)}s`,
        pornographyLikelihood: likelihood,
      };
    });
label detection에서는 해당 객체의 설명과 객체가 인식되는 시간을표기해서 출력한다.
    const labelContentResult = labelContentAnnotation?.map((label) => {
      console.log(`Label ${label?.entity?.description} occurs at:`);
      if (label && label.segments) {
        return {
          label: label?.entity?.description,
          time: label.segments.map((segment) => {
            const time =
              segment.segment as protos.google.cloud.videointelligence.v1.IVideoSegment;
            const startTime = time.startTimeOffset;
            const endTime = time.endTimeOffset;
            if (startTime && endTime) {
              if (startTime.seconds === undefined) {
                startTime.seconds = 0;
              }
              if (startTime.nanos === undefined) {
                startTime.nanos = 0;
              }
              if (endTime.seconds === undefined) {
                endTime.seconds = 0;
              }
              if (endTime.nanos === undefined) {
                endTime.nanos = 0;
              }
              return {
                start:
                  `\tStart: ${startTime.seconds}` +
                  `.${(startTime.nanos || 0 / 1e6).toFixed(0)}s`,
                end:
                  `\tEnd: ${endTime.seconds}.` +
                  `${(endTime.nanos || 0 / 1e6).toFixed(0)}s`,
                confidence: `\tConfidence: ${segment.confidence}`,
              };
            }
          }),
        };
      }
    });
텍스트는 프레임 단위로 탐지되므로 너무 많은 결과가 발생합니다.
따라서 Levenshtein 알고리즘을 사용해 유사한 텍스트를 그룹화하고, 대표 텍스트만 출력하도록 개선했습니다.
(Levenshtein 알고리즘에 대한 자세한 설명은 별도의 글에서 다루겠습니다.)
최종 결과물
영상 검사
결과 보고서
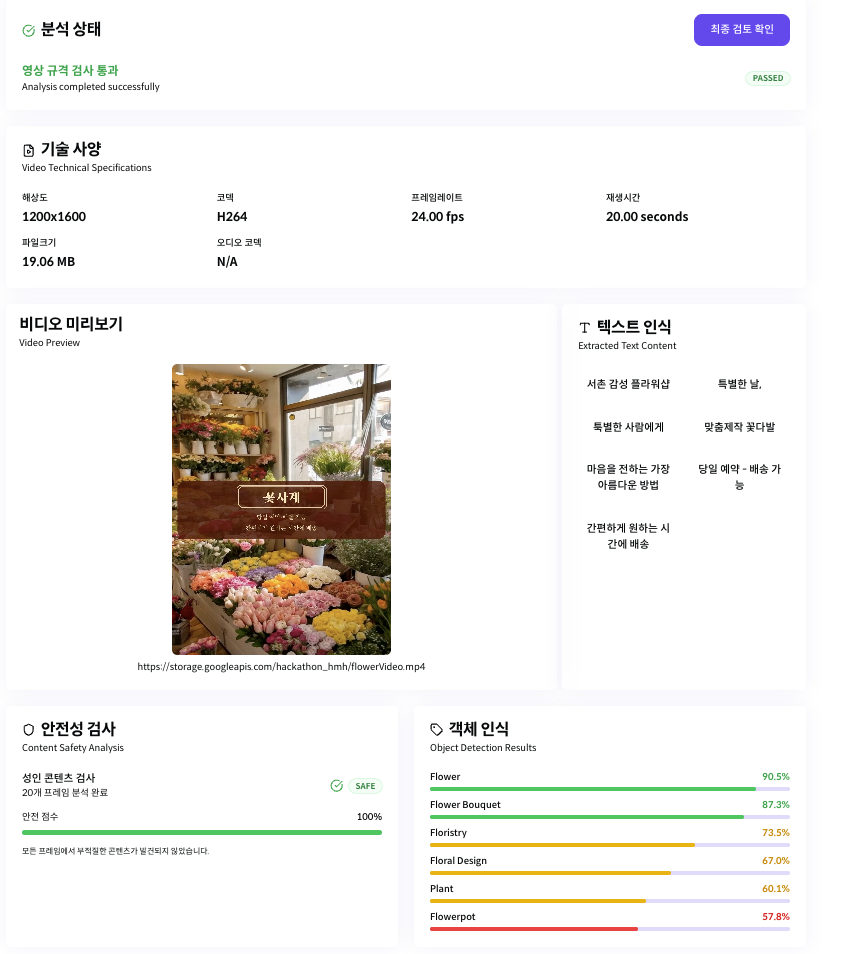
이번 글에서는 Google Video Intelligence API를 이용해 영상 내부 정보를 분석하고,
유해성 콘텐츠 검사, 객체 및 개념 라벨 검출, 텍스트 인식 (OCR 기반) 을 수행한 뒤 결과를 가공해 보고서 형태로 만드는 과정을 살펴봤습니다.
다음 글에서는 텍스트 중복 문제를 해결한 Levenshtein 알고리즘 적용에 대해 더 자세히 정리해 보겠습니다.