오늘은 도보 내비게이션 을 만들었던 경험을 기록하려고 한다.
1. 요구 및 구현사항
네이버 지도 활용한 도보 길찾기 기능이 필요하다.
React native 에서 네이버 지도를 사용하여 도보 길찾기 기능을 구현 해달라니...
기능만 들어도 정말 설레이는 도전적인 내용이다! 우선은 라이브러리 탐색부터 시작했다.
2. 네이버 맵 라이브러리 사용하기
네이티브 SDK? 네이버 맵 라이브러리?
우선 네이티브 SDK 개발을 할지 react-native-naver-map 라이브러리를 사용할지 고민하다가 기능 구현을 위한 일정이 촉박한 상황임을 고려해봤을때 라이브러리를 사용하는 것으로 결정하였다.
최근에 관리가 되고있는지를 중요시하여 아래 라이브러리를 사용하기로 했다. 자세한 셋팅 방법이 repo 의 README 에 매우 상세하게 정리되어 있어 수월하게 셋팅 하였다.
https://github.com/mym0404/react-native-naver-map
결과보기
지도위에 경로 표현하기
NaverMapView 의 기본 셋팅 및 코드는 생략하고 경로를 표시하기 위해서 어떤 설정들이 필요하지만 보도록 하겠다.
import {
  MapType,
  NaverMapMarkerOverlay,
  NaverMapPathOverlay,
  NaverMapPolygonOverlay,
  NaverMapView,
} from '@mj-studio/react-native-naver-map';


const MapScreen = () => {
  const DEFAULT_MAP_OPTIONS = {
    mapType: 'Basic' as MapType,
    isIndoorEnabled: true,
    symbolScale: 1,
    lightness: 0,
    isShowCompass: false,
    isShowScaleBar: false,
    isShowZoomControls: true,
    isExtentBoundedInKorea: true,
  };

  const patternInterval = Platform.OS === 'ios' ? 20 : 40;

  return (
    <Wrapper>
      <NaverMapView ref={mapRef} camera={camera} locale={language} {...DEFAULT_MAP_OPTIONS} style={{flex: 1}}>
        <NaverMapPathOverlay
          coords={walkPath}
          width={6}
          color={colors.primary_50}
          outlineColor={colors.primary_70}
          outlineWidth={2}
          patternImage={require('@/assets/image/ic_pattern_arrow.png')}
          patternInterval={patternInterval}
        />
        ...
      </NaverMapView>
    </Wrapper>
  );
};

const Wrapper = styled.View`
  flex: 1;
`;

export default MapScreen;
NaverMapView 내부에 NaverMapPathOverlay 를 포함한다. NaverMapPathOverlay 는 coords prop 에 특정 데이터를 넣어주면 그 좌표대로 경로를 그려준다. 그려지는 경로에 대해서 다양한 커스텀을 지원하고 있다.
- coords: 그려질 경로의 좌표 데이터
- width: 경로 선의 width 값
- color: 경로의 메인 color
- outlineColor: 경로의 outlineColor
- outlineWidth: 경로의 outlineWidth 값
- patternImage: 경로 내부에 반복적으로 넣을 이미지 이다. 보통은 화살표 이미지로 사용하고 png 형식이다. 만약 화살표 이미지를 사용 할것이라면 이미지의 12시 방향이 화살표의 끝이어야 한다.
- patternInterval: 반복될 patternImage 의 간격을 의미힌다. ios 랑 android 랑 같은 값을 넣으면 차이가 꽤 발생하니 분기를 해주는 것이 좋다.
  routeList: [
    {latitude: 37.54577620087599, longitude: 126.91191808737676},
    {latitude: 37.545839549972854, longitude: 126.91122843431248},
    ...
  ]
coords 데이터의 형식은 위와 같다. 데이터로 유추해보면 latitude, longitude 포함한 하나의 객체가 Point 가 되고 그 포인트 사이를 Line 으로 그려주는 방식으로 경로를 표현하는듯 하다.
근데 당장 테스트를 위한 위경도 값을 어떻게 얻어야 하나...
다행히도 똑똑한 사람들이 이미 훌륭한 툴을 만들어 두었다.
https://geojson.io 사이트에 들어가서 그리기 도구를 이용하여 지도위에 경로, 다각형, 원 등등을 그리면 그린대로 위경도 값을 알려준다.
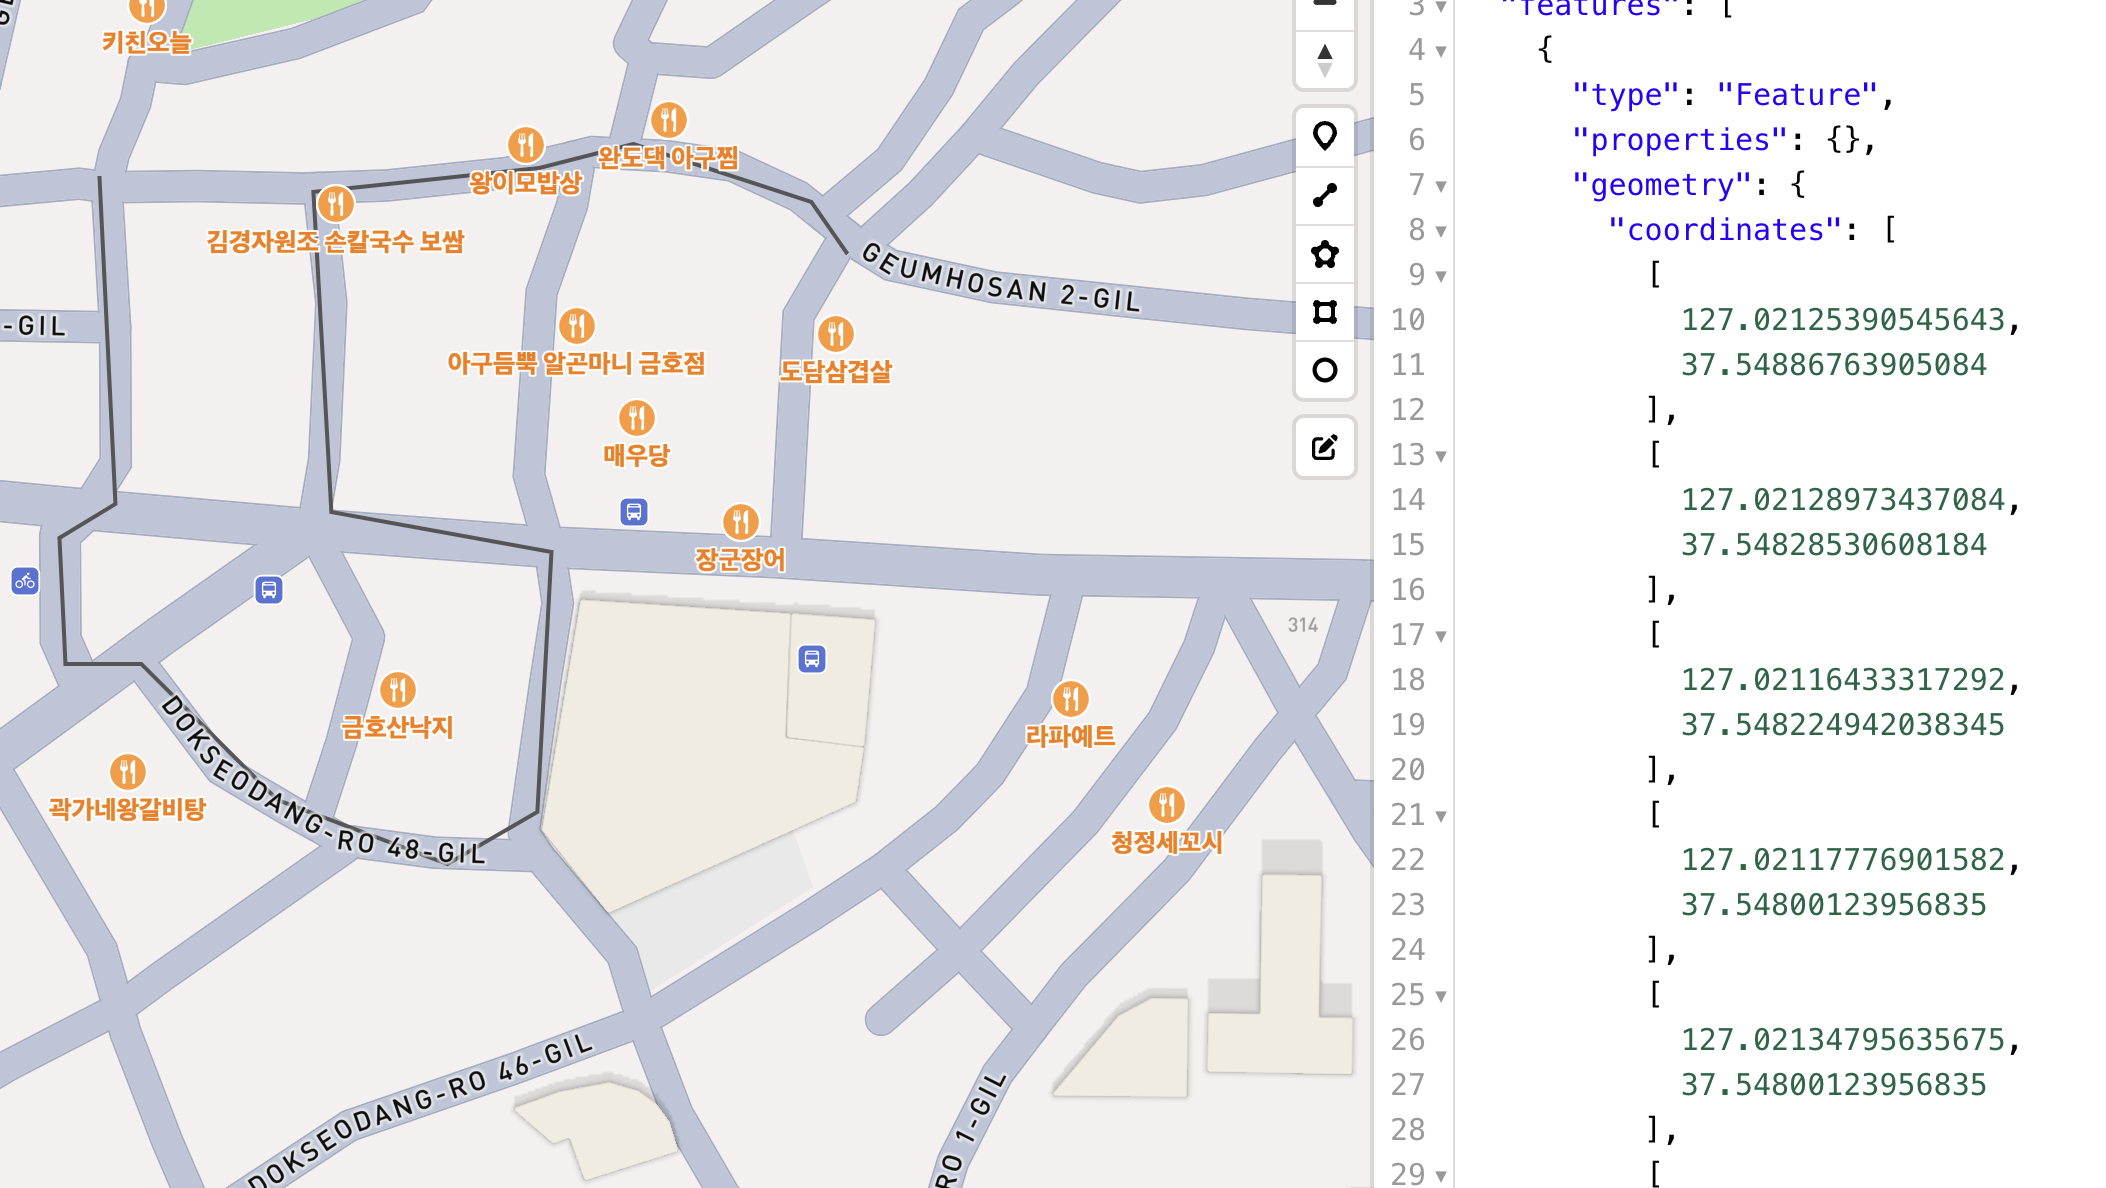
근데 데이터의 구조가 다르기 때문에 약간의 포팅 작업이 필요하다.
const routeList = coordinates.map((coord) => ({longitude: coord[0], latitude: coord[1]}))이런 식으로 하면 되지 않을까...? 테스트 해본 코드는 아니라서 잘 돌아갈지는 장담하지 못한다.
2. TMAP API 사용하기
제일 중요한 도보 경로 데이터를 얻어오자
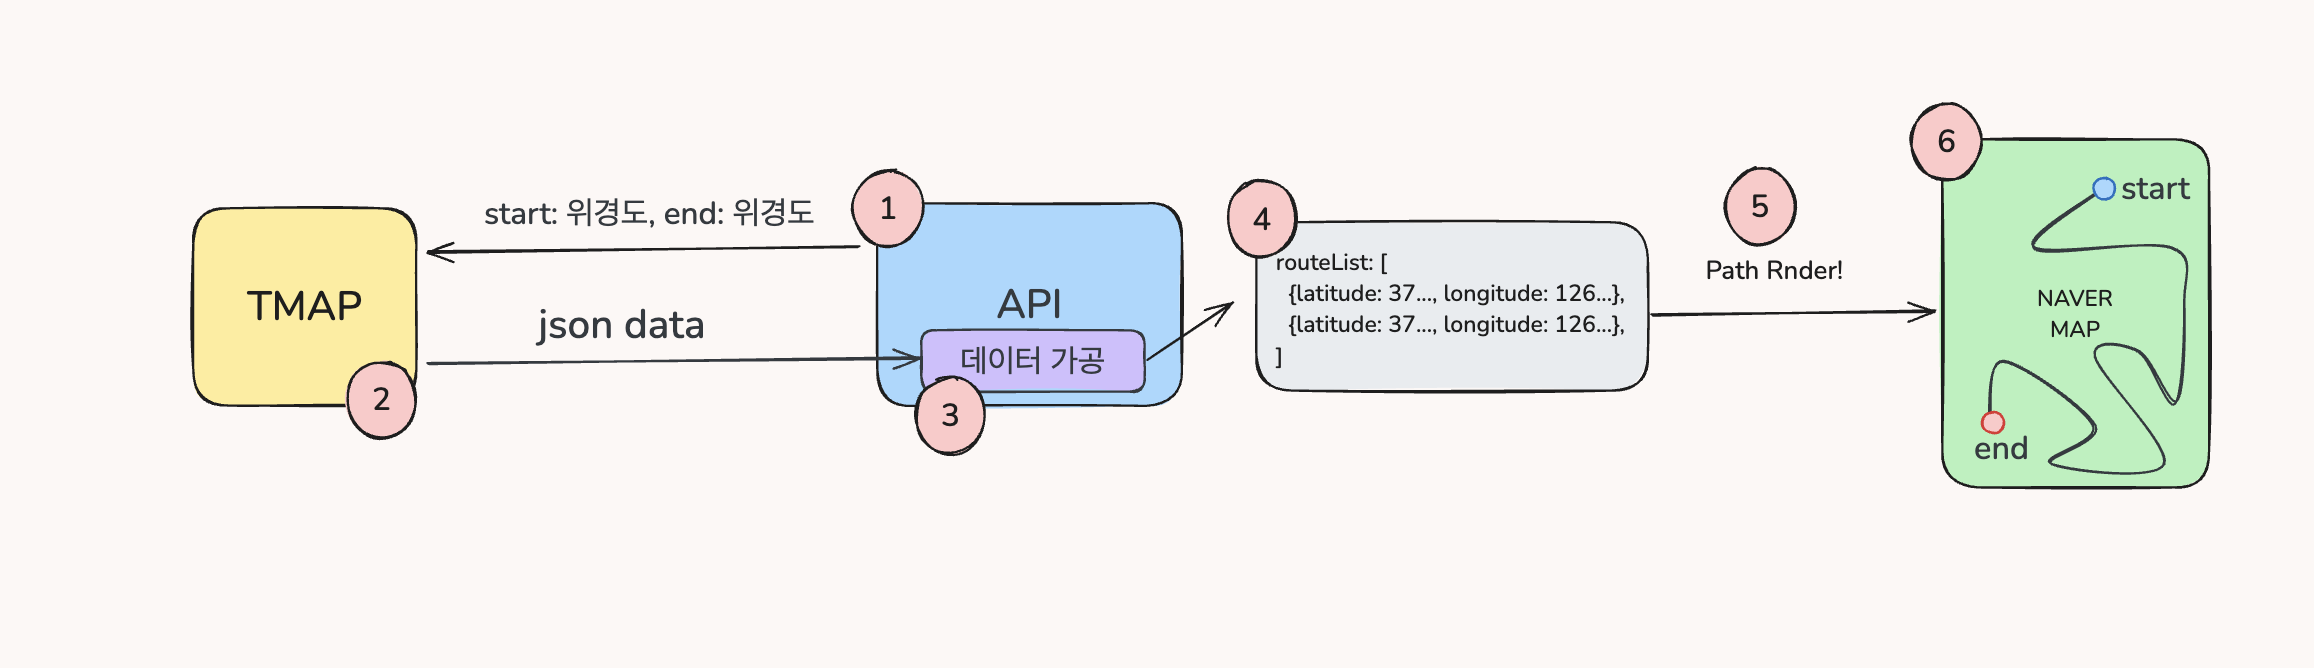
대충이라도 흐름의 파악을 위하여 작성 해보았다.
- 출발, 도착지 위치의 정보 등을 TMAP API 에 요청한다.
- TMAP 의 응답 json data (도보경로) 를 받아온다.
- NaverMap 에 Path 를 그리기 위한 데이터로 가공한다.
- 가공된 데이터
- 가공한 데이터를 prop 으로 넘여준다.
- 네이버맵 렌더 완료!
TMAP 에 도보경로를 요청하는 api 코드는 다음과 같다. TMAP_APP_KEY 는 회원 가입 및 발급 신청을 통하여 따로 발급 받도록 한다.
enum API {
  TMAP_URL = 'https://apis.openapi.sk.com/',
  TMAP_APP_KEY = 'API_KEY',
}

const TMAP_BASE_URL = API.TMAP_URL;
const TMAP_APP_KEY = API.TMAP_APP_KEY;
const tmapUrl = 'tmap/routes/pedestrian?version=1';


const request = {
  reqCoordType: 'WGS84GEO',
  startName: '출발지',
  endName: '도착지',
  searchOption: '0',
  resCoordType: 'WGS84GEO',
  sort: 'index',
  angle: 20,
  speed: 4,
};

export const requestTmap = async (departure: Location, destination: Location): Promise<GeojsonFeatureCollection> => {
    const response = await fetch(`${TMAP_BASE_URL}${tmapUrl}`, {
      method: 'POST',
      headers: {
        'Content-Type': 'application/json',
        Accept: 'application/json',
        appKey: TMAP_APP_KEY,
      },
      body: JSON.stringify({
        ...request,
        startX: departure.longitude,
        startY: departure.latitude,
        endX: destination.longitude,
        endY: destination.latitude,
      }),
    });
  	...
};
더욱 자세하게 알고싶다면 공식문서를 필독하자!
[SK TMAP API DOCS] 보행자-경로안내
[SK TMAP API DOCS] 경로안내 샘플
3. API 데이터 가공하기
TMAP 응답 샘플 데이터를 대략 분석해보자
const data = [
    {
      type: 'Feature',
      geometry: {
        type: 'Point',
        coordinates: [126.90219466987142, 37.56561453365859],
      },
      properties: {
        totalDistance: 2933,
        totalTime: 2275,
        index: 0,
        pointIndex: 0,
        name: '',
        description: '40m 이동',
        direction: '',
        nearPoiName: '',
        nearPoiX: '0.0',
        nearPoiY: '0.0',
        intersectionName: '',
        facilityType: '11',
        facilityName: '',
        turnType: 200,
        pointType: 'SP',
      },
    },
    {
      type: 'Feature',
      geometry: {
        type: 'LineString',
        coordinates: [
          [126.90219466987142, 37.56561453365859],
          [126.9021780048811, 37.56560897845115],
          [126.90180304205003, 37.565503428466954],
          [126.90176693462324, 37.5654895405477],
        ],
      },
      properties: {
        index: 1,
        lineIndex: 0,
        name: '',
        description: ', 40m',
        distance: 40,
        time: 28,
        roadType: 21,
        categoryRoadType: 0,
        facilityType: '11',
        facilityName: '',
      },
    },
    {
      type: 'Feature',
      geometry: {
        type: 'Point',
        coordinates: [126.90176693462324, 37.5654895405477],
      },
      properties: {
        index: 2,
        pointIndex: 1,
        name: '',
        description: '좌회전 후 월드컵로 을 따라 223m 이동 ',
        direction: '',
        nearPoiName: '',
        nearPoiX: '0.0',
        nearPoiY: '0.0',
        intersectionName: '',
        facilityType: '11',
        facilityName: '',
        turnType: 12,
        pointType: 'GP',
      },
    },
    {
      type: 'Feature',
      geometry: {
        type: 'LineString',
        coordinates: [
          [126.90176693462324, 37.5654895405477],
          [126.90175304841138, 37.56543954611427],
          [126.90183359873832, 37.56536455627678],
          [126.90213357906636, 37.56509237107681],
          [126.9025252199764, 37.56473964132838],
          [126.90270020927193, 37.56455355499006],
          [126.90296685985477, 37.5642619270107],
          [126.90324739845222, 37.56395641200584],
          [126.90328628497107, 37.56391475088009],
        ],
      },
      properties: {
        index: 3,
        lineIndex: 1,
        name: '월드컵로',
        description: '월드컵로, 223m',
        distance: 223,
        time: 189,
        roadType: 21,
        categoryRoadType: 0,
        facilityType: '11',
        facilityName: '',
      },
    }
	...
]- type 은 'Point', 'LineString' 으로 온다.
- 0번 인덱스, 첫번째 데이터의 properties 에는 totalDistance(경로의 총 길이) 와 totalTime(소요시간, 초) 의 정보가 존재한다.
- type 이 'Point' 일때 coordinates 는 Array 형태로 0번째 1번째 순서대로 경도, 위도 의 값을 가지고있다.
- type 이 'LineString' 일때 coordinates 는 이중배열 형태로 외부 배열에는 여러개의 Point 를 가지고있고, 내부 배열은 0번째 1번째 순으로 경도, 위도 의 값을 가지고있다.
- properties 의 값은 type 에 따라 다르다.
우선 크게 이정도로만 요약해 보자.
대략적인 특징을 보면 어떤 알고리즘을 작성해야 하는지 알수 있는데,
우선 경로를 그리기 위해서는 'LineString' type 데이터로 충분히 그릴수 있다고 판단하여. type 이 LineString 인 데이터만 사용하기로 했다.
// 1. LineString type 만 필터링
const getLineStringFromGeojson = (geojson, type) => {
  return geojson.filter(feature => feature.geometry.type === type);
}

const lineString = getLineStringFromGeojson(data, 'LineString');
LineString 데이터를 보면서 알게된건 중복되는 위도, 경도 값들이 존재한다는 것이었다. 그래서 중복 되는 위경도 값을 제거할 필요가 있었고, 그 다음에 최종적으로 NaverMap Path 를 위한 데이터로 가공 하였다.
interface Location {
  latitude: number;
  longitude: number;
}

const getLocationsFromLineString = (lines: GeoJSON.Feature[]) => {
  // 이중배열인 coordinates 처리, Set을 사용해 중복 제거
  const uniqueCoords = new Set(
    lines.flatMap(line =>
      line.geometry.coordinates.map(([lng, lat]) => `${lat},${lng}`)
    )
  );

  // uniqueCoords 객체로 변환
  return Array.from(uniqueCoords).map(coord => {
    const [lat, lng] = coord.split(',').map(Number);
    return { latitude: lat, longitude: lng };
  });
};

// 사용
const pathList: Location[] = getLocationsFromLineString(lineString);
최종적으로 나온 데이터인 pathList 를 NaverMapView 의 coords props 에 전달해주면 최종 경로가 그려진다.
<NaverMapPathOverlay
coords={walkPath}
width={6}
color={colors.primary_50}
outlineColor={colors.primary_70}
outlineWidth={2}
patternImage={require('@/assets/image/ic_pattern_arrow.png')}
patternInterval={patternInterval}
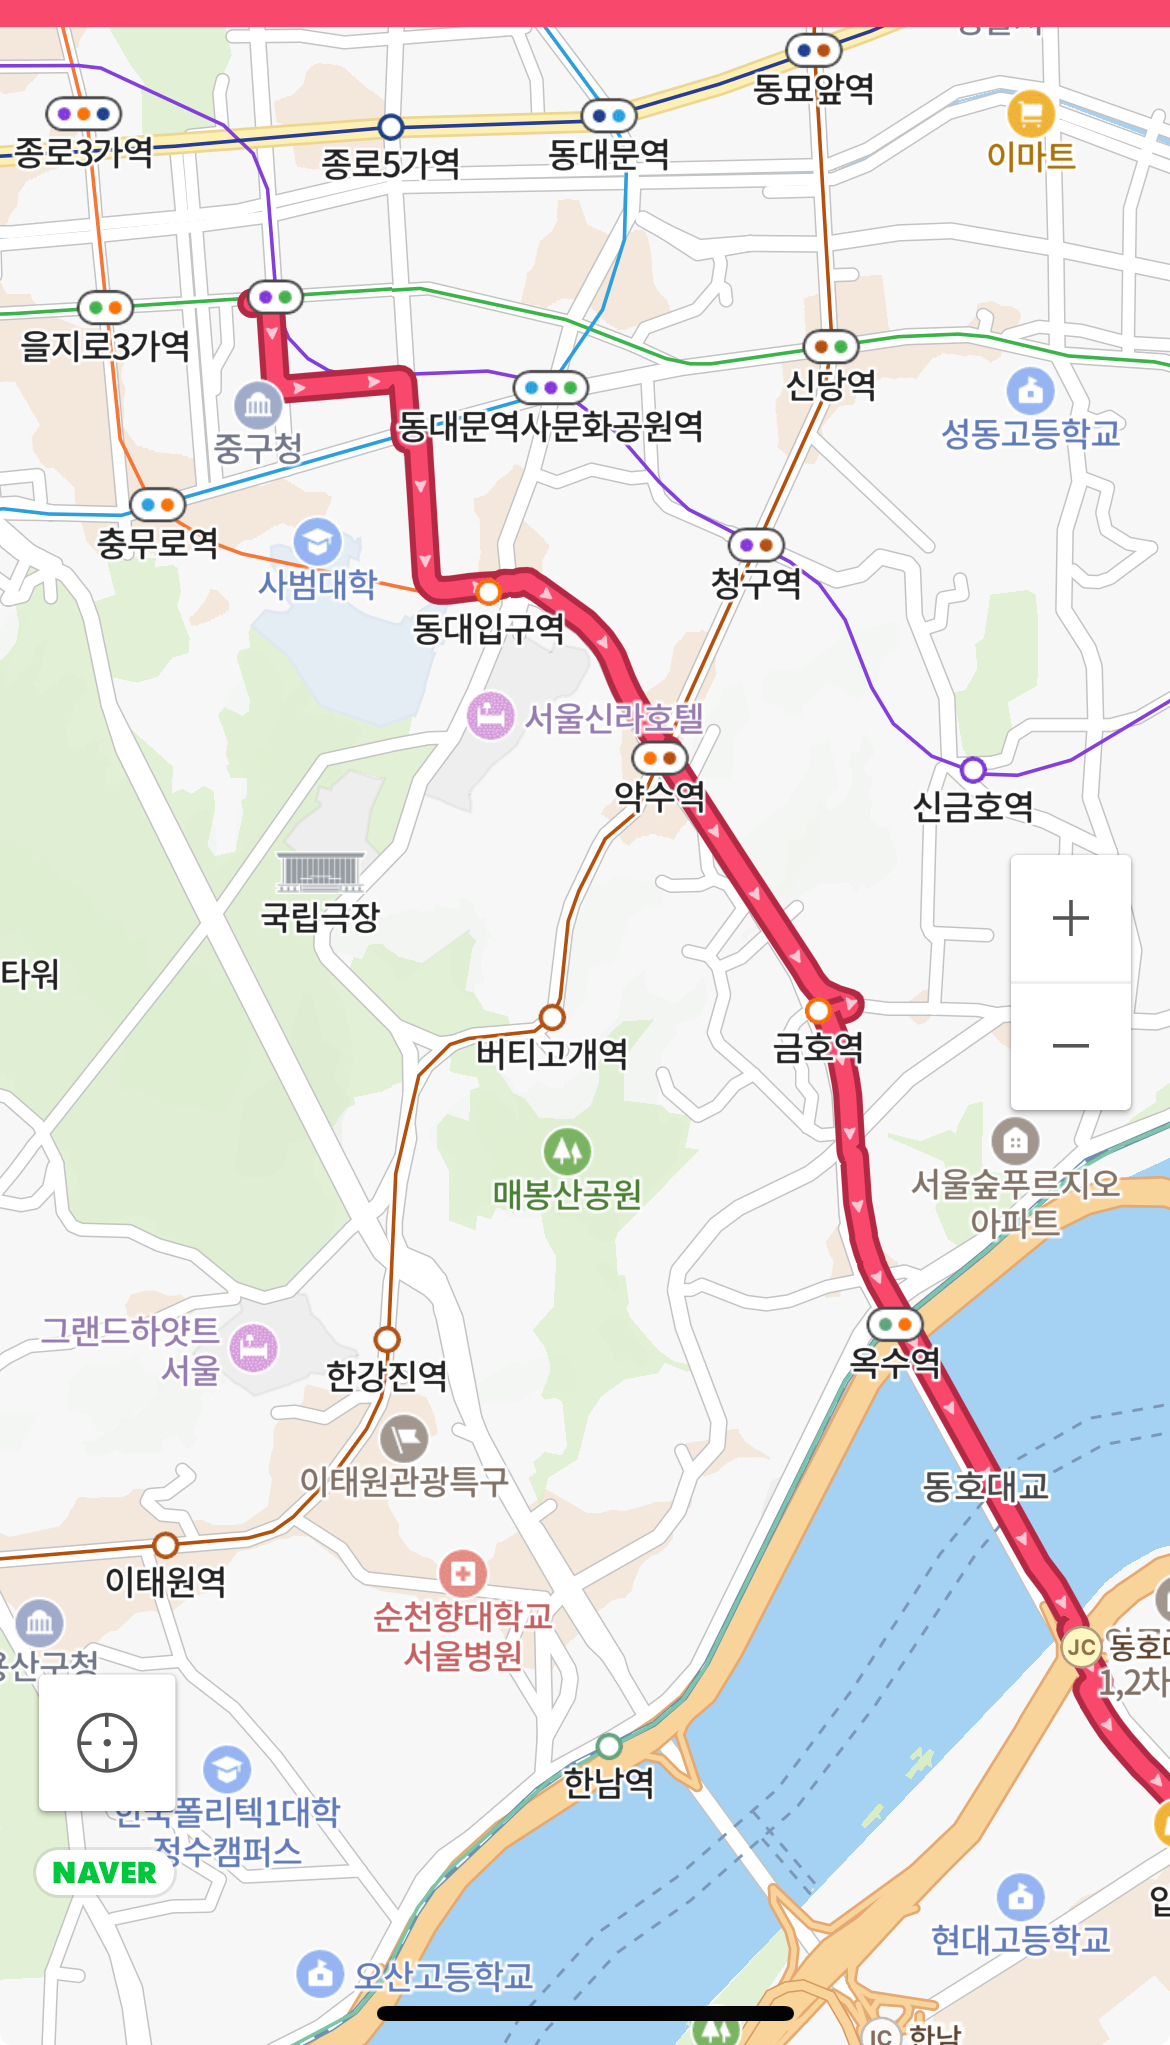
/>결과보기
출발은 을지로 어딘가의 카페,
도착은 신사 어딘가의 카페이다

4. 추가요구 사항
음성 내비게이션 기능도 추가 해주세요~
도보 내비게이션의 시각적인 부분은 지도에 경로를 그리는 것으로 해결하였으나, 내비게이션은 청각 정보도 같이 전달해줘야 한다는 주장으로 경로를 음성안내 기능도 추가되었다.
TMAP, NAVER 둘 다 그런 API 는 제공하지 않는다.
나는 지도 API 를 이용하는 것이지 위치에 따른 음성파일 재생은 사실 완전히 다른 영역의 이야기이긴 하다. 특히나 도보 내비게이션의 음성안내는 더욱 희소한 기능 이다.
불가능 한걸 알면서도 우리는 어둠에서 빛을 향해 나아가야 한다.
"불가능은 없다." 라는 말은 너무 유치하고 뻔하다. 내가 지금부터 노력해서 육상 100M 올림픽 금메달을 딸거라고 하면 "그래 불가능은 없어!" 라며 응원을 해줄수는 없을것이다. 불가능한건 분명히 존재한다.
하지만 중요한건 불가능 하다고 무조건 단정짓지 않는 자세와 불가능을 가능하게 만드려는 과정에서 나오는 결과물이 아닐까..
빛을 향해 나아가보자
사실 불가능 까지는 아니다. 이미 정확한 위치 정보와 tmap 응답 데이터 에서
description: '좌회전 후 월드컵로 을 따라 223m 이동"
처럼 유의미한 데이터들이 존재하기 때문에다.
- 최종 가공 데이터에 Point 와 description 정보를 포함하고 이를 가공한다.
- description 의 Text 를 음성변환 하여 실행한다. (TTS, TextToSpeach)
- 유저의 현재 위치를 트래킹 하여 Point 의 위도, 경도 반경안에 (5-20m) 유저가 감지 될 때, TTS 를 실행한다. (하버사인 공식)
이 세가지로 나는 빛을향해 나아가보려고 한다.
다음에 계속...!

안녕하세요:) 저는 정부사업 공모전 웹 개발 프로젝트를 리딩하고 있는 백엔드 개발자 김동준입니다.
우선 좋은 정보의 게시물 공유 감사합니다. 작성해주신 내용이 저희 프로젝트 컨셉에 필수적인 내용이어서
혹시 공모전 프로젝트에 관심이 있으실지 연락 드립니다:)
좋은 정보의 글 감사합니다!