[튜토리얼] AWS EC2- 프론트 build Nginx 배포
- AWS 로그인 인스턴트 생성 또는 시작
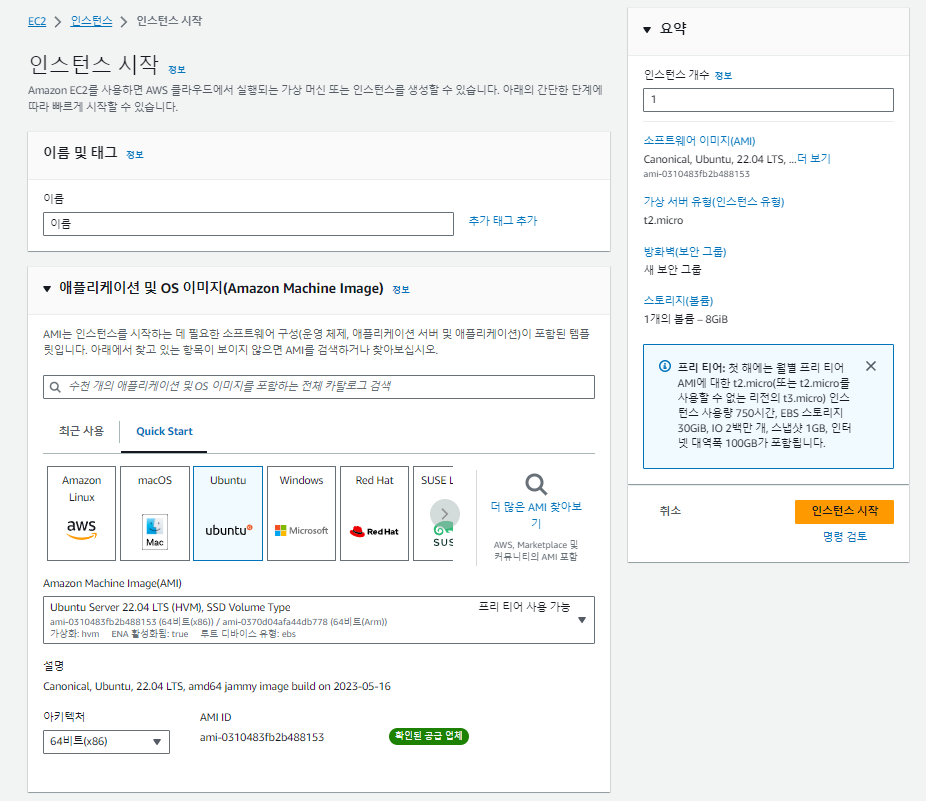
- 이름 : 이름 및 태그적는다
- Quick Start : Ubuntu > Ubuntu Server 는 22.04 LTS / 20.04 LTS 선택
- 인스턴스 유형 : t2.micro (프리 티어 사용 가능)
- 키페어 설정


- 키 페어 이름 입력 : 이름을 입력한다.
- 키 페어 유형 : RSA 선택
- 프라이빗 키 파일 형식 : .pem
으로 설정 후 키 페어 생성
- 보안그룹 생성

- 유형 : 사용자 지정 TCP
- 포트범위 : 프론트 -> 80 , 백 -> 22
💥백엔드 22번 포트 IP는 0.0.0.0/0 으로 하면 보안상 좋지 않으므로 / 내IP 로 나중에는 설정해야한다.
설정 후 규칙 저장
- 보안그룹 설정
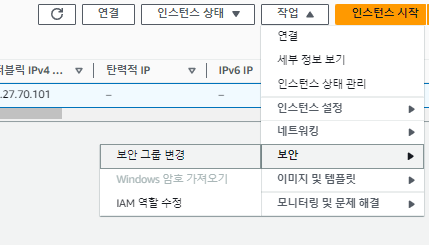
- 인스턴스에 가서 체크박스 체크 후 작업 -> 보안 -> 보안 그룹 변경 후 보안그룹 선택 후 적용
- 설정 후 인스턴스 연결을 한다
초기 경로는 home > ubuntu 이고 ubuntu에 시작됨
ll , ls 로 해당 경로에 폴더/파일 리스트 확인
- node.js, npm, ufw 설치
- home 경로나 ubuntu 경로나 상관없음
# 패키지 목록 업데이트
sudo apt-get update

# node.js npm 설치
sudo apt-get install nodejs npm ufw

# ufw 활성화
sudo ufw enable
- Nginx 설치 및 front build 파일 업로드
# 패키지 목록 업데이트
sudo apt-get update

# Nginx 설치
sudo apt-get install nginx

# Nginx 서비스 시작 및 부팅시 자동으로 실행
sudo systemctl start nginx
sudo systemctl enable nginx

# Git 저장소 복제 - home 폴더에서 생성 (ubuntu와 같은 폴더에서)
git clone 'Git 저장소 URL'
💥ubuntu에서는 권한이 있어서 sudo가 필요 없지만 home에서 할때는 sudo 를 앞에 써서 git clone을 한다.
Nginx 동작 확인 방법
Nginx가 정상적으로 동작하는지 확인하려면 웹 브라우저를 열고 서버의 IP 주소 또는 도메인 이름을 입력하십시오.
기본적으로 Nginx는 "Wellcome to Nginx"라는 화면을 표시합니다.
- 만약 방화벽이 활성화되어 있다면, Nginx의 기본 HTTP 포트 80을 방화벽 규칙에서 허용해야 합니다.
# ufw 포트 열기
# 예를 들어, HTTP(포트 80)와 HTTPS(포트 443)를 열려면 다음과 같이 실행합니다.
sudo ufw allow 80/tcp
sudo ufw allow 443/tcp
sudo ufw allow 22/tcp

# ufw 활성화
sudo ufw enable

# 규칙 확인
sudo ufw status
- nginx 설정
기본 설정 파일인 default 파일을 편집합니다.
sudo nano /etc/nginx/sites-available/defaultdefault 설정 파일에 웹 사이트 또는 애플리케이션에 대한 가상 호스트 설정을 작성합니다. 원하는 가상 호스트 설정을 작성한 후, 저장하고 편집기를 종료합니다.
server {
    listen 80;
    server_name app-name.com www.app-name.com;  # 도메인 이름 설정

    root /var/www/app-name;  # 웹 애플리케이션의 경로
    index index.html;

    location / {
        try_files $uri $uri/ /index.html;
    }
}
- 퍼블릭 IPv4 주소
✅혹시 나중에 까먹을까봐 전체 과정을 기록
ubuntu@ip-172-31-15-17:/home$
🟢ubuntu@ip-172-31-15-17:/home$ git clone https://github.com/NuyHesHUB/invest-aws-test-build.git🟢

🔴fatal: could not create work tree dir 'invest-aws-test-build': Permission denied🔴

😊 sudo를 적지 않아서 생김 😊

ubuntu@ip-172-31-15-17:/home$ cd ubuntu
🟢ubuntu@ip-172-31-15-17:~$ git clone https://github.com/NuyHesHUB/invest-aws-test-build.git🟢
Cloning into 'invest-aws-test-build'...
remote: Enumerating objects: 30, done.
remote: Counting objects: 100% (30/30), done.
remote: Compressing objects: 100% (28/28), done.
remote: Total 30 (delta 1), reused 30 (delta 1), pack-reused 0
Unpacking objects: 100% (30/30), 1.84 MiB | 1.35 MiB/s, done.

🟢ufw 포트 열기🟢
ubuntu@ip-172-31-15-17:~$ sudo ufw allow 80/tcp
Rule added
Rule added (v6)
ubuntu@ip-172-31-15-17:~$ sudo ufw allow 443/tcp
Rule added
Rule added (v6)
ubuntu@ip-172-31-15-17:~$ sudo ufw allow 22/tcp
Rule added
Rule added (v6)

🟢ufw 활성화🟢
ubuntu@ip-172-31-15-17:~$ sudo ufw enable
Command may disrupt existing ssh connections. Proceed with operation (y|n)? y
Firewall is active and enabled on system startup

🟢ufw status 규칙 확인🟢
ubuntu@ip-172-31-15-17:~$ sudo ufw status
Status: active

To                         Action      From
--                         ------      ----
80/tcp                     ALLOW       Anywhere
443/tcp                    ALLOW       Anywhere
22/tcp                     ALLOW       Anywhere
80/tcp (v6)                ALLOW       Anywhere (v6)
443/tcp (v6)               ALLOW       Anywhere (v6)
22/tcp (v6)                ALLOW       Anywhere (v6)

🟢nginx 설정 : 기본 설정 파일인 default 파일을 편집합니다.🟢
ubuntu@ip-172-31-15-17:~$ sudo nano /etc/nginx/sites-available/default

ubuntu@ip-172-31-15-17:~$ ls
invest-aws-test-build

🟢nginx 설정 : 기본 설정 파일인 default 파일을 편집합니다.🟢
ubuntu@ip-172-31-15-17:~$ sudo nano /etc/nginx/sites-available/default


🟢ubuntu의 권한 확인 (ll)🟢
ubuntu@ip-172-31-15-17:~$ ll
total 32

drwxr-xr-x 5 ubuntu ubuntu 4096 Sep 13 02:50 ./
drwxr-xr-x 3 root   root   4096 Sep 13 02:39 ../
-rw-r--r-- 1 ubuntu ubuntu  220 Feb 25  2020 .bash_logout
-rw-r--r-- 1 ubuntu ubuntu 3771 Feb 25  2020 .bashrc
drwx------ 2 ubuntu ubuntu 4096 Sep 13 02:43 .cache/
-rw-r--r-- 1 ubuntu ubuntu  807 Feb 25  2020 .profile
drwx------ 2 ubuntu ubuntu 4096 Sep 13 02:39 .ssh/
-rw-r--r-- 1 ubuntu ubuntu    0 Sep 13 02:44 .sudo_as_admin_successful
drwxrwxr-x 4 ubuntu ubuntu 4096 Sep 13 02:50 invest-aws-test-build/

ubuntu@ip-172-31-15-17:~$ cd ../

🟢home의 권한 확인 (ll)🟢
ubuntu@ip-172-31-15-17:/home$ ll
total 12
drwxr-xr-x  3 root   root   4096 Sep 13 02:39 ./
drwxr-xr-x 19 root   root   4096 Sep 13 02:39 ../
drwxr-xr-x  5 ubuntu ubuntu 4096 Sep 13 02:50 ubuntu/

🟢sudo nginx -t🟢
ubuntu@ip-172-31-15-17:/home$ sudo nginx -t
nginx: the configuration file /etc/nginx/nginx.conf syntax is ok
nginx: configuration file /etc/nginx/nginx.conf test is successful

🟢sudo systemctl restart nginx🟢
ubuntu@ip-172-31-15-17:/home$ sudo systemctl restart nginx
ubuntu@ip-172-31-15-17:/home$ sudo systemctl restart nginx

🟢sudo ufw status🟢
ubuntu@ip-172-31-15-17:/home$ sudo ufw status
Status: active

To                         Action      From
--                         ------      ----
80/tcp                     ALLOW       Anywhere
443/tcp                    ALLOW       Anywhere
22/tcp                     ALLOW       Anywhere
80/tcp (v6)                ALLOW       Anywhere (v6)
443/tcp (v6)               ALLOW       Anywhere (v6)
22/tcp (v6)                ALLOW       Anywhere (v6)

🟢sudo systemctl restart nginx🟢
ubuntu@ip-172-31-15-17:/home$ sudo systemctl restart nginx

🟢sudo systemctl status nginx🟢
ubuntu@ip-172-31-15-17:/home$ sudo systemctl status nginx
● nginx.service - A high performance web server and a reverse proxy server
     Loaded: loaded (/lib/systemd/system/nginx.service; enabled; vendor preset: enabled)
     Active: active (running) since Wed 2023-09-13 03:28:28 UTC; 1min 46s ago
       Docs: man:nginx(8)
    Process: 14222 ExecStartPre=/usr/sbin/nginx -t -q -g daemon on; master_process on; (code=exited, status=0/SUCCESS)
    Process: 14223 ExecStart=/usr/sbin/nginx -g daemon on; master_process on; (code=exited, status=0/SUCCESS)
   Main PID: 14224 (nginx)
      Tasks: 2 (limit: 1141)
     Memory: 2.3M
     CGroup: /system.slice/nginx.service
             ├─14224 nginx: master process /usr/sbin/nginx -g daemon on; master_process on;
             └─14225 nginx: worker process

Sep 13 03:28:28 ip-172-31-15-17 systemd[1]: Starting A high performance web server and a reverse proxy server...
Sep 13 03:28:28 ip-172-31-15-17 systemd[1]: Started A high performance web server and a reverse proxy server.

🟢home의 권한 확인 (ll)🟢
ubuntu@ip-172-31-15-17:/home$ ll
total 12
drwxr-xr-x  3 root   root   4096 Sep 13 02:39 ./
drwxr-xr-x 19 root   root   4096 Sep 13 02:39 ../
drwxr-xr-x  5 ubuntu ubuntu 4096 Sep 13 02:50 ubuntu/
ubuntu@ip-172-31-15-17:/home$ sudo chmod 755 ubuntu/
ubuntu@ip-172-31-15-17:/home$ ll
total 12
drwxr-xr-x  3 root   root   4096 Sep 13 02:39 ./
drwxr-xr-x 19 root   root   4096 Sep 13 02:39 ../
drwxr-xr-x  5 ubuntu ubuntu 4096 Sep 13 02:50 ubuntu/

🟢ubuntu의 권한 확인 (ll)🟢
ubuntu@ip-172-31-15-17:/home$ cd ubuntu
ubuntu@ip-172-31-15-17:~$ ll
total 32
drwxr-xr-x 5 ubuntu ubuntu 4096 Sep 13 02:50 ./
drwxr-xr-x 3 root   root   4096 Sep 13 02:39 ../
-rw-r--r-- 1 ubuntu ubuntu  220 Feb 25  2020 .bash_logout
-rw-r--r-- 1 ubuntu ubuntu 3771 Feb 25  2020 .bashrc
drwx------ 2 ubuntu ubuntu 4096 Sep 13 02:43 .cache/
-rw-r--r-- 1 ubuntu ubuntu  807 Feb 25  2020 .profile
drwx------ 2 ubuntu ubuntu 4096 Sep 13 02:39 .ssh/
-rw-r--r-- 1 ubuntu ubuntu    0 Sep 13 02:44 .sudo_as_admin_successful
drwxrwxr-x 4 ubuntu ubuntu 4096 Sep 13 02:50 invest-aws-test-build/

🟢invest-aws-test-build의 권한 확인 (ll)🟢
ubuntu@ip-172-31-15-17:~$ cd invest-aws-test-build/
ubuntu@ip-172-31-15-17:~/invest-aws-test-build$ ll
total 16
drwxrwxr-x 4 ubuntu ubuntu 4096 Sep 13 02:50 ./
drwxr-xr-x 5 ubuntu ubuntu 4096 Sep 13 02:50 ../
drwxrwxr-x 8 ubuntu ubuntu 4096 Sep 13 02:50 .git/
drwxrwxr-x 3 ubuntu ubuntu 4096 Sep 13 02:50 build/

🟢/etc/nginx/sites-available/🟢
ubuntu@ip-172-31-15-17:~/invest-aws-test-build$ cd /etc/nginx/sites-available/
ubuntu@ip-172-31-15-17:/etc/nginx/sites-available$ cat default
##
# You should look at the following URL's in order to grasp a solid understanding
# of Nginx configuration files in order to fully unleash the power of Nginx.
# https://www.nginx.com/resources/wiki/start/
# https://www.nginx.com/resources/wiki/start/topics/tutorials/config_pitfalls/
# https://wiki.debian.org/Nginx/DirectoryStructure
#
# In most cases, administrators will remove this file from sites-enabled/ and
# leave it as reference inside of sites-available where it will continue to be
# updated by the nginx packaging team.
#
# This file will automatically load configuration files provided by other
# applications, such as Drupal or Wordpress. These applications will be made
# available underneath a path with that package name, such as /drupal8.
#
# Please see /usr/share/doc/nginx-doc/examples/ for more detailed examples.
##

# Default server configuration
#
server {
        listen 80 default_server;
        listen [::]:80 default_server;

        # SSL configuration
        #
        # listen 443 ssl default_server;
        # listen [::]:443 ssl default_server;
        #
        # Note: You should disable gzip for SSL traffic.
        # See: https://bugs.debian.org/773332
        #
        # Read up on ssl_ciphers to ensure a secure configuration.
        # See: https://bugs.debian.org/765782
        #
        # Self signed certs generated by the ssl-cert package
        # Don't use them in a production server!
        #
        # include snippets/snakeoil.conf;

		🟢경로 설정 하는 곳🟢
        root /home/ubuntu/invest-aws-test-build;
		💥경로 설정하고 나서 ctrl+x 로 나간 후 Enter

        # Add index.php to the list if you are using PHP
        index index.html index.htm index.nginx-debian.html;

        server_name _;

        location / {
                # First attempt to serve request as file, then
                # as directory, then fall back to displaying a 404.
                try_files $uri $uri/ =404;
        }

        # pass PHP scripts to FastCGI server
        #
        #location ~ \.php$ {
        #       include snippets/fastcgi-php.conf;
        #
        #       # With php-fpm (or other unix sockets):
        #       fastcgi_pass unix:/var/run/php/php7.4-fpm.sock;
        #       # With php-cgi (or other tcp sockets):
        #       fastcgi_pass 127.0.0.1:9000;
        #}

        # deny access to .htaccess files, if Apache's document root
        # concurs with nginx's one
        #
        #location ~ /\.ht {
        #       deny all;
        #}
}


# Virtual Host configuration for example.com
#
# You can move that to a different file under sites-available/ and symlink that
# to sites-enabled/ to enable it.
#
#server {
#       listen 80;
#       listen [::]:80;
#
#       server_name example.com;
#
#       root /var/www/example.com;
#       index index.html;
#
#       location / {
#               try_files $uri $uri/ =404;
#       }
#}
ubuntu@ip-172-31-15-17:/etc/nginx/sites-available$ sudo nano /default
ubuntu@ip-172-31-15-17:/etc/nginx/sites-available$ sudo nano default
ubuntu@ip-172-31-15-17:/etc/nginx/sites-available$ sudo systemctl restart nginx