HTML
07_이미지관련태그.html
<!DOCTYPE html>
<html lang="en">
<head>
<meta charset="UTF-8">
<meta name="viewport" content="width=device-width, initial-scale=1.0">
<title>07_이미지관련태그</title>
</head>
<body>
<!-- Unsplash : 이미지 무료 다운로드 사이트 -->
<h1>img 태그</h1>
<pre>
- 웹 문서에 사진, 그림 같은 이미지를 삽입하는 용도의 태그
[속성]
1) src : 삽입할 이미지의 경로를 지정하는 속성(파일경로, 웹주소)
2) width / height : 이미지의 크기를 지정하는 속성
3) alt : 이미지를 설명하는 속성 -> 이미지가 출력되지 않는 경우 화면에 직접 표시
(웹접근성)
</pre>
<hr>
<h3>src 속성 확인</h3>
<!--
상대경로 : 현재 위치를 기준으로 경로 지정
.. : 상위 폴더
/ : 아래, 안쪽, 안에
./ : 동일 레벨
-->
<img src="./images/animals/cat1.jpg"> <!-- 확장자 꼭 붙여주어야 함. -->
<hr>
<!-- 웹 이미지 경로(웹상 절대 경로)를 이용해서 이미지 출력 -->
<img src="https://images.unsplash.com/photo-1574158622682-e40e69881006?ixlib=rb-4.0.3&ixid=M3wxMjA3fDB8MHxwaG90by1wYWdlfHx8fGVufDB8fHx8fA%3D%3D&auto=format&fit=crop&w=880&q=80">
<hr><hr>
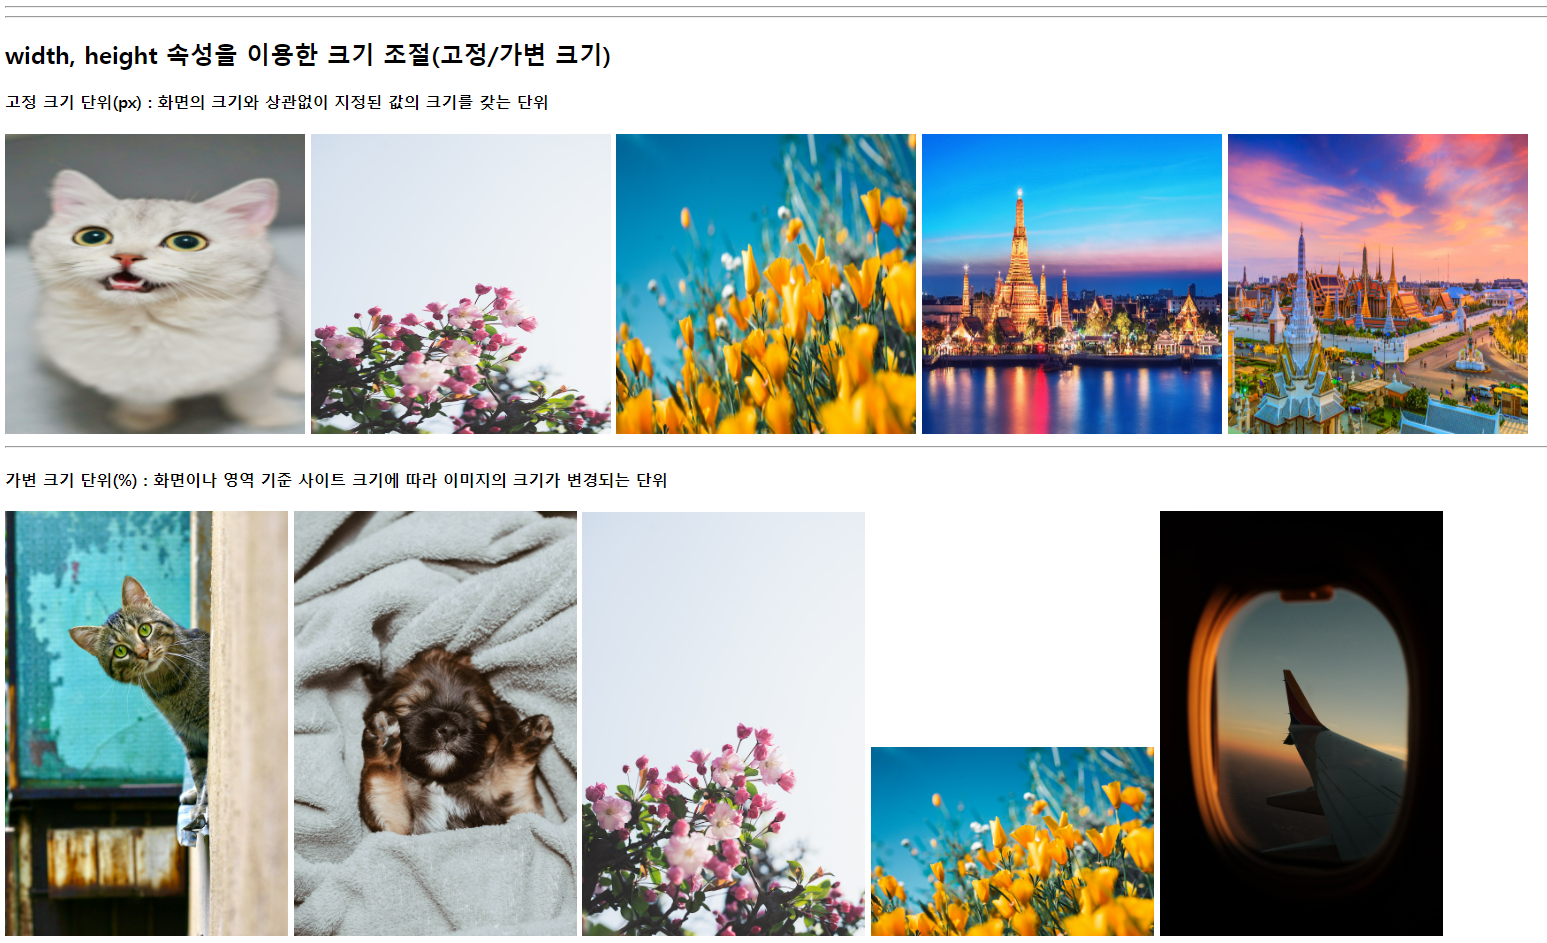
<h2>width, height 속성을 이용한 크기 조절(고정/가변 크기)</h2>
<h4>고정 크기 단위(px) : 화면의 크기와 상관없이 지정된 값의 크기를 갖는 단위</h4>
<img src="./images/animals/cat2.jpg" width="300px" height="300px">
<img src="./images/flowers/flower1.jpg" width="300px" height="300px">
<img src="./images/flowers/flower2.jpg" width="300px" height="300px">
<img src="./images/travel/travel1.jpg" width="300px" height="300px">
<img src="./images/travel/travel2.jpg" width="300px" height="300px">
<hr>
<h4>가변 크기 단위(%) : 화면이나 영역 기준 사이트 크기에 따라 이미지의 크기가 변경되는 단위</h4>
<img src="./images/animals/cat1.jpg" width="15%">
<img src="./images/animals/dog1.jpg" width="15%">
<img src="./images/flowers/flower1.jpg" width="15%">
<img src="./images/flowers/flower2.jpg" width="15%">
<img src="./images/travel/travel3.jpg" width="15%">
<hr>
<h2>alt 속성 확인</h2>
<img src="./images/travel/travel4.jpg" alt="여행지">
<!-- 경로가 틀릴 경우, 이미지가 깨지게 되는데 이때 여행지 단어가 뜸. -->
</body>
</html>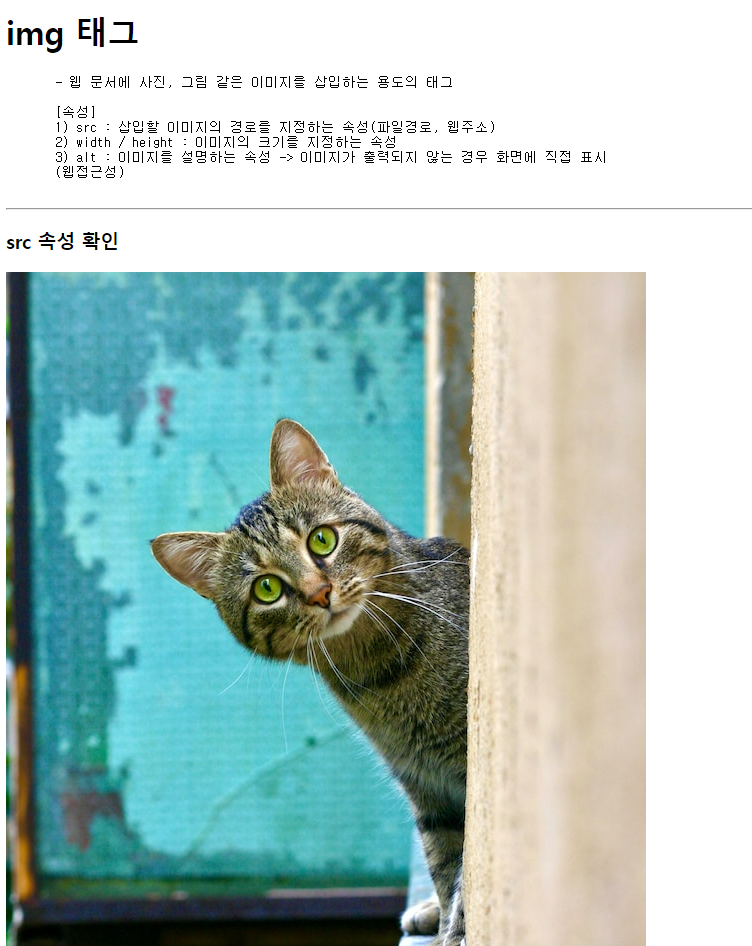


08_하이퍼링크관련태그.html
<!DOCTYPE html>
<html lang="en">
<head>
    <meta charset="UTF-8">
    <meta name="viewport" content="width=device-width, initial-scale=1.0">
    <title>08_하이퍼링크 관련 태그</title>
</head>
<body>
    <h1>하이퍼 링크 관련 태그 : a(anchor) 태그</h1>

    <pre>
        a태그는 현재 HTML문서와 다른 HTML문서를 연결해서
        페이지 이동을 할 수 있게 하는 기능을 제공.

        이 때, a태그로 감싸진 문자열 == 하이퍼링크
    </pre>

    <hr>

    <h2>a태그를 이용한 하이퍼링크 구현</h2>

    <ul>
        <li>
            <a href="01_글자관련태그.html">01_글자 관련 태그</a>
        </li>
        <li>
            <a href="02_목록관련태그.html" target="_blank">02_목록 관련 태그</a>
        </li>

        <!-- target 속성 : 연결된 문서를 어디에서 열 것인지 지정하는 속성
            기본값 : 같은 탭
            _blank : 새탭 == 비어있는탭
        -->

        <li>
            <a href="https://www.naver.com" target="_blank">네이버로 이동</a>
        </li>
    </ul>

    <hr>

    <h2>이미지 클릭 시 페이지 이동</h2>

    <a href="https://www.naver.com">
            <img src="./images/things/fire.jpg" width="120px">
    </a>

    <hr>

    <h2>한 페이지 내에서 이동하기</h2>

    <ul id="list">
        목록
        <li><a href="#cat1">고양이1</a></li>
        <li><a href="#cat2">고양이2</a></li>
        <li><a href="#dog1">강아지1</a></li>
    </ul>

    <h3 id="cat1">고양이1</h3>
    <img src="./images/animals/cat1.jpg">
    <a href="#list">목록으로 이동</a>

    <h3 id="cat2">고양이2</h3>
    <img src="./images/animals/cat2.jpg">
    <a href="#list">목록으로 이동</a>

    <h3 id="dog1">강아지1</h3>
    <img src="./images/animals/dog1.jpg">
    <a href="#list">목록으로 이동</a>
</body>
</html>


09_입력관련태그.html
<!DOCTYPE html>
<html lang="en">
<head>
<meta charset="UTF-8">
<meta name="viewport" content="width=device-width, initial-scale=1.0">
<title>09_입력관련태그</title>
</head>
<body>
<h1>input 태그, form 태그</h1>
<h2>input 태그</h2>
<p>웹 문서에서 사용자가 입력할 수 있는 양식을 제공하는 태그</p>
<h3>text 관련된 input 태그</h3>
<h4>type="text"</h4>
<pre>
- 한 줄 짜리 문자열(텍스트)을 입력할 수 있는 입력 상자
- input 태그의 type의 기본값으로, 생략가능
- inline 형식 (모든 input 태그가 inline)
</pre>
<input>
<input type="text">
<pre>
<h3>text 관련 input 태그의 공용 속성</h3>
- size : 입력상자 크기
- maxlength : 입력 받는 텍스트의 최대길이
- placeholder : 입력 상자에 작성될 내용을 설명
</pre>
아이디 : <input type="text" size="15" maxlength="10" placeholder="아이디 입력">
<hr>
<h4>type="password"</h4>
<p>비밀번호 입력 상자(입력되는 텍스트를 가려줌)</p>
비밀번호 : <input type="password">
<hr>
<h4>type="url"</h4>
<p>주소 입력 시 사용하는 입력 상자</p>
홈페이지 : <input type="url" value="https://">
<!-- value : 모든 input 태그의 type에서 사용 가능한 속성
input 태그에 들어갈 초기값을 지정
-->
<hr>
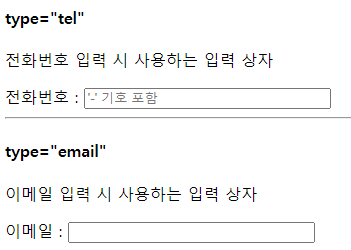
<h4>type="tel"</h4>
<p>전화번호 입력 시 사용하는 입력 상자</p>
전화번호 : <input type="tel" size="30" placeholder="'-' 기호 포함">
<hr>
<h4>type="email"</h4>
<p>이메일 입력 시 사용하는 입력 상자</p>
이메일 : <input type="email" size="30">
<!-- url, email, tel 단독 사용 시 type="text" 와 같지만
form 태그 내부에서 사용되면
입력된 값이 용도에 맞는 값인지 유효성 검사를 간단히 진행함.
-->
<hr><hr><hr>
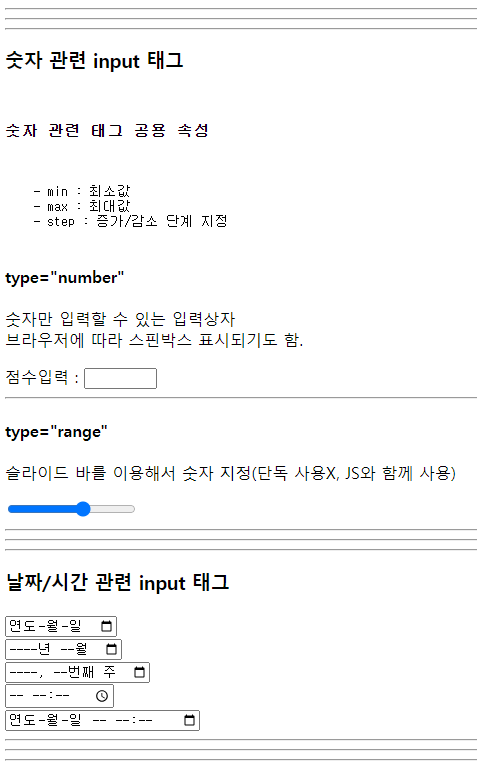
<h3>숫자 관련 input 태그</h3>
<pre>
<h3>숫자 관련 태그 공용 속성</h3>
- min : 최소값
- max : 최대값
- step : 증가/감소 단계 지정
</pre>
<h4>type="number"</h4>
<p>
숫자만 입력할 수 있는 입력상자<br>
브라우저에 따라 스핀박스 표시되기도 함.
</p>
점수입력 : <input type="number" min="0" max="100" step="10">
<hr>
<h4>type="range"</h4>
<p>슬라이드 바를 이용해서 숫자 지정(단독 사용X, JS와 함께 사용)</p>
<input type="range" min="0" max="50" step="10">
<hr>
<hr>
<hr>
<h3>날짜/시간 관련 input 태그</h3>
<input type="date"><br>
<input type="month"><br>
<input type="week"><br>
<input type="time"><br>
<input type="datetime-local">
<hr><hr><hr>
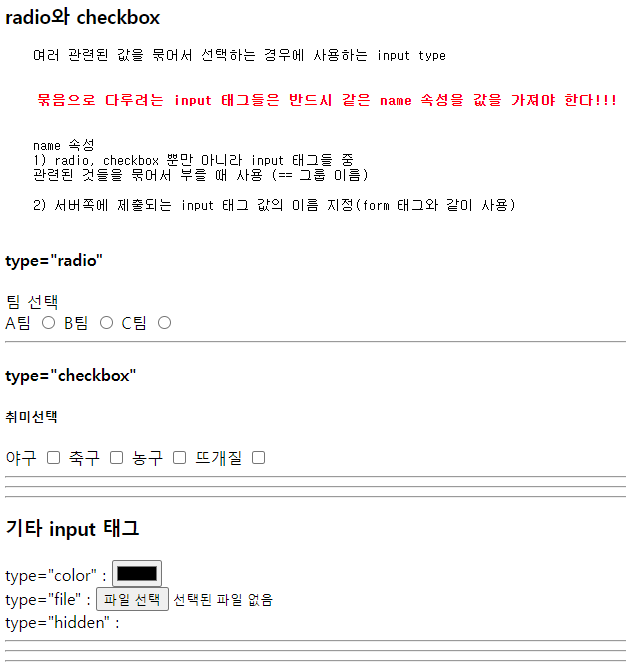
<h3>radio와 checkbox</h3>
<pre>
여러 관련된 값을 묶어서 선택하는 경우에 사용하는 input type
<strong style="color: red;">
묶음으로 다루려는 input 태그들은 반드시 같은 name 속성을 값을 가져야 한다!!!
</strong>
name 속성
1) radio, checkbox 뿐만 아니라 input 태그들 중
관련된 것들을 묶어서 부를 때 사용 (== 그룹 이름)
2) 서버쪽에 제출되는 input 태그 값의 이름 지정(form 태그와 같이 사용)
</pre>
<h4>type="radio"</h4>
<!-- id 속성 : 식별자 (하나의 HTML문서에서 중복 금지) -->
팀 선택<br>
<label for="a-team">A팀</label> <input type="radio" name="team" id="a-team">
<label>B팀</label> <input type="radio" name="team" id="b-team">
<label>C팀</label> <input type="radio" name="team" id="c-team">
<hr>
<h4>type="checkbox"</h4>
<h5>취미선택</h5>
<label for="baseball">야구</label>
<input type="checkbox" name="hobby" id="baseball">
<label for="soccer">축구</label>
<input type="checkbox" name="hobby" id="soccer">
<label for="basketball">농구</label>
<input type="checkbox" name="hobby" id="basketball">
<!-- 두번째 방법! -->
<label>뜨개질
<input type="checkbox">
</label>
<hr>
<hr>
<hr>
<h3>기타 input 태그</h3>
type="color" : <input type="color"><br>
type="file" : <input type="file"><br>
type="hidden" : <input type="hidden" value="값이 있었는데 없었어요">
<hr>
<hr>
<hr>
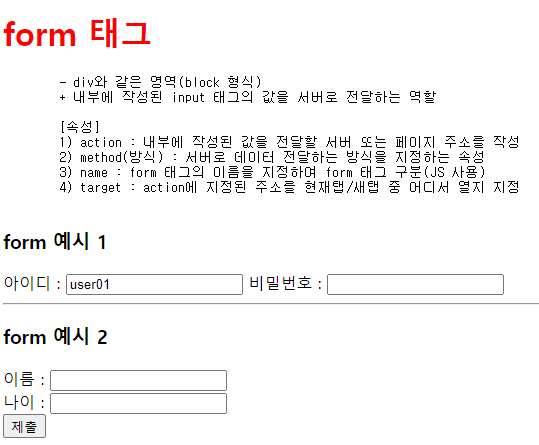
<h1 style="color : red">form 태그</h1>
<pre>
- div와 같은 영역(block 형식)
+ 내부에 작성된 input 태그의 값을 서버로 전달하는 역할
[속성]
1) action : 내부에 작성된 값을 전달할 서버 또는 페이지 주소를 작성
2) method(방식) : 서버로 데이터 전달하는 방식을 지정하는 속성
3) name : form 태그의 이름을 지정하여 form 태그 구분(JS 사용)
4) target : action에 지정된 주소를 현재탭/새탭 중 어디서 열지 지정
</pre>
<h3>form 예시 1</h3>
<form>
아이디 : <input type="text" name="id" value="user01">
비밀번호 : <input type="password" name="pw">
</form>
<!--
주소?id=user01&pw=pass01
? : 제출된 값을 나타내는 문자열의 시작부분
id, pw : input태그 name 속성값
user01, pass01 : input 태그에 입력한 값 (value)
id=user01&pw=pass01 : name 속성 값이 'id'인 input 태그에 작성된값 'user01' 과,
name 속성 값이 'pw'인 input 태그에 작성된값 'pass01' 이다
-->
<hr>
<h3>form 예시 2</h3>
<form action="08_하이퍼링크관련태그.html">
<!-- action : 제출할 서버 또는 페이지 주소 -->
이름 : <input type="text" name="inputName"> <br>
나이 : <input type="number" name ="inputAge"> <br>
<button type="submit">제출</button>
</form>
<hr>
<h3>form 예시 3</h3>
<form action="07_이미지관련태그.html" target="_blank">
팀 선택<br>
<label for="aa-team">A팀</label> <input type="radio" name="team" id="aa-team" value="A">
<label>B팀</label> <input type="radio" name="team" id="bb-team" value="B">
<label>C팀</label> <input type="radio" name="team" id="cc-team" value="C">
<br><br>
<label for="baseball">야구</label>
<input type="checkbox" name="hobby" id="baseball" value="야구">
<label for="soccer">축구</label>
<input type="checkbox" name="hobby" id="soccer" value="축구">
<label for="basketball">농구</label>
<input type="checkbox" name="hobby" id="basketball" value="농구">
<br>
<br>
<button type="submit">제출</button>
</form>
<!-- radio, checkbox 선택 시 전달되는 값이 'on' 으로 나오는 경우
-> 선택된 input 태그에 아무런 값이 작성되어있지 않을 때 (value 없을때)
체크는 되었다라는 것을 인식해 'on' 이라는 단어로 표현
** input 태그 value 속성 추가 **
-->
<h3>버튼을 나타내는 input 태그</h3>
<pre>
input 태그 중
type="submit" / type="reset" / type="button"
위 3개가 버튼을 나타내는 타입, 최근 사용 안함
-> 왜? 버튼의 사용도가 너무 많아져서
별도의 button 태그가 새롭게 등장함
</pre>
<!--
<input type="button"> 사용안하고
<button></button> 사용
-->
<!-- button 태그
type="submit / reset / button"
-->
<!-- submit : 제출(기본값) -->
<button>제출</button>
<!-- reset : 버튼이 포함된 form 태그 내부 input 값을 모두 초기화 -->
<form>
<input>
<button type="reset">초기화</button>
</form>
<button type="button" id="btn">그냥 버튼</button>
<!-- 아무런 기능이 없는 버튼
JS를 이용해서 원하는 기능을 추가할 수 있다!
-->
<script>
// 자바스크립트 작성 영역
document.getElementById("btn").addEventListener("click", function() {
alert("버튼 클릭됨");
})
</script>
<hr>
<h3>fieldset / legend</h3>
<pre>
fieldset : 테두리를 만들어 그룹을 구분하는 영역
legend : fieldset 테두리에 이름을 붙이는 것
</pre>
<form>
<fieldset>
<legend>회원가입</legend>
아이디 : <input> <br>
비밀번호 : <input type="password">
<button>가입하기</button>
</fieldset>
</form>
<hr><hr><hr>
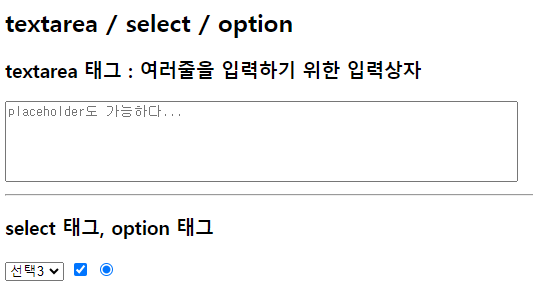
<h2>textarea / select / option</h2>
<h3>textarea 태그 : 여러줄을 입력하기 위한 입력상자</h3>
<textarea rows="5" cols="70" style="resize: none;"
placeholder="placeholder도 가능하다..."
></textarea>
<hr>
<h3>select 태그, option 태그</h3>
<form>
<select>
<option value="1">선택1</option>
<option value="2">선택2</option>
<option selected>선택3</option>
<option>선택4</option>
<option>선택5</option>
</select>
<!-- select 제출 시
option 태그에 value가 있으면 : value 속성안에 작성된 값
option 태그에 value가 없으면 : <option></option> 사이에 작성된 내용이 제출된다
selected 속성 : select의 기본 값을 설정하는 속성
-->
<input type="checkbox" checked>
<input type="radio" checked>
<!-- checked 속성 : checkbox / radio 체크해두는 속성 -->
</form>
</body>
</html>
cf ) 서버에 하단과 같은 주소( 예시 )로 전달

10_HTML연습문제 1.html
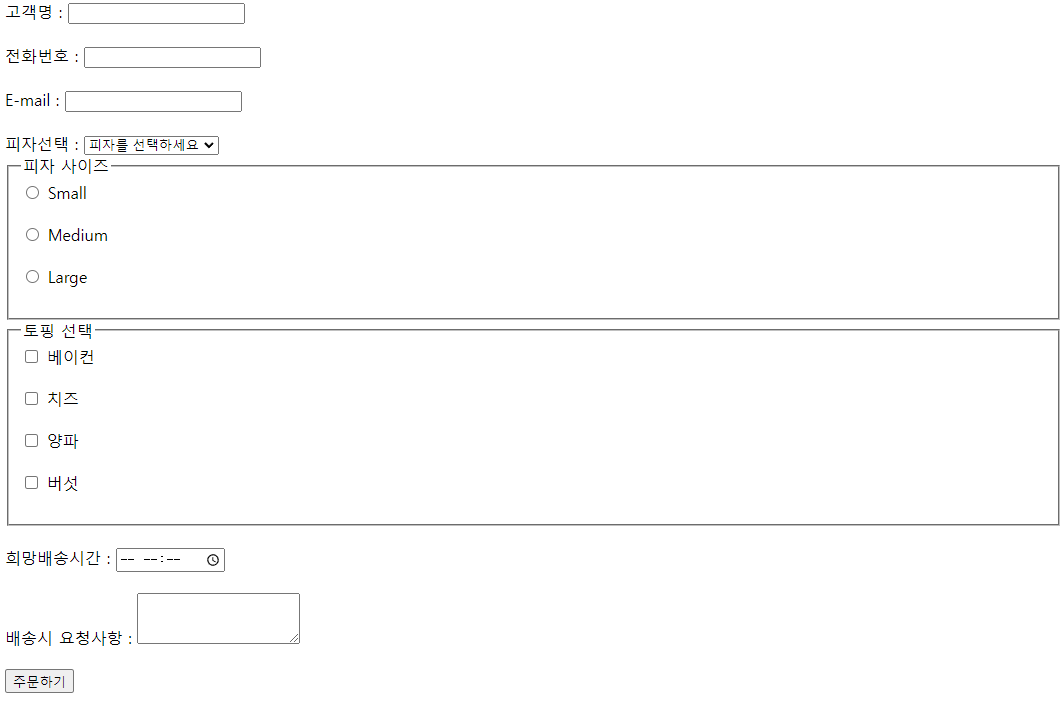
<!DOCTYPE html>
<html lang="en">
<head>
    <meta charset="UTF-8">
    <meta name="viewport" content="width=device-width, initial-scale=1.0">
    <title>10_HTML연습문제</title>
</head>
<body>
    <!-- form 태그 action에 아무것도 적지 않으면 현재 페이지로 정보 전달 -->
    <form action="">
        <label>고객명 :</label>
        <input type="text" name="clientName"> <br><br>

        <label>전화번호 :</label>
        <input type="tel" name="clientPhone"> <br><br>

        <label>E-mail :</label>
        <input type="email" name="clientEmail"> <br><br>


        <label>피자선택 : </label>
        <select name="pizza">
            <option value="cheese">치즈 피자</option>
            <option value="pepperoni">페퍼로니 피자</option>
            <option value="potato">포테이토 피자</option>
            <option value="sweatpotato">고구마 피자</option>
            <option selected>피자를 선택하세요</option>
        </select>

        <fieldset>
            <legend>피자 사이즈</legend>
            <label>
                <input type="radio" name="size" value="small">
                Small
            </label><br><br>
            <label>
                <input type="radio" name="size" value="medium">
                Medium
            </label><br><br>
            <label>
                <input type="radio" name="size" value="large">
                Large
            </label><br><br>
        </fieldset>

        <fieldset>
            <legend>토핑 선택</legend>
            <label>
                <input type="checkbox" name="topping" value="bacon">
                베이컨
            </label><br><br>
            <label>
                <input type="checkbox" name="topping" value="cheese">
                치즈
            </label><br><br>
            <label>
                <input type="checkbox" name="topping" value="onion">
                양파
            </label><br><br>
            <label>
                <input type="checkbox" name="topping" value="mushroom">
                버섯
            </label><br><br>
        </fieldset>
        <br>
        희망배송시간 :
        <input type="time"><br><br>

        배송시 요청사항 : <textarea row="3"></textarea><br><br>

        <button>주문하기</button>
    </form>
</body>
</html>
11_HTML연습문제 2.html
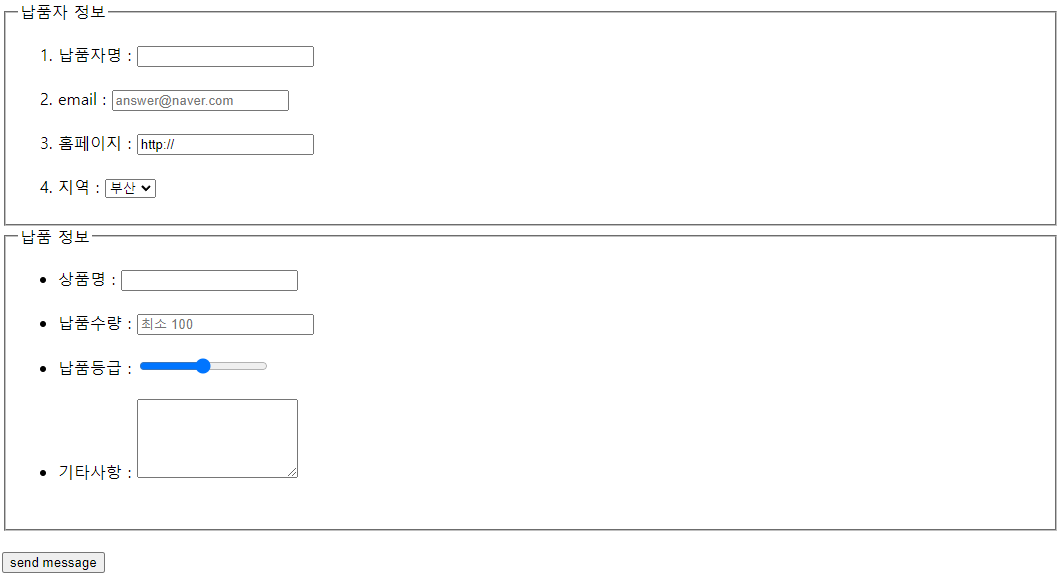
<!DOCTYPE html>
<html lang="en">
<head>
    <meta charset="UTF-8">
    <meta name="viewport" content="width=device-width, initial-scale=1.0">
    <title>11_HTML연습문제2</title>
</head>
<body>

    <form>

        <fieldset>
            <legend>납품자 정보</legend>

            <ol>
                <li>
                    <label>납품자명 : </label>
                    <input type="text" name="name">
                    <br><br>
                </li>
                <li>
                    <label>email : </label>
                    <input type="email" name="email" placeholder="answer@naver.com">
                    <br><br>
                </li>
                <li>
                    <label>홈페이지 : </label>
                    <input type="url" name="homepage" value="http://">
                    <br><br>
                </li>
                <li>
                    <label>지역 : </label>
                    <select name="location">
                        <option >부산</option>
                        <option>서울</option>
                        <option>경기</option>
                    </select>
                </li>
            </ol>
        </fieldset>

        <fieldset>
            <legend>납품 정보</legend>
            <ul>
                <li>
                    <label>상품명 :
                        <input type="text" name="productName">
                    </label>
                </li>

                <br>

                <li>
                    <label>납품수량 :
                        <input type="number" placeholder="최소 100" min="100">
                    </label>
                </li>

                <br>

                <li>
                    <label>납품 등급 :
                        <input type="range">
                    </label>
                </li>

                <br>

                <li>
                    <label>기타 사항 :
                        <textarea name="etc" rows="5"></textarea>
                    </label>
                </li>
                <br>
            </ul>
        </fieldset>
        <br>

        <button>send message</button>
    </form>
</body>
</html>
12_HTML연습문제 3.html
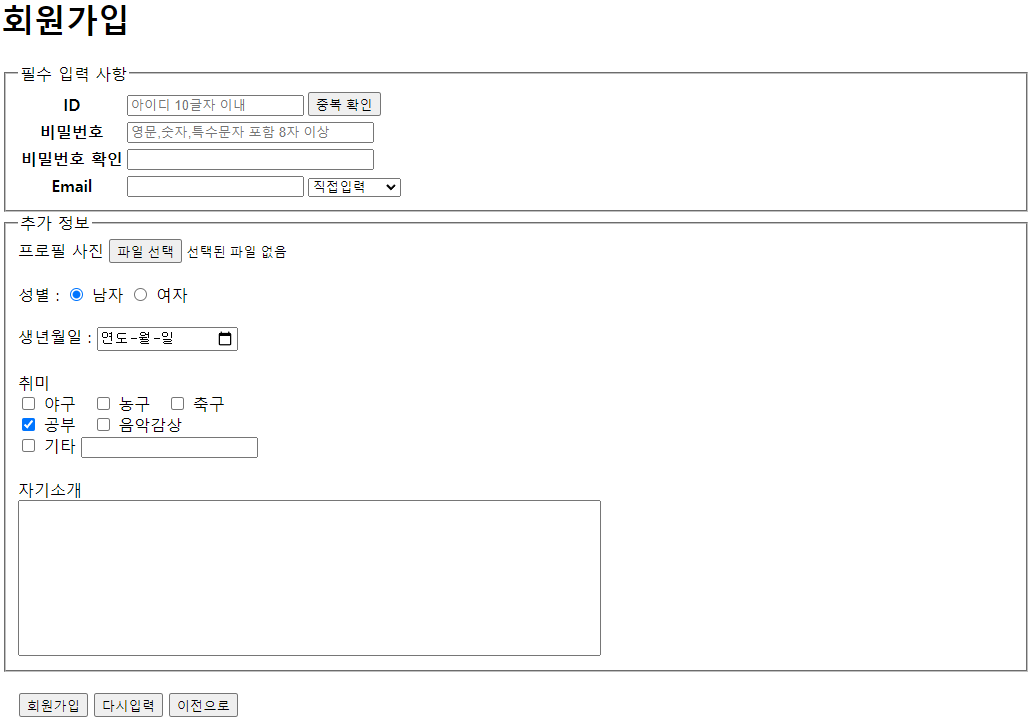
<!DOCTYPE html>
<html lang="en">
<head>
<meta charset="UTF-8">
<meta name="viewport" content="width=device-width, initial-scale=1.0">
<title>12_HTML연습문제3</title>
</head>
<body>
<form>
<h1>회원 가입</h1>
<fieldset>
<legend>필수 입력 사항</legend>
<table>
<tr>
<th>ID</th>
<td>
<input type="text" placeholder="아이디 10글자 이내">
</td>
<td>
<button type="button">중복 확인</button>
</td>
</tr>
<tr>
<th>비밀번호</th>
<td colspan="2">
<input type="password" size="30" placeholder="영문,숫자,특수문자 포함 8자 이상">
</td>
</tr>
<tr>
<th>비밀번호 확인</th>
<td colspan="2">
<input type="password" size="30">
</td>
</tr>
<tr>
<th>Email</th>
<td>
<input type="email">
</td>
<td>
<select>
<option>naver.com</option>
<option>daum.com</option>
<option>nate.com</option>
<option>gmail.com</option>
<option selected>직접입력</option>
</select>
</td>
</tr>
</table>
</fieldset>
<fieldset>
<legend>추가 정보</legend>
프로필 사진 <input type="file"><br><br>
성별 :
<label>
<input type="radio" value="man" name="gender" checked>남자
</label>
<label>
<input type="radio" value="woman" name="gender">여자
</label>
<br><br>
생년월일 : <input type="date" name="dateIn"><br><br>
취미<br>
<label>
<input type="checkbox" name="hobby" value="baseball">
야구
</label>
<label>
<input type="checkbox" name="hobby" value="baseketball">
농구
</label>
<label>
<input type="checkbox" name="hobby" value="football">
축구
</label><br>
<label>
<input type="checkbox" name="hobby" value="study" checked>
공부
</label>
<label>
<input type="checkbox" name="hobby" value="music">
음악감상
</label>
<br>
<label>
<input type="checkbox" name="hobby" value="etc">
기타
</label>
<input type="text">
<br><br>
자기소개<br>
<textarea rows="10" cols="80" style="resize: none;"></textarea>
</fieldset>
<br>
<button type="submit">회원가입</button>
<button type="reset">다시입력</button>
<button type="button">이전으로</button>
</form>
</body>
</html>CSS
<!DOCTYPE html>
<html lang="en">
<head>
<meta charset="UTF-8">
<meta name="viewport" content="width=device-width, initial-scale=1.0">
<title>01_CSS개요, 선택자 1</title>
<style>
/* CSS 주석 */
/* style 태그 : css 코드만 작성할 수 있는 영역을 제공하는 태그 */
div {
border : 3px solid red; /* 3px 두께의 빨간 실선 */
}
strong {
background-color: yellow;
}
span {
background-color: pink;
}
/* 아이디 선택자 (#) */
#li-1 { background-color: red;}
#li-2 { background-color: orange;}
#li-3 { background-color: yellow;}
#li-4 { background-color: green;}
#li-5 { background-color: blue;}
/* 콤마(,) 를 이용한 여러 선택자 동시 작성 */
#li-1, #li-2, #li-3, #li-4, #li-5 {
color: white;
}
/* 클래스 선택자 (.) */
.test-1 { color: red;}
.test-2 { color: white; background-color: black;}
.aaa {
font-weight: bold;
}
/* 모든 요소 선택자 (*) */
/* 웹폰트 사이트 : 눈누 */
@font-face { /* 웹폰트 추가 */
font-family: 'omyu_pretty';
src: url('https://cdn.jsdelivr.net/gh/projectnoonnu/noonfonts_2304-01@1.0/omyu_pretty.woff2') format('woff2');
font-weight: normal;
font-style: normal;
}
* {
/* 글꼴 모양 */
font-family: 'omyu_pretty';
/* 글꼴 크기 */
font-size: 20px;
}
</style>
</head>
<body>
<h1>CSS(Cascading Style Sheets)</h1>
<pre>
마크업 언어(HTML)가 실제로 화면에
표시되는 방법(모양, 색상, 크기, 스타일...)을 기술하는 언어.
(HTML 코드가 화면에 어떤 스타일로 보여질지 지정하는 것)
</pre>
<hr>
<h1>CSS Selector(선택자)</h1>
<pre>
Selector란?
현재 HTML 문서 내에서 특정한 요소를 선택하는 문자 또는 문자열.
스타일을 적용하고자 하는 요소를 선택하는 방법
</pre>
<hr>
<h3>태그 선택자</h3>
<pre>
현재 HTML 문서 내에 같은 태그를 선택하는 선택자.
작성법
태그명 { CSS 코드 ; }
</pre>
<div>
<strong>strong 태그에 작성된 내용입니다.</strong>
<br>
<span>span 태그에 작성된 내용입니다.</span>
<ul>
<li>
<strong>strong 태그에 작성된 내용입니다.</strong>
</li>
<li>
<span>span 태그에 작성된 내용입니다.</span>
</li>
</ul>
</div>
<hr>
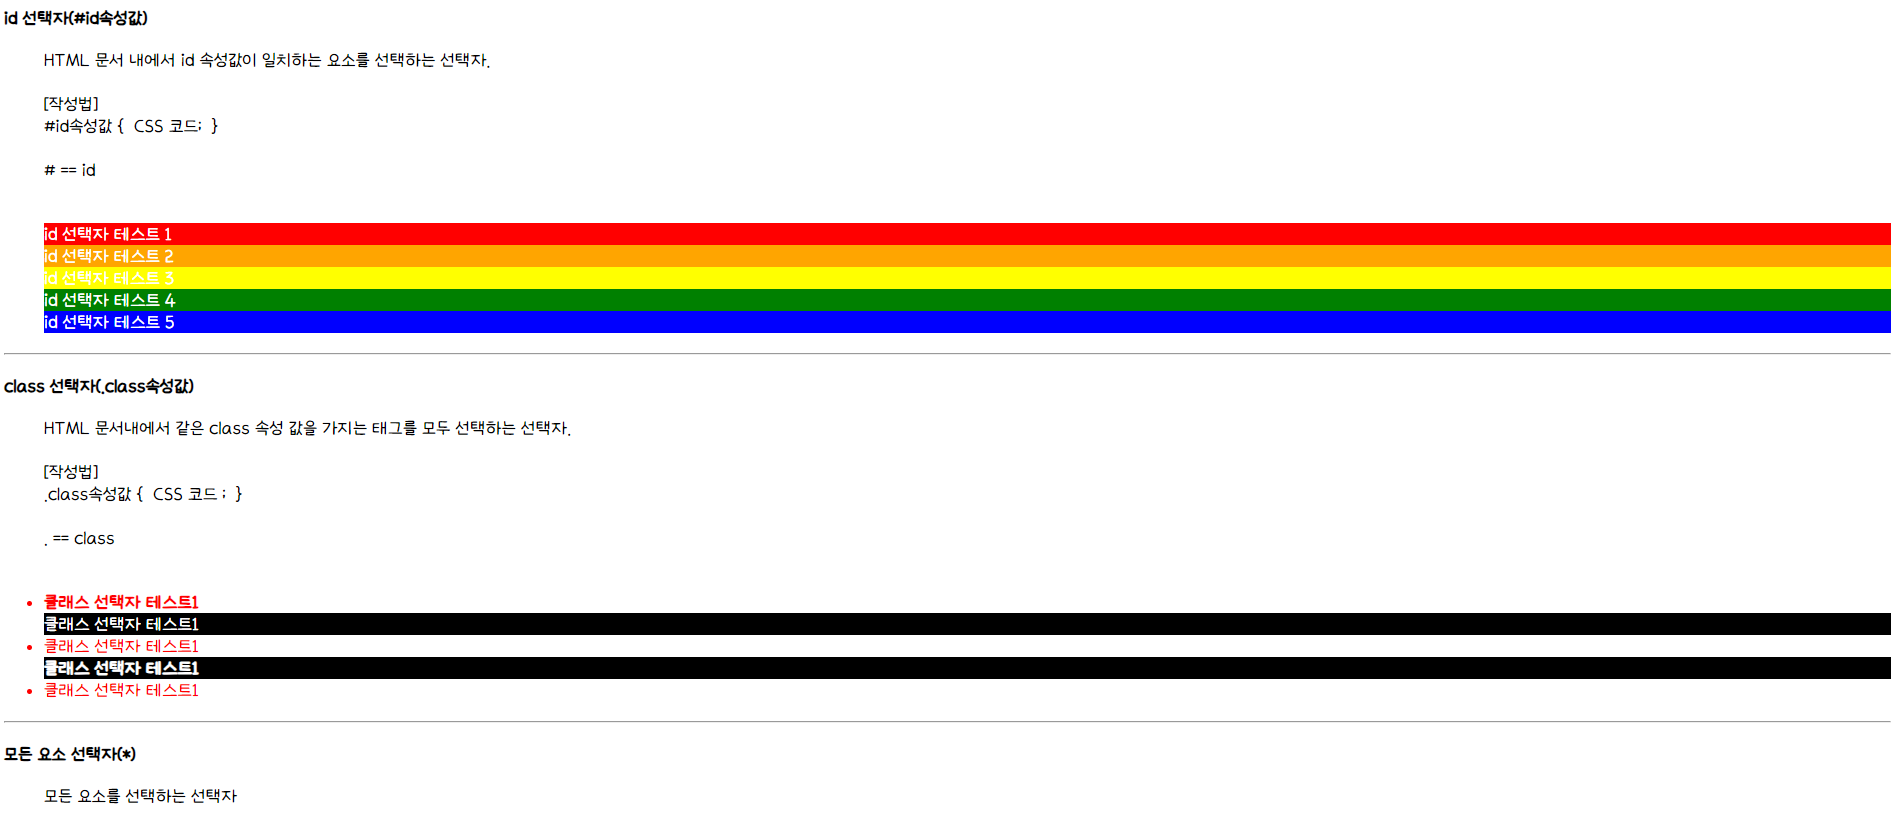
<h3>id 선택자(#id속성값)</h3>
<pre>
HTML 문서 내에서 id 속성값이 일치하는 요소를 선택하는 선택자.
[작성법]
#id속성값 { CSS 코드; }
# == id
</pre>
<!--
Java : 카멜 표기법(helloWorld)
DB : 대문자, 띄어쓰기 _ 로 표시(MEMBER_NO)
HTML : 하이픈 표기법 (li-1, class-1)/ 언더바 표기법(li_1, class_1)
-->
<ol>
<li id="li-1">id 선택자 테스트 1</li>
<li id="li-2">id 선택자 테스트 2</li>
<li id="li-3">id 선택자 테스트 3</li>
<li id="li-4">id 선택자 테스트 4</li>
<li id="li-5">id 선택자 테스트 5</li>
</ol>
<hr>
<h3>class 선택자(.class속성값)</h3>
<pre>
HTML 문서내에서 같은 class 속성 값을 가지는 태그를 모두 선택하는 선택자.
[작성법]
.class속성값 { CSS 코드 ; }
. == class
</pre>
<ul>
<li class="test-1 aaa">클래스 선택자 테스트1</li>
<li class="test-2">클래스 선택자 테스트1</li>
<li class="test-1">클래스 선택자 테스트1</li>
<li class="test-2 aaa">클래스 선택자 테스트1</li>
<li class="test-1">클래스 선택자 테스트1</li>
</ul>
<hr>
<h3>모든 요소 선택자(*)</h3>
<pre>
모든 요소를 선택하는 선택자
</pre>
</body>
</html>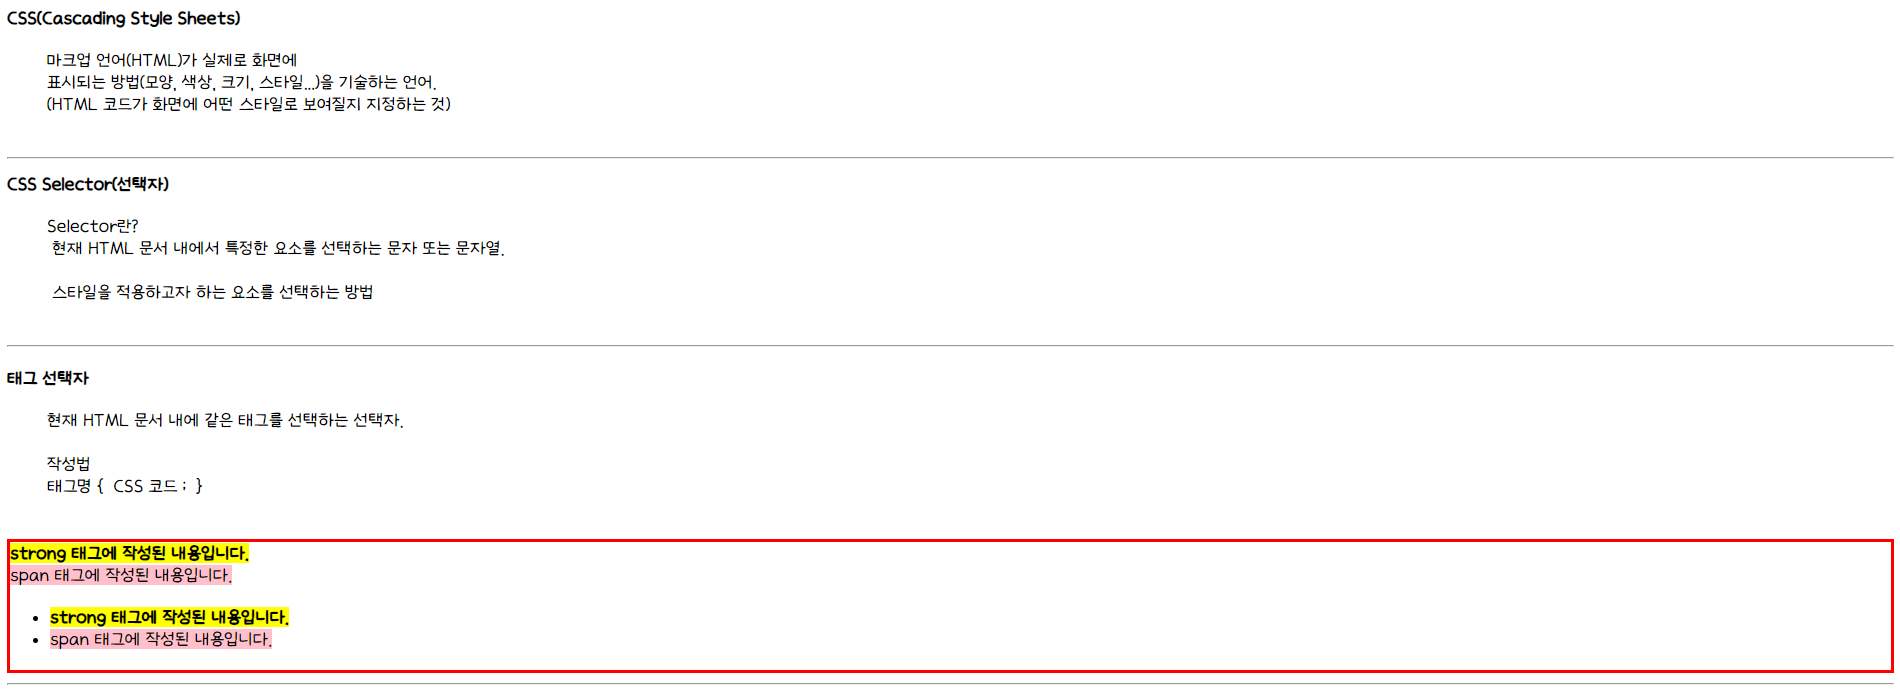
참고 사이트 추천
1. Unsplash (이미지 무료 다운로드 사이트)
https://unsplash.com/ko
2. 눈누 (웹폰트 사이트)
https://noonnu.cc/
cf) TIP!
VSCODE
파일 -> 폴더 열기 -> webfront 폴더 선택 시 모든 파일 볼 수 있음
