
🧩 id로 태그 선택하기
document.ElementById('id')- 만약 존재하지 않는 id를 넣으면
null출력
🧩 class로 태그 선택하기
document.ElementByClassName('class')- 깊이랑은 상관 없이 위에서부터 아래 순서
- 클래스가 하나밖에 없는 클래스를 선택해도, 요소 1개가 들어있는
html 컬렉션이 선택된다. index로 접근해야 하나만 출력 할 수 있다.- 존재하지 않는 클래스 이름을 출력하면 null 값이 아닌
존재하지 않는 html컬렉션이 출력
const myTags = document.getElementsByClassName('red');
console.log(myTags);
console.log(myTags[0]);
const myTags = document.getElementsByClassName('bee');
console.log(myTags === false); // false
console.log(myTags.length); // 0🧩 유사배열
- 배열의 상태는 유사하지만, 배열은 아닌 것
- 유사 배열도 다음 같은 조건이 갖춰줘야 한다.
- 숫자 형태의 indexing이 가능하다.
- length 속성
- 배열의 기본 메소드를 사용할 수 없다.
- Array.isAraay는 false
const myTags = documnet.getElementsByClassName('color-btn');
Array.isAraay(myTags);		// false
🧩 태그 이름으로 태그 선택
document.getElementsByTagName('tag');
🧩 css 선택자로 태그 선택
document.querySelector('css')= HTML 태그 유연하게 선택document.querySelectorAll('css')= 여러개의 태그 선택querySelector는 해당되는 요소가 여러개라도, 가장 1번재 요소만 선택qeurySelectorAll은 요소가 하나만 있더라도 NodeList로 반환된다.- 아래 코드는 1번째 빼고 다 같은 결과가 나온다.
🔥
document.querySelector, querySelectorAll 사용시 주의점
클래스명 =.
아이디명 =#붙여 줘야한다.
const myTag = document.querySelector(".color-btn");
console.log(myTag);

const myTags = document.querySelectorAll(".color-btn");
console.log(myTags);

const myTags2 = document.getElementsByClassName("color-btn");
console.log(myTags2);
🧩 이벤트 / 버튼 클릭
const btn = document.querySelector('#myBtn');

// 이벤트 핸들링
btn.onclick = function () {		// 이벤트 핸들러
	console.log('bee');
}| 메소드 | 의미 | 결과 |
|---|---|---|
| document.getElementById('id') | HTML id속성으로 태그 선택하기 | id에 해당하는 태그 하나 |
| document.getElementsByClassName('class') | HTML class속성으로 태그 선택하기 | class에 해당하는 태그 모음(HTMLCollection) |
| document.getElementsByTagName('tag') | HTML 태그 이름으로 태그 선택하기 | tag에 해당하는 태그 모음(HTMLCollection) |
| document.querySelector('css') | css 선택자로 태그 선택하기 | css 선택자에 해당하는 태그 중 가장 첫번째 태그 하나 |
| document.querySelectorAll('css') | css 선택자로 태그 선택하기 | css 선택자에 해당하는 태그 모음(NodeList) |
🧩 window
- 모든 내장객체는
window안에 존재 - 전역객체 Global Object
console.log(window);🧩 DOM (Document Object Model)
- 문서 객체 모델
console.log(document);
console.log(typeof document);
console.dir(document);

const title = document.querySelector("#title");
🧩 console.log vs console.dir
const str = 'bee';
const num = 123;
const bool = true;
const arr = [1, 2, 3];
const obj = {
  name: 'bee',
  email: 'bee@honey.kr',
};

function func() {
  console.log('bee');
}

console.log('--- str ---');
console.log(str);
console.dir(str);
console.log('--- num ---');
console.log(num);
console.dir(num);
console.log('--- bool ---');
console.log(bool);
console.dir(bool);
console.log('--- arr ---');
console.log(arr);
console.dir(arr);
console.log('--- obj ---');
console.log(obj);
console.dir(obj);
console.log('--- func ---');
console.log(func);
console.dir(func);
📌 출력하는 자료형이 다르다
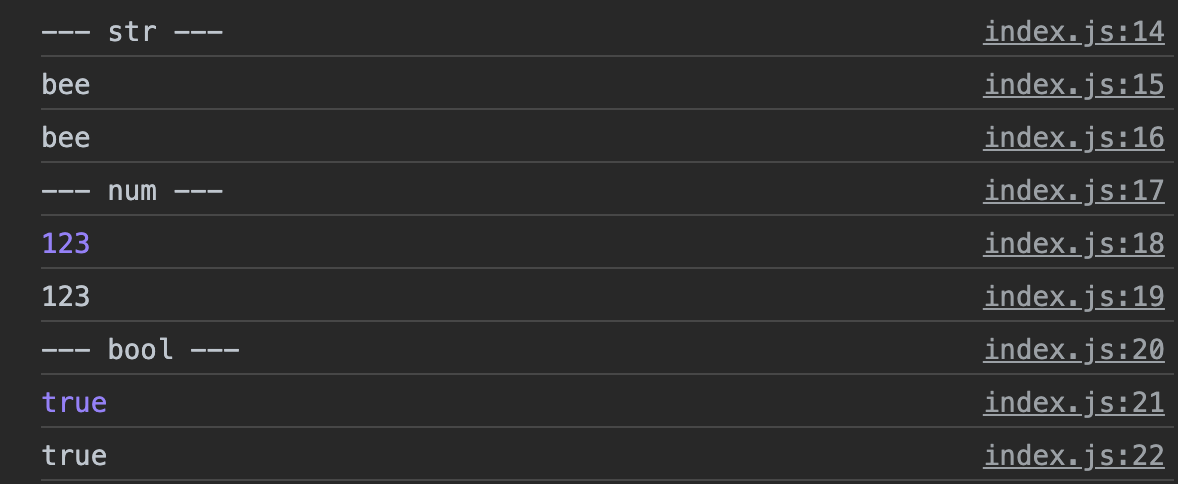
dir메소드는 문자열 표시 형식으로 콘솔에 출력
📌 log 값 자체 / dir 객체의 속성
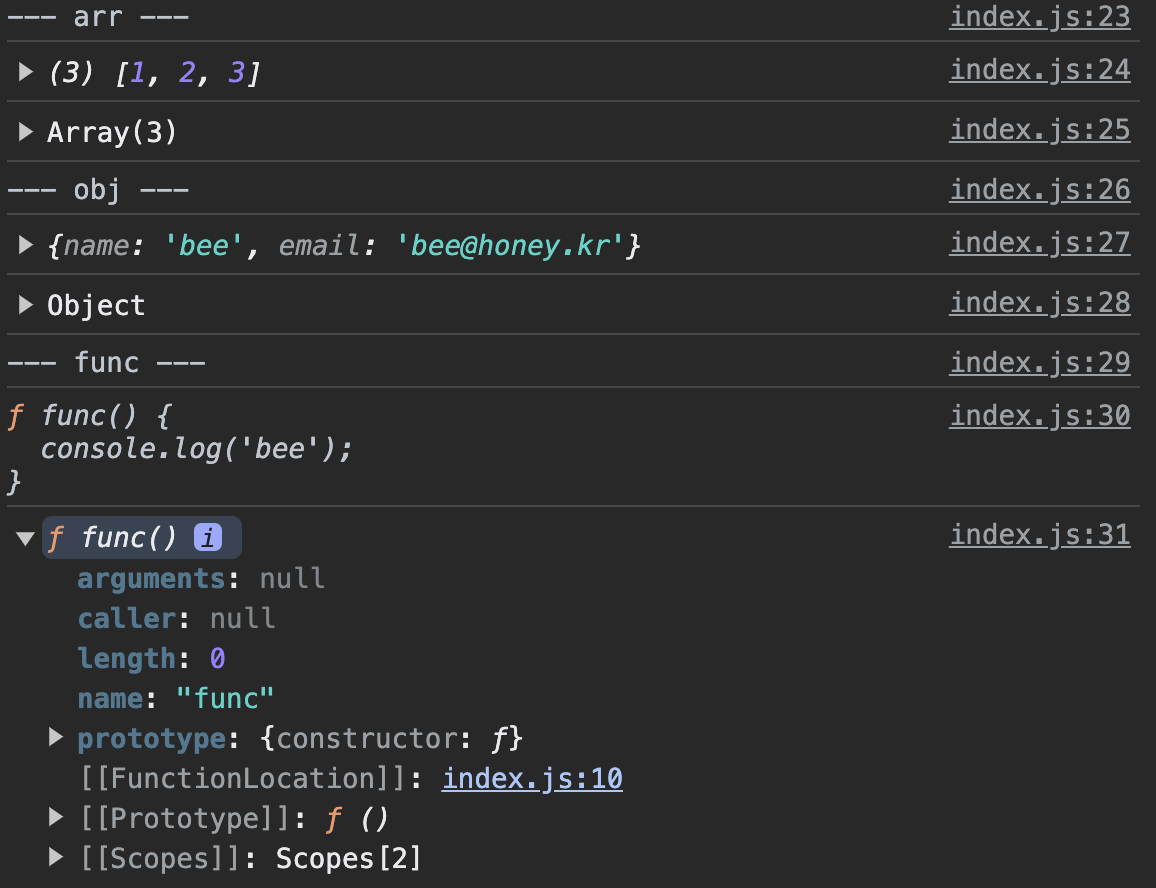
log메소드는 파라미터로 전달받은 값을 위주로 출력dir메소드는 객체의 속성을 좀 더 자세하게 출력- 객체의 유형이 먼저 출력
- 함수가 가진 속성들을 출력
📌 log 여러개 / dir 1개만

log메소드는 여러 값을 쉼표로 구분해서 전달하면, 전달 받은 모든 값을 출력dir메소드는 여러 값을 전달하더라도 1번째 값만 출력
📌 Dom 객체
log메소드는 HTML 형태로 출력dir메소드는 객체 형태로 출력
🔥
log= 콘솔에서 값 자체를 확인
🔥dir= 객체의 속성을 확인
🧩 DOM 트리
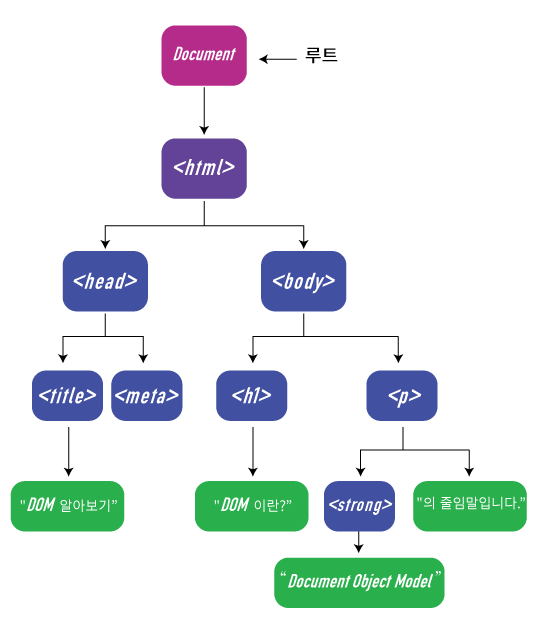
📌 노드 타입 (Node Type)
요소 노드(Element Node) : 태그를 표현하는 노드텍스트 노드(Text Node) : 문자를 표현하는 노드'
-> 텍스트 노드는 요소 노드의 자식요소가 되고, 텍스트 노드는 자식노드를 가질 수 없다.
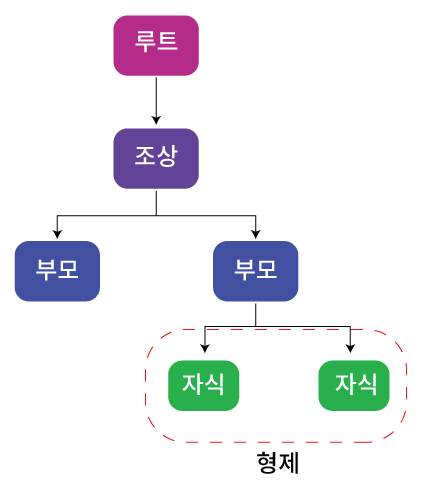
📌 부모 요소 노드
const myTag = document.querySelector('#content');

// 부모 요소 노드
console.log(myTag.parentElement);
📌 형제 요소 노드
// 형제 요소 노드
console.log(myTag.previousElementSibling);	// 이전 or 좌측
console.log(myTag.nextElementSibling);		// 다음 or 우측
📌 자식 요소 노드
// 자식 요소 노드
console.log(myTag.children[1]);
console.log(myTag.firstElementChild);	// 첫번째 자식
console.log(myTag.lastElementChild);	// 마지막 자식
🧩 요소 노드 추가하기
- 요소 노드 만들기
const first = document.createElement('li');- 요소 노드 꾸미기: textContent, innerHTML ...
first.textContent = '처음';- 요소 노드 추가하기: NODE.prepend, append, after, before
tomorrow.prepend(first);	// 요소 가장 첫번째에 추가하기
tomorrow.append(last);		// 요소 마지막에 추가하기
tomorrow.before(prev);		// 메소드를 호출한 앞쪽
tomorrow.after(prev);		// 메소드를 호출한 뒤쪽
🧩 요소 노드 삭제하기
// 노드 삭제하기: Node.remove()
tomorrow.remove();
today.children[2].remove();
🧩 요소 노드 이동하기
// 노드 이동하기: prepend, append, before, after
today.append(tomorrow.children[1]);

tomorrow.children[1].after(today.children[1]);
🧩 속성 접근
element.getAttribute('속성')
🧩 속성 추가
- 존재하지 않는 속성 =
추가 - 존재하는 속성 =
수정 element.setAttribute('속성', '값')
🧩 속성 삭제
element.removeAttribute('속성')
🧩 스타일 다루기
- css 원하는 스타일의 클래스를 미리 만들고, JavaScript로 클래스 속성을 다루는 방식
권장
// element.classList: add, remove, toggle
const item = tomorrow.children[1];
item.classList.toggle('done');
🧩 DOM 이동시 활용 가능한 프로퍼티
| 프로퍼티 | 유형 | 결과 |
|---|---|---|
| element.children | 자식 요소 노드 | element의 자식 요소 모음(HTMLCollection) |
| element.firstElementChild | 자식 요소 노드 | element의 첫 번째 자식 요소 하나 |
| element.lastElementChild | 자식 요소 노드 | element의 마지막 자식 요소 하나 |
| element.parentElement | 부모 요소 노드 | element의 부모 요소 하나 |
| element.previousElementSibling | 형제 요소 노드 | element의 이전(previous) 혹은 좌측(left)에 있는 요소 하나 |
| element.nextElementSibling | 형제 요소 노드 | element의 다음(next) 혹은 우측(right)에 있는 요소 하나 |
| node.childNodes | 자식 노드 | node의 자식 노드 모음(NodeList) |
| node.firstChild | 자식 노드 | node의 첫 번째 자식 노드 하나 |
| node.lastChild | 자식 노드 | node의 마지막 자식 노드 하나 |
| node.parentNode | 부모 노드 | node의 부모 요소 하나 |
| node.previousSibling | 형제 노드 | node의 이전(previous) 혹은 좌측(left)에 있는 노드 하나 |
| node.nextSibling | 형제 노드 | node의 다음(next) 혹은 우측(right)에 있는 노드 하나 |
🧩 주요 요소 노드 프로퍼티
| 프로퍼티 | 내용 | 참고사항 |
|---|---|---|
| element.innerHTML | 요소 노드 내부의 HTML코드 문자열로 리턴 | 요소 안의 정보를 확인할 수도 있지만, 내부의 HTML 자체를 수정할 때 좀 더 자주 활용 |
| element.outerHTML | 요소 노드 자체의 전체적인 HTML 코드를 문자열로 리턴 | outerHTML은 새로운 값을 할당하면 요소 자체가 교체되어 버리기 때문에 주의 |
| element.textContent | 요소 노드 내부의 내용들 중에서 HTML을 제외하고 텍스트만 리턴 | textContent는 말그대로 텍스트만 다루기 때문에 HTML태그를 쓰더라도 모두 텍스트로 처리됨 |
🧩 이벤트 핸들러 등록 / 삭제
- 이벤트 핸들러 등록 :
element.addEventListener(event, handler) - 이벤트 핸들러 삭제 :
element.removeListener(event, handler)
// 이벤트 등록하기
let btn = document.querySelector('#myBtn');

function event1() {
	console.log('Hi bee!');
};

function event2() {
  console.log('Hi again!');
}

btn.addEventListener('click', event1);
btn.addEventListener('click', event2);

btn.removeEventListener('click', event2);
🧩 버블링
- 이벤트가
상위요소로 전파 - 어떤 하나의 요소에 이벤트가 발생하면 요소에 할당된 이벤트 핸들러에서 동작하고 끝나는게 아니라
같은 타입의 핸들러에 한해서부모 요소의 핸들러도 동작 - 이벤트 핸들러가 등록된 요소에 접근 =
currentTarget - 버블링 멈추기 =
event.stoppropagation();
🧩 캡쳐링
- 이벤트가
하위요소로 전파 - 자식요소에서 부모요소로 전파
🧩 브라우저 기본 동작 막기
- 꼭 필요할때만 사용하기
event.preventDefault();
🧩 마우스 버튼 이벤트
- MouseEvent.button
0: 마우스 왼쪽 버튼1: 마우스 휠3: 마우스 오른쪽 버튼
- MoustEvent.type
click: 마우스 왼쪽 버튼을 눌렀을 때contextmenu: 마우스 오른쪽 버튼을 눌렀을때dbclick: 동일한 위치에서 빠르게 두번 click 했을 때mousedown: 마우스 버튼을 누른 순간mouseup: 마우스 버튼을 눌렀다 뗀 순간
🧩 마우스 이동 이벤트 1
- MouseEvent.type
mousemove: 마우스 포인터가 이동할 때mouseover: 마우스 포인터가 요소 밖에서 안으로 이동 할 때mouseout: 마우스 포인터가 요소 안에서 밖으로 이동 할 때
- MouseEvent.target
- 이벤트가 발생한 요소
- MouseEvent.relatedTarget
- 이벤트가 발생하기 직전(또는 직후)에 마우스가 위치해 있던 요소
mouseover,mouseout= 자식요소 계산
mouseenter,mouseleave= 자식요소 계산 X
📍 공통점
- 마우스 포인터가 요소 바깥쪽에서 안쪽으로, 안쪽에서 바깥쪽으로 들어갈때 발생
🔥 차이점
- 버블링이 일어나지 않음
- 자식요소 계산하지 않음
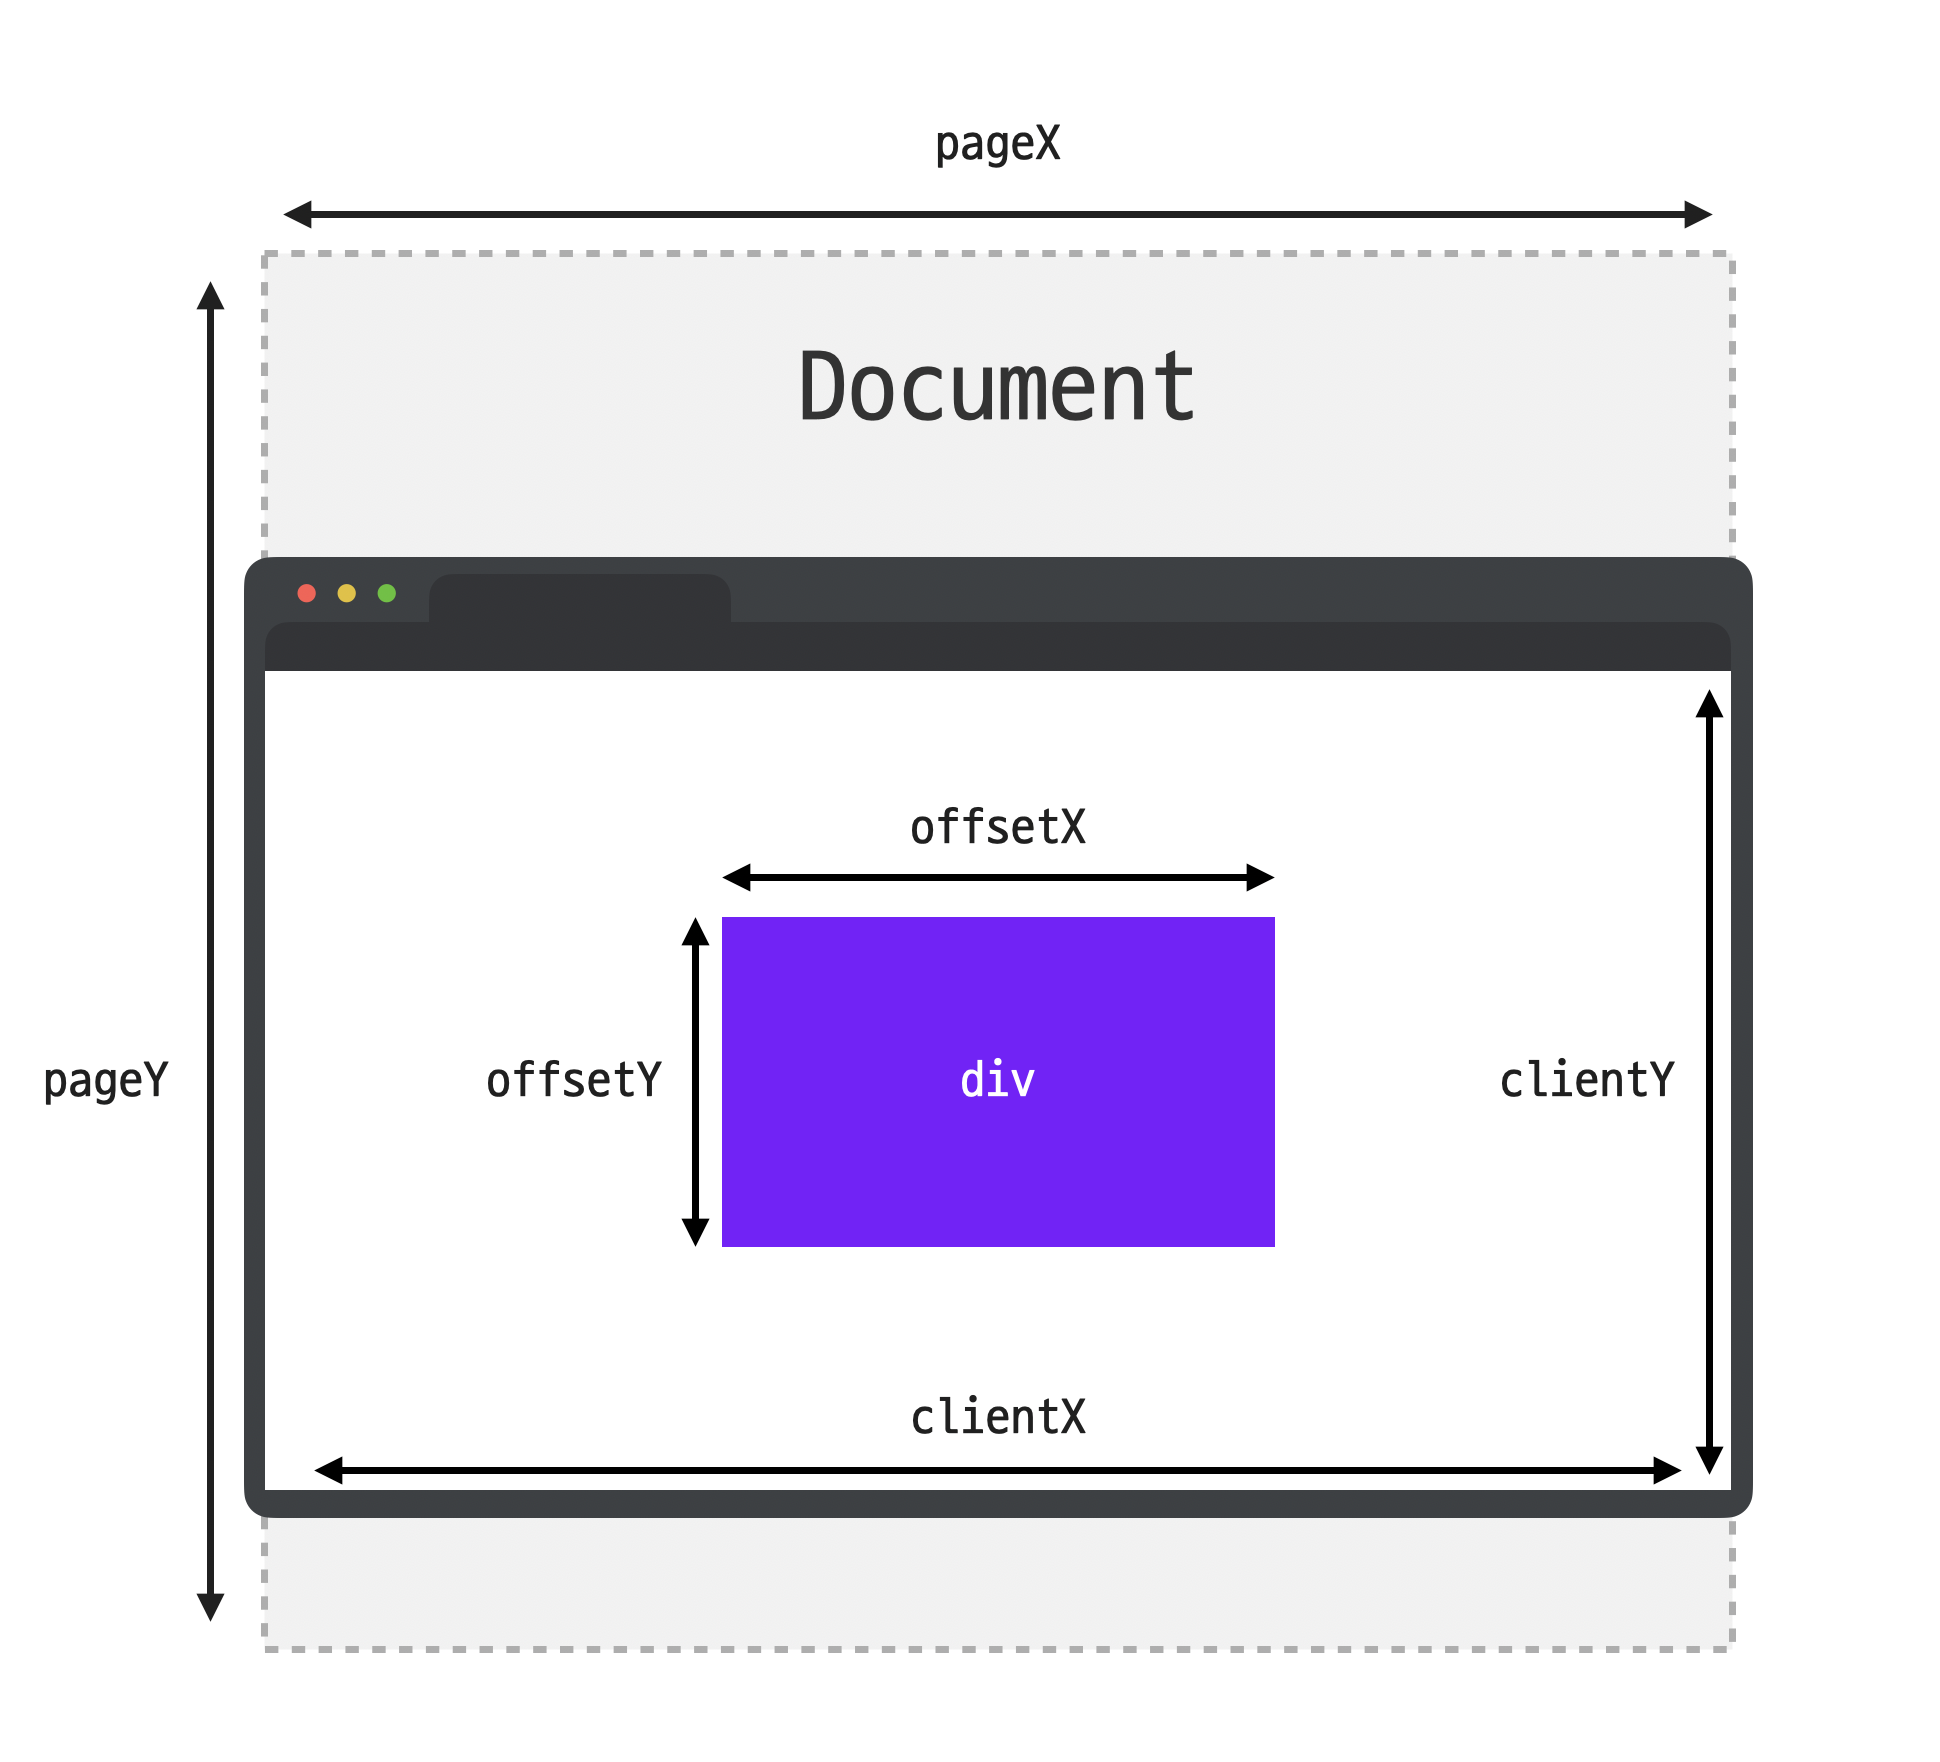
MouseEvent.clientX, clientY: 화면에 표시되는 창 기준 마우스 포인터 위치MouseEvent.pageX, pageY: 웹 문서 전체 기준 마우스 포인터 위치MouseEvent.offsetX, offsetY: 이벤트가 발생한 요소 기준 마우스 포인터 위치
🧩 키보드 이벤트
KeyboardEvent.typekeydown: 키보드 버튼을 누른 순간keypress: 키보드 버튼을 누른 순간keyup: 키보드 버튼을 눌렀다 뗀 순간
KeyboardEvent.key: 이벤트가 발생한버튼의 값KeyboardEvent.code: 이벤트가 발생한 버튼의 키보드에서물리적인 위치
🧩 input 태그
-
포커스 이벤트
focusin: 요소에 포커스 되었을 때focusout: 요소에 포커스가 빠져나갈 때focus: 요소에 포커스가 되었을 때 (버블링 X)blur: 요소에 포커스가 빠져나갈 때 (버블링 X)
-
입력 이벤트
input: 사용자가 입력을 할 때change: 요소의 값이 변했을 때
🧩 스크롤 이벤트
- 스크롤은 윈도우 객체에 이벤트 핸들러를 등록하는 경우가 많음

해보고 싶은거 하기