react-native-bootsplash 이 라이브러리가 더 안정적이라 이걸 사용하도록
2026.03월기준
시작,단색 스플래시
- 시작
라이브러리 사용함
블로그 보고 따라함
- 기본 스플래시 없애기
안드로이드 12 부터 기본 스플래시가 강제적으로 들어가게됨
→ 투명하게 만들어서 안보이게 함
안드로이드 12부터 SplashScreen API가 추가되었다. (안드로이드 12 SplashScreen API 문서) 따라서 기본 스플래시가 강제적으로 보이게 되어서
커스텀 스플래시를 만들면 기본+커스텀 두 개의 스플래시가 보이게 된다.
따라서 아래 코드를 추가하여 기본 시작 화면을 투명화 처리함으로써 기본 스플래시가 안보이게 한다.
android/app/src/main/res/values/styles.xml로 이동하여 다음과 같이 파일을 편집
<style name="AppTheme" parent="Theme.AppCompat.DayNight.NoActionBar">
    <!-- Customize your theme here. -->
    <item name="android:editTextBackground">@drawable/rn_edit_text_material</item>
    <item name="android:windowIsTranslucent">true</item> // 코드 추가
</style>- 해상도별 스플래시 이미지 준비
이 크기대로 디자이너님이 만들어 주셨다
- 이미지 맞추기
- 에서 받은 이미지가 비율이 안맞는듯? 더 정확한 자료가 필요해
- 이미지 맞추기
android:scaleType="centerCrop"
위 코드 적용시켜서 이미지 짜름
3. 대로 하면 가로가 더 긴것 같아서 세로에 맞추고 가로 남는건 자름
https://velog.io/@oyunseong/Android-ImageView-scaleType-속성
그라데이션 스플래시
안드로이드에서
색으로 표현
그라데이션 백그라운드를 만든 다음 로고(이미지)를 가운데 넣었다.
RelativeLayout에 의해서 그라데이션 배경은 화면 폭에 맞춰지지만 로고는 중앙에 정해진 크기로 들어가게된다.
gradation_background.xml
<!-- android/app/src/main/res/drawable/gradation_background.xml -->
<?xml version="1.0" encoding="utf-8"?>
<shape xmlns:android="http://schemas.android.com/apk/res/android"
    android:shape="rectangle">
    <gradient
        android:startColor="#C1DC89"
        android:endColor="#53A485"
        android:angle="90"/>
</shape>
launch_screen.xml
<!-- res/layout/launch_screen.xml -->
<?xml version="1.0" encoding="utf-8"?>
<RelativeLayout xmlns:android="http://schemas.android.com/apk/res/android"
    android:layout_width="match_parent"
    android:layout_height="match_parent"
    android:background="@drawable/gradient_background">

    <ImageView
        android:layout_width="120dp"
        android:layout_height="120dp"
        android:layout_centerHorizontal="true"
        android:layout_centerVertical="true"
        android:adjustViewBounds="true"
        android:scaleType="fitCenter"
        android:src="@drawable/launch_screen" />

</RelativeLayout>
이미지로 표현
drawable에 이미지를 추가한 뒤 다음과 같이 작성하였다.
이미지를 추가할때는 대문자를 사용하면 안된다
<?xml version="1.0" encoding="utf-8"?>
<RelativeLayout xmlns:android="http://schemas.android.com/apk/res/android"
    android:layout_width="match_parent"
    android:layout_height="match_parent">

    <!-- 배경 이미지를 전체화면에 꽉 차게 표시 -->
    <ImageView
        android:id="@+id/background_image"
        android:layout_width="match_parent"
        android:layout_height="match_parent"
        android:adjustViewBounds="true"
        android:scaleType="centerCrop"
        android:src="@drawable/background_green" />

    <!-- 중심에 logo 또는 아이콘 표시 -->
    <ImageView
        android:layout_width="120dp"
        android:layout_height="120dp"
        android:layout_centerHorizontal="true"
        android:layout_centerVertical="true"
        android:adjustViewBounds="true"
        android:scaleType="fitCenter"
        android:src="@drawable/launch_screen" />

</RelativeLayout>
IOS에서
이미지로 표현
IOS에서는 그라데이션 표현이 안되어서 이미지뷰를 사용해서 표현해야한다.
1. LanchScreen으로 이동 상단 + 에서 이미지뷰를 생성한다.
2. Images에 배경으로 쓸 이미지를 추가한다.(png,jpg)
3. 생성한 이미지뷰를 클릭,오른쪽 속성창(Attributes Inspector) 확인, 이미지를 선택한다.
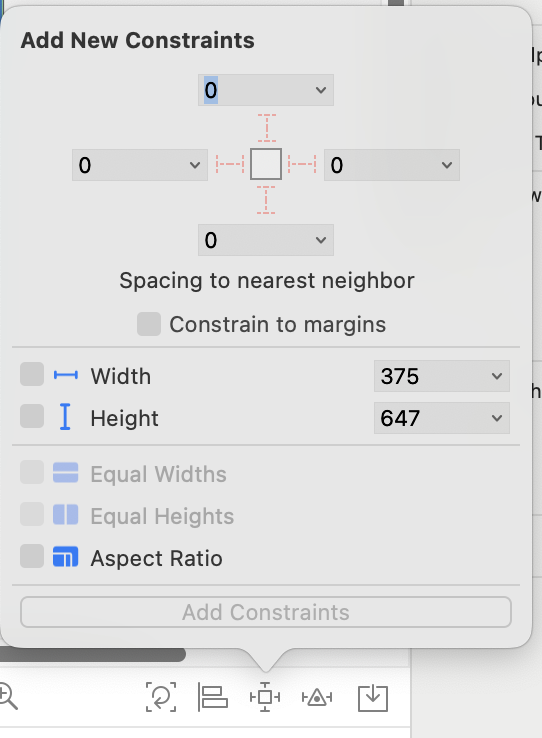
4.이미지뷰가 선택된 상태에서 하단의 버튼을 눌러 constraints조절 (모두 0) 사진참고
5. 오른쪽 속성창(Attributes Inspector) 에서 ContentMode 를 Aspect Fill(이미지가 뷰에 꽉 차게 보이지만, 비율을 유지합니다. 잘릴 수 있습니다.)로 설정
6. safeArea에 의해 이미지가 꽉채워지지 않는다면 꽉채워지게 조정하기
- 왼쪽 constrants에서 배경 이미지뷰가 SafeArea와 연결된 제약들을 삭제한다
-제약조건을 다시 모두 0으로 설정하면 끝