앱 프로젝트 - 03 - 1 (비밀 다이어리) - SharedPreference, Thread(UI Thread와 새로운 쓰래드) 그리고 Handler, Theme(테마)설정하기, AlertDialog, Custom Font 사용하는 법, 기본 컴포넌트(Button, TextView 등등) 색 변경하기 ,,,,,, 글 입력이 멈춘 후 0.5초가 지나면 저장되는 코드
소개
비밀번호를 입력해야만 다이어리에 들어갈 수 있도록 하는 앱

레이아웃 소개

비밀번호를 입력하면 들어가지는 다이어리 영역

시작하기에 앞서 알고 갈 것들
SharedPreference
--> Preference라는 xml설정 파일을 다른 앱들간에 공유를 해 줄 수 있는 기능
이 프로젝트에선 이 기능을 앱의 데이터를 저장하는 용도로 사용할 것임
즉, 이 앱에서 다이어리의 비밀번호와 다이어리의 내용에 대한 부분을 이 기능을 통해 저장할 것임
( 일종의 local DB라고 생각하면 될 듯 )
SharedPreference란?
일반적으로 기기에 데이터를 저장하는 방법은 크게 2가지가 있음
1. localDB에 저장하는 방법
2. 파일에 직접 적어서 저장하는 방법
여기서 SharedPreferences는 2번에 해당하며
파일에 직접 적는 방식 중에서도 그것을 편하게 해주는 Preference를 여러 앱에서 접근할 수 있게 Share해주는 기능이 포함된 것이 이제부터 사용할 SharedPreferences 기능이다.
즉 ,
SharedPreference라는 기능은 Preference파일을 사용하고, 다른 앱에서도 해당 파일을 사용할 수 있게 Share해주는 기능이다.
SharedPreference의 저장방식?
SharedPreferences는 map과 같이 Key - value형식으로 데이터를 저장한다.
SharedPreference 사용하기
SharePreference 만들기 -> getSharedPreferences()
val passwordPreferences = getSharedPreferences("password", Context.MODE_PRIVATE) password라는 이름의 SharedPreferencs를 가져온다.
----> 없을경우 만든다.getSharedPreferences()
SharedPreference를 불러오는 메소드
--> 첫번째 파라미터로 불러올 Preference의 이름을 받고, 두번째 파라미터로 모드를 받음
만약에 해당하는 이름의 Preference파일이 없다면, 자동으로 만들어준다.
위의 설명처럼 SharedPreference는 Preference파일을 다른 앱에서도 사용(Share)할 수 있게 해주는 기능이기 때문에 password라는 Preference파일을 이 앱에서만 사용하기 위해서 Mode를 Private로 설정하였다.
SharePreference에서 값 불러오기 -> getString(), getInt(), getBoolean()등등
예시)
val passwordPreferences = getSharedPreferences("password", Context.MODE_PRIVATE)

val value : String = passwordPreferences.getString("password", "000")
password라는 SharedPreferencs공간( 위에서 정의 )에서 "password"라는 이름의 key에 대한 value를 가져온다.
위에 설명한대로 SharedPreferences는 map과 같이 Key value형식으로 데이터를 저장한다.
따라서 값을 가져올 당시 getString()의 경우
첫번째 파라미터로 가져올 데이터의 Key값을 받고, 두번째 파라미터로 그 이름의 Key값이 없을 경우 반환되는 디폴트 값을 받는다.
그리고 getString()자체가 해당 key을 통해 가져올 value가 문자열이라는 의미이며, 만약 정수라면 getInt() 메소드를 통해 가져왔을 것이다.
SharePreference에 값 넣기(저장하기) -> getString(), getInt(), getBoolean()등등
val passwordPreferences = getSharedPreferences("password", Context.MODE_PRIVATE)

 passwordPreferences.edit {
                    val passwordFromUser = "1234"
                    putString("password", passwordFromUser)

                    commit()


                }
SharedPreference에 값을 저장( edit )하는 코드
edit 함수를 이용해서 람다함수 방식으로 데이터를 저장
람다함수 방식으로 SharedPreferences를 블록에 열었기 때문에 this를 통해 접근 가능
--> 객체 내부의 메소드 putString()은 문자열을 넣는 메소드로
첫번째 파라미터로 key를,
두번째 파라미터로 데이터를 받음
이렇게 putString(),putInt() 등과 같은 메소드로 넣을 데이터를 세팅 했다면
commit이나, apply를 통해 데이터를 저장해줘야 함
< commit과 apply의 차이점 >
1. commit의 경우
데이터가 들어갈 때까지 UI쓰래드(메인 쓰래드)를 멈춤
( 동기화방식 ) --> 코드가 잠시 멈춘다는 뜻
=> 따라서 너무 무거운 내용을 해선 안됨,, 화면이 멈춰있는 다는 뜻이기 때문
2가지 방식으로 commit형식을 사용할 것을 명시할 수 있음
- edit에 파라미터로 true를 주는 방법
 passwordPreferences.edit(true){
                    val passwordFromUser = "1234"
                    putString("password", passwordFromUser)
}- edit에 있는 commit() 메소드를 사용하는 방법
 passwordPreferences.edit {
                    val passwordFromUser = "1234"
                    putString("password", passwordFromUser)

                    commit()
                }
2. apply의 경우
데이터가 들어가게 해놓고 UI쓰래드(메인 쓰래드)가 그냥 진행됨
( 비동기화 방식 ) --> 그냥 진행된다는 뜻
[ apply 사용 ] --> commit형식을 명시하지 않을 경우 기본적으로 apply형식으로 넣어짐 --> 비동기방식
 passwordPreferences.edit {
                    val passwordFromUser = "1234"
                    putString("password", passwordFromUser)
                }
여기서 edit이란?
SharedPreferences의 내부에 정의된 메소드이다.
public inline fun SharedPreferences.edit(
    commit: Boolean = false,
    action: SharedPreferences.Editor.() -> Unit
) {
    val editor = edit()
    action(editor)
    if (commit) {
        editor.commit()
    } else {
        editor.apply()
    }
}
edit을 (ctrl+클릭) 해보면 위의 코드가 나오며 edit의 구조를 알 수 있는데,
위와 같이 파라미터로 commit을 설정할 수 있고 ( true로 바꾸면 commit형식으로 ),
아래와 같이 직접 commit메소드를 직접 실행할수도 있다. ( edit의 구조를 보면 이해할 수 있는 부분임 )
그리고 아무것도 건드리지 않고 기본으로 가면 apply형식으로 실행된다.
Thread와 Handler
UI쓰래드와 별도의 쓰래드
--> 안드로이드 스튜디오에서 항상 사용하는 쓰래드는 UI쓰래드(혹은 메인쓰래드)라고 한다.
( UI가 실재로 동작하는 쓰래드 )
만약에 네트워크 통신이나 파일에 저장하는 기능 등의 UI쓰래드가 많이 느려지는 작업을 할때에는 별도의 쓰래드를 열어서 UI 쓰래드와 별도로 작업을 진행하게 된다.
그런데 예를 들어 별도의 쓰래드에서 네트워크로 업로드나 다운로드와 같은 작업을 완료했다고 하고, UI쓰래드에다가 이런 변경을 업데이트 해줘야 되는 필요가 있다고 할 때 해당 별도의 쓰래드에서 UI쓰래드에 접근하려고 하면 접근이 불가능하다.
왜냐하면 별도의 쓰래드는 메인쓰래드가 아니기 때문에 UI작업이 불가능하기 때문이다.
Thread란?
Thread는 코드를 실행시키는 단위라고 말할 수 있다.
안드로이드 스튜디오에서는 처음에 UI쓰래드 혹은 메인쓰래드라고 하는 한 개의 쓰래드가
코드를 한줄 한줄 실행시키는 것으로 프로그램이 진행된다.
우리도 쓰래드를 만들어서 사용할 수 있는데,
이렇게 새로운 쓰래드( 편의상 New쓰래드라고 하겠음 )를 만들어서 사용하면, 기존의 있던 UI쓰래드와 별개로 쓰래드가 진행되게 된다.
( 즉, 병렬실행되는 것 )
[ 쓰래드 생성 + 실행 예시 ]
        val t = Thread(Runnable {
            Log.e("aa", "aa")
        }).start()
--> 해당 코드는 New쓰래드( 내가 생성한 쓰래드 )로 UI쓰래드와 별도로 코드가 진행된다.
그런데 이때 문제점이 있는데, UI쓰래드와 New쓰래드는 서로 별도로 진행되는 쓰래드이기 때문에 New쓰래드의 내용이 UI쓰래드의 내용에 영향을 미칠 수 없게 된다.
 이게 무슨 뜻이냐면 앱의 전반적인 진행이 UI쓰래드로 이루어지는데, 내가 만든 New쓰래드는
 UI쓰래드에 영향을 미칠 수 없기 떄문에 New쓰래드가 앱의 내용( 코드 )에 영향을 미칠 수 없다는 의미가 된다.
따라서 내가 만든 New쓰래드가 UI쓰래드와 데이터를 주고 받는 등의 통신을 해야할 필요성이 있는데,
안드로이드 스튜디오에서는 Handler를 사용하여 이것이 가능해진다.
혹은 runOnUIThread{ }를 사용하여 UI에 접근할 수 있게 된다.
val textView = findViewById<TextView>(R.id.textView1)

val t = Thread(Runnable {

            // 해당 부분에선 UI에 접근 불가
           // textView.setText("aa")  --> 에러발생

            runOnUiThread{
             // 해당 부분에선 UI에 접근 가능
             textView.setText("aa")

            }


        }).start()
--> runOnUiThread는 Activity 클래스에 정의되어 있는 Handler( UI쓰래드와 연결되어 있음 )의 post메소드를 실행시키는 메소드이다. ( 즉, 아래와 동일하다. )
혹은 Handler를 사용하여 이런식으로도 가능하다.
val handler = Handler(Looper.getMainLooper())

val textView = findViewById<TextView>(R.id.textView1)

val t = Thread(Runnable {

            // 해당 부분에선 UI에 접근 불가
           // textView.setText("aa")  --> 에러발생

            handler.post {
             // 해당 부분에선 UI에 접근 가능
             textView.setText("aa")

            }


        }).start()
Handler
안드로이드 스튜디오에서 제공하는 UI쓰래드와 내가 만든 새로운 쓰래드( 편의상 New쓰래드라고 부르겠음 )를 연결하고 서로 데이터를 주고 받는 등의 통신할 수 있게 해주는 기능
Handler의 파라미터로는 Looper를 넣어줘야 함 -> 이중에서 MainLooper를 넣어주면 해당 Handler는 MainThread와 연결된 Handler가 만들어짐
Activity에서도 기본적으로 Handler가 하나 돌아가고 있으며, View에도 Handler가 있어서 View에서도 Handler의 기능을 사용할 수 있음
Handler의 함수들중 주로 사용하는 함수는 post()함수와 postDelayed()함수이다.
Handler를 따로 구현하게 되면 Send메세지와 같은 함수를 통해 메세지를 다른 쓰래드로 보내고, 해당 쓰래드에서 메세지를 캐치를 해서 열어볼수 있는 기능도 제공하고 있음
[ Handler 사용 예시 ]
val handler = Handler(Looper.getMainLooper())


// 새로 만든 쓰래드
val runnable = Runnable {
        //  New쓰래드( 내가 만든 쓰래드 )의 내용
        }

handler.post(runnable)

// handler.postDelayed(runnable,500)

// handler.removeCallbacks(runnable)
-
Handler의 파라미터로는 Looper를 넣어줘야 함
--> Looper 중에서 MainLooper를 넣어주면 해당 Handler는 MainThread( = UI쓰래드 )와 연결된 Handler가 만들어짐
-
Handler의 함수들중 주로 사용하는 함수는 post()함수와 postDelayed()함수이다.
--> post()함수는 파라미터로 Runnable객체를 받아서 해당 쓰래드를 실행시켜줌
--> postDelayed()함수는 첫번째 파라미터로 Runnable객체를, 두번째 파라미터로 밀리세컨트를 받아서 해당 시간동안 딜레이 후 쓰래드를 실행시켜줌 -
removeCallbacks()함수의 경우 파라미터로 받은 쓰래드에 대해 pending( 보류 )상태이면 해당 쓰래드를 종료 및 제거해준다.
--> 예를들어 postDelayed()에 의해 쓰래드가 딜레이 상태일 때 removeCallbacks()가 실행되면 해당 쓰래드를 종료 및 제거해줌
AlertDialog
      AlertDialog.Builder(this)

            .setTitle("실패")
            .setMessage("비밀번호가 잘못되었습니다.")
            .setPositiveButton("확인") { dialog, which ->
//                            --> PositiveButton이 눌리면 실행될 람다함수
            }
            .create()
            .show()
[ AlertDialog 만들기 ]
1. AlertDialog에서 Builder를 가져와서 AlertDialog에 대한 구성(Building)을 시작한다.
AlertDialog를 만들어줌( Builder ) --> Builder는 첫번째 파라미터로 현재 위치를 받는다.2. AlertDialog의 각각의 내용을 Builder의 함수들을 이용해서 확장함수 형태로 설정해준다.
setTitle(), setMessage(), setPositiveButton(), setNegativeButton() 등등 3. 설정이 되었으면 Builder의 create()함수를 이용하여 구성한 AlertDialog를 생성하고
4. show()함수를 이용하여 생성한 AlertDialog를 화면에 나타낸다.
Custom Font 적용하기
res에 폰트를 추가하여 사용
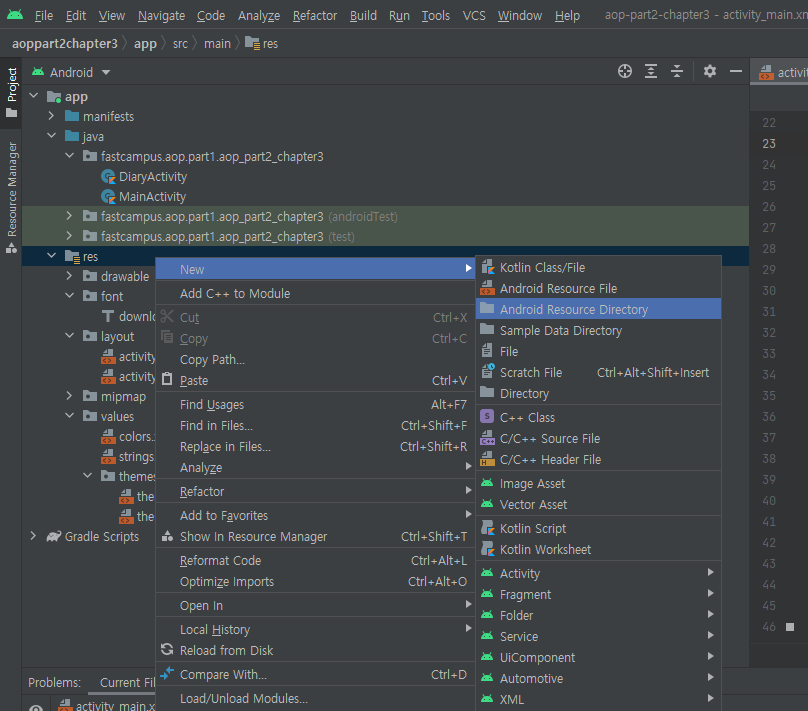
1. res우클릭 -> new -> Android Resource Directory -> font폴더 생성


2. 인터넷에서 폰트파일( ttf파일 )을 받아서 해당 폴더에 넣고, 해당 위젯의 속성에서 가져와서 사용
주의!!!!!! --> ( resource의 이름은 대문자를 사용하지 않으므로 대문자가 있으면 수정해야함 )
3. fontFamily속성을 통해 폰트 가져옴

Theme ( 테마 ) 설정하기
res폴더 안에 themes폴더 안에 themes.xml파일에서 테마를 만들 수 있음

Theme ( 테마 )란?
액티비티에 적용되는 기본 설정 같은 것이다.
Theme를 만들고 적용하는 과정
1. themes.xml파일에 테마를 만듬 ( style 사용 )

style의 name 속성은 해당 테마의 이름이다.
style의 parent속성은 해당 테마의 내용이다.
예를 들어, 위 코드에서 두번째로 정의된 테마의 경우,
이름은 "Theme.Aoppart2chapter3.NoActionBar" 이며,
내용은 NoActionBar 즉, 상단 액션바를 없애는 테마이다.
2. Manifest에서 테마를 액티비티에 적용함

Theme에 의해 고정된 기본 컴포넌트 색 바꾸기
Button과 AppCompatButton의 차이점
        <androidx.appcompat.widget.AppCompatButton
            android:id="@+id/openButton"
            android:layout_width="40dp"
            android:layout_height="60dp"
            android:layout_marginEnd="10dp"
            android:background="#CDCDCD"
            app:layout_constraintBottom_toBottomOf="@id/numberPicker1"
            app:layout_constraintEnd_toStartOf="@id/numberPicker1"
            app:layout_constraintStart_toStartOf="parent"
            app:layout_constraintTop_toTopOf="@id/numberPicker1"/>


	<Button
		android:id="@+id/openButton"
		android:layout_width="40dp"
		android:layout_height="60dp"
		android:layout_marginEnd="10dp"
		app:layout_constraintBottom_toBottomOf="@id/numberPicker1"
		app:layout_constraintEnd_toStartOf="@id/numberPicker1"
		app:layout_constraintStart_toStartOf="parent"
		app:layout_constraintTop_toTopOf="@id/numberPicker1" />
기본 컴포넌트의 경우 테마(Theme)의 영향을 받아 MaterialComponents 설정에 의해 색이 미리 정해지게 된다.
( 바로 위에 Theme 설명하는 부분에서 manifest를 보면 application에 설정된 테마가 MaterialComponents임 )따라서 여기서 벗어나기 위해 MaterialComponents의 영향을 받지 않는 기본 컴포넌트들이 필요한데
이렇게 영향을 받지 않는 컴포넌트들이 기본적으로 각 컴포넌트들의 이름앞에 AppCompat을 붙인 이름으로 정의되어 있다.
예를 들어
AppCompatButton, AppCompatCheckBox, AppCompatImageView, AppCompatTextView 등등
왠만한 기본 컴포넌트들은 다 정의되어 있다고 보면된다.
- 위 코드에서 Button의 경우, background를 아무리 바꿔도 적용되지 않음
- 반면 AppCompatButton의 경우, background를 변경해주면 잘 적용됨
코드 소개
MainActivity.kt
package fastcampus.aop.part1.aop_part2_chapter3

import android.content.Context
import android.content.Intent
import android.graphics.Color
import androidx.appcompat.app.AppCompatActivity
import android.os.Bundle
import android.widget.NumberPicker
import android.widget.Toast
import androidx.appcompat.app.AlertDialog
import androidx.appcompat.widget.AppCompatButton
import androidx.core.content.edit

class MainActivity : AppCompatActivity() {

    private val numberPicker1: NumberPicker by lazy {
        findViewById<NumberPicker>(R.id.numberPicker1)
            .apply {
                minValue = 0
                maxValue = 9
            }
    }


    private val numberPicker2: NumberPicker by lazy {
        findViewById<NumberPicker>(R.id.numberPicker2)
            .apply {
                minValue = 0
                maxValue = 9
            }
    }
    private val numberPicker3: NumberPicker by lazy {
        findViewById<NumberPicker>(R.id.numberPicker3)
            .apply {
                minValue = 0
                maxValue = 9
            }
    }
    private val openButton: AppCompatButton by lazy {
        findViewById(R.id.openButton)
    }
    private val changePasswordButton: AppCompatButton by lazy {
        findViewById(R.id.chagnePasswordButton)
    }


    private var changePasswordMode = false
    // 패스워드를 바꾸는 동안 다른 동작을 입력할 경우 생각 못한 오류가 발생 할 수 있기 때문에
    // 위의 변수를 통해 패스워드가 변경되는 동안에는 다른 작업이 불가능하게 설정할 것임

    override fun onCreate(savedInstanceState: Bundle?) {
        super.onCreate(savedInstanceState)
        setContentView(R.layout.activity_main)

        numberPicker1
        numberPicker2
        numberPicker3

        openButton.setOnClickListener {

            if (changePasswordMode) {
                Toast.makeText(this, "패스워드 변경중입니다", Toast.LENGTH_SHORT).show()
                return@setOnClickListener
            }

            val passwordPreferences = getSharedPreferences("password", Context.MODE_PRIVATE)
            val passwordFromUser =
                "${numberPicker1.value}${numberPicker2.value}${numberPicker3.value}"

            if (passwordPreferences.getString("password", "000").equals(passwordFromUser)) {


                //패스워드 성공


                // TODO 다이어리 페이지 작성 후에 넘겨주어야함
                startActivity(Intent(this, DiaryActivity::class.java))

            } else {
                //패스워드 실패
                showErrorAlertDialog()
            }

        }

        changePasswordButton.setOnClickListener {
            // 한번 눌렀을 때 비밀번호가 맞으면 비밀번호 변경 모드로 돌입
            // 비밀번호 변경 모드 상태에서 한번더 누르면 비밀번호가 변경되면서 비밀번호 변경모드에서 나감

            val passwordPreferences = getSharedPreferences("password", Context.MODE_PRIVATE)
            // password라는 이름의 Preference를 SharedPreference를 이용하여 가져옴 -> Private모드로

            val passwordFromUser =
                "${numberPicker1.value}${numberPicker2.value}${numberPicker3.value}"


            if (changePasswordMode) {
                // 비밀번호를 저장하는 기능
                passwordPreferences.edit(true) {
                    // apply와 commit중 commit형식으로 데이터를 저장할 것임

                    val passwordFromUser =
                        "${numberPicker1.value}${numberPicker2.value}${numberPicker3.value}"
                    putString("password", passwordFromUser)
                    //password라는 SharedPreferencs공간에서( 위에서 정의 ) "password" 라는 key로 passwordFromUser의 값을 value로 해서 넣는다.

                }


                changePasswordMode = false
                changePasswordButton.setBackgroundColor(Color.BLACK)


            } else {
                // changePasswordMode가 활성화 + 비밀번호가 맞는지 체크

                if (passwordPreferences.getString("password", "000").equals(passwordFromUser)) {
                    //패스워드 성공

                    // TODO 패스워드 변경모드로 전환
                    changePasswordMode = true
                    Toast.makeText(this, "패스워드 변경모드 활성화", Toast.LENGTH_SHORT).show()
                    changePasswordButton.setBackgroundColor(Color.RED)
                } else {
                    //패스워드 실패
                    showErrorAlertDialog()

                }

            }


        }
    }

    private fun showErrorAlertDialog() {
        AlertDialog.Builder(this)
            .setTitle("실패")
            .setMessage("비밀번호가 잘못되었습니다.")
            .setPositiveButton("확인") { dialog, which ->
//                            --> PositiveButton이 눌리면 실행될 람다함수
            }
            .create()
            .show()

    }
}
이 코드에서 주목할 부분
xml파일에서 컴포넌트들을 가져올 때 lazy init으로 해주는 이유
......

 private val numberPicker3: NumberPicker by lazy {
        findViewById<NumberPicker>(R.id.numberPicker3)
            .apply {
                minValue = 0
                maxValue = 9
            }
    }
 private val openButton: AppCompatButton by lazy {
        findViewById(R.id.openButton)
    }


......


    override fun onCreate(savedInstanceState: Bundle?) {
        super.onCreate(savedInstanceState)
        setContentView(R.layout.activity_main)

        numberPicker1
        numberPicker2
        numberPicker3
왜 각 View들을 lazy init으로 가져올까??
그 이유는 View가 그려지는 시점이 아래의 onCreate함수가 실행되는 시점이기 때문이다.
즉, onCreate가 실행되어 View가 그려진 이후에야 View들을 온전히 가져올 수 있다.
따라서 여기서는 lazy init을 통해 이 객체를 사용할 때 해당 View를 가져올 것이라는 선언만 해주고,
실제로 View를 가져오는 것은 onCreate가 실행된 이후( 즉, View들이 그려진 이후 )에 이 객체들이 사용될 시점에 가져오는 것이다.
또한 onCreate보다 아래가 아닌 굳이 전역에서 선언해주는 이유는 onCreate밖에서도 해당 컴포넌트들을 사용해야하기 때문이다.
    override fun onCreate(savedInstanceState: Bundle?) {
        super.onCreate(savedInstanceState)
        setContentView(R.layout.activity_main)

        numberPicker1
        numberPicker2
        numberPicker3
그리고 위에서 말했듯 lazy init을 통해 해당 객체가 사용될 시점에 View들을 가져와 할당하겠다고 선언했으므로
onCreate이후( 즉, View들이 그려진 이후 )에 이 객체들이 사용하여 할당해주는 것이다.
( 굳이 이렇게 의미없이 해당 객체를 사용한 이유는 코드상 해당 객체를 따로 사용하는 일이 없기 때문이다. )
activity_main.xml
<?xml version="1.0" encoding="utf-8"?>
<androidx.constraintlayout.widget.ConstraintLayout xmlns:android="http://schemas.android.com/apk/res/android"
    xmlns:app="http://schemas.android.com/apk/res-auto"
    xmlns:tools="http://schemas.android.com/tools"
    android:layout_width="match_parent"
    android:layout_height="match_parent"
    android:background="#3f51b5"
    tools:context=".MainActivity">


    <TextView
        app:layout_constraintStart_toStartOf="parent"
        app:layout_constraintEnd_toEndOf="parent"
        android:text="@string/title"
        android:textSize="30sp"
        android:textStyle="bold"
        android:fontFamily="@font/downloaded_font"
        android:layout_marginBottom="50dp"
        app:layout_constraintBottom_toTopOf="@id/passwordLayout"
        android:layout_width="wrap_content"
        android:layout_height="wrap_content"/>


    <!--    <View-->
    <!--        app:layout_constraintStart_toStartOf="@id/openButton"-->
    <!--        app:layout_constraintEnd_toEndOf="@id/numberPicker3"-->
    <!--        app:layout_constraintTop_toTopOf="@id/numberPicker1"-->
    <!--        app:layout_constraintBottom_toBottomOf="@id/numberPicker1"-->
    <!--        android:background="#AFAEAE"-->
    <!--        android:layout_width="0dp"-->
    <!--        android:layout_height="0dp"/>-->
    <!--    이 상태로 했더니 떨어뜨리고 싶어도 margin이나 padding을 줘도 안의 내용들과 떨어뜨릴 수 없음-->
    <!--    이유는  ConstraintsLayout환경하에 딱 맞게 제약해놨기 떄문-->
    <!--    즉, 제약의 영역에서 감싼 것이기 떄문에 margin이나 padding과 같은 속성이 먹히지 않는 것이다.-->
    <!--    따라서 여백을 주기 위해서는 이런 방식이 아니라 따로 ConstraintsLayout을 만들어 감싸줘야 함-->


    <androidx.constraintlayout.widget.ConstraintLayout
        android:layout_width="wrap_content"
        android:id="@+id/passwordLayout"
        android:layout_height="wrap_content"
        android:background="#AFAEAE"
        android:padding="15dp"
        app:flow_verticalBias="0.45"
        app:layout_constraintBottom_toBottomOf="parent"
        app:layout_constraintEnd_toEndOf="parent"
        app:layout_constraintStart_toStartOf="parent"
        app:layout_constraintTop_toTopOf="parent">
<!--        위의 View로는 해결하지 못한 부분을 해결한 ConstraintsLayout-->
<!--        이것으로 모든 위젯을 제약의 영역에서 감싸는 것이 아니라, width와 heigjt의 영역에서 감싸였다.-->
<!--        따라서 padding이나 margin과 같은 속성들도 적용되는 것이다.-->


        <androidx.appcompat.widget.AppCompatButton
            android:id="@+id/openButton"
            android:layout_width="40dp"
            android:layout_height="60dp"
            android:layout_marginEnd="10dp"
            android:background="#CDCDCD"
            app:layout_constraintBottom_toBottomOf="@id/numberPicker1"
            app:layout_constraintEnd_toStartOf="@id/numberPicker1"
            app:layout_constraintStart_toStartOf="parent"
            app:layout_constraintTop_toTopOf="@id/numberPicker1"/>

<!--        기본 컴포넌트의 경우 테마(Theme)의 영향을 받아 MaterialComponents 설정에 의해 색이 미리 정해지게 된다.-->
<!--        따라서 여기서 벗어나기 위해 MaterialComponents의 영향을 받지 않는 기본 컴포넌트들이 필요한데-->

<!--        이렇게 영향을 받지 않는 컴포넌트들이 기본적으로 각 컴포넌트들의 이름앞에 AppCompat을 붙인 이름으로 정의되어 있다.-->
<!--        예를 들어 AppCompatButton, AppCompatCheckBox, AppCompatImageView, AppCompatTextView 등등-->
<!--        왠만한 기본 컴포넌트들은 다 정의되어 있다고 보면된다.-->


<!--        <Button-->
<!--            android:id="@+id/openButton"-->
<!--            android:layout_width="40dp"-->
<!--            android:layout_height="60dp"-->
<!--            android:layout_marginEnd="10dp"-->
<!--            app:layout_constraintBottom_toBottomOf="@id/numberPicker1"-->
<!--            app:layout_constraintEnd_toStartOf="@id/numberPicker1"-->
<!--            app:layout_constraintStart_toStartOf="parent"-->
<!--            app:layout_constraintTop_toTopOf="@id/numberPicker1" />-->

        <androidx.appcompat.widget.AppCompatButton
            android:id="@+id/chagnePasswordButton"
            android:layout_width="10dp"
            android:layout_height="10dp"
            android:layout_marginTop="10dp"
            android:background="#9E9999"
            app:layout_constraintEnd_toEndOf="@+id/openButton"
            app:layout_constraintStart_toStartOf="@+id/openButton"
            app:layout_constraintTop_toBottomOf="@id/openButton"/>


<!--        <Button-->
<!--            android:id="@+id/chagnePasswordButton"-->
<!--            android:layout_width="10dp"-->
<!--            android:layout_height="10dp"-->
<!--            android:layout_marginTop="10dp"-->
<!--            android:background="#9E9999"-->
<!--            app:layout_constraintEnd_toEndOf="@+id/openButton"-->
<!--            app:layout_constraintStart_toStartOf="@+id/openButton"-->
<!--            app:layout_constraintTop_toBottomOf="@id/openButton" />-->
        <!--    처음에 그냥 Button의 background색을 지정했을 경우에, 아무런 변화가 없었음-->
        <!--     이유는 테마(Theme) 떄문
        res폴더에 themes폴더에 themes.xml파일을 보면
        style의 parent속성이 parent="Theme.MaterialComponents.DayNight.DarkActionBar"로 되어 있음
        이처럼 MaterialComponents로 되어있는 테마는 기본 컴포넌트들의 색깔을 미리 style에 있는 Primary 색깔들로 바꿔버리는 특성이 있다.
        ( 그래서 background설정을 해도 기본 컴포넌트 중 하나인 버튼의 색깔이 바뀌지 않은 것)
        따라서 Theme를 수정하거나, Button이 아닌 다른 컴포넌트를 사용하거나 둘 중 하나를 해줘야 색을 바꿀 수 있음

        >> 이번에는 Theme를 바꾸기 보단, MaterialComponents의 영향을 받기 않는
        AppCompatButton을 사용할 것임
        -->


        <NumberPicker
            android:id="@+id/numberPicker1"
            android:layout_width="30dp"
            android:layout_height="120dp"
            android:background="#9E9999"
            app:layout_constraintBottom_toBottomOf="parent"
            app:layout_constraintEnd_toStartOf="@+id/numberPicker2"
            app:layout_constraintHorizontal_chainStyle="packed"
            app:layout_constraintStart_toEndOf="@id/openButton"
            app:layout_constraintTop_toTopOf="parent" />

        <NumberPicker
            android:id="@+id/numberPicker2"
            android:layout_width="30dp"
            android:layout_height="120dp"
            android:background="#9E9999"
            app:layout_constraintEnd_toStartOf="@+id/numberPicker3"
            app:layout_constraintStart_toEndOf="@+id/numberPicker1"
            app:layout_constraintTop_toTopOf="@+id/numberPicker1" />

        <NumberPicker
            android:id="@+id/numberPicker3"
            android:layout_width="30dp"
            android:layout_height="120dp"
            android:background="#9E9999"
            app:layout_constraintEnd_toEndOf="parent"
            app:layout_constraintStart_toEndOf="@+id/numberPicker2"
            app:layout_constraintTop_toTopOf="@+id/numberPicker1" />
    </androidx.constraintlayout.widget.ConstraintLayout>


</androidx.constraintlayout.widget.ConstraintLayout>
이 코드에서 주목할 부분
ConstraintsLayout에 대한 방법론 --> 내부의 컴포넌트 감쌀 때 margin과 padding 가능하게 하기
    <View
            app:layout_constraintStart_toStartOf="@id/openButton"
            app:layout_constraintEnd_toEndOf="@id/numberPicker3"
            app:layout_constraintTop_toTopOf="@id/numberPicker1"
            app:layout_constraintBottom_toBottomOf="@id/numberPicker1"
            android:background="#AFAEAE"
            android:layout_width="0dp"
            android:layout_height="0dp"/>


    <androidx.constraintlayout.widget.ConstraintLayout
        android:layout_width="wrap_content"
        android:id="@+id/passwordLayout"
        android:layout_height="wrap_content"
        android:background="#AFAEAE"
        android:padding="15dp"
        app:flow_verticalBias="0.45"
        app:layout_constraintBottom_toBottomOf="parent"
        app:layout_constraintEnd_toEndOf="parent"
        app:layout_constraintStart_toStartOf="parent"
        app:layout_constraintTop_toTopOf="parent">

      ......
<!--        위의 View로는 해결하지 못한 부분을 해결한 ConstraintsLayout-->
<!--        이것으로 모든 위젯을 제약의 영역에서 감싸는 것이 아니라, width와 heigjt의 영역에서 감싸였다.-->
<!-- 따라서 padding이나 margin과 같은 속성들도 적용되는 것이다.-->-
View를 이용하여 ConstraintsLayout환경에서 제약을 사용하여 내부 컴포넌트들을 감쌌을 때 --> padding, margin 불가
--> 이 상태로 했더니 떨어뜨리고 싶어도 margin이나 padding을 줘도 안의 내용들과 떨어뜨릴 수 없음
이유는 ConstraintsLayout환경하에 딱 맞게 제약해놨기 때문
즉, 제약의 영역에서 감싼 것이기 떄문에 margin이나 padding과 같은 속성이 먹히지 않는 것이다.따라서 여백을 주기 위해서는 이런 방식이 아니라 따로 ConstraintsLayout을 만들어 감싸줘야 함
-
ConstraintLayout을 이용하여 컴포넌트를 감쌌을 때 --> margin, padding 가능
위의 View로는 해결하지 못한 부분을 해결한 ConstraintsLayout
이것으로 모든 컴포넌트를 제약의 영역에서 감싸는 것이 아니라, width와 height의 영역에서 감싸였다.
따라서 padding이나 margin과 같은 속성들도 적용되는 것이다.
Button과 AppCompatButton의 차이점 --> 기본 컴포넌트들 색 바꾸기
        <androidx.appcompat.widget.AppCompatButton
            android:id="@+id/openButton"
            android:layout_width="40dp"
            android:layout_height="60dp"
            android:layout_marginEnd="10dp"
            android:background="#CDCDCD"
            app:layout_constraintBottom_toBottomOf="@id/numberPicker1"
            app:layout_constraintEnd_toStartOf="@id/numberPicker1"
            app:layout_constraintStart_toStartOf="parent"
            app:layout_constraintTop_toTopOf="@id/numberPicker1"/>


	<Button
		android:id="@+id/openButton"
		android:layout_width="40dp"
		android:layout_height="60dp"
		android:layout_marginEnd="10dp"
		app:layout_constraintBottom_toBottomOf="@id/numberPicker1"
		app:layout_constraintEnd_toStartOf="@id/numberPicker1"
		app:layout_constraintStart_toStartOf="parent"
		app:layout_constraintTop_toTopOf="@id/numberPicker1" />
기본 컴포넌트의 경우 테마(Theme)의 영향을 받아 MaterialComponents 설정에 의해 색이 미리 정해지게 된다.
( 바로 위에 Theme 설명하는 부분에서 manifest를 보면 application에 설정된 테마가 MaterialComponents임 )따라서 여기서 벗어나기 위해 MaterialComponents의 영향을 받지 않는 기본 컴포넌트들이 필요한데
이렇게 영향을 받지 않는 컴포넌트들이 기본적으로 각 컴포넌트들의 이름앞에 AppCompat을 붙인 이름으로 정의되어 있다.
예를 들어
AppCompatButton, AppCompatCheckBox, AppCompatImageView, AppCompatTextView 등등
왠만한 기본 컴포넌트들은 다 정의되어 있다고 보면된다.
- 위 코드에서 Button의 경우, background를 아무리 바꿔도 적용되지 않음
- 반면 AppCompatButton의 경우, background를 변경해주면 잘 적용됨
DiaryActivity.kt
package fastcampus.aop.part1.aop_part2_chapter3

import android.content.Context
import android.os.Bundle
import android.os.Handler
import android.os.Looper
import android.util.Log
import android.widget.EditText
import androidx.appcompat.app.AppCompatActivity
import androidx.core.content.edit
import androidx.core.widget.addTextChangedListener

class DiaryActivity : AppCompatActivity(){

    private val handler = Handler(Looper.getMainLooper())
    // 이번 코드에서는 postDelayed()함수를 사용할 것 (몇 초 이후에 Thread를 실행시켜줌)

    override fun onCreate(savedInstanceState: Bundle?) {
        super.onCreate(savedInstanceState)
        setContentView(R.layout.activity_diary)

        val diaryEditText: EditText = findViewById(R.id.diaryEditText)
      // 해당 컴포넌트는 onCreate밖으로 나갈 일이 없기 때문에 lazy init을 안쓰고
      // 그냥 이렇게 onCreate안에 선언해줘도 상관없다.

        val detailPreferences = getSharedPreferences("diary", Context.MODE_PRIVATE)
        // diary라는 이름의 SharedPreferencs 공간을 가져온다. >> 없을경우 만든다.

        diaryEditText.setText(detailPreferences.getString("detail",""))
        // 해당 SharedPreferences에서 detail이라는 이름의 key에 대한 value를 가져온다.
    // (value가 문자열타입이므로 getString으로 가져옴)


        // 새로운 쓰래드를 만든 것 -> 아래의 Handler를 이용하여 메인 쓰래드와 연결하여 실행시킬 것임
        val runnable = Runnable {
            getSharedPreferences("diary", Context.MODE_PRIVATE).edit {
                putString("detail", diaryEditText.text.toString())
                //   Thread를 사용하여 글을 쓰다가 잠깐 멈칫 했을 때만 넣어주도록 설정할 것임

                // 그리고 MainActivity에서는 commit을 사용해서 데이터가 저장된 다음에 다른 코드가 실행되도록 했지만, 이번에는 Thread를 사용해서 실시간으로 넣을 것이므로 apply를 사용하여 비동기적으로 데이터를 저장할 것이다.

            }
        }


        diaryEditText.addTextChangedListener {
//            해당 EditText의 내용이 변경될 때마다 해당 메소드가 호출됨 ( 갑작스런 문제상황으로 인해 써놓은 데이터가 유실되지 않도록 글을 적을 떄마다 저장하게 설정할 것임 )

//            detailPreferences.edit {
//                putString("detail", diaryEditText.text.toString())
//            }

             // 하지만 이렇게 자주 넣어 준다면 오히려 느려지는 문제 발생
             //   ==> 따라서 위에 코드에 Thread를 사용하여 글을 쓰다가 잠깐 멈칫 했을 때만 넣어주도록 설정할 것임


            handler.removeCallbacks(runnable)
            // 해당 쓰래드에 대해 아직 실행되지 않고 pending( 보류란 의미 )되어 있는 쓰래드가 있다면, 지워줌

            handler.postDelayed(runnable,500)
            // 위에 만들어 놓은 새로운 쓰래드를 Main쓰래드와 연결시켜 실행시킴
            // --> 0.5초마다 한번씩 실행시킴


        }

    }


}
이 코드에서 주목할 부분
글을 입력할 때는 저장하지 않다가, 글 입력을 멈춘후 0.5초가 지났을 경우에 글의 내용을 저장하는 코드에 대한 방법론
--> 일일이 글을 입력할 때마다 저장한다면, 너무 비효율적이다.
--> 따라서 글의 입력은 멈춘 후 0.5초가 지난 시점에 저장하는 코드를 만들었다.
즉, 이 코드를 해설해보자면,
EditText의 내용이 변경될 때마다 EditText에 대해 addTextChangeListener()가 실행되는데,
그 내용은 먼저 위에서 만들어낸 새로운 쓰래드( runnable )에 대해 현재 해당 쓰래드가 pendding( 보류 )상태라면 removeCallbacks에 의해 제거되고,
그 다음에 handler를 통해 위에서 만들어낸 새로운 쓰래드를 메인 쓰래드와 연결시켜서 0.5초의 딜레이( pending상태 ) 이후 실행시키게 된다.
즉, 0.5초의 딜레이( pending ) 동안에 내가 글을 입력해서 해당 코드가 실행될 경우 removeCallbacks에 의해 딜레이( pending )중인 새로운 쓰래드는 제거되고 다시 쓰래드를 실행시켜 딜레이( pending ) 시킨다.
그러다가 내가 입력을 멈추고 0.5 초가 지나면 딜레이( pending )상태가 종료되고 쓰래드가 실행되어 EditText의 내용이 저장되는 것이다.
이것으로 입력을 잠깐 멈췄을 때마다 저장하는 기능이 완성된 것이다.
activity_diary
<?xml version="1.0" encoding="utf-8"?>
<androidx.constraintlayout.widget.ConstraintLayout xmlns:android="http://schemas.android.com/apk/res/android"
    android:layout_width="match_parent"
    xmlns:app="http://schemas.android.com/apk/res-auto"
    android:background="#ac56f8"
    android:padding="24dp"
    android:layout_height="match_parent">

    <EditText
        android:id="@+id/diaryEditText"
        android:layout_width="0dp"
        android:layout_height="0dp"
        android:padding="10dp"
        app:layout_constraintTop_toTopOf="parent"
        app:layout_constraintBottom_toBottomOf="parent"
        app:layout_constraintStart_toStartOf="parent"
        app:layout_constraintEnd_toEndOf="parent"
        android:background="@color/white"
        android:gravity="start|top"/>


</androidx.constraintlayout.widget.ConstraintLayout>
이 코드에서 주목할 부분
gravity 속성 설정
글을 왼쪽 위에 부터 쓰기 위해서 android:gravity="start|top"으로 설정
