앱 프로젝트 - 08 - (심플 웹 브라우저) - WebView(보안 고려 X), elevation 속성 (그림자), EditText(inputType, imeOptions-> EditText에 Enter에 대한 리스너), 백버튼 클릭에 대한 리스너(onBackPressed()), SwipeRefreshLayout(화면을 아래로 당겨서 새로 로딩하는 기능), Inner Class와 Nested Class, ContentLoadingProgressBar
소개
- 웹사이트를 불러올 수 있다.
- 뒤로가기, 앞으로 가기 기능이 있다.
- 홈 버튼을 눌러 처음으로 돌아갈 수 있다.
- 웹사이트의 로딩 정도를 확인할 수 있다.
활용 기술
-
ConstraintLayout
-
EditText
-
WebView
//////////
- 프로젝트 셋업하기
- 기본 UI 구성하기
- URL 로딩 기능 구현하기
- 네비게이션 기능 구현하기
- 완성도 높이기
레이아웃 소개

시작하기에 앞서 알고갈 것들
elevation 속성 --> 그림자를 만들어줌
대다수의 컴포넌트에 넣을 수 있는 기본 속성
--> 그림자를 만들어줌
하지만 background색이 지정되어있지 않을 경우,
그 컴포넌트는 투명한 것이며 색처럼 보이는 것은 window색임
이 경우 컴포넌트가 투명하므로 그림자도 없음
따라서 elevation속성을 사용할 떄는 background를 설정해줘야함
......

    <androidx.constraintlayout.widget.ConstraintLayout
        android:id="@+id/toolbar"
        android:layout_width="0dp"
        android:layout_height="?attr/actionBarSize"
        android:background="@color/white"
        android:elevation="4dp"
        app:layout_constraintLeft_toLeftOf="parent"
        app:layout_constraintRight_toRightOf="parent"
        app:layout_constraintTop_toTopOf="parent">
        <!--    ?attr/을 통해 현재 영역의 테마속성에 접근할 수 있음-->
......

Inner class ( 내부 클래스 )와 Nested class ( 중첩 클래스 )
두 개념은 Class의 내부에 Class를 선언할 때 생기는 개념이다.
이때
-
Inner class는 내부 클래스로 내부에 선언한 클래스가 상위 클래스에 속한다는 것을 나타낸다
--> 따라서 Inner class는 상위 클래스의 멤버 객체( 변수, 메소드 등 )에 직접 접근할 수 있는 권한이 있다. -
Nested class는 중첩 클래스로 내부에 선언한 클래스가 상위 클래스와 별개의 클래스라는 것을 나타낸다.
--> 따라서 Nested class는 상위 클래스의 멤버 객체( 변수, 메소드 등 )에 직접 접근할 수 없다. ( 별도의 클래스이기 때문에 )
또한 이 두가지 개념의 기본적인 세팅은 Java와 Kotlin에서 다른데,
-
Java의 경우, 클래스 내부에 클래스를 선언하면 선언한 클래스는 기본적으로 Inner class로서 인식된다.
--> 따라서 Java에서는 내부에 클래스를 선언하면 그 클래스는 그냥 상위 클래스의 멤버 객체에 접근할 수 있다. -
Kotlin의 경우, 클래스 내부에 클래스를 선언하면 선언한 클래스는 기본적으로 Nested class로서 인식된다.
--> 따라서 Kotlin에서는 내부에 클래스를 선언하면 그 클래스는 그냥 상위 클래스의 멤버 객체에 접근할 수 없다.그러므로 Kotlin 환경에서 상위 클래스의 멤버 객체에 접근하기 위해서는
inner class라고 명시해주는 것으로 해당 클래스를 inner class로 만들 필요가 있다.
예를 들어 )
class a {

    private val num: Int = 50
    val name: String = "하하"

    private val num_activate() {
    	println(num)
    }

    val name_activate() {
    	println(name)
    }

    class b {


    }

    inner class c {


    }


}
이 코드에서 내용을 해석해보자면,
-
b, c클래스는 a 클래스의 내부에서 선언되었으므로 a 클래스는 b, c클래스의 상위 클래스이다.
-
kotlin 환경이므로,
class 선언만 해준 b는 기본적으로 Nested class이며
inner class 선언을 해준 c는 inner class이다 -
kotlin 환경에서 변수는 기본적으로 public이므로
b,c 모두 name 멤버변수와 name_activate() 멤버함수에 접근할 수 있다. -
private선언된 num 멤버변수와 num_activate() 멤버함수는 class의 내부에서만 접근할 수 있으므로,
inner class인 c는 접근할 수 있고, b는 접근할 수 없다.
결국 이 내용의 핵심은 이것이다.
kotlin에서는 class 내부에 class를 선언할 때, inner class로 선언해주어야만 상위 클래스의 멤버 객체에 접근할 수 있다.
SwipeRefreshLayout
SwipeRefreshLayout 공식문서 : https://developer.android.com/jetpack/androidx/releases/swiperefreshlayout
화면을 아래로 당기면ㅡ,
로딩화면 ( 화살표가 도는 화면 )이 나타나며,
이후 로딩이 완료되면 앱의 정보가 갱신되어 나타나는 레이아웃이다.
이 레이아웃을 사용하기 위해서는 안드로이드에서 내려받아야 한다.
[ 현재 1.1.0버전이 최신이며, 더 최신버전이 나왔을 수도 있으므로 위의 공식문서 확인할 것 ]
dependencies {
    implementation("androidx.swiperefreshlayout:swiperefreshlayout:1.1.0")
}
이렇게 추가해주면 SwipeRefreshLayout을 사용할 수 있다.
SwipeRefreshLayout 사용법
1. 스크롤을 했을 때 데이터를 로딩할 영역을 SwipeRefreshLayout로 감싸준다.
예시)
<androidx.swiperefreshlayout.widget.SwipeRefreshLayout
    android:layout_width="0dp"
    android:layout_height="0dp"
    app:layout_constraintBottom_toBottomOf="parent"
    app:layout_constraintLeft_toLeftOf="parent"
    app:layout_constraintRight_toRightOf="parent"
    app:layout_constraintTop_toBottomOf="@id/toolbar"
 >

    <WebView
        android:id="@+id/webView"
        android:layout_width="match_parent"
        android:layout_height="match_parent"
 />

</androidx.swiperefreshlayout.widget.SwipeRefreshLayout>

2. kt파일에서 SwipeRefreshLayout에 대하여 setOnRefreshListener()를 구현한다.
......

    private val refreshLayout: SwipeRefreshLayout by lazy {
        findViewById(R.id.refreshLayout)
    }

......

	// SwipeRefreshLayout을 스크롤하면 해당 메소드가 호출된다.
        refreshLayout.setOnRefreshListener {
            webView.reload()
        }
--> SwipeRefreshLayout을 스크롤하면 OnRefreshListener 메소드가 호출된다.
3. 로딩이 완료된 시점에 SwipeRefreshLayout의 Refreshing속성을 false로 바꿔줘야 한다.
로딩이 완료된 시점에 SwipeRefreshLayout의 Refreshing속성을 false로 바꿔줘야만
위에서 원으로 돌아가는 화살표가 사라진다.
중요한 것은 Refreshing속성을 false로 바꿔주는 타이밍은 SwipeRefreshLayout의 OnRefreshListener()를 통해
해당 컴포넌트들이 모두 갱신된 이후여야 한다는 것이다.
SwipeRefreshLayout와 WebView에 대한 예시
--> xml 부분은 동일하다.
......

    private val webView: WebView by lazy {
        findViewById(R.id.webView)
    }
    private val refreshLayout: SwipeRefreshLayout by lazy {
        findViewById(R.id.refreshLayout)
    }


    ......


        webView.apply {

            webViewClient = WebViewClient()
            // 웹뷰의 동작을 오버라이드 하는 부분 --> 호출한 웹사이트가 WebView안에서 실행되도록

            settings.javaScriptEnabled = true
            // 웹뷰에서 javaScript를 사용하겠다고 명시 ( 보안상의 문제 있음 )

            loadUrl(DEFAULT_URL)
            // manifest에서 http도 사용할 것으로 명시하였으므로 http를 사용 ( 보안상의 문제 있음 )

        }


        ......


        refreshLayout.setOnRefreshListener {
            webView.reload()
        }


        ......


    inner class WebViewClient: android.webkit.WebViewClient(){

        // WebView의 페이지가 다 로딩되었을 때 호출되는 메소드
        override fun onPageFinished(view: WebView?, url: String?) {
            super.onPageFinished(view, url)

            refreshLayout.isRefreshing = false
        }
    }
ContentLoadingProgressBar
ContentLoadingProgressBar 공식문서 : https://developer.android.com/reference/androidx/core/widget/ContentLoadingProgressBar
ProgressBar를 보조하기 위한 위젯
( ProgressBar를 상속받는 클래스임 )
--> 따라서 사용방법은 ProgressBar와 동일하다.
로딩이 너무 빠를 경우 단순히 깜빡깜빡하는 경우가 존재할 수 있음 --> 사용자 입장에선 이럴경우 뭔가 문제가 있다고 인식할 여지 있음
--> 따라서 로딩이 빠르게 되더라도 사용자가 ProgressBar를 인식하는 최소한의 시간동안은 화면에 남을 수 있게 도와줌

여기서 style="@style/Widget.AppCompat.ProgressBar.Horizontal" 속성은
Determinate ProgressBar일 경우에 사용하는 것이다.
ProgressBar에 대한 공식문서로 가면 나와있는데,
ProgressBar는 기본적으로
Determinate한 것( operation이 얼마나 걸릴지 명확한 경우 )과
Indeteminate한 것( operation이 얼마나 걸릴지 명확하지 않은 경우 )이 있다.
onBackPressd() -> 기기의 백버튼 클릭에 대한 리스너
기기의 백버튼을 클릭하면 호출되는 메소드로 다음과 같은 형태를 가지고 있다.
 override fun onBackPressed() {

            super.onBackPressed()
            // 해당 코드가 실행되면 앱이 종료됨

        }
    }
onBackPressed()의 경우 기본적으로 위와 같은 형태로 이루어져있는데,
위 코드의 "super.onBackPressed()"부분이 호출되면 앱이 종료되게 된다.
따라서 백버튼을 눌렀을 때, 어떠한 작업이 수행되도록하고 싶다면 아래와 같이 분기시켜주면 된다.
이번 앱에서 사용한 예제
 override fun onBackPressed() {
        if(webView.canGoBack()) {
            // 뒤로 갈 수 있는 지 확인 -> 뒤에 웹페이지가 있으면 true, 뒤에 이제 웹페이지가 없어서 뒤로 갈 수 없다면 false

            webView.goBack()
        }else {


            super.onBackPressed()
            // 해당 코드가 실행되면 앱이 종료되게 되는 것 --> 따라서 백버튼을 눌렀을 때 앱이 종료되는 것이 아니라
            // 이전 페이지로 가거나, 다른 작업이 실행되는 등등의 것들이 하고 싶다면 해당 코드를 제거하고 그 코드를 넣어줘야함
        }
    }
EditText
글을 입력하기 위한 태그
EditText의 속성
-
paddingHorizontal --> 좌우 padding
만약에 EditText의 background에 ShapeDrawable을 설정하거나 했을 경우
EditText의 커서가 너무 왼쪽에 딱 붙어있어서 안쪽으로 넣어주고 싶다면 padding값을 주면 된다. -
inputType
무엇이 입력되어야 하는지 선택
--> 이것에 따라 해당 EditText를 클릭했을 때 나타나는 키보드의 종류가 다름입력 방법 유형 지정에 대한 공식문서 ( 키보드 유형 지정 부분 ) : https://developer.android.com/training/keyboard-input/style
( 해당 속성에 입력 가능한 키워드에 대한 리스트는 해당 공식문서에서 inputType을 클릭하면 나타남 ) -
autofillHints
EditText의 자동입력과 관련된 속성
( 주로 패스워드, 이메일과 관련된 영역사용하지 않을 경우 다음과 같은 속성을 추가해준다.
android:importantForAutofill="no"-
labelFor
접근성 관련해서 여기에 어떤 것이 입력되어야 하는지 나타내는 부분
-
selectAllOnFocus
EditText의 내용을 클릭하면 내용 전체가 focusing됨
android:selectAllOnFocus="true"-
imeOptions
EditText에 입력할 때 키보드가 나타나는데,
입력을 완료한 후 키보드에 있는 Enter버튼을 눌렀을 때 어떻게 동작할지를 정하는 부분--> Enter버튼을 눌렀을 때 실행되는 동작에 대한 부분이므로 아래에 있는 EditText의 Listener설정과도 연관이 있는 속성임
입력 방법 유형 지정에 대한 공식문서 ( 입력 방법 작업 지정하기 부분 ) : https://developer.android.com/training/keyboard-input/style
( 해당 속성에 입력 가능한 키워드에 대한 리스트는 해당 공식문서에서 imeOptions를 클릭하면 나타남 )
EditText에 입력후 Enter를 눌렀을 때 실행되는 Listener
( imeOptions와 연관됨 )
......
    private val addressBar: EditText by lazy {
       findViewById(R.id.addressBar)
   }
......

addressBar.setOnEditorActionListener { v, actionId, event ->
           if (actionId == EditorInfo.IME_ACTION_DONE) {
               webView.loadUrl(v.text.toString())
           }

           return@setOnEditorActionListener false
       }
EditText에 대한 리스너를 넣어주는 메소드인 setOnDeitorActionListener는
파라미터로 onEditorActionListener()메소드를 받는다.
이때 위의 코드는 onEditorActionListener()를 람다함수 형태로 생성하여 넣어주는 형태인데,
onEditorActionListener()는
-
첫번째 파라미터로 Enter가 클릭되어 해당 리스너를 호출한 EditText를 받아오고,
-
두번째 파라미터로 해당 EditText에서 설정된 imeOptions 속성을 가져오고,
-
세번째 파라미터로 해당 리스너가 호출되었을 때 (즉, 사용자가 Enter키를 눌렀을 때)
실행될 부분에 대한 것들을 람다함수 형태로 받는다. -
마지막으로 return에 대한부분인데,
- return이 True이면 해당 리스너에서 이미 동작을 모두 정의하고 해소했으므로,
imeOptions에 해당하는 작업을 실행하지 않도록한다. - return이 false이면 해당 리스너에서 동작을 모두 정의하진 않았으므로,
imeOptions에 해당하는 작업까지 실행하도록 한다.
예를 들어 ))
impOptions에 설정된 것이 "actionDone"일 경우,
해당 리스너의 return이 false이면 "actionDone"이 정상실행되어 Enter를 누르면 키보드가 없어지게 되고,
해당 리스너의 return이 true이면 "actionDone"이 생략되어 Enter를 눌러도 키보드는 사라지지 않고 남아있게 된다.
WebView
WebView의 보안 --> 공부하는 입장이므로 고려하지 않을것
WebView는 외부와 연결하는 영역을 가지고 있기 때문에 보안이 중요하다.
그런데 보안과 관련한 문제는 아직은 어렵기 때문에 보안을 제외하고 WebView에 대해서만 우선 공부할 예정이다.
그런데 중요한 것이 안드로이드에서 기본적인 보안을 위해 준비해 놓은 장치들이 있는데,
우리는 WebView에 대해 공부하는 입장이기 때문에 일단 이 장치들을 해제하고 진행할 것이다.
만약에 나중에 실제로 WebView를 써서 앱을 만든다고 한다면, 아래와 같이 해제해버리면 안되고 보안을 고려하여 처리해야만 한다 !!!
-
http, https 보안 처리 해제
아래의 두 주소를 비교해보면 http / https의 차이가 있는 것을 알 수 있다.
"https://www.google.com"
"http://www.google.com"이것은 보안 프로토콜과 관련된 부분인데, https는 프로토콜을 암호화 시켜준 것이다.
기본적으로 http주소로 접근하는 것을 막는 것이 보안상 적절하지만
아직까지도 https를 지원하지 않는 사이트들도 있으며,대부분의 https를 지원하는 웹사이트들은 (구글, 네이버와 같은 몇몇 사이트들)
http로 접근했다고 하더라도 https로 Redirecting 시켜주고 있다.안드로이드에서도 보안을 위해 9버전 이상부터는 default로 https를 사용하며,
http를 지원하지 않는다.그런데 https를 사용하려면 별도의 처리가 필요한데, 우리는 공부의 목적으로 WebView를 이용할 것이기 때문에 따로 보안에 대해 고려하지 않을 것이다.
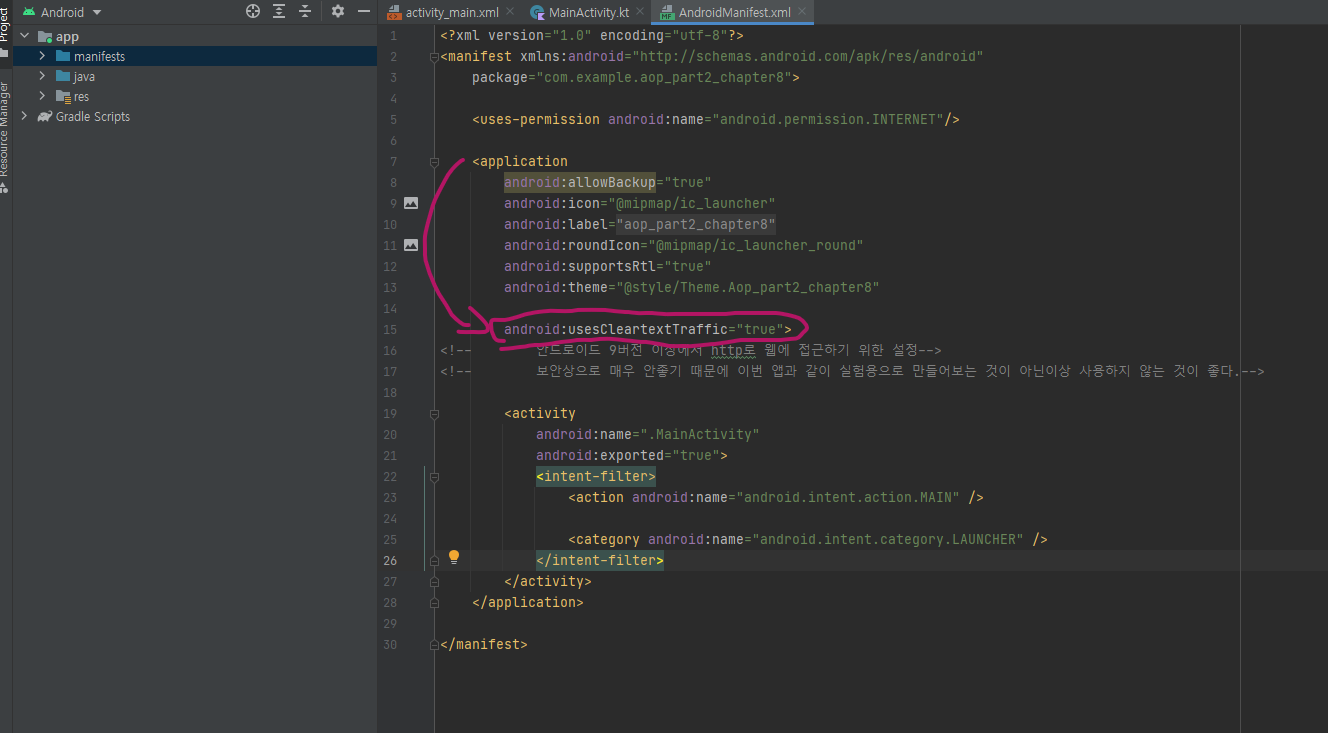
따라서 http로 접속이 가능하도록 manifest의 application의 속성에 다음과 같이 선언해주어야한다.
다시 강조하지만 이것은 보안상 매우 취약한 방법이다. 따라서 실제로 앱을 만들어서 배포할 생각이라면 이 방식이 아니라 https를 이용하기 위해 처리를 해주는 게 맞다.

android:usesCleartextTraffic="true"-
javaScript 사용금지 보안 해제하기
웹뷰에 웹사이트를 올리는데 성공하였더라도 웹사이트의 버튼들이 동작하지 않을 것이다.
그 이유는 다음과 같은데대부분의 웹사이트에서는 javascript로 웹사이트의 동작과 기능들이 구현되어 있다.
그런데 안드로이드 같은 경우, 보안상의 이유로 default로 javascript와 관련된 기술들을 허용하지 않고 있음
그래서 본래는 이 부분또한 보안상의 이유로 별도의 처리를 해줘야하지만,
우리는 WebView에 대한 공부 목적으로 사용할 것이므로 javaScript와 관련된 보안도 해제할 것이다.그래서 View를 초기화 할때 javascript를 사용하겠다는 것 또한 명시해줘야함
앞에 말한 부분과 같이 javaScript를 허용할 경우, 보안 관련해서 취약해지기 때문에 실제 앱을 구현하여 올릴 생각이라면 보안상의 처리를 해줄 필요가 있다
( 지금은 공부용이므로 보안 고려하지 않을 것임 )
 --> 이렇게 WebView에 settings에 javaScriptEnabled를 true로 설정해줘야한다.
WebView xml 부분
    <WebView
        android:id="@+id/webView"
        android:layout_width="0dp"
        android:layout_height="0dp"
        app:layout_constraintBottom_toBottomOf="parent"
        app:layout_constraintLeft_toLeftOf="parent"
        app:layout_constraintRight_toRightOf="parent"
        app:layout_constraintTop_toBottomOf="@id/toolbar" />
딱히 특별한 건 없음
WebView를 사용하기 위한 Manifest설정
<?xml version="1.0" encoding="utf-8"?>
<manifest xmlns:android="http://schemas.android.com/apk/res/android"
    package="com.example.aop_part2_chapter8">

    <uses-permission android:name="android.permission.INTERNET"/>

    <application
        android:allowBackup="true"
        android:icon="@mipmap/ic_launcher"
        android:label="@string/app_name"
        android:roundIcon="@mipmap/ic_launcher_round"
        android:supportsRtl="true"
        android:theme="@style/Theme.Aop_part2_chapter8"

        android:usesCleartextTraffic="true">
<!--        안드로이드 9버전 이상에서 http로 웹에 접근하기 위한 설정-->
<!--        보안상으로 매우 안좋기 때문에 이번 앱과 같이 실험용으로 만들어보는 것이 아닌이상 사용하지 않는 것이 좋다.-->

        <activity
            android:name=".MainActivity"
            android:exported="true">
            <intent-filter>
                <action android:name="android.intent.action.MAIN" />

                <category android:name="android.intent.category.LAUNCHER" />
            </intent-filter>
        </activity>
    </application>

</manifest>
- WebView를 사용하기 위해서는 인터넷에 대한 Permission을 얻어야하므로
다음과 같이 Permission설정을 해줘야한다.
<uses-permission android:name="android.permission.INTERNET"/>WebView 사용하기
    private val webView: WebView by lazy {
        findViewById(R.id.webView)
    }

......

        webView.apply {

            webViewClient = WebViewClient()
            // WebViewClient를 세팅해주는 모습
            // WebViewClient 구성없이 단순히 이것만 해줘도 --> 호출한 웹사이트가 WebView안에서 실행되도록 할 수 있다.

            // 웹뷰의 동작을 오버라이드 하는 부분 --> 아래에 설명

            webChromeClient = WebChromeClient()
            // WebChromeClient를 세팅해주는 모습

            settings.javaScriptEnabled = true
            // 해당 웹뷰에서 javaScript를 사용하겠다고 명시

            //loadUrl("https://www.google.com")
            loadUrl("http://www.google.com")

        }
WebView의 내용 설명
- WebViewClient와 WebChromeClient의 차이??
-
WebViewClient는 주로 컨텐츠 로딩과 관련된 이벤트를 제공
-
WebChromeClient는 브라우저의 차원의 이벤트를 제공
-> 예를 들어, javaScript에 alert이벤트, WebContent에 Title정보를 받아오는 등의 브라우저 관점의 이벤트들
-
webViewClient = WebViewClient()
이 코드는 WebViewClient를 세팅해주는 모습이다.만약 WebViewClient를 세팅하지 않고 웹뷰를 실행할 경우,
웹사이트가 웹뷰에서 실행되는 것이 아니라 외부 웹브라우저가 열리면서 다른 브라우저가 실행되게 된다.
( 따로 구현하지 않고 세팅해줘도 되긴한다. )이를 해결하여 웹뷰에서 실행시키기 위해서는 WebView의 동작을 오버라이드 해야하는데, 이 방법은 아래의 공식문서에 나와 있다.
웹뷰에 대한 공식문서(페이지 탐색 처리 부분) : https://developer.android.com/guide/webapps/webview?hl=ko
일반적으로 필요에 따라 WebViewClient()를 상속받은 Class로 직접 구현해서 세팅하는데, 아래에 정리해 놓았다.
- webChromeClient = WebChromeClient()
이 코드는 WebChromeClient()를 세팅해주는 모습이다.
WebChromeClient()의 경우 필요에 따라 세팅해주면 된다.
WebChromeClient또한 WebViewClient처럼 WebChromeClient()를 상속받은 Class로 직접 구현하여 세팅하는데, 아래에 정리해 놓았다.
-
settings.javaScriptEnabled = true
이 코드는 해당 WebView에서 javaScript의 동작을 허용하겠다고 설정한 것이다.이렇게 할 경우 보안상의 문제가 될 여지가 있으며,
이 코드에 대한 좀 더 자세한 내용은 위에 "WebView의 보안" 부분에 적어놓았다. -
loadUrl("http://www.google.com")
이 코드는 해당 WebView에 Url를 세팅하는 코드이다.본래 https를 사용해야하지만, https를 사용하려면 따로 처리하는 부분까지 구현해줘야한다.
현재는 공부목적이므로 http를 사용할 것이다.하지만 http의 경우 보안상의 문제로 안드로이드 9 버전 이후부터 지원하지 않는 방식이므로
그냥 사용하면 not available 오류가 발생하면서 실행되지 않는다.따라서 http를 사용하기 위해서는 위에 "WebView의 보안"부분에서 설명했듯이 manifest에 코드를 추가해줘야한다.
webView 제어하기
    private val webView: WebView by lazy {
        findViewById(R.id.webView)
    }
        private val goHomeButton : ImageButton by lazy {
        findViewById(R.id.goHomeButton)
    }
    private val goBackButton : ImageButton by lazy {
        findViewById(R.id.goBackButton)
    }

    private val goForwardButton : ImageButton by lazy {
        findViewById(R.id.goForwardButton)
    }

    ......

        // 기기에서 백버튼을 눌렀을 때 호출되는 메소드
    override fun onBackPressed() {
        if(webView.canGoBack()) {
            // 뒤로 갈 수 있는 지 확인 -> 뒤에 웹페이지가 있으면 true,
            // 뒤에 이제 웹페이지가 없어서 뒤로 갈 수 없다면 false

            webView.goBack()
        }else {
            super.onBackPressed()

        }
    }

    ......

        private fun bindViews() {
        addressBar.setOnEditorActionListener { v, actionId, event ->
            if (actionId == EditorInfo.IME_ACTION_DONE) {
                webView.loadUrl(v.text.toString())
            }

            return@setOnEditorActionListener false
        }

        goBackButton.setOnClickListener {
            webView.goBack()
        }

        goForwardButton.setOnClickListener {
            webView.goForward()
        }

        goHomeButton.setOnClickListener {
            webView.loadUrl(DEFAULT_URL)
        }

    }

    companion object {
        private const val DEFAULT_URL="http://www.google.com"
    }
WebViewClient 직접 구현하기

    inner class WebViewClient: android.webkit.WebViewClient(){

        // WebView의 페이지에 대한 호출이 시작되면 호출되는 메소드
        override fun onPageStarted(view: WebView?, url: String?, favicon: Bitmap?) {
            super.onPageStarted(view, url, favicon)

        }


        // WebView의 페이지가 다 로딩되었을 때 호출되는 메소드
        override fun onPageFinished(view: WebView?, url: String?) {
            super.onPageFinished(view, url)

            // onPageFinished에 두번째 파라미터로 들어오는 url은 해당 페이지의 실제 주소임
            // --> 따라서 페이지가 로딩되면 그 페이지의 실제주소로 주소창을 리다이렉팅 해줌
            addressBar.setText(url)

        }
    }
--> 위와 같이 inner class로 WebViewClient()를 상속받는 Class를 만들어서 필요한 메소드를 오버라이드하여 구현하면 됨
위의 코드는 예시이고, 더 많은 메소드들을 오버라이드 할 수 있으니 알아서 잘 쓸 것
WebChromeClient 직접 구현하기

    inner class WebChromeClient: android.webkit.WebChromeClient() {

        // WebView의 로딩값이 변경되면 호출되는 메소드
        // 코드를 타고 들어가보면, 현재 페이지의 로딩 정도를 0~100사이로 반환한다고 나와있음
        override fun onProgressChanged(view: WebView?, newProgress: Int) {
            super.onProgressChanged(view, newProgress)

            progressBar.progress = newProgress
        }
    }
--> 위와 같이 inner class로 WebChromeClient()를 상속받는 Class를 만들어서 필요한 메소드를 오버라이드하여 구현하면 됨
위의 코드는 예시이고, 더 많은 메소드들을 오버라이드 할 수 있으니 알아서 잘 쓸 것
위에서 사용된 WebView 제어 메소드들
-
goBack()
이전 페이지로 감 -
goForward()
앞 페이지로 감 -
loadUrl("url주소")
"url주소"의 웹사이트를 호출 -
canGoBack()
뒤로 갈 수 있는 지 확인
뒤에 웹페이지가 있으면 true,
뒤에 이제 웹페이지가 없어서 뒤로 갈 수 없다면 false -
canGoForward()
앞으로 갈수 있는지 확인
코드소개
MainActivity.kt
package com.example.aop_part2_chapter8

import android.annotation.SuppressLint
import android.graphics.Bitmap
import android.media.Image
import androidx.appcompat.app.AppCompatActivity
import android.os.Bundle
import android.view.inputmethod.EditorInfo
import android.webkit.URLUtil
import android.webkit.WebView
import android.webkit.WebViewClient
import android.widget.EditText
import android.widget.ImageButton
import androidx.core.widget.ContentLoadingProgressBar
import androidx.swiperefreshlayout.widget.SwipeRefreshLayout

class MainActivity : AppCompatActivity() {

    private val webView: WebView by lazy {
        findViewById(R.id.webView)
    }

    private val addressBar: EditText by lazy {
        findViewById(R.id.addressBar)
    }

    private val goHomeButton : ImageButton by lazy {
        findViewById(R.id.goHomeButton)
    }
    private val goBackButton : ImageButton by lazy {
        findViewById(R.id.goBackButton)
    }

    private val goForwardButton : ImageButton by lazy {
        findViewById(R.id.goForwardButton)
    }
    private val refreshLayout: SwipeRefreshLayout by lazy {
        findViewById(R.id.refreshLayout)
    }

    private val progressBar: ContentLoadingProgressBar by lazy {
        findViewById(R.id.progressBar)
    }

    override fun onCreate(savedInstanceState: Bundle?) {
        super.onCreate(savedInstanceState)
        setContentView(R.layout.activity_main)


        initViews()
        bindViews()
    }

    // 기기에서 백버튼을 눌렀을 때 호출되는 메소드
    override fun onBackPressed() {
        if(webView.canGoBack()) {
            // 뒤로 갈 수 있는 지 확인 -> 뒤에 웹페이지가 있으면 true, 뒤에 이제 웹페이지가 없어서 뒤로 갈 수 없다면 false

            webView.goBack()
        }else {


            super.onBackPressed()
            // 해당 코드가 실행되면 앱이 종료되게 되는 것 --> 따라서 백버튼을 눌렀을 때 앱이 종료되는 것이 아니라
            // 이전 페이지로 가거나, 다른 작업이 실행되는 등등의 것들이 하고 싶다면 해당 코드를 제거하고 그 코드를 넣어줘야함
        }
    }

    @SuppressLint("SetJavaScriptEnabled")  // javaScript를 허용해서 발생하는 보안 문제에 대한 경고 무시
    private fun initViews() {

        webView.apply {

            webViewClient = WebViewClient()
            // WebViewClient를 세팅
            // WebViewClient 구성없이 단순히 이것만 해줘도 --> 호출한 웹사이트가 WebView안에서 실행되도록 할 수 있다.

            webChromeClient = WebChromeClient()
            // WebChromeClient를 세팅

            settings.javaScriptEnabled = true
            // 웹뷰에서 javaScript를 사용하겠다고 명시 ( 보안상의 문제 있음 )

            loadUrl(DEFAULT_URL)
            // manifest에서 http도 사용할 것으로 명시하였으므로 http를 사용 ( 보안상의 문제 있음 )

        }

        // WebView에서 WebViewClient와 WebChromeClient의 차이
        // WebViewClient는 주로 컨텐츠 로딩과 관련된 이벤트를 제공
        // WebChromeClient는 브라우저의 차원의 이벤트를 제공 -> 예를 들어, javaScript에 alert이벤트, WebContent에 Title정보를 받아오는 등의 브라우저 관점의 이벤트들


    }

    private fun bindViews() {
        addressBar.setOnEditorActionListener { v, actionId, event ->
            if (actionId == EditorInfo.IME_ACTION_DONE) {

                // 주소에 http://을 붙였는지 안붙였는지 확인, 붙였으면 그대로 실행, 안붙였으면 붙여서 실행
                val loadingUrl = v.text.toString()
                if(URLUtil.isNetworkUrl(loadingUrl)){
                webView.loadUrl(v.text.toString())
            }else{
                webView.loadUrl("http://$loadingUrl")
                }

            }

            return@setOnEditorActionListener false
        }

        goBackButton.setOnClickListener {
            webView.goBack()
        }

        goForwardButton.setOnClickListener {
            webView.goForward()
        }

        goHomeButton.setOnClickListener {
            webView.loadUrl(DEFAULT_URL)
        }

        refreshLayout.setOnRefreshListener {
            webView.reload()
        }

    }


    inner class WebViewClient: android.webkit.WebViewClient(){

        // WebView의 페이지가 시작되면 호출되는 메소드
        override fun onPageStarted(view: WebView?, url: String?, favicon: Bitmap?) {
            super.onPageStarted(view, url, favicon)

            progressBar.show()
        }

        // WebView의 페이지가 다 로딩되었을 때 호출되는 메소드
        override fun onPageFinished(view: WebView?, url: String?) {
            super.onPageFinished(view, url)

            refreshLayout.isRefreshing = false
            progressBar.hide()
            goBackButton.isEnabled = webView.canGoBack()
            goForwardButton.isEnabled = webView.canGoForward()

            // onPageFinished에 두번쨰 파라미터로 들어오는 url은 해당 페이지의 실제 주소임
            // --> 따라서 페이지가 로딩되면 그 페이지의 실제주소로 주소창을 리다이렉팅 해줌
            addressBar.setText(url)

        }
    }

    inner class WebChromeClient: android.webkit.WebChromeClient() {

        // WebView의 로딩값이 변경되면 호출되는 메소드
        // 코드를 타고 들어가보면, 현재 페이지의 로딩 정도를 0~100사이로 반환한다고 나와있음
        override fun onProgressChanged(view: WebView?, newProgress: Int) {
            super.onProgressChanged(view, newProgress)

            progressBar.progress = newProgress
        }
    }

    companion object {
        private const val DEFAULT_URL="http://www.google.com"
    }


}
activity_main.xml
<?xml version="1.0" encoding="utf-8"?>
<androidx.constraintlayout.widget.ConstraintLayout xmlns:android="http://schemas.android.com/apk/res/android"
    xmlns:app="http://schemas.android.com/apk/res-auto"
    xmlns:tools="http://schemas.android.com/tools"
    android:layout_width="match_parent"
    android:layout_height="match_parent"
    tools:context=".MainActivity">

    <androidx.constraintlayout.widget.ConstraintLayout
        android:id="@+id/toolbar"
        android:layout_width="0dp"
        android:layout_height="?attr/actionBarSize"
        android:background="@color/white"
        android:elevation="4dp"
        app:layout_constraintLeft_toLeftOf="parent"
        app:layout_constraintRight_toRightOf="parent"
        app:layout_constraintTop_toTopOf="parent">


        <ImageButton
            android:id="@+id/goHomeButton"
            android:layout_width="0dp"
            android:layout_height="0dp"
            android:background="?attr/selectableItemBackground"
            android:src="@drawable/ic_home"
            app:layout_constraintBottom_toBottomOf="parent"
            app:layout_constraintDimensionRatio="1:1"
            app:layout_constraintLeft_toLeftOf="parent"
            app:layout_constraintTop_toTopOf="parent" />
        <!--        background 속성에 ripple 이펙트를 넣어줌 (안드로이드에서 기본 제공) >> 해당 버튼이 클릭될 때 background 모션-->
        <!--        이때 background가 ?attr/selectableItemBackground로 설정되었기 떄문에 기본의 ImageButton의 기본 크기는 덮어씌워졌음-->
        <!--        그래서 width, height를 0dp 로 바꾸고 layout_constraintDimensionRatio를 통해 컴포넌트의 크기를 맞춰줄 것임-->
        <!--        ( 해당 속성비율은 width height 모두 match_parent일 경우 제약을 만족하는 더 큰값을 기준으로 한다. )-->

        <EditText
            android:id="@+id/addressBar"
            android:layout_width="0dp"
            android:layout_height="32dp"
            android:background="@drawable/shape_address_bar"
            android:imeOptions="actionDone"
            android:importantForAutofill="no"
            android:inputType="textUri"
            android:selectAllOnFocus="true"
            android:paddingHorizontal="16dp"
            android:textSize="14sp"
            app:layout_constraintBottom_toBottomOf="parent"
            app:layout_constraintLeft_toRightOf="@+id/goHomeButton"
            app:layout_constraintRight_toLeftOf="@+id/goBackButton"
            app:layout_constraintTop_toTopOf="parent" />
        <!--        imeOptions은 해당 EditText에 대해 나타난 키보드에서 Enter를 눌렀을 떄 어떻게 할 것인가 설정하는 부분이다. > "actionDone"이면 키보드가 사라지게 한다-->


        <ImageButton
            android:id="@+id/goForwardButton"
            android:layout_width="0dp"
            android:layout_height="0dp"
            android:background="?attr/selectableItemBackground"
            android:src="@drawable/ic_forward"
            app:layout_constraintBottom_toBottomOf="parent"
            app:layout_constraintDimensionRatio="1:1"
            app:layout_constraintRight_toRightOf="parent"
            app:layout_constraintTop_toTopOf="parent" />

        <ImageButton
            android:id="@+id/goBackButton"
            android:layout_width="0dp"
            android:layout_height="0dp"
            android:background="?attr/selectableItemBackground"
            android:src="@drawable/ic_back"
            app:layout_constraintBottom_toBottomOf="parent"
            app:layout_constraintDimensionRatio="1:1"
            app:layout_constraintRight_toLeftOf="@+id/goForwardButton"
            app:layout_constraintTop_toTopOf="parent" />


    </androidx.constraintlayout.widget.ConstraintLayout>

    <androidx.swiperefreshlayout.widget.SwipeRefreshLayout
        android:id="@+id/refreshLayout"
        android:layout_width="0dp"
        android:layout_height="0dp"
        app:layout_constraintBottom_toBottomOf="parent"
        app:layout_constraintLeft_toLeftOf="parent"
        app:layout_constraintRight_toRightOf="parent"
        app:layout_constraintTop_toBottomOf="@id/toolbar">

        <WebView
            android:id="@+id/webView"
            android:layout_width="match_parent"
            android:layout_height="match_parent" />

    </androidx.swiperefreshlayout.widget.SwipeRefreshLayout>

    <androidx.core.widget.ContentLoadingProgressBar
        android:id="@+id/progressBar"
        style="@style/Widget.AppCompat.ProgressBar.Horizontal"
        android:layout_width="0dp"
        android:layout_height="2dp"
        app:layout_constraintLeft_toLeftOf="parent"
        app:layout_constraintRight_toRightOf="parent"
        app:layout_constraintTop_toBottomOf="@+id/toolbar" />

</androidx.constraintlayout.widget.ConstraintLayout>
activity_main.xml에서 주목할 부분
?attr/로 들어가는 값들
?attr/을 통해 현재 영역의 테마속성에 접근할 수 있다.
예를 들어, android:layout_height="?attr/actionBarSize" 처럼 현재 actionBar의 Size를 가져오는 등의 것들이 가능하다.
또한 android:background="?attr/selectableItemBackground" 처럼 안드로이드에 이미 만들어져 있는 것을 가져와서 사용해줄 수도 있다.
( 위의 코드는 해당 컴포넌트가 클릭되었을 때 Background가 ripple로 설정한 모션을 하도록 설정)
AndroidManifest.xml
<?xml version="1.0" encoding="utf-8"?>
<manifest xmlns:android="http://schemas.android.com/apk/res/android"
    package="com.example.aop_part2_chapter8">

    <uses-permission android:name="android.permission.INTERNET"/>
  <!-- 인터넷 접속을 위한 권한을 가져옴 -->

    <application
        android:allowBackup="true"
        android:icon="@mipmap/ic_launcher"
        android:label="@string/app_name"
        android:roundIcon="@mipmap/ic_launcher_round"
        android:supportsRtl="true"
        android:theme="@style/Theme.Aop_part2_chapter8"

        android:usesCleartextTraffic="true">
<!--        안드로이드 9버전 이상에서 http로 웹에 접근하기 위한 설정-->
<!--        보안상으로 매우 안좋기 때문에 이번 앱과 같이 실험용으로 만들어보는 것이 아닌이상 사용하지 않는 것이 좋다.-->

        <activity
            android:name=".MainActivity"
            android:exported="true">
            <intent-filter>
                <action android:name="android.intent.action.MAIN" />

                <category android:name="android.intent.category.LAUNCHER" />
            </intent-filter>
        </activity>
    </application>

</manifest>
