
S3(Simple Storage Service)
블록 스토리지
: 원시 스토리지. 데이터가 관련 없는 블록의 어레이로 구성된다.
ex) 하드디스크, 스토리지 영역 네트워크(SAN), 스토리지 어레이
Amazon EBS파일 스토리지
: 파일(서비스) 시스템이 관련 없는 데이터 블록을 관리한다. 네이티브 파일 시스템이 디스크에 데이터를 배치한다.
ex) 네트워크 연결 스토리지(NAS) 어플라이언스, Windows 파일 서버
Amazon EFS객체 스토리지
: 데이터, 데이터 속성, 메타데이터, 객체 ID를 캡슐화하는 가상 컨테이너를 저장한다.
ex) Ceph, OpenStack Swift
Amazon S3
storage?
- 어떻게 하면 고가용성을 보장하면서 스토리지 비용을 최적화하고 보안을 제공할 수 있습니까?
- 오래된 이미지의 스토리지 비용을 절감하고 싶습니다. 어떻게 하면 프로세스를 자동화할 수 있습니까?
- windows와 linux 모두에 대해 안전하고 확장 가능한 스토리지를 구축하기 위해 검토할 수 있는 몇가지 옵션은 무엇입니까?
- 비교적 짧은 기간에 대규모 데이터를 클라우드로 이전해야 합니다. 어떤 옵션이 있습니까?
S3 ❔
: AWS애서 제공하는 인터넷 저장소로 용량 무제한의 파일 저장소이다.
: Region 레벨의 서비스로 AZ 영역 외부에 아키텍처가 위치한다. 모든 AZ에 복제되어 저장되기 때문에 내구성을 제공한다. 객체 수준의 스토리지를 제공한다.
S3 확장
: file의 count/size, version 관리, aws service와의 연계
S3에서 EC2 instance로 데이터를 보내는 것은 비용이 들지 않는다.
Contents를 업로드하고 삭제할 때는 접근제어가 있어야 한다.(ACL)
HTTP(웹)을 이용하여 파일 접근 및 업로드/다운로드가 가능하다
S3 요소
-
버킷(bucket) - 프로젝트(용도)
: S3에서 생성할 수 있는 최상위 디렉토리
각 region별로 생성 가능하고 버킷의 모든 이름은 모든 S3 region에서 유일해야 하며 계정별로 100개까지 생성할 수 있다. 또한 버킷 안에 객체가 저장되고 디렉토리 생성이 가능하며 저속 제어 및 권한 관리가 가능하다. -
객체(object) - 파일 + 파일의 설정요소로 구성
: S3에 데이터가 저장되는 최소단위. 파일과 메타데이터로 구성
기본적으로 객체의 key가 데이터 이름이고, value가 데이터 타입이다. 객체 하나의 크기는 최소 1byte부터 최대 5TB까지 가능하다.
SNS와 같이 서버에 많은 미디어 파일을 저장해야 하는 경우 EC2와 EBS만을 사용해서 저장을 하게 되면 용량에 따른 과금 및 저장소 구축/관리로 인한 성능 문제가 발생할 수 있다.
=> S3를 사용하면 버킷으로 모든 미디어 파일을 관리할 수 있고 과금도 EC2 & EBS 조합보다 상대적으로 저렴하게 이용할 수 있다.
만약, 정적 웹서비스를 구축한다면 EC2와 EBS를 생성하지 않고, 바로 S3에서 연결해서 사용할 수 있다. 동적 웹페이지 서비스에서는 할 수 없다.
S3를 이용한 Serverless 환경 예
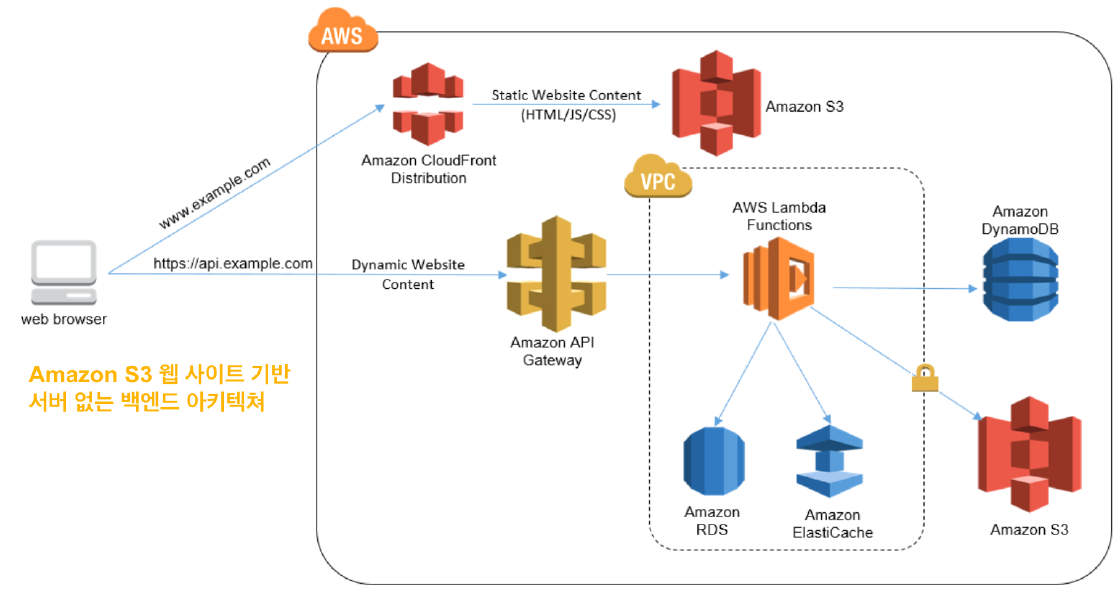
람다함수가 백앤드 역할을 한다. S3는 단순 파일 스토리지이기 때문에 프로그램을 설치할 수 없으므로 정적 웹 페이지만 제공 가능하다.
S3 접근 제어
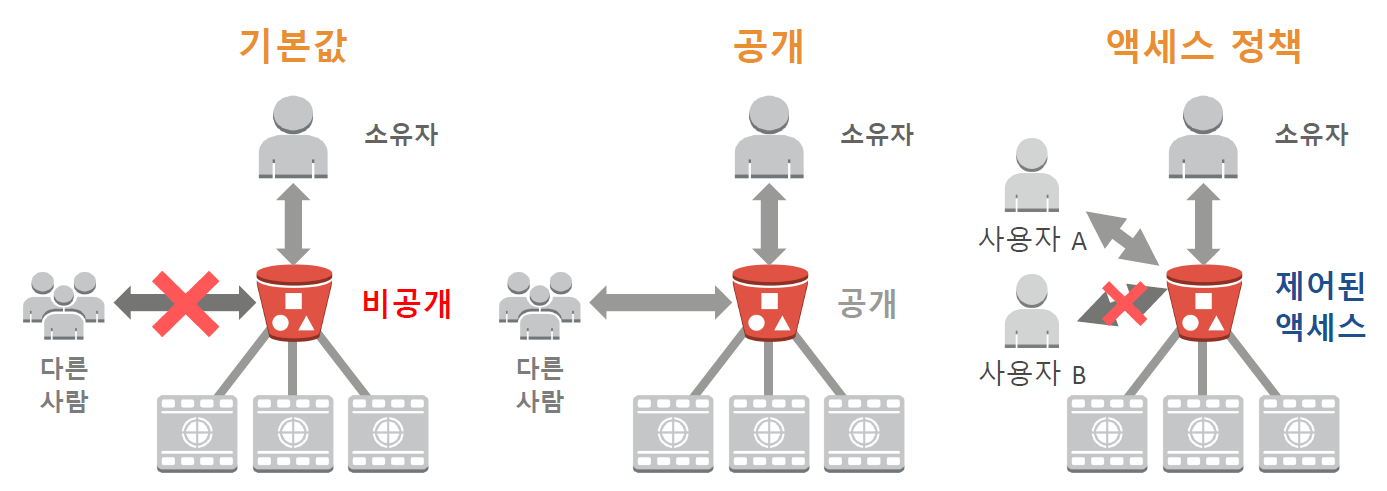
기본값은 private이다. 제어된 액세스는 인증된 사용자에게만 액세스 할 수 있게 해주는 것이다. 따라서 bucket을 만들때 어떤 것을 올리고 누구를 접근할 수 있게 해줄지 계획이 있어야 한다.
버킷 정책
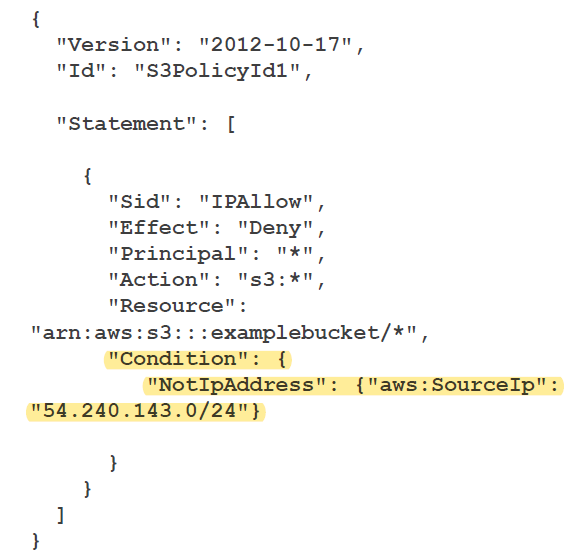
-> Condition - 저 ip 대역은 차단한다.
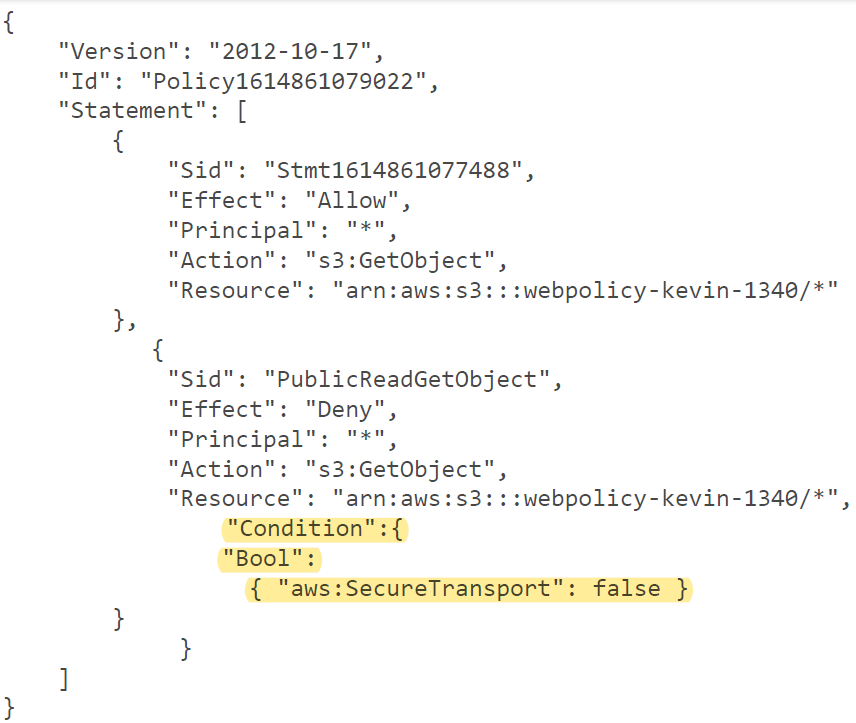
-> HTTPS 아닌 것은 deny한다. only https!
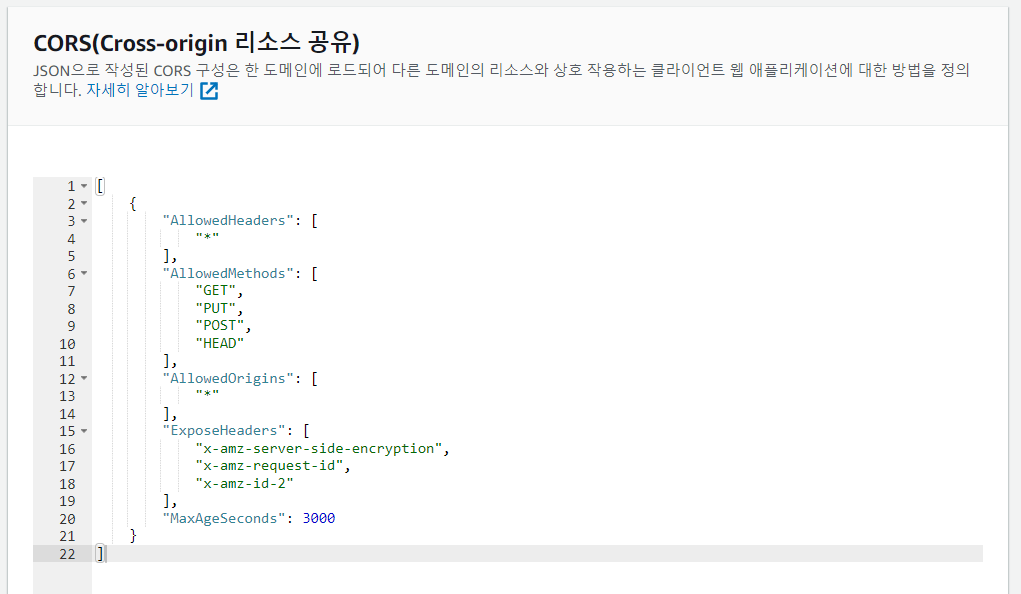
CORS
: 처음 사용된 도메인의 자원을 다른 도메인에 공유하는 기능
한 도메인에서 로드되어 있는 클라이언트 웹 애플리케이션이 다른 도메인에 있는 리소스와 상호 작용하는 방법을 정의한다
CORS 지원을 통해 S3로 다양한 기능의 클라이언트 즉 웹 애플리케이션을 구축하고 개별적으로 S3 리소스에 대한 교차 오리진 액세스를 허용할 수 있다.
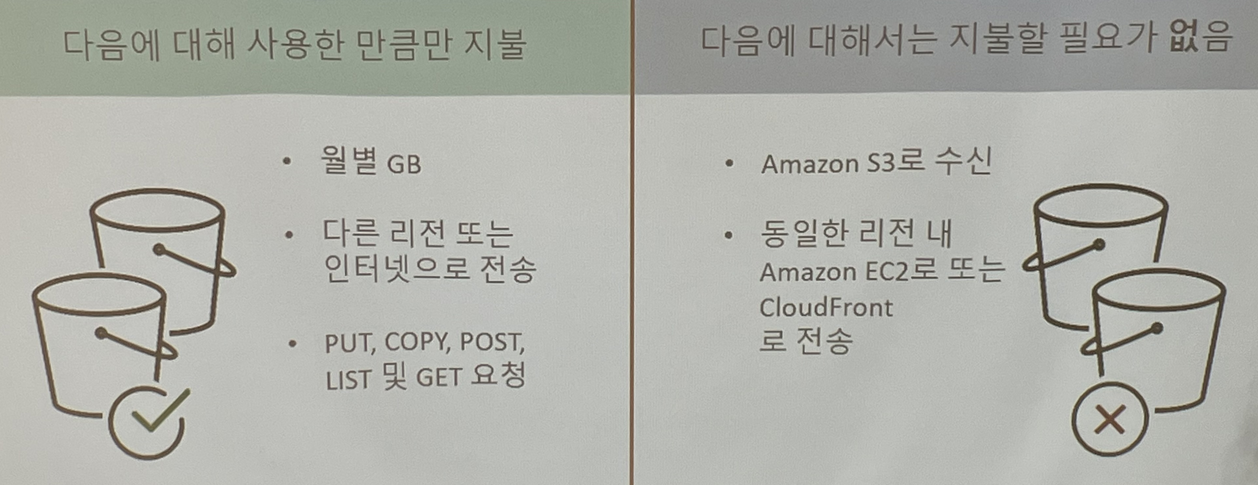
S3 비용
: S3는 저장과 전송을 구분하여 요금을 청구한다. 사용한 만큼만 비용을 청구한다.
데이터를 저장 및 관리할 때 고려해야 할 6가지 비용 요소
- 스토리지 요금제
- 요청 및 데이터 검색 요금제
- 데이터 전송 및 S3 Transfer Acceleration 요금제
- 데이터 관리 및 분석 요금제
- S3 복제 요금제
- S3 객체 Lambda를 사용하여 데이터를 처리하는 비용
S3 사용 사례
- 정적 웹 콘텐츠 및 미디어 저장 및 배포 용도
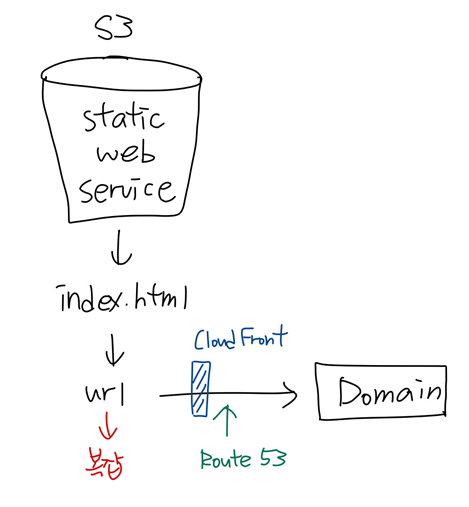
정적 컨텐츠를 S3 버킷에 저장하여 region 레벨(EC2)에서 보다 빠르게 접근할 수 있도록 구성한다. => CloudFront

EC2에 코드(정적)를 넣는 것과 S3에 넣어서 실행하는 것의 차이
: EC2에는 apache를 깔아놓았기 때문에 되는 것이지만 S3는 설치해 놓지 않았어도 가능하다.
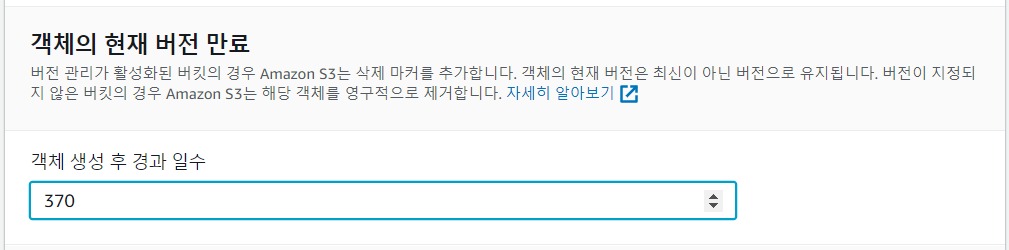
- 버전(시점) 관리 용도 : 기본값(비활성화)
버킷을 통해 실수로 삭제하거나 덮어쓴 객체를 복구할 수 있다.
이전 버전에 대한 DELETE, UPDATE 이전 버전을 관리할 수 있으며, 동일 resource name의 경우 사진의 이름이 같더라도 리소스 id가 변경되면서 이전 버전의 사진으로 롤백 할수도 있다. 저장이 배수로 늘어나 추가적인 스토리지 사용으로 인한 비용이 발생한다.
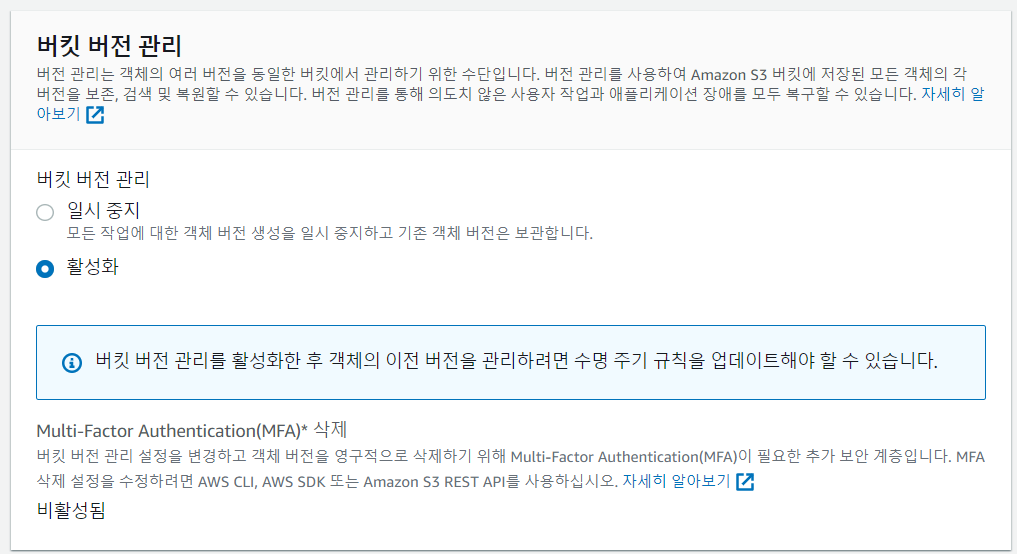
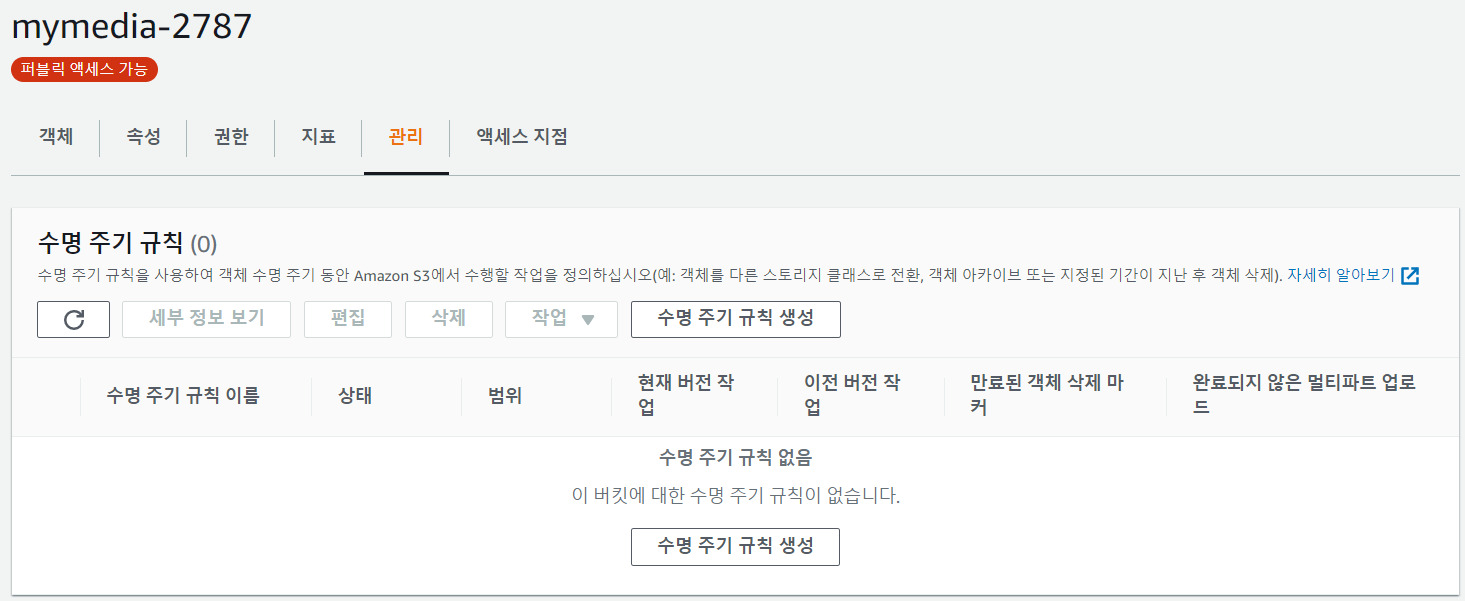
-> 버킷 버전 관리를 활성화하면 수명 주기 규칙을 업데이트해야 한다고 뜬다. 오래된 파일(저장된 데이터가 축적되면 용량과 비용만 차지함)을 관리하기 위해 lifecycle 규칙 관리가 필요하다.
-
대용량 분석 또는 연산을 위한 데이터 스토어
S3의 사용량을 분석하거나 거래분석, 클릭스트림, 미디어 트랜스코딩 등의 분석 기능으로 사용할 수 있다.사진이 저장됨과 동시에 분석된다.(trigger)
사진이 들어온 걸 알려주는 eventalarm 기능이 S3에 존재한다.
분석 결과를 Lambda가 전달한다. -
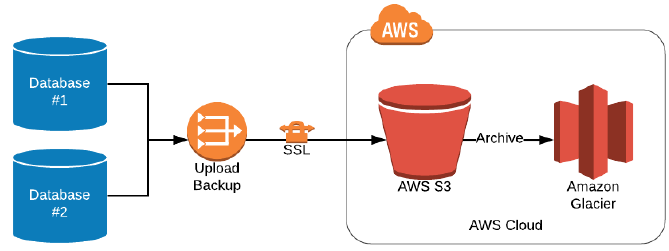
백업 및 아카이빙 도구
내구성 및 확장성이 매우 뛰어난 스토리지 서비스로 장기적으로 필요한 데이터의 경우 Amazon S3 Glacier로 이전하여 관리하면 비용적인 이점을 가져갈 수 있다.
EC2, EBS 등의 스냅샷을 저장하는 공간도 Amazon S3를 사용한다.
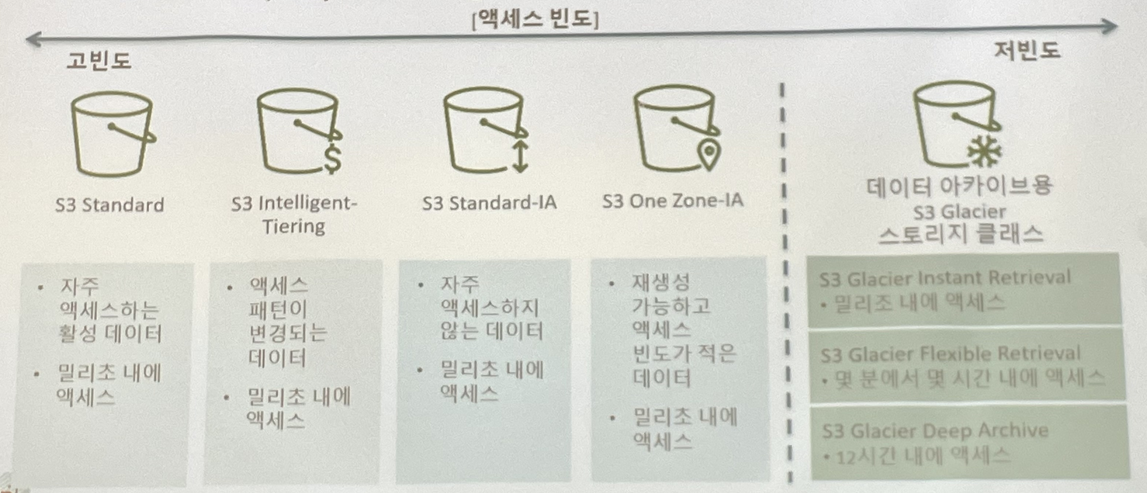
S3 storage class
자주 액세스하는 데이터 - S3 Standard
수명이 길지만 자주 액세스하지 않는 데이터 - S3 Standard-IA / S3 One Zone-IA
장기 아카이브 및 디지털 보존 - S3 Glacier / S3 Glacier Deep Archive
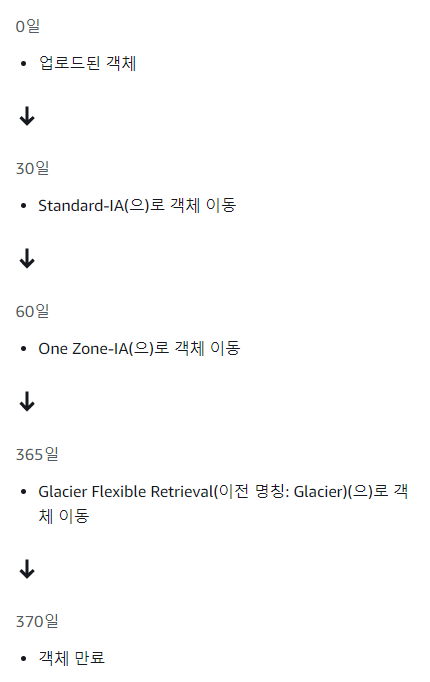
=> S3 수명 주기 정책을 설정한 후에는 애플리케이션 변경 없이 데이터가 다른 스토리지 클래스로 자동으로 전송된다.
Intelligent-Tiering
: 알 수 없거나 자주 변화하는 액세스 패턴이 있는 데이터를 위한 서비스
S3 Standard와 S3 Standard-IA 사이에 사용량을 분석해 스토리지 비용을 자동으로 최적화한다.
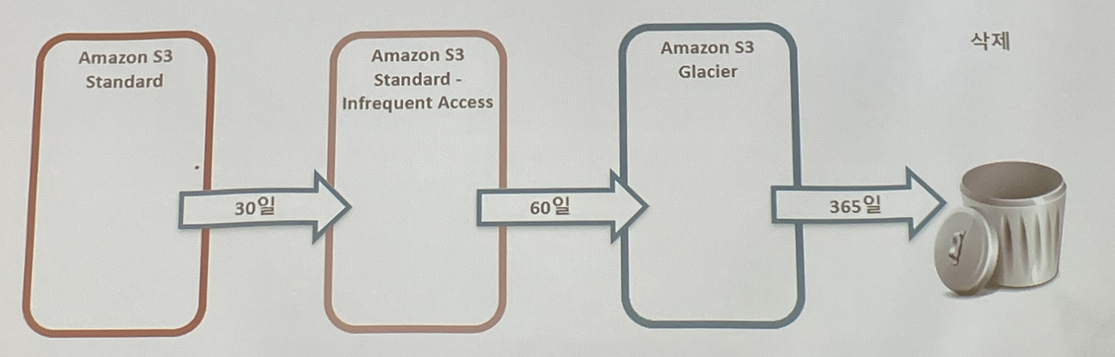
standard로 가장 먼저 들어온다. 30일이 지나면(임의로 정함) 사람들의 액세스가 떨어진다. 그러면 IA나 One zone으로 보낼 수 있다. IA나 One zone으로 들어온 데이터는 60일이 지나면 Glacier로 들어가게 된다. Glacier에서 1년이 지나면 삭제된다.
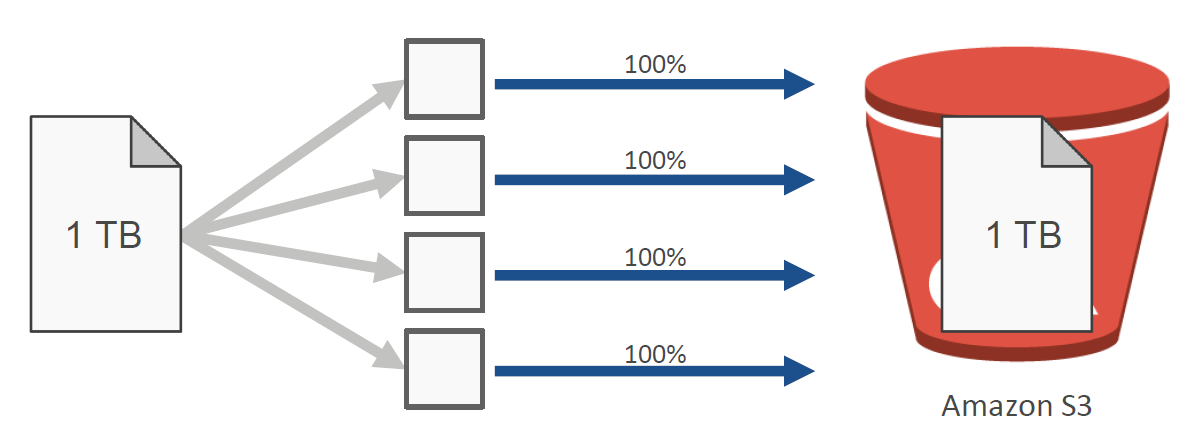
S3 Multipart upload
: 대용량 파일을 업로드 할 때 사용한다. 파일을 여러 개의 블록으로 나눠서 동시에 여러개의 connection을 통해서 업로드한다. 업로드가 parallel하게 이루어진다.
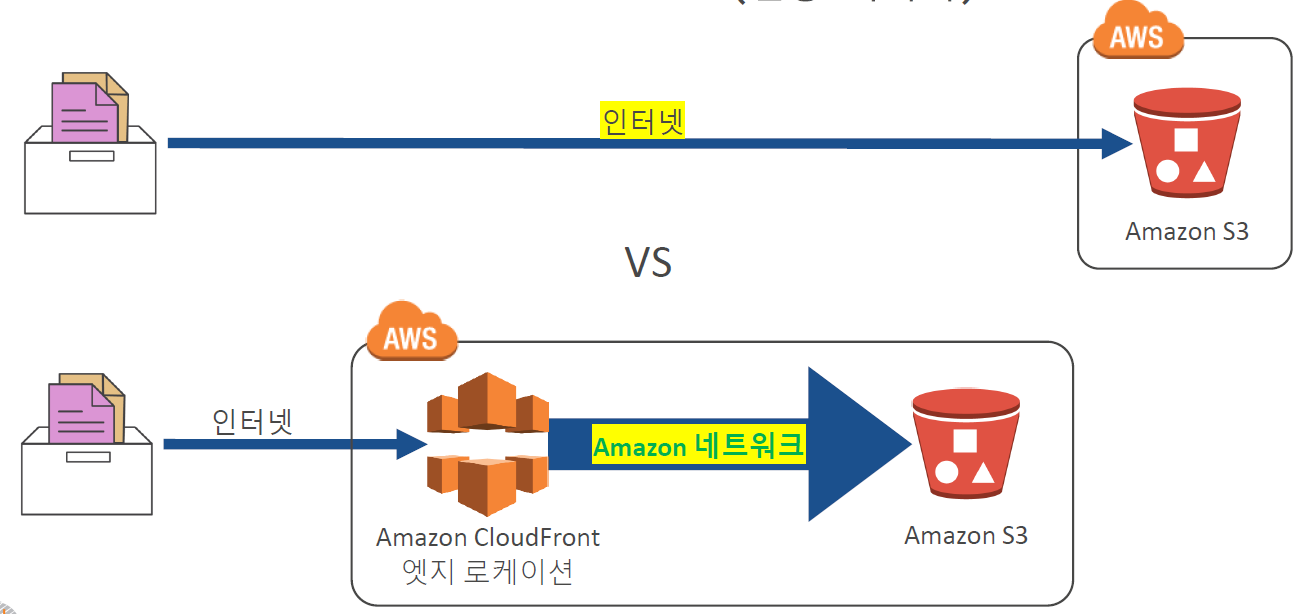
S3 Transfer Acceleration(전송 가속기)
S3 전송은 기본적으로 사용자 네트워크(인터넷) 기반으로 수행된다.
아주 대용량인 경우에는 오히려 그냥 데이터를 들고가서 넣는 것이 나을 수도 있다.
S3로 데이터 이동
- AWS Snowcone
: 소형의 견고한 엣지 컴퓨팅 및 데이터 스토리지 제품 - AWS Snowball
: 직접 데이터를 가져가서 데이터센터에 넣어준다. 페타바이트급 데이터 전송 디바이스 - AWS Snowmobile
: 초대용량 데이터 센트를 AWS로 이전하기 위한 엑사바이트 규모의 데이터 마이그레이션 서비스
S3 쿼리
: S3에서는 쿼리문도 가능하다.
S3 실습
- 먼저 인스턴스 생성하기

- 버킷 만들기 클릭
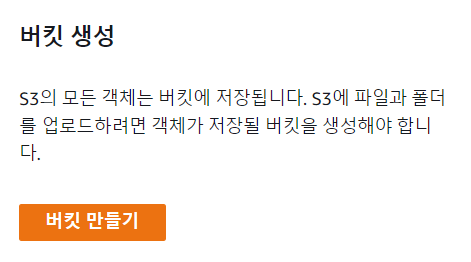
- 버킷 이름 정하기
전역에서 고유해야 하는 것은 region에서 고유해야 한다는 것이다.
다른 버킷에서 설정을 복사하는 것도 가능하다.
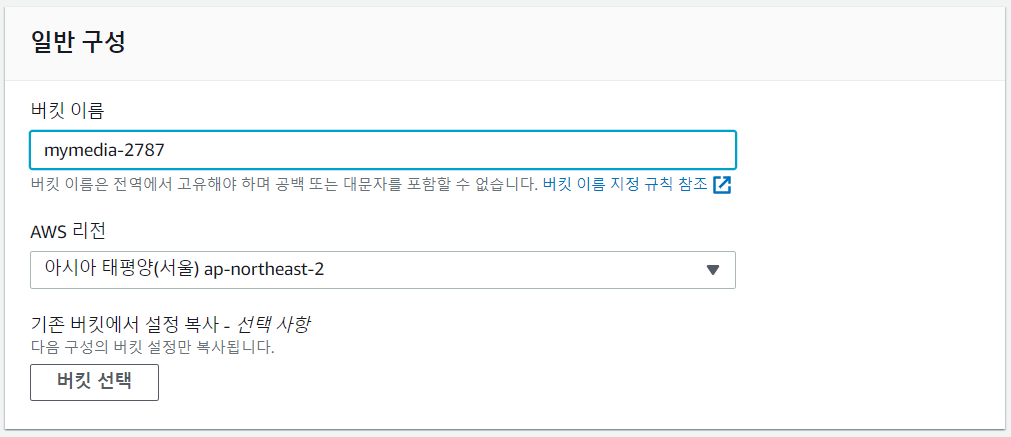
서울-서울 복사 비용이 들지 않는다.
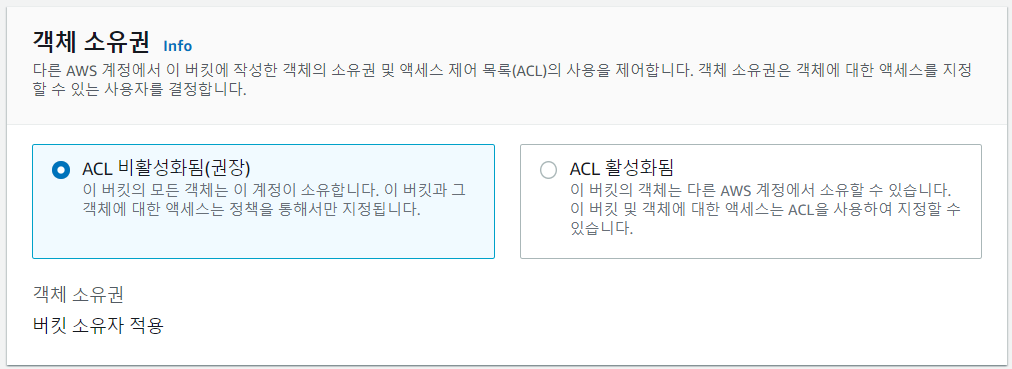
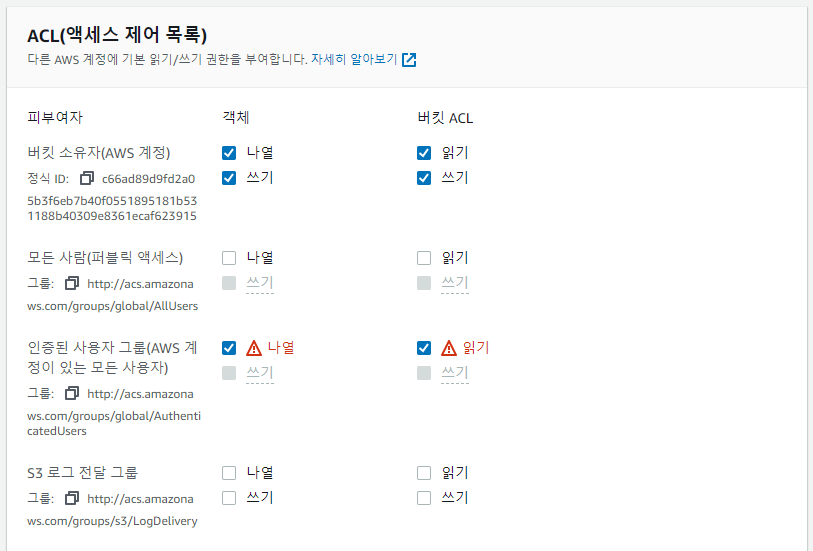
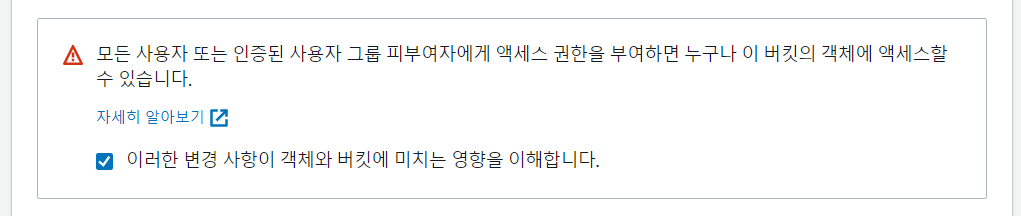
서울-도쿄 복사 비용이 든다. - ACL 비활성화
ACL을 비활성화 하면 소유자만 접근할 수 있게 된다.
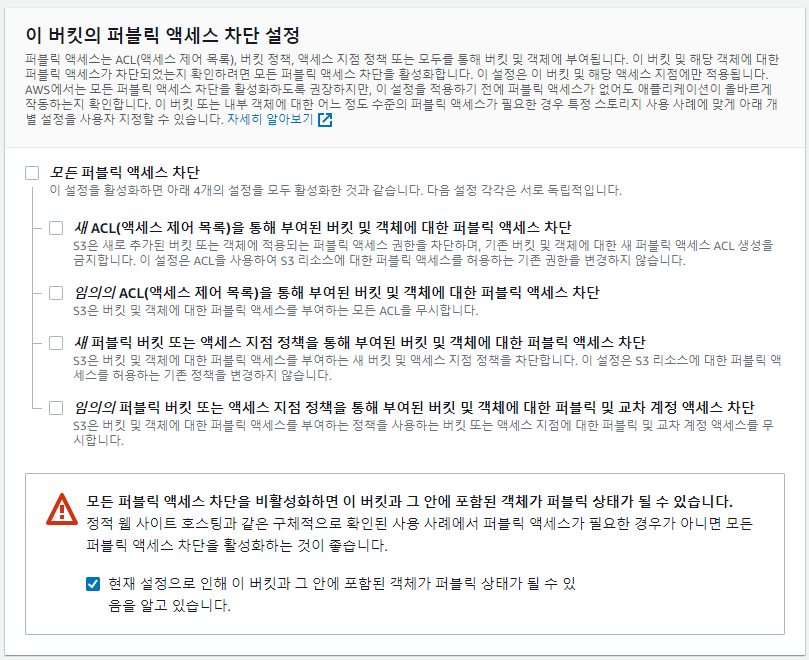
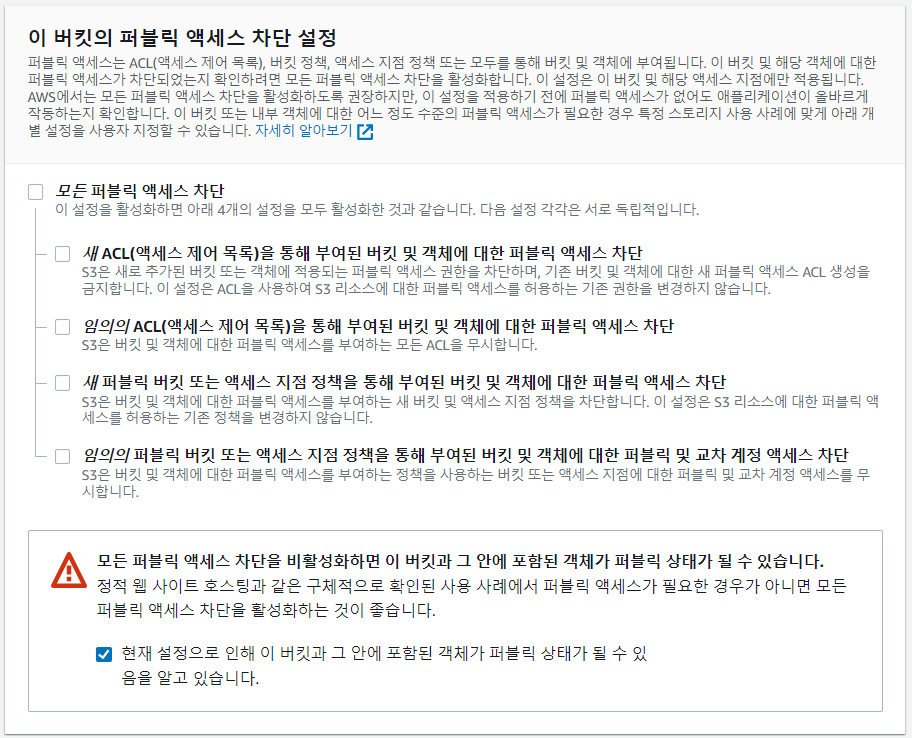
- 기본적으로는 퍼블릭 액세스가 차단되어 있다. 부분적으로 차단할 수도 있다.
- 버전 관리를 활성화하면 덮어쓰고 이전 데이터를 보관한다.

- 생성 완료
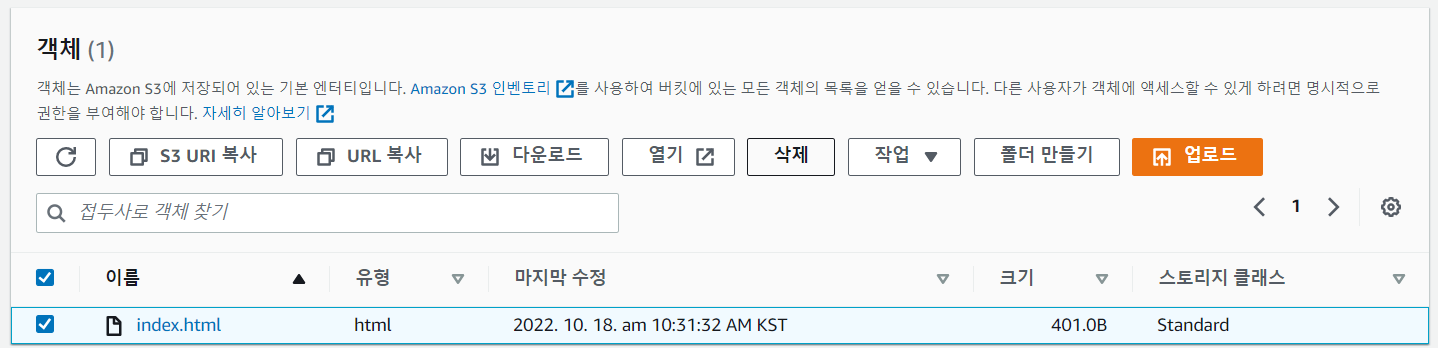
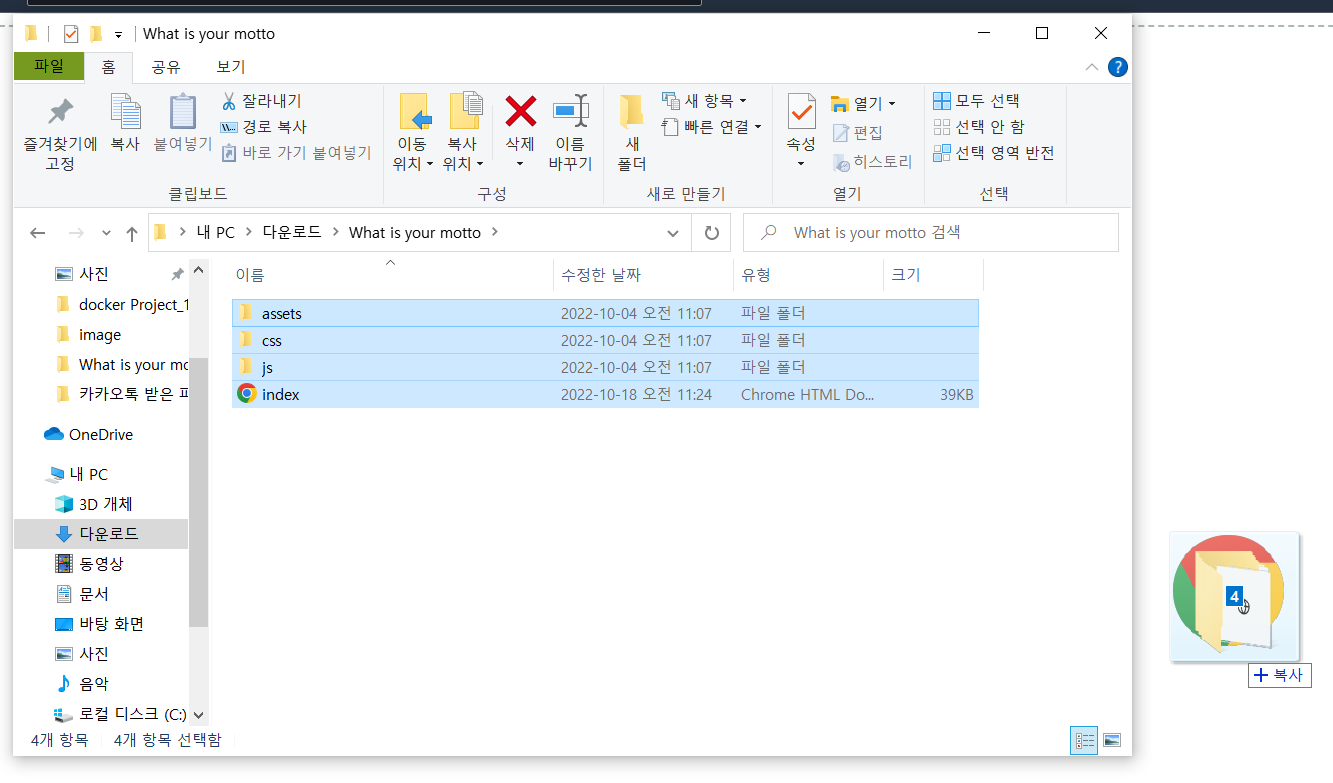
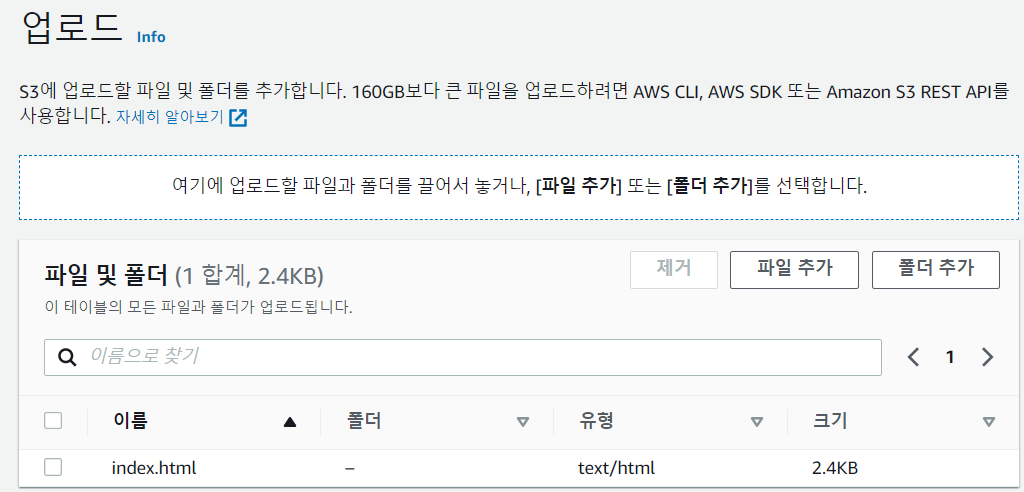
- 업로드 버튼을 눌러서 업로드 할 수 있다.
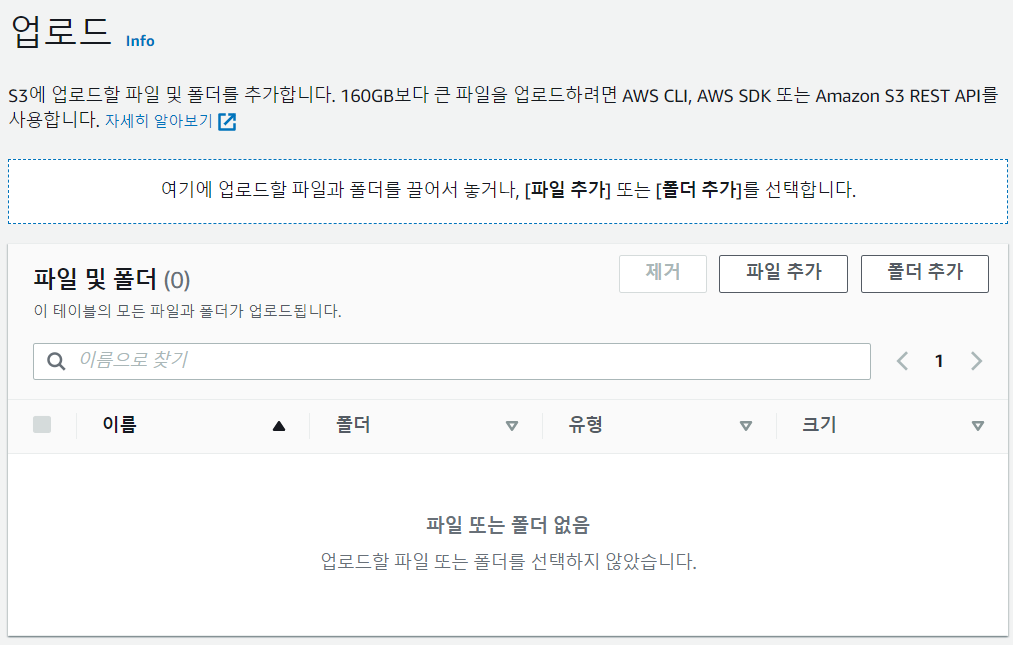
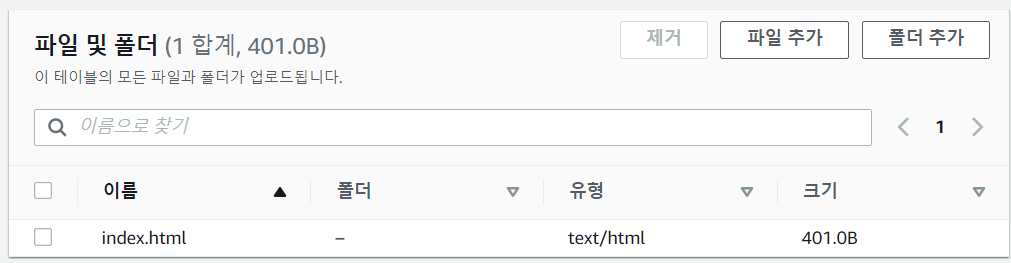
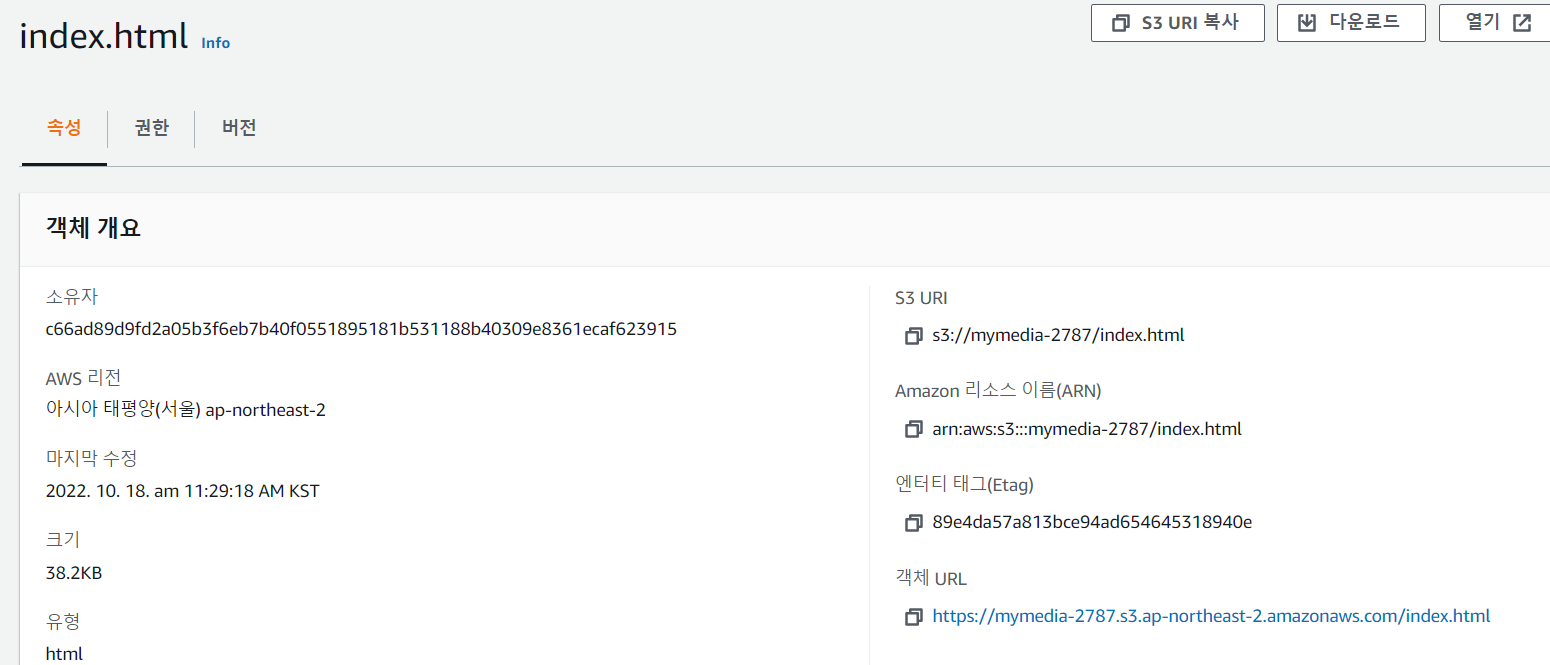
- index.html 파일을 업로드한다.
- 객체 URL을 통해 접근할 수 있다.
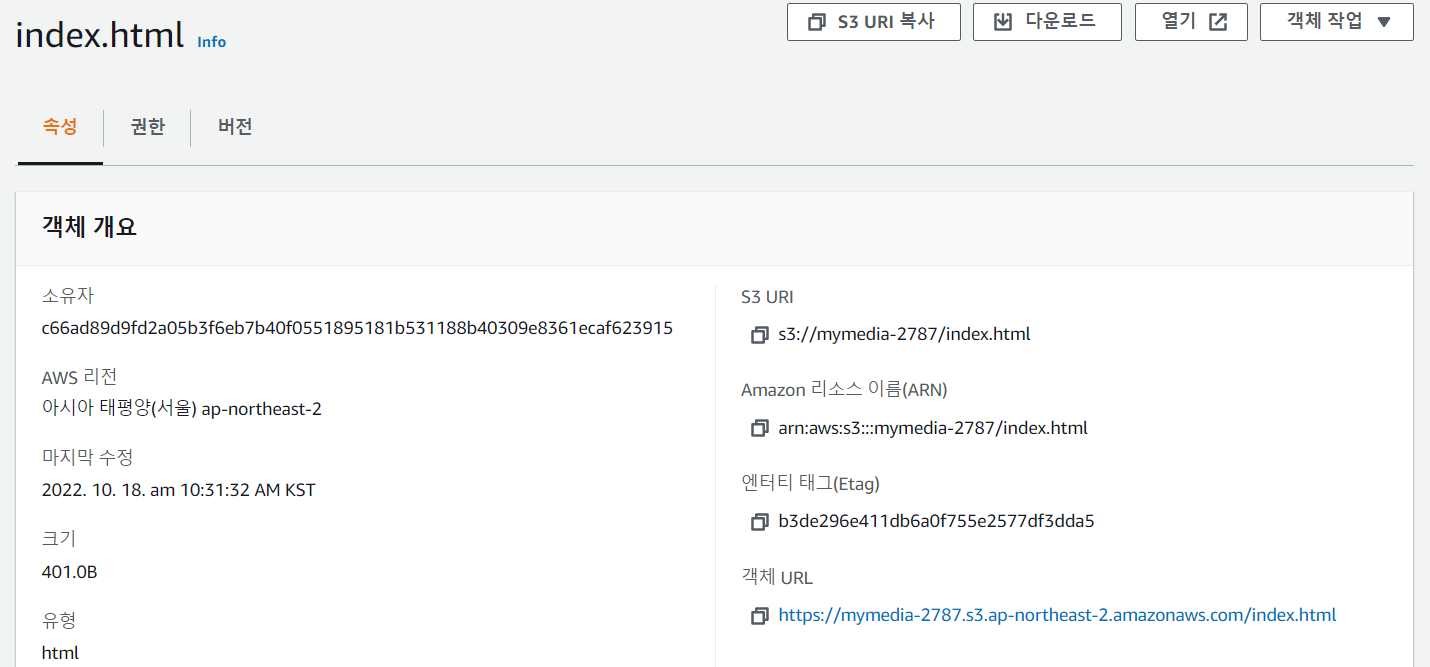
- 하지만 아직 버킷 정책을 설정하지 않아서 접근이 deny 되었다.

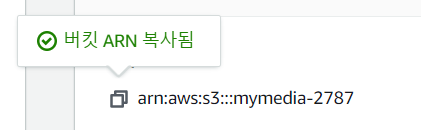
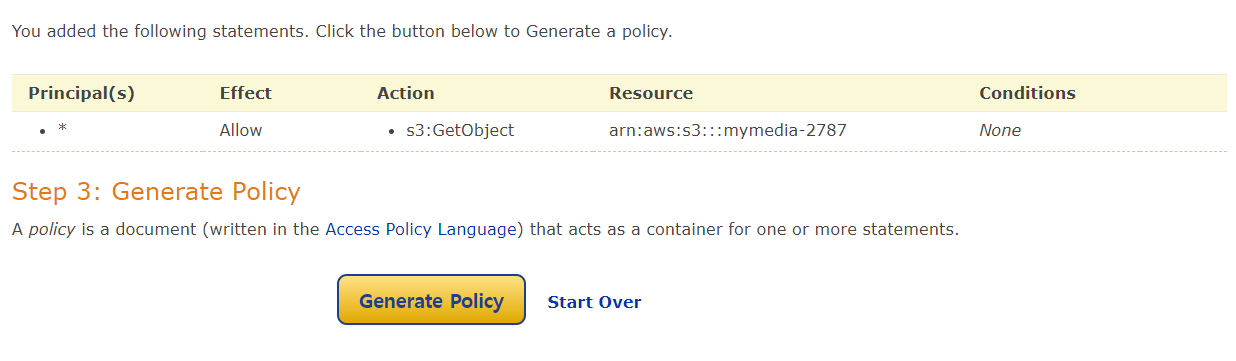
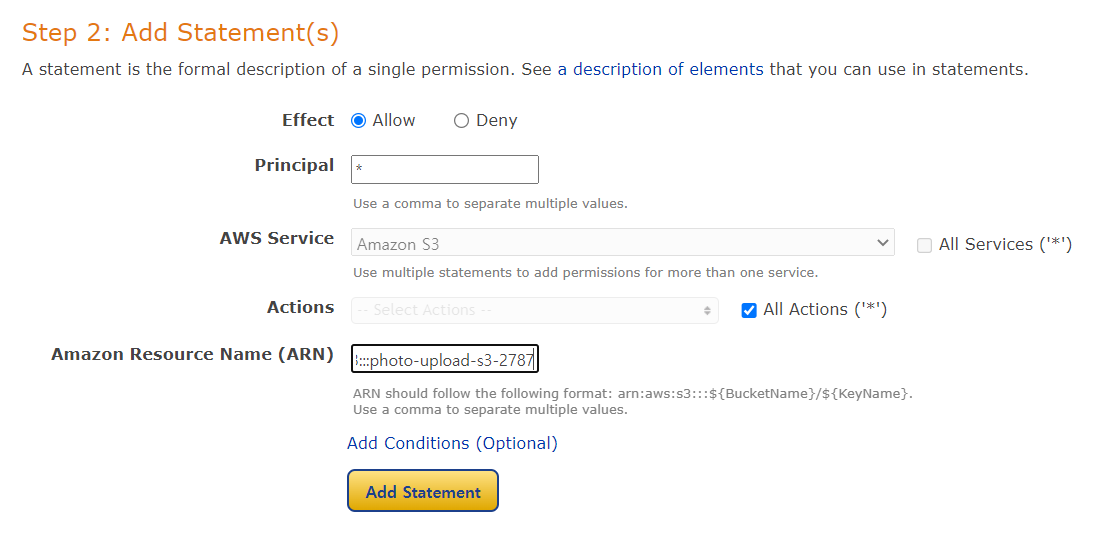
- 버킷 정책을 만들어준다.

- arn 복사
- 정책 생성기 클릭

- S3 정책 선택

- 읽기를 위해 GetObject 선택
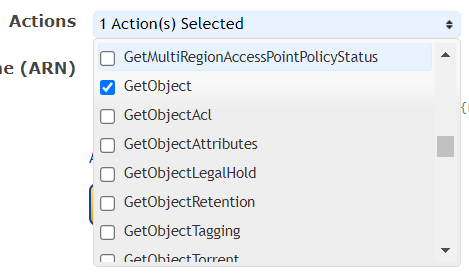
- 복사한 arn을 넣어준다.
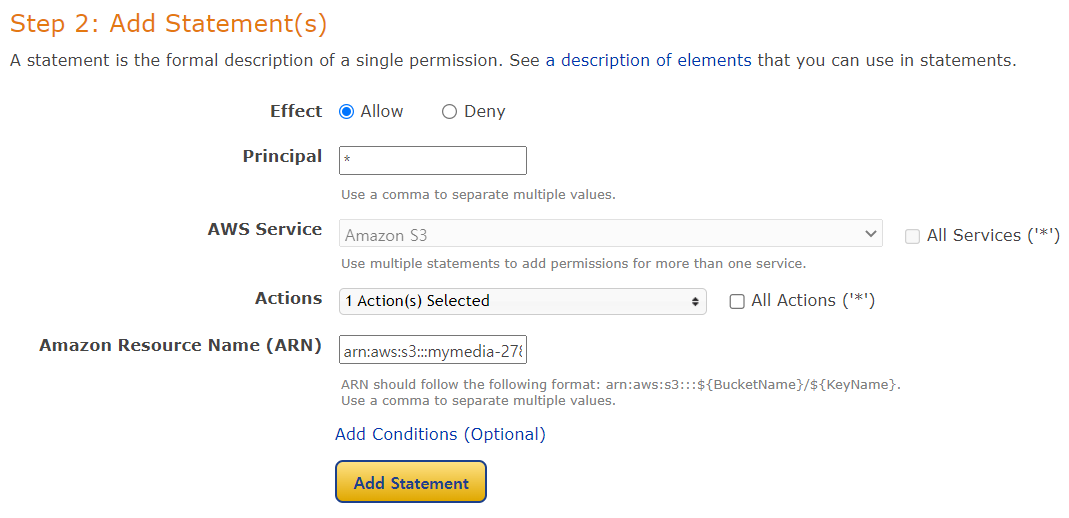
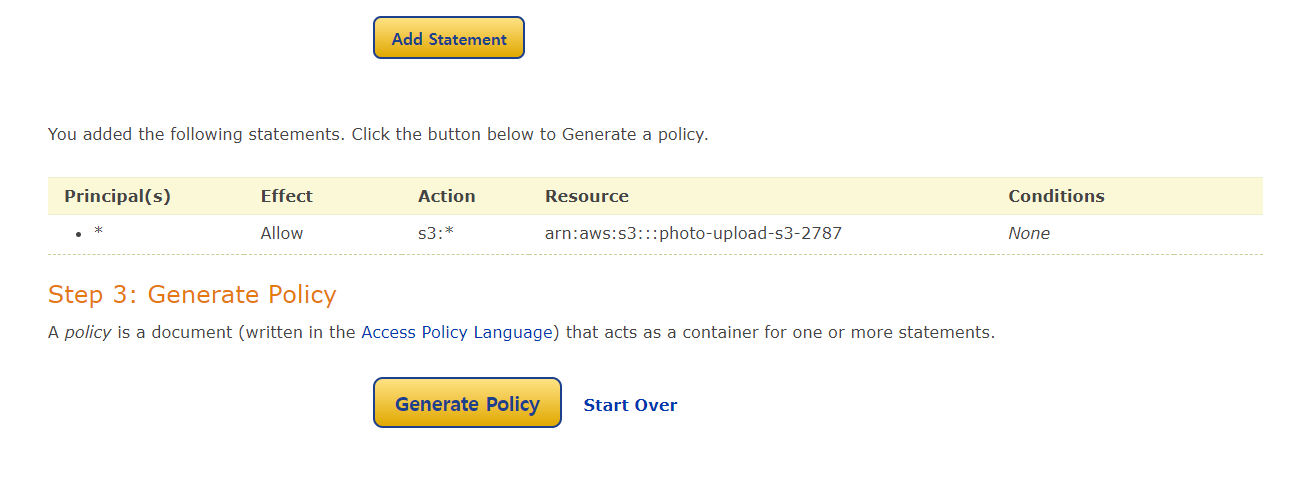
- Add Statement를 누르고 Generate Policy를 클릭한다.
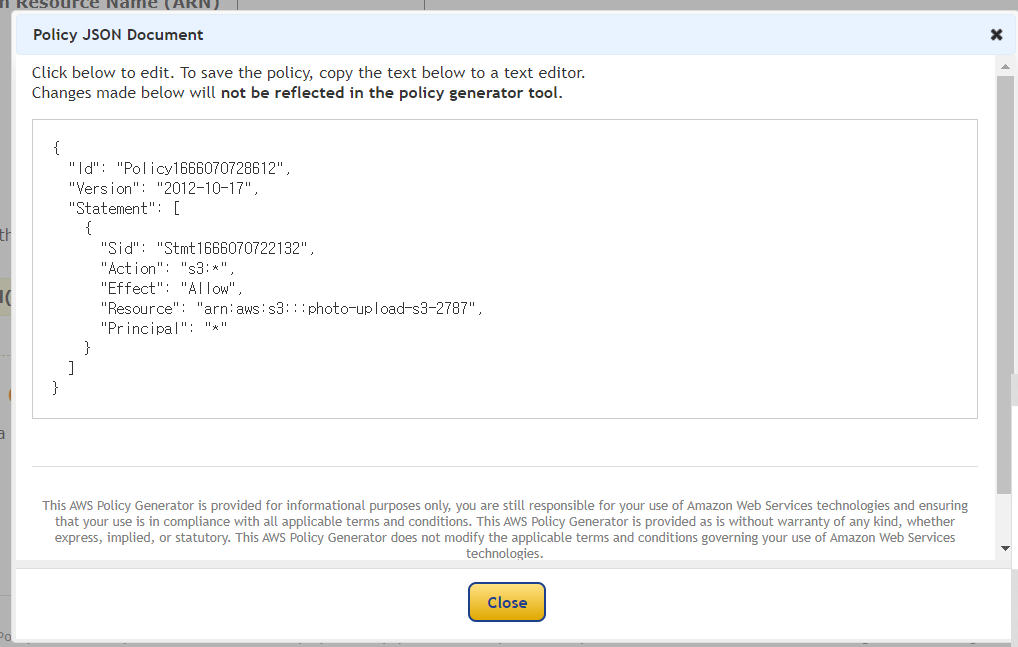
- 정책이 생성되었다.
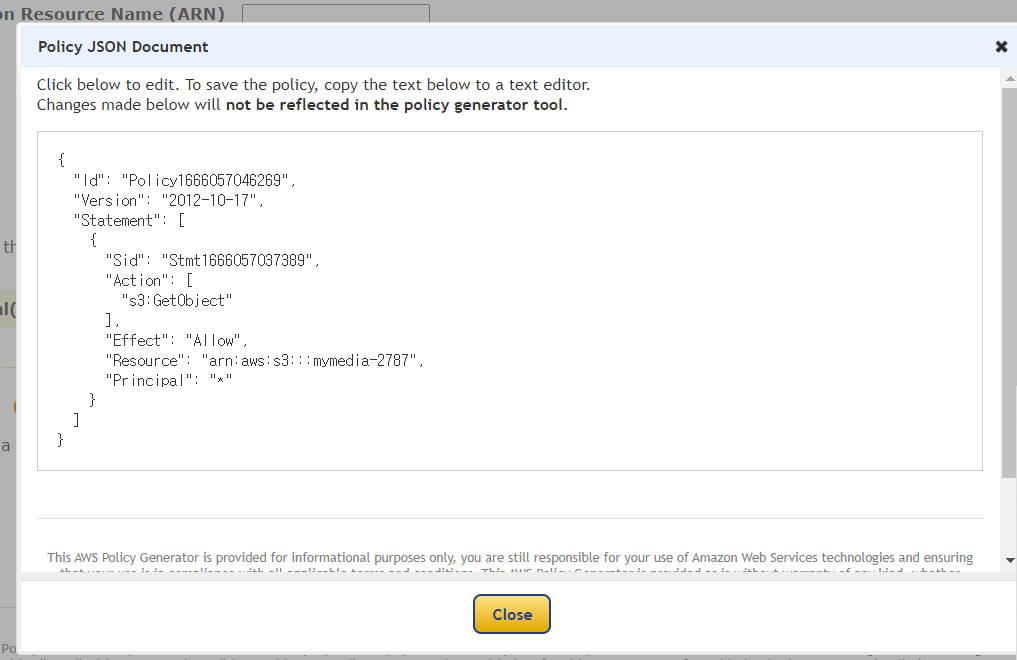
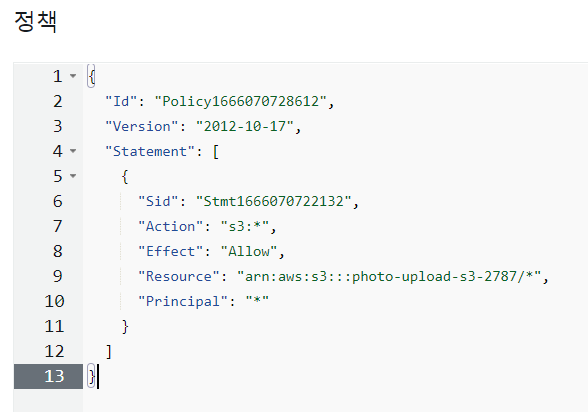
- 복사해서 붙여넣는다
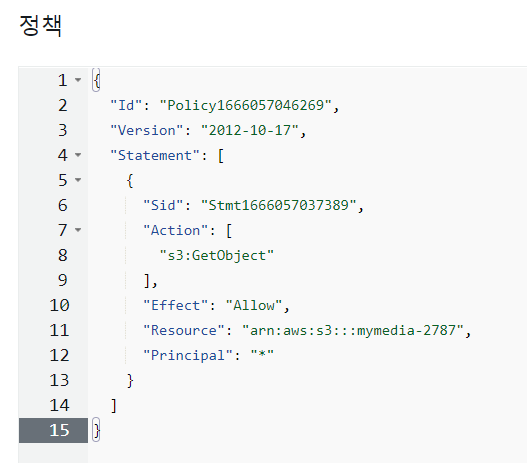
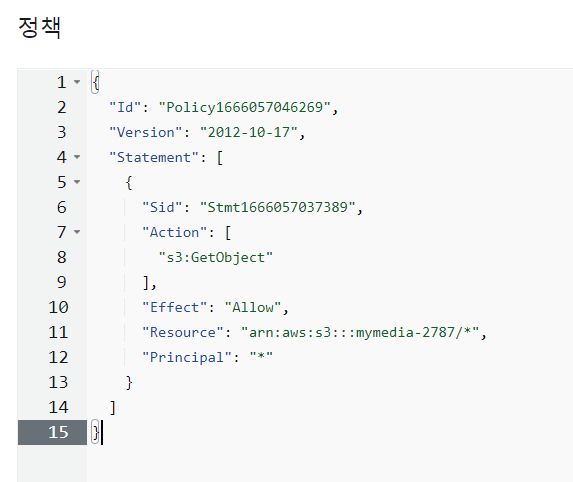
- 11번째 줄에 /*을 추가한다. - 이 버킷 안에 있는 모든 파일을 불러오기 위해
- http와 https 둘다 접속 가능하다.
보안팀의 https만 해라. 하지만 고객은 http, https 모두 사용한다.
=> http로 들어오는 것은 https로 꺾어준다.(redirection) - http 차단하기 - 정책을 수정해준다.
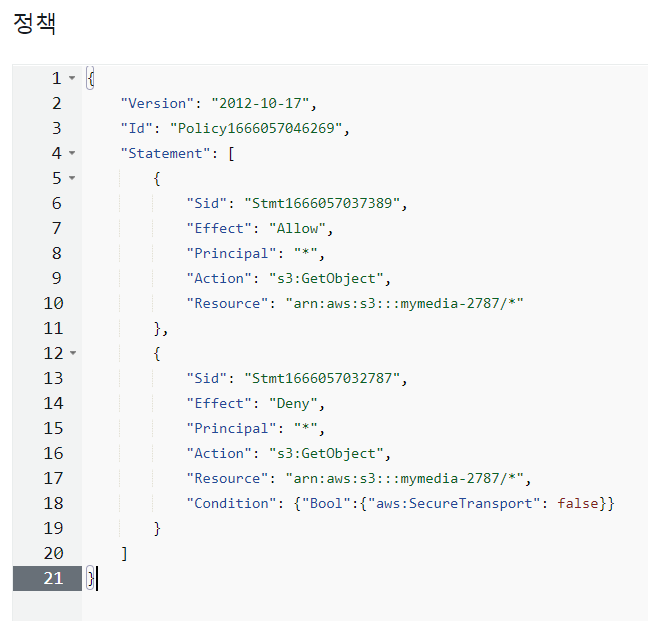
- http로 접속하면 access가 deny된 것을 확인할 수 있다.

EC2 & S3 비교 실습
EC2
- winSCP로 프로젝트 파일을 인스턴스의 /var/www/html/으로 옮긴다.

- 인스턴스 주소로 접근
- 접근

S3
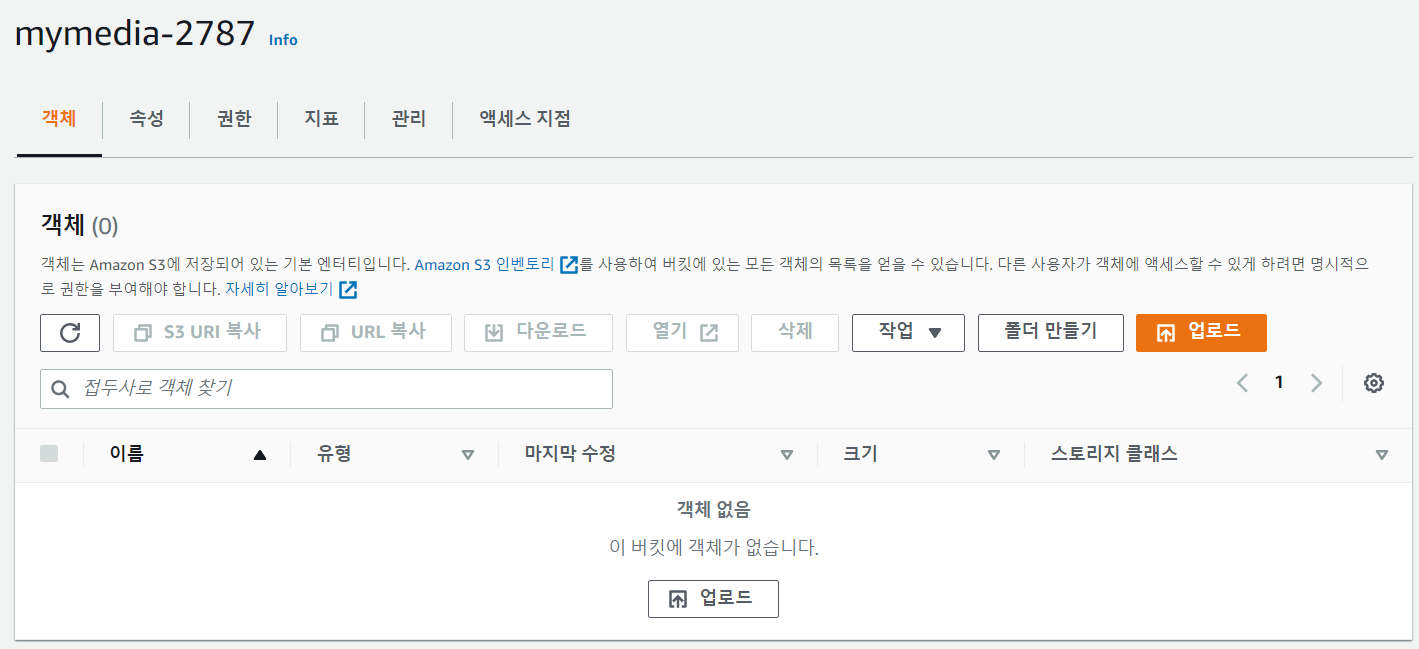
- 만들었던 객체 삭제
- 웹 프로젝트 파일을 업로드한다.
- index.html 객체 URL로 접근할 수 있다.
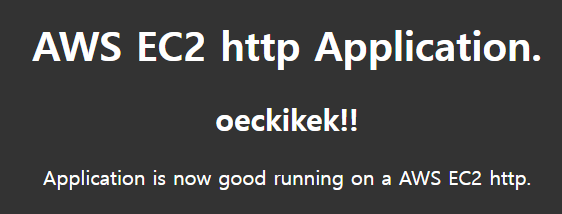
- 접근

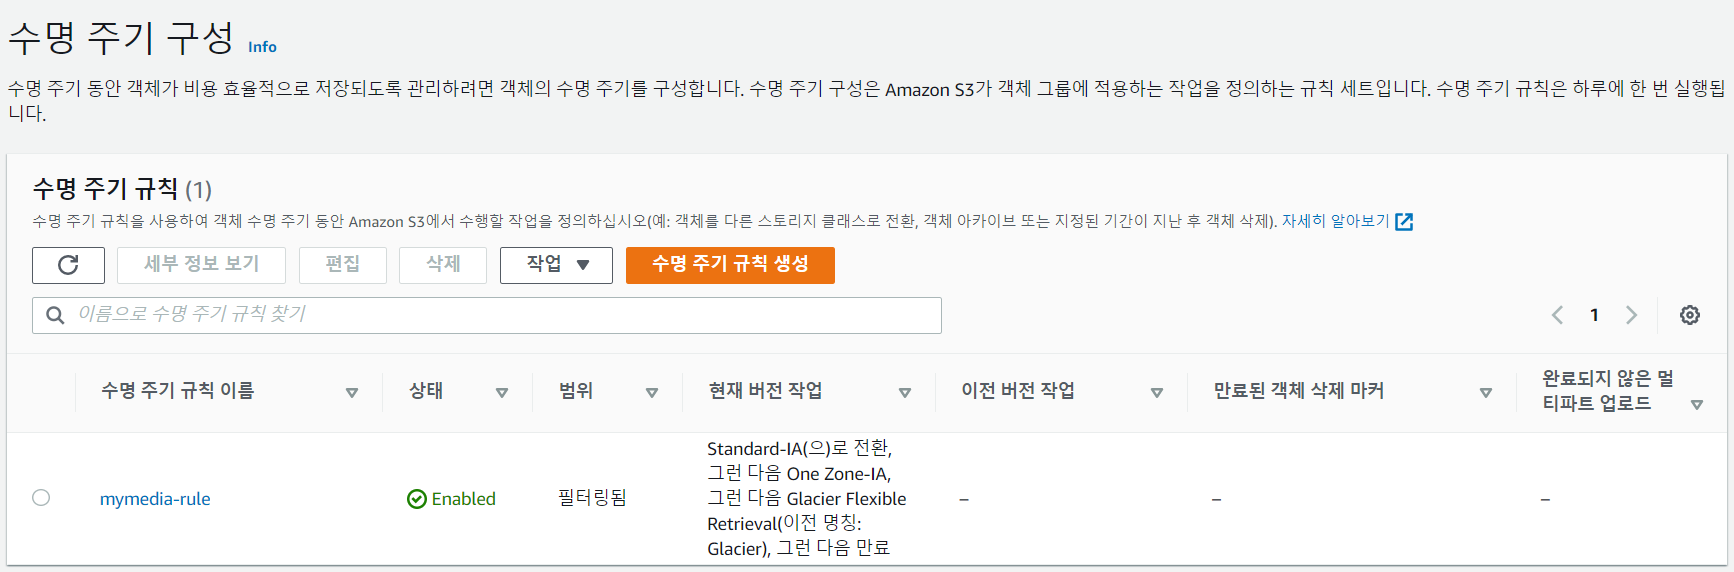
수명주기 정책
- 수명주기규칙 생성하기
- 이름 적기
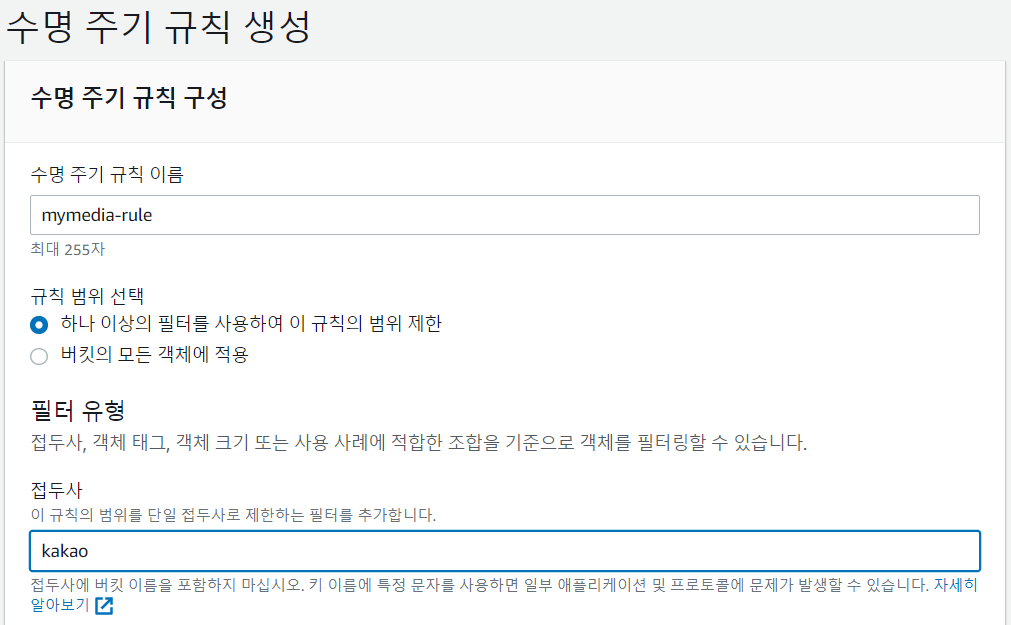
- 작업 선택
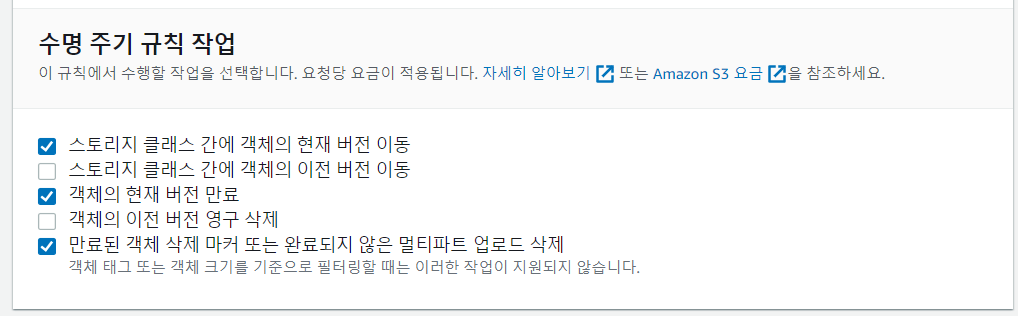
- Standard에 들어왔다는 전제하에 Standard-IA로 옮긴다.
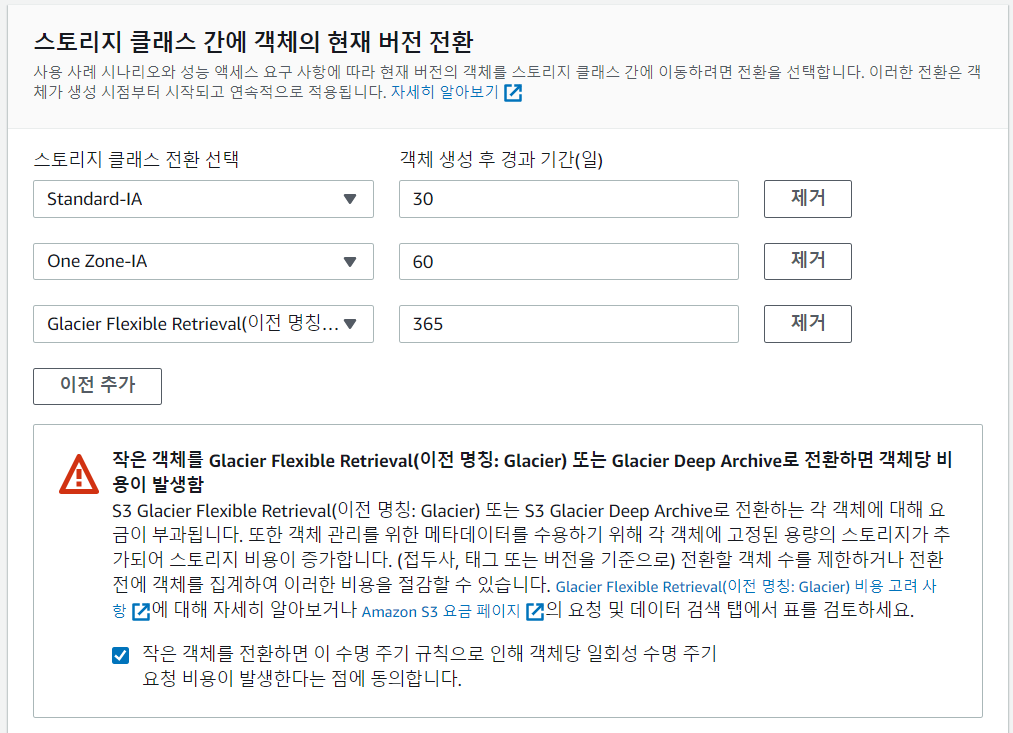
- 경과 일수 정하기
- 요약
- 생성 완료
S3 파일 upload 실습
순서
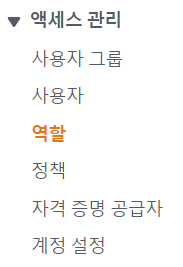
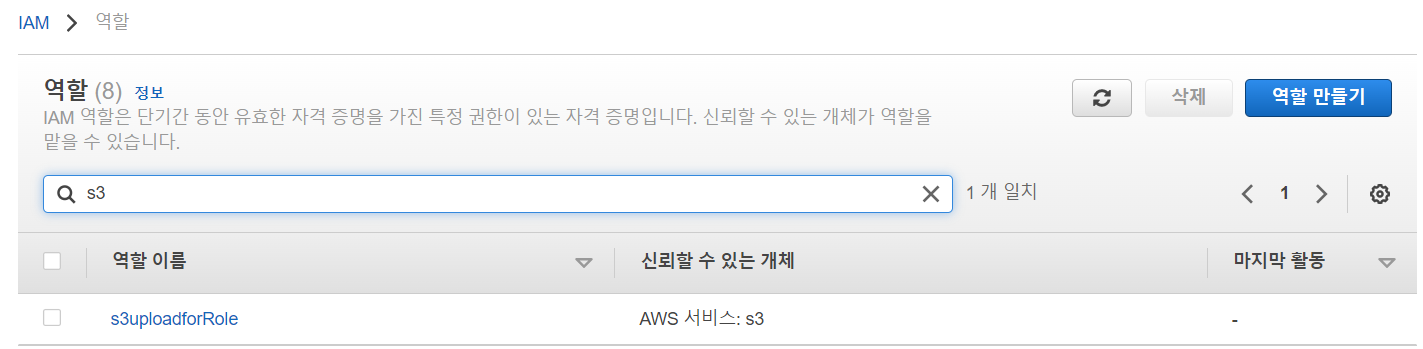
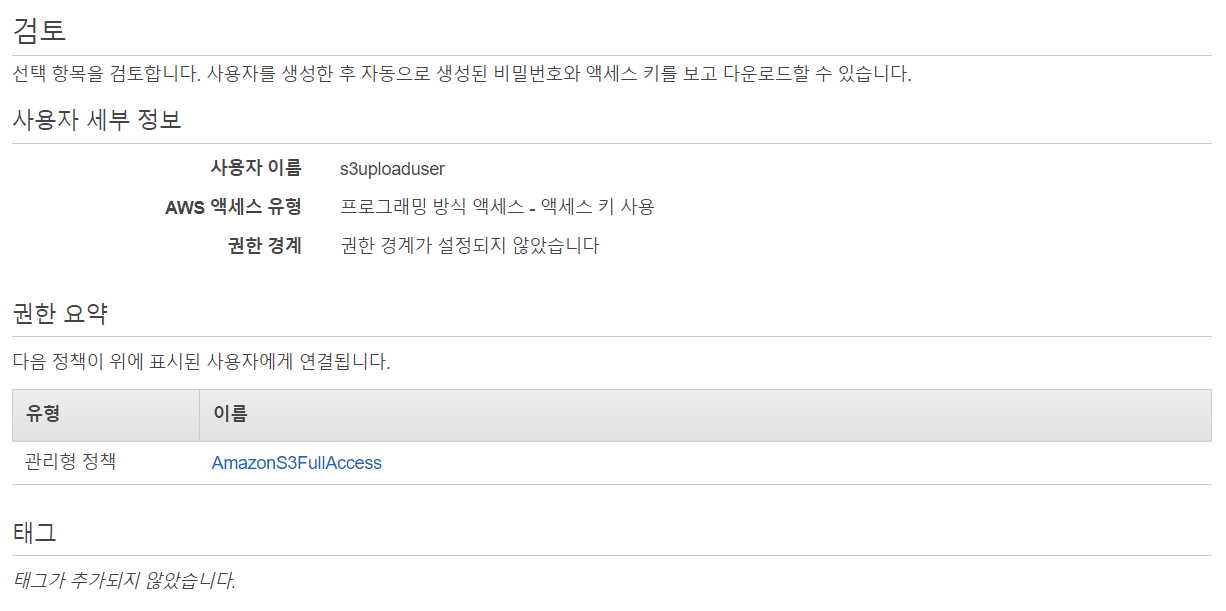
- IAM에서 역할 탭 들어가기
- 역할 만들기

- 사용할 S3 서비스 선택
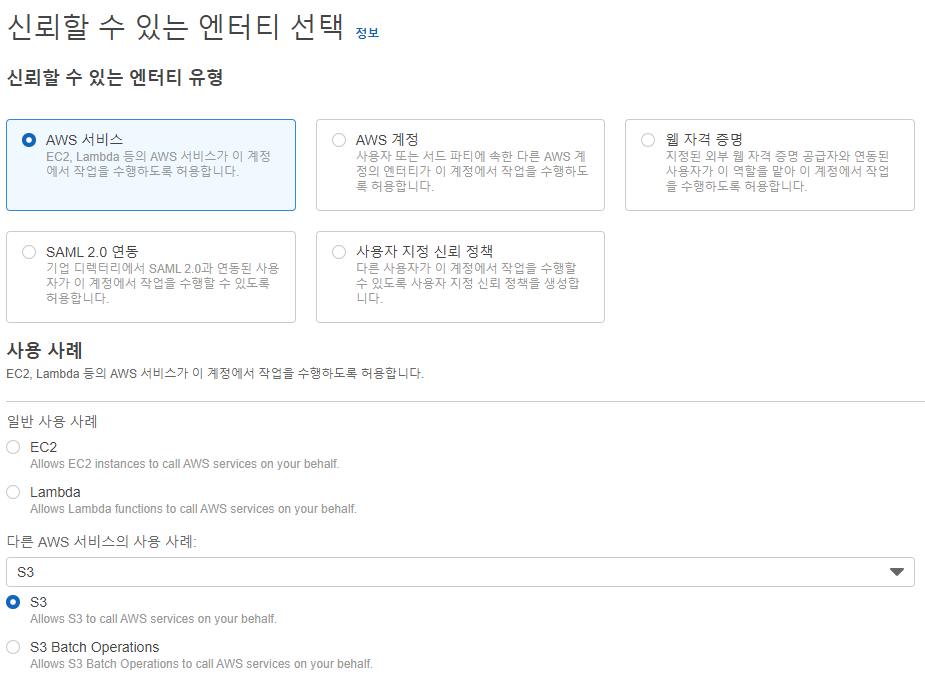
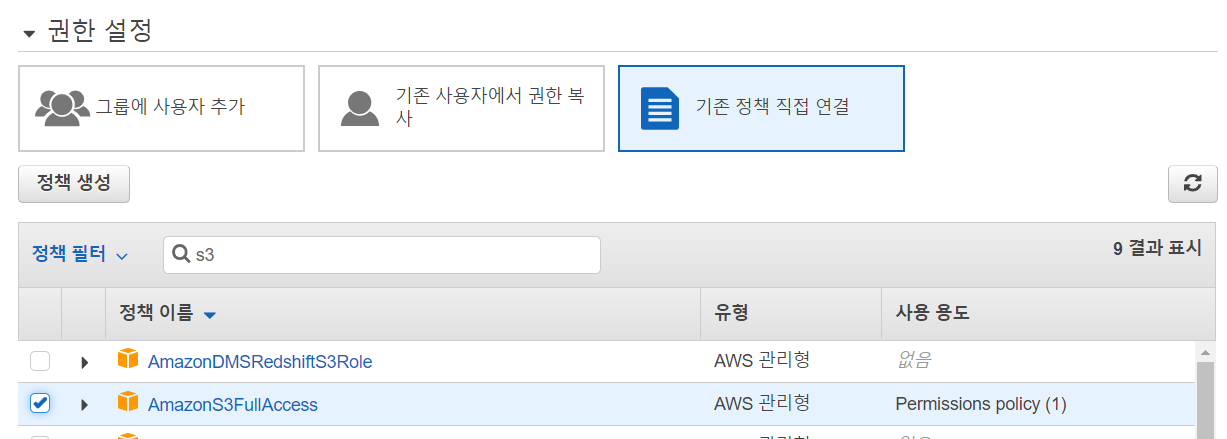
- AmazonS3FullAccess 정책 선택

- 역할 이름 지정

- 역할 생성 완료
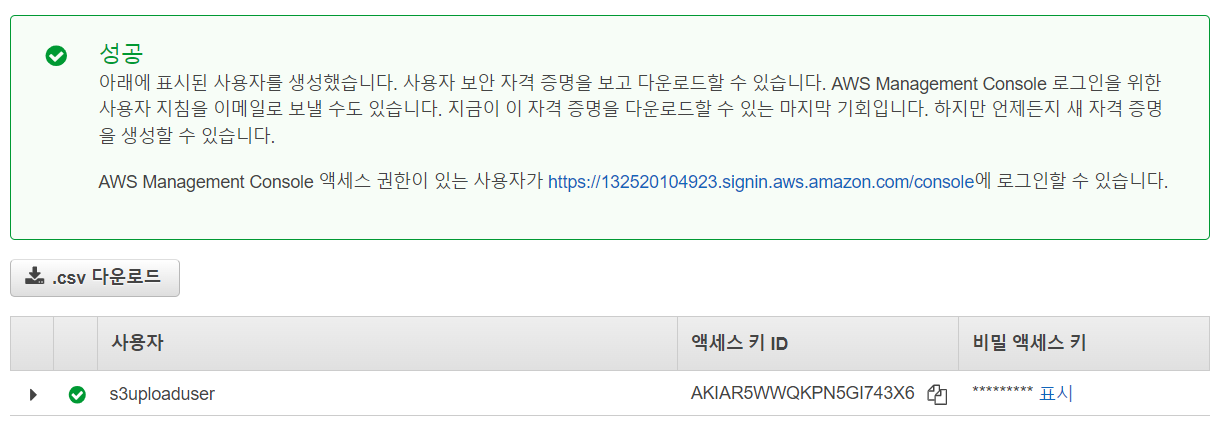
- 사용자 탭으로 이동
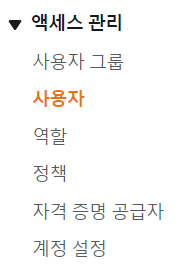
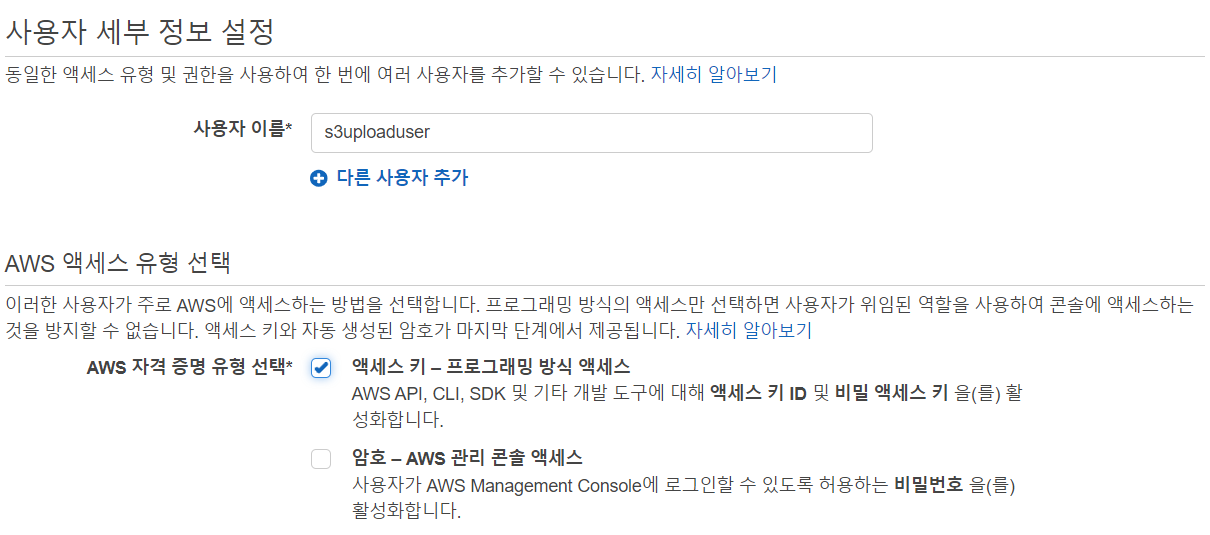
- 사용자 추가

- 이름 설정
- 정책 선택
- 요약
- 생성 완료
- S3에서 버킷 탭으로 이동
- 버킷 이름 작성
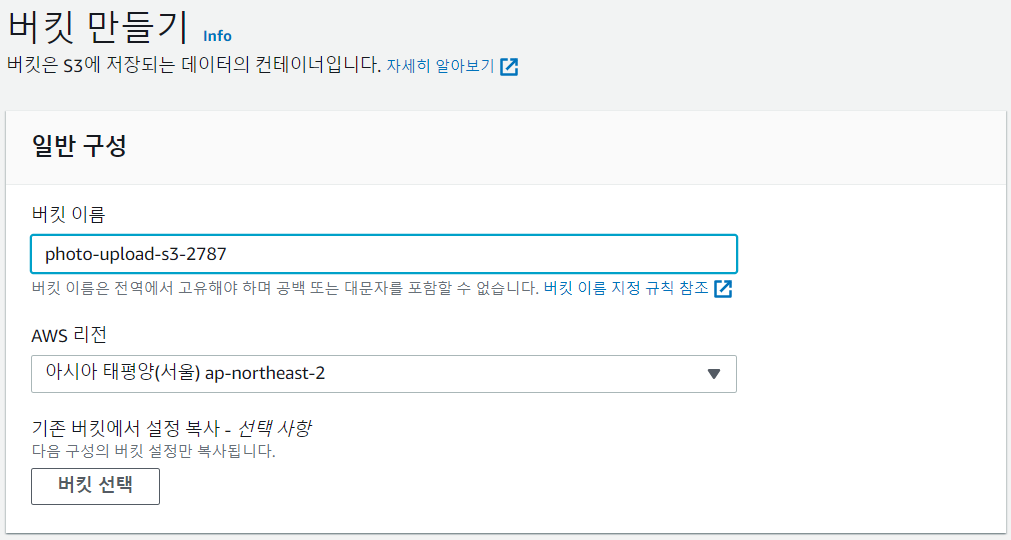
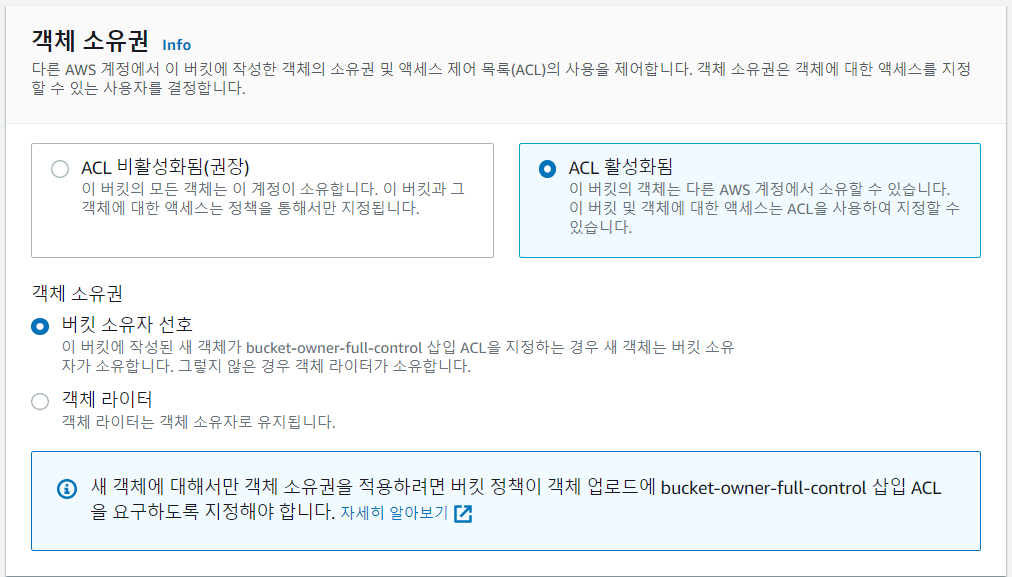
- ACL 활성화 시켜주기
- 퍼블릭 액세스 차단 체크 풀기
- 생성 완료
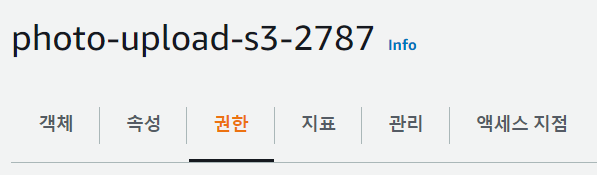
- 정책 넣기 - 권한 탭으로 이동
- 버킷 정책 편집 클릭

- 정책 생성기 클릭

- S3 정책 선택

- arn 복사해서 넣고, Add Statement
- Generate Policy
- 복사해서 붙여넣기
- ACL 편집

- 체크
- CORS 편집

- 넣기
- index 파일 조정
- S3에 업로드하기
- 확인

S3 CLI로 확인 실습
aws configure
## 버전 확인
[ec2-user@ip-172-31-40-76 ~]$ aws --version
aws-cli/1.18.147 Python/2.7.18 Linux/5.10.144-127.601.amzn2.x86_64 botocore/1.18.6
## 다운로드
[ec2-user@ip-172-31-40-76 ~]$ curl "https://awscli.amazonaws.com/awscli-exe-linux-x86_64.zip" -o "awscliv2.zip"
## 압축 해제
[ec2-user@ip-172-31-40-76 ~]$ unzip awscliv2.zip
## update
[ec2-user@ip-172-31-40-76 ~]$ sudo ./aws/install --update
Found same AWS CLI version: /usr/local/aws-cli/v2/2.8.3. Skipping install.
## 다시 버전 확인
[ec2-user@ip-172-31-40-76 ~]$ aws --version
aws-cli/2.8.3 Python/3.9.11 Linux/5.10.144-127.601.amzn2.x86_64 exe/x86_64.amzn.2 prompt/off
## 거부되었다
[ec2-user@ip-172-31-40-76 ~]$ aws ec2 describe-instances
Unable to locate credentials. You can configure credentials by running "aws configure".
## configure 실행
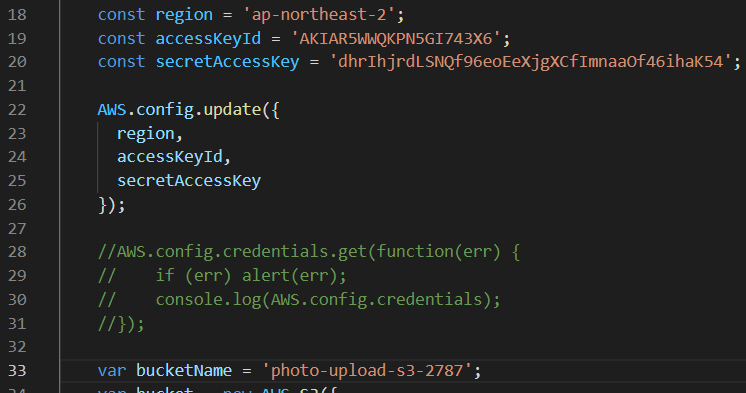
[ec2-user@ip-172-31-40-76 ~]$ aws configure
AWS Access Key ID [None]: AKIAR5WWQKPN5GI743X6
AWS Secret Access Key [None]: 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
Default region name [None]: ap-northeast-2
Default output format [None]: json
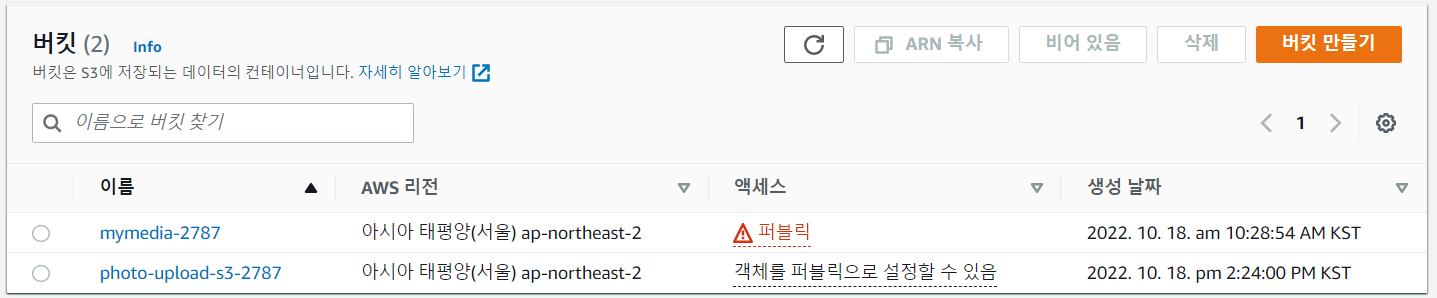
## bucket list를 조회할 수 있다. - 이 계정에 full 권한을 주어서 가능하다.
[ec2-user@ip-172-31-40-76 ~]$ aws s3 ls
2022-10-18 03:22:41 mymedia-2787
2022-10-18 05:28:51 photo-upload-s3-2787
## ec2 관련 권한은 주지 않아서 볼 수 없다.
[ec2-user@ip-172-31-40-76 ~]$ aws ec2 describe-instances
An error occurred (UnauthorizedOperation) when calling the DescribeInstances operation: You are not authorized to perform this operation.
## aws 디렉터리에 config 정보가 저장되어 있다.
[ec2-user@ip-172-31-40-76 ~]$ cd .aws/
[ec2-user@ip-172-31-40-76 .aws]$ ls
config credentials
## config 확인
[ec2-user@ip-172-31-40-76 .aws]$ cat config
[default]
region = ap-northeast-2
output = json
## credentials 확인
[ec2-user@ip-172-31-40-76 .aws]$ cat credentials
[default]
aws_access_key_id = AKIAR5WWQKPN5GI743X6
aws_secret_access_key = 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- s3 bucket에 파일 upload 하기
## bucket list 확인
[ec2-user@ip-172-31-40-76 .aws]$ aws s3 ls
2022-10-18 03:22:41 mymedia-2787
2022-10-18 05:28:51 photo-upload-s3-2787
## 특정 bucket의 객체 list 확인
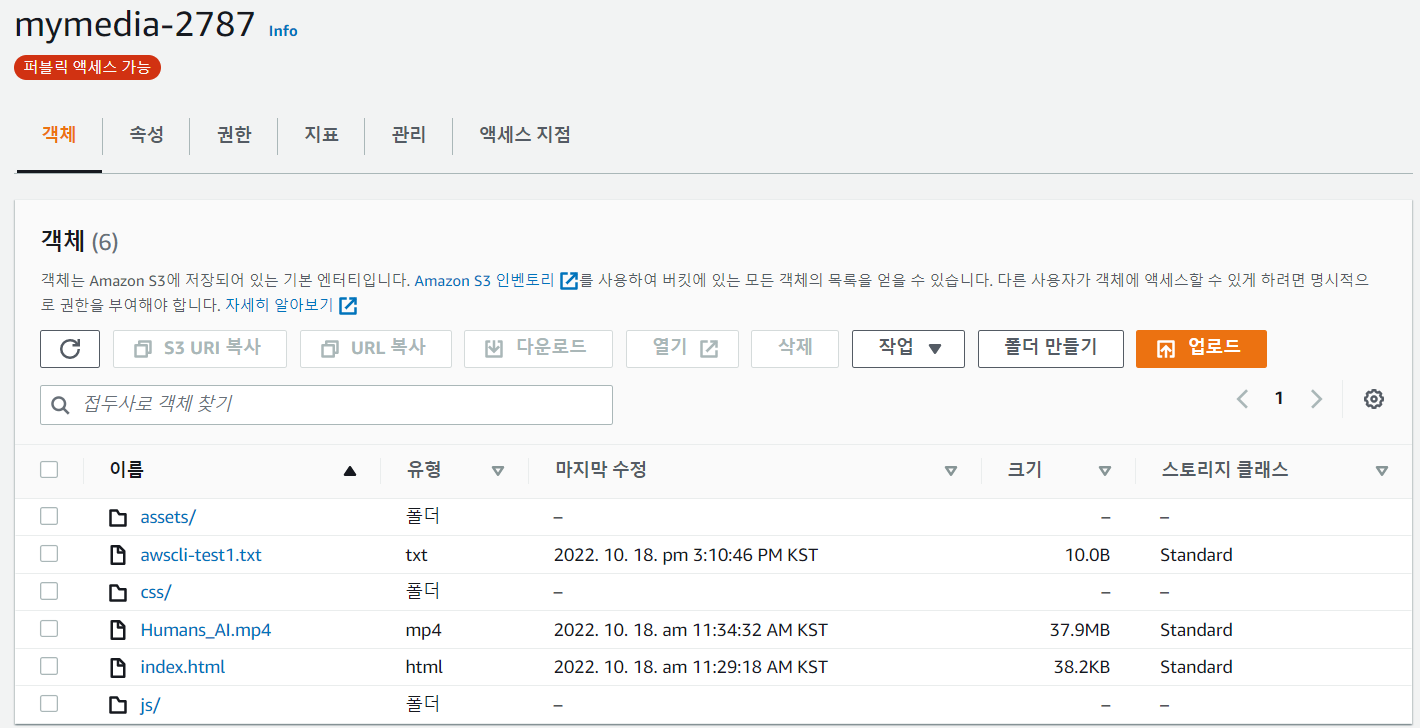
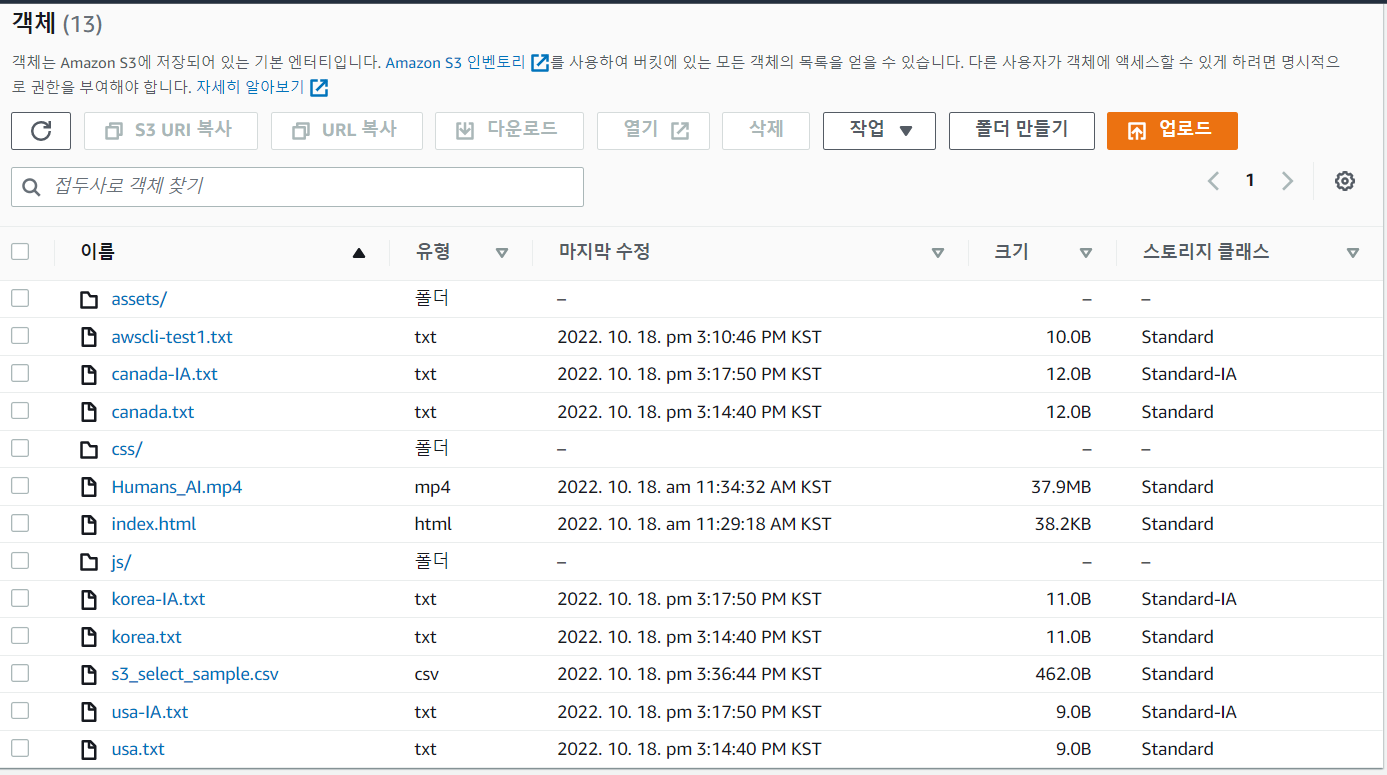
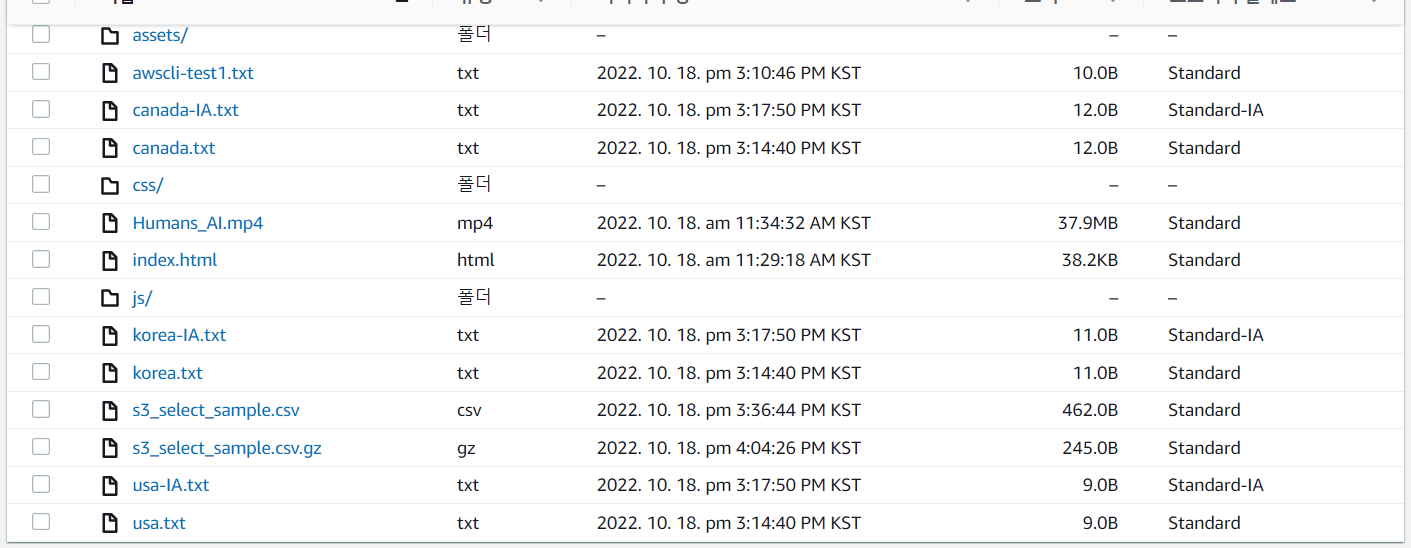
[ec2-user@ip-172-31-40-76 .aws]$ aws s3 ls s3://mymedia-2787
PRE assets/
PRE css/
PRE js/
2022-10-18 02:34:32 39782929 Humans_AI.mp4
2022-10-18 02:29:18 39114 index.html
## 디렉터리 생성 이동
[ec2-user@ip-172-31-40-76 .aws]$ mkdir LABs && cd $_
## 파일 생성
[ec2-user@ip-172-31-40-76 LABs]$ echo 'aws cloud' > awscli-test1.txt
## mymedia-2787 버킷에 upload 하기
[ec2-user@ip-172-31-40-76 LABs]$ aws s3 cp awscli-test1.txt s3://mymedia-2787/awscli-test1.txt
: mymedia-2787 버킷에 awscli-test1.txt 파일이 upload 되었다.
- 파일 여러개를 bucket에 upload 하기
## 디렉터리 생성 이동
[ec2-user@ip-172-31-40-76 LABs]$ mkdir upload && cd $_

## 파일 생성
[ec2-user@ip-172-31-40-76 upload]$ echo 'hi~ korea.' > korea.txt
[ec2-user@ip-172-31-40-76 upload]$ echo 'hi~ usa.' > usa.txt
[ec2-user@ip-172-31-40-76 upload]$ echo 'hi~ canada.' > canada.txt

## 확인
[ec2-user@ip-172-31-40-76 upload]$ ls
canada.txt  korea.txt  usa.txt

## 상위 디렉터리로 이동
[ec2-user@ip-172-31-40-76 upload]$ cd ..

## upload
[ec2-user@ip-172-31-40-76 LABs]$ aws s3 sync upload s3://mymedia-2787/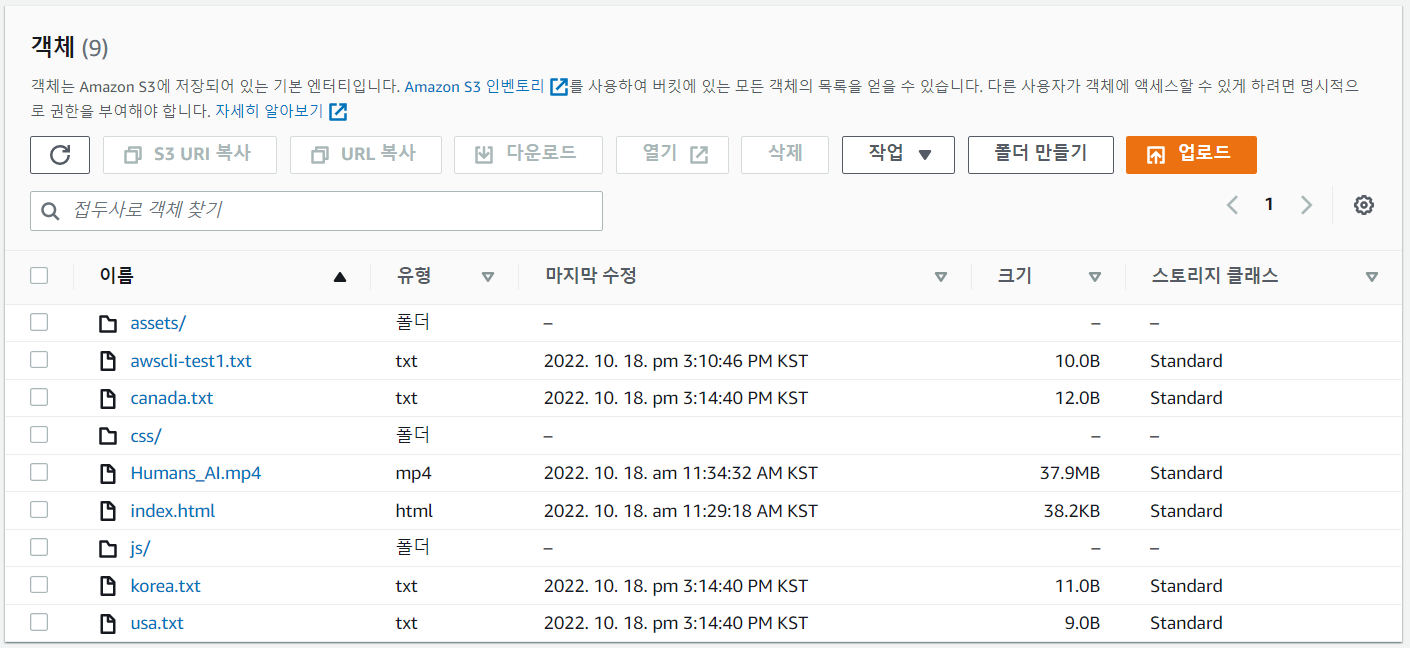
: 파일 3개가 모두 upload 되었다.
- Standard-IA로 upload 하기
## 이동
[ec2-user@ip-172-31-40-76 LABs]$ cd upload/
## 이름 바꾸기
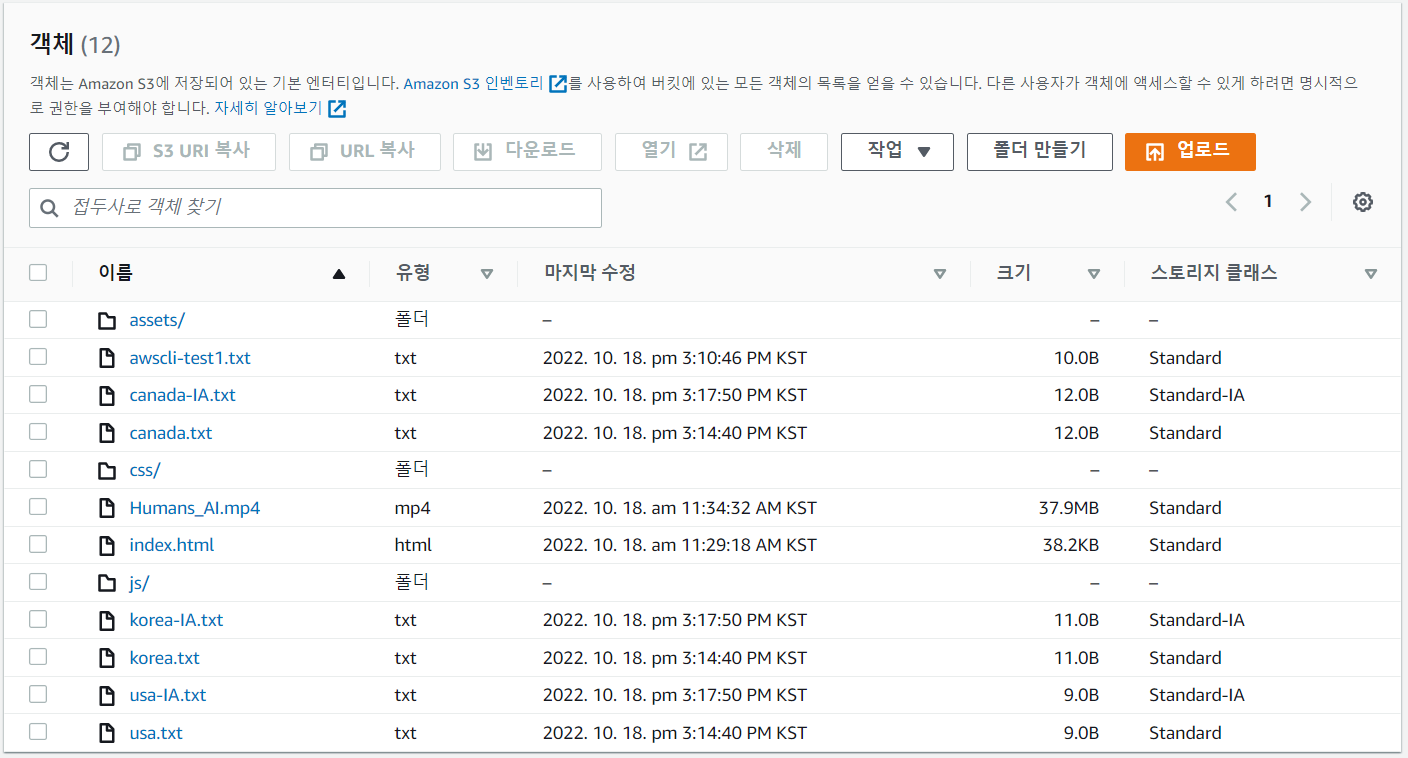
[ec2-user@ip-172-31-40-76 upload]$ mv canada.txt canada-IA.txt
[ec2-user@ip-172-31-40-76 upload]$ mv korea.txt korea-IA.txt
[ec2-user@ip-172-31-40-76 upload]$ mv usa.txt usa-IA.txt
## 확인
[ec2-user@ip-172-31-40-76 upload]$ ls
canada-IA.txt korea-IA.txt usa-IA.txt
## 상위 디렉터리로 이동
[ec2-user@ip-172-31-40-76 upload]$ cd ..
## upload
[ec2-user@ip-172-31-40-76 LABs]$ aws s3 sync upload s3://mymedia-2787/ --storage-class STANDARD_IA
- bucket 만들기
웹사이트가 제작된 압축파일을 개발팀으로부터 git으로 제공받았다.
이 객체를 s3://awscli-bucket????에 업로드 후 해당 버킷에 제공받은 파일내용을 압축 풀어서 버킷에 넣고, 해당 index.html의 서비스를 S3 URL로 확인해 본다.
## git 다운 로드
[ec2-user@ip-172-31-40-76 LABs]$ sudo yum -y install git

## git clone
[ec2-user@ip-172-31-40-76 LABs]$ git clone https://github.com/brayanlee/website.git

## 이동
[ec2-user@ip-172-31-40-76 LABs]$ cd website/

## 압축풀기
[ec2-user@ip-172-31-40-76 website]$ tar xvzf webapp.tar.gz

## 서울 region에 bucket 생성, region 생략 시 미국 오레곤으로 설정된다.
[ec2-user@ip-172-31-40-76 website]$ aws s3 mb s3://awscli-bucket-2787 --region ap-northeast-2

## bucket 생성 확인
[ec2-user@ip-172-31-40-76 website]$ aws s3 ls
2022-10-18 06:23:02 awscli-bucket-2787
2022-10-18 03:22:41 mymedia-2787
2022-10-18 05:28:51 photo-upload-s3-2787

## website directory 내의 모든 data를 생성한 버킷에 업로드한다
[ec2-user@ip-172-31-40-76 website]$ cd ..
[ec2-user@ip-172-31-40-76 LABs]$ aws s3 sync ./website s3://awscli-bucket-2787 --acl public-read
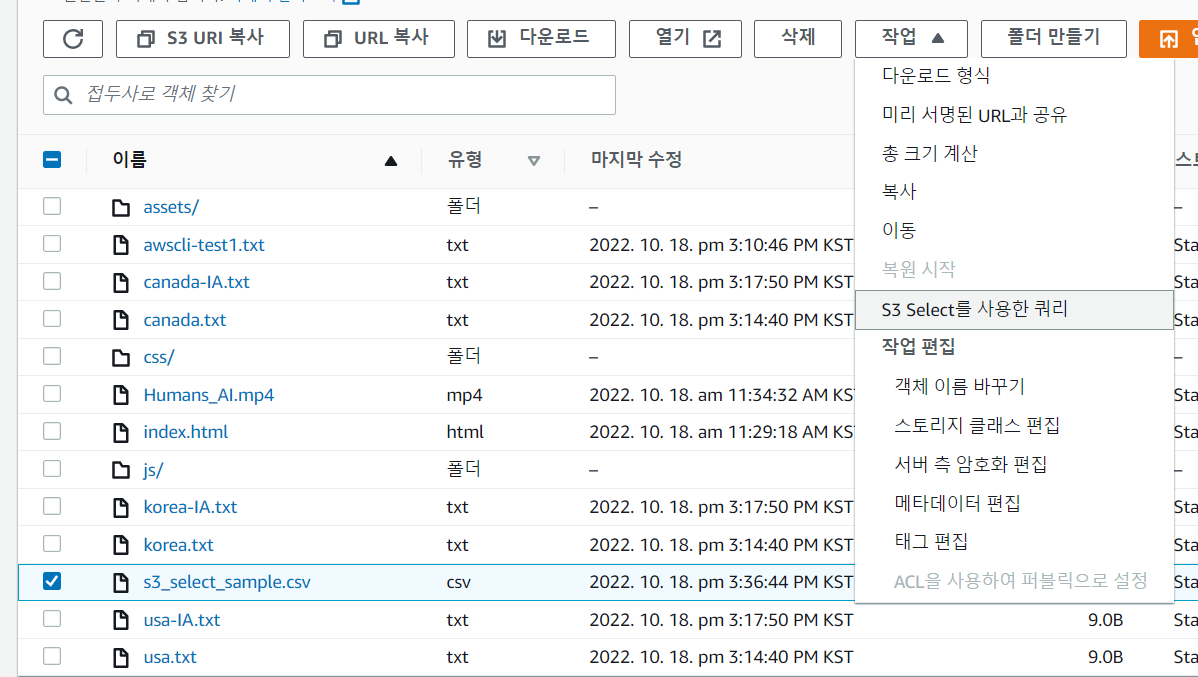
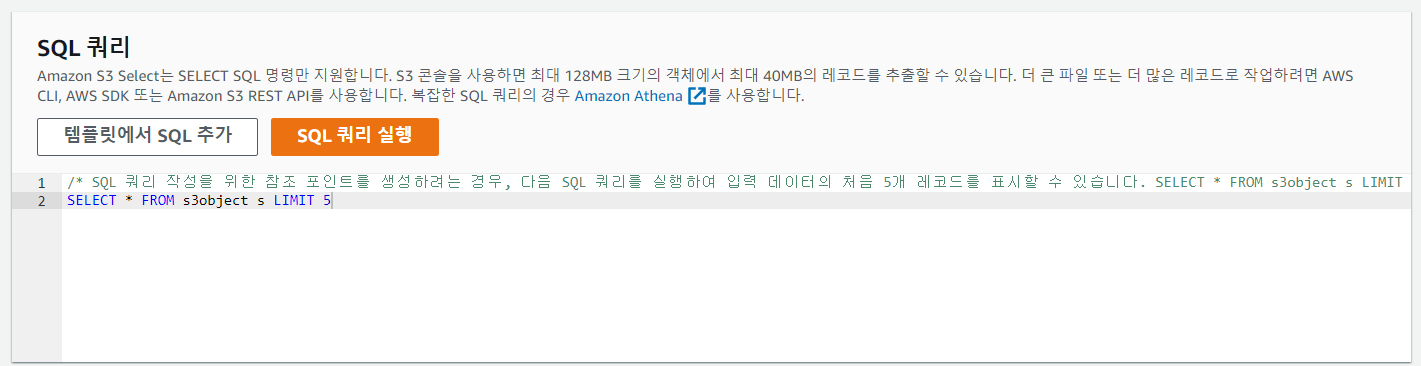
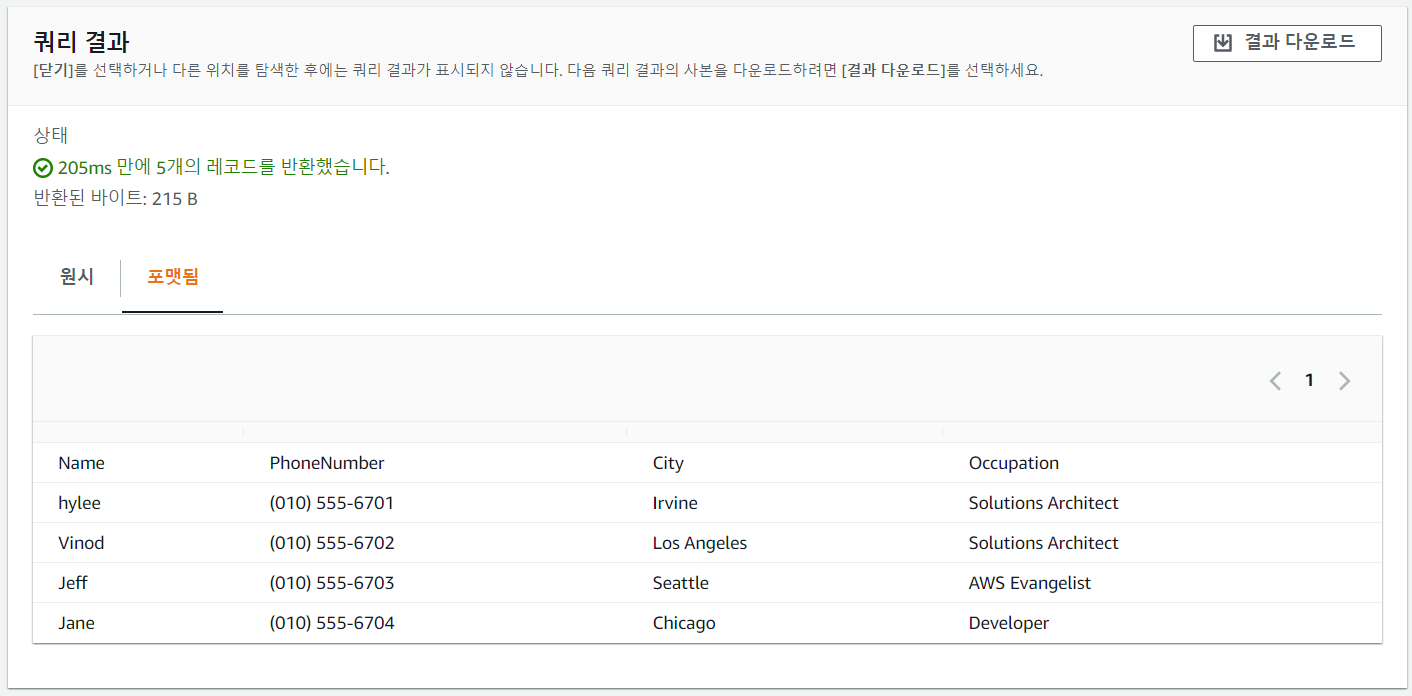
S3 Select를 사용한 쿼리 실습
## csv 파일 생성
[ec2-user@ip-172-31-40-76 LABs]$ vi s3_select_sample.csv
Name,PhoneNumber,City,Occupation
hylee,(010) 555-6701,Irvine,Solutions Architect
Vinod,(010) 555-6702,Los Angeles,Solutions Architect
Jeff,(010) 555-6703,Seattle,AWS Evangelist
Jane,(010) 555-6704,Chicago,Developer
kevin,(010) 555-6705,Seoul,Instructor
Mary,(010) 555-6706,Chicago,Developer
Kate,(010) 555-6707,Chicago,Developer
Alice,(010) 555-6708,Seattle,AWS Evangelist
Sunny,(010) 555-6709,Seoul,Instructor
Sam,(010) 555-6710,Los Angeles,Solutions Architect

## upload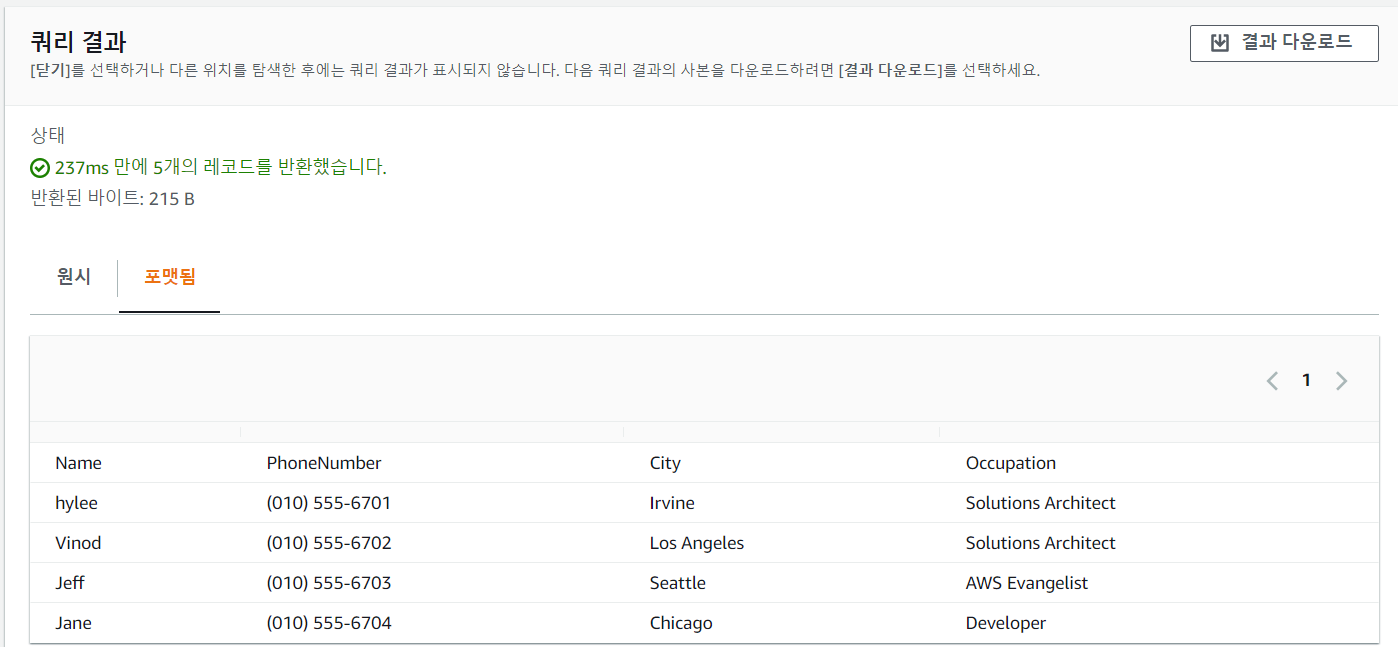
[ec2-user@ip-172-31-40-76 LABs]$ aws s3 cp s3_select_sample.csv s3://mymedia-2787/- csv 파일 upload 완료
- 쿼리 결과 확인 가능
파이썬으로 s3 접근
## 가상 환경 만들기
[ec2-user@ip-172-31-40-76 LABs]$ python3 -m venv ~/s3select_demo/env
[ec2-user@ip-172-31-40-76 LABs]$ source ~/s3select_demo/env/bin/activate

## 파이썬 개발 환경이 생겼다.
(env) [ec2-user@ip-172-31-40-76 LABs]$

## SDK를 사용하기 위해 install
(env) [ec2-user@ip-172-31-40-76 LABs]$ pip install boto3

## py 파일 작성
(env) [ec2-user@ip-172-31-40-76 LABs]$ vi employee_query.py
import boto3
s3 = boto3.client('s3')
resp = s3.select_object_content(
    Bucket='mymedia-2787',
    Key='s3_select_sample.csv',
    ExpressionType='SQL',
    Expression="SELECT * FROM s3object s where s.\"Name\" = 'kevin'",
    InputSerialization = {'CSV': {"FileHeaderInfo": "Use"}, 'CompressionType': 'NONE'},
    OutputSerialization = {'CSV': {}},
)

for event in resp['Payload']:
    if 'Records' in event:
        records = event['Records']['Payload'].decode('utf-8')
        print(records)
    elif 'Stats' in event:
        statsDetails = event['Stats']['Details']
        print("Stats details bytesScanned: ")
        print(statsDetails['BytesScanned'])
        print("Stats details bytesProcessed: ")
        print(statsDetails['BytesProcessed'])
        print("Stats details bytesReturned: ")
        print(statsDetails['BytesReturned'])

## 실행
(env) [ec2-user@ip-172-31-40-76 LABs]$ python3 employee_query.py
kevin,(010) 555-6705,Seoul,Instructor

Stats details bytesScanned:
462
Stats details bytesProcessed:
462
Stats details bytesReturned:
38- 압축 파일로 해보기
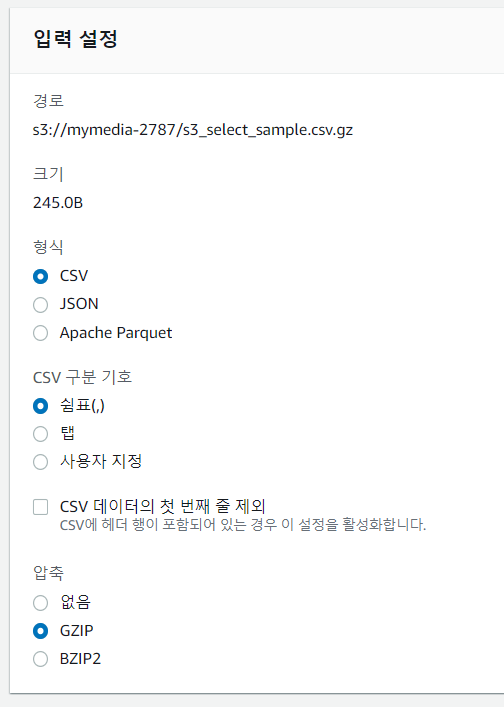
## 압축
(env) [ec2-user@ip-172-31-40-76 LABs]$ gzip s3_select_sample.csv
(env) [ec2-user@ip-172-31-40-76 LABs]$ ls
s3_select_sample.csv.gz

## upload
(env) [ec2-user@ip-172-31-40-76 LABs]$ aws s3 cp s3_select_sample.csv.gz s3://mymedia-2787/

## py 파일 작성
(env) [ec2-user@ip-172-31-40-76 LABs]$ vi kevin_stat.py
import boto3
s3 = boto3.client('s3')
resp = s3.select_object_content(
    Bucket='mymedia-2787',
    Key='s3_select_sample.csv.gz',
    ExpressionType='SQL',
    Expression="SELECT * FROM s3object s where s.\"Name\" = 'kevin'",
    InputSerialization = {'CSV': {"FileHeaderInfo": "Use"}, 'CompressionType': 'GZIP'},
    OutputSerialization = {'CSV': {}},
)

for event in resp['Payload']:
    if 'Records' in event:
        records = event['Records']['Payload'].decode('utf-8')
        print(records)
    elif 'Stats' in event:
        statsDetails = event['Stats']['Details']
        print("Stats details bytesScanned: ")
        print(statsDetails['BytesScanned'])
        print("Stats details bytesProcessed: ")
        print(statsDetails['BytesProcessed'])
        print("Stats details bytesReturned: ")
        print(statsDetails['BytesReturned'])

## 실행
(env) [ec2-user@ip-172-31-40-76 LABs]$ python3 kevin_stat.py
kevin,(010) 555-6705,Seoul,Instructor

Stats details bytesScanned:
245
Stats details bytesProcessed:
462
Stats details bytesReturned:
38- 올라간 것 확인
- S3 select를 이용한 쿼리 선택
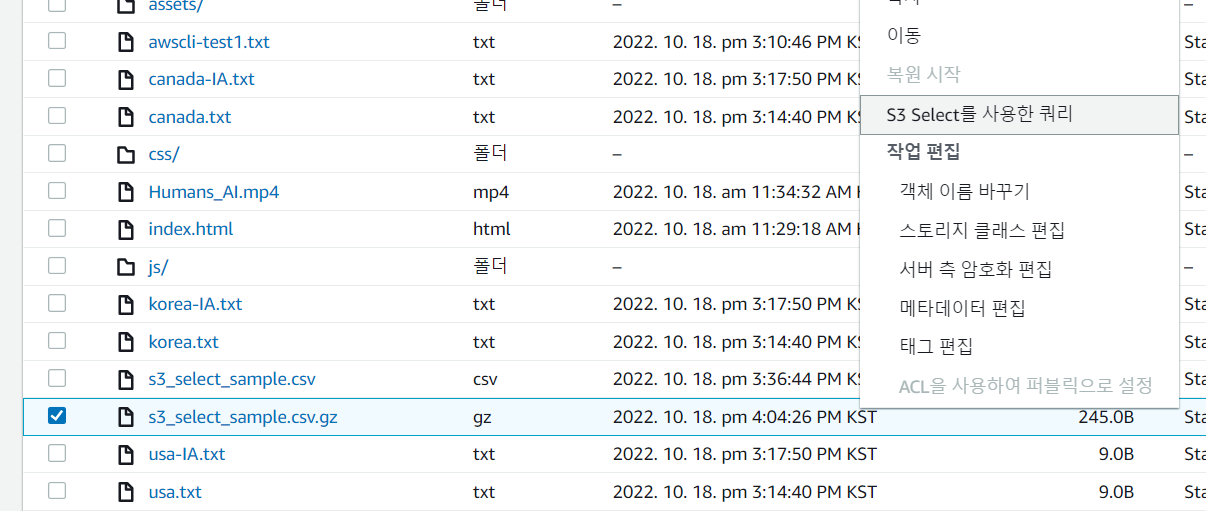
- 확인

정리 잘 하셨네여