Class의 기본
: package로 묶여 있다.
-
private field
-
static field
-
constructor 여러개
constructor overloading -
일반적인 business method는 public 설정
-
private field에 대한 Getter, Setter method
-
main method (optional)
JVM이 관리하는 Memory 구조
- Register
: 프로그램의 실행 포인터를 관리하는 영역. JVM에 의해서만 관리된다. - Runtime constant pool
: 실행 시에 사용하는 상수들이 모여있는 곳. - Method Area
: class 자체에 대한 정보 (클래스 이름, 필드, 메소드, ... 코드에 대한 정보) 저장
클래스를 처음 사용하는 시점에 메모리에 올라간다. - Heap
: new keyword로 생성되는 모든 인스턴스 저장
string pool을 Heap 안에 가지고 있고, 여기에서 문자열을 관리한다. - Call Stack
: method가 호출되면 method를 위한 공간이 잡힌다.
method 안에서 사용하는 local 변수들을 위한 공간도 잡힌다.
Java Program 실행 과정
- class에 fields, constructor, method추가
- JVM이 기동
- class loader가 해당 클래스를 loading
- class file에 대한 검사 수행
- main() 호출
main에 static이 붙는 이유
: instance를 생성하지 않고 main을 호출해야 하기 때문이다.
main에 public이 붙는 이유
: class loader와 우리 코드는 서로 다른 package이기 때문에 호출하려면 public으로 지정해야 한다.
연습 코드 1
public class Student {

	// field (변수들)
    // instance variable -> instance 내에 공간이 생성
	String stuName;  // String -> class -> reference type -> 문자열
	String stuNum;  // 학번 - 연산을 하지 않는 숫자는 문자열 처리가 좋다.

	// 생성자들
	// 인스턴스를 초기화해주는 역할
	// default constructor
	Student() {

	}

	// method (함수들)
	public static void main(String[] args) {
		Student stu = new Student();  // instance를 생성

		// . operator ( . 연산자 )
		stu.stuName = "홍길동";  // 문자열은 ""로, 문자일 때는 ''로

	}
}
코드 시작 후 Memory
- java Student
- Method Area에 해당 클래스(Student)가 가지고 있는 정보를 기입한다. 정보만 기입하는 것이다. 공간이 만들어지지는 않는다.
: field 정보 - stuNum, stuName이 있다.
method 정보 - main() {~~~}, constructor 정보, ... - main() 호출 - method가 호출
- Stack에 main() 공간이 잡힌다.
- new Student() - Heap에 instance 공간이 잡힌다. 이 안에 필드들의 공간도 생긴다. 초기화는 아직 되지 않았다.
- stu라는 변수는 Stack의 main() 공간에 들어가고, Heap의 instance 주소를 레퍼런스 한다.
- stu를 따라가서 홍길동을 필드에 넣는다.
- main()이 끝나면 Stack에서 main()을 pop한다.
- grabage collector는 Heap에서 참조가 되고 있지 않은 메모리를 청소한다.
-> 생성되었던 instance가 사라지게 된다. - Method Area에서 클래스 정보를 없앤다.
- 프로그램 종료
연습 코드 2
public class Student {

	// field (변수들)
	// instance variable -> instance 내에 공간이 생성
	String stuName;  // String -> class -> reference type -> 문자열
	String stuNum;  // 학번 - 연산을 하지 않는 숫자는 문자열 처리가 좋다.

	// static variable, class variable
	// method area 안의 class 정보 안에 공간이 생성
	// class에 대한 정보가 method area에 올라갈 때 생성
	// 모든 인스턴스에 의해서 공유되는 field
	static String univName;

	// 생성자들
	// 인스턴스를 초기화해주는 역할
	// default constructor
	Student() {

	}

	// method (함수들)
	public String getName() {  // instance method
		return this.stuName;
	}

	public static String getUnivName() {  // class method
		return univName;
	}

	public static void main(String[] args) {
		Student stu = new Student();  // instance를 생성

		// . operator ( . 연산자 )
		stu.stuName = "홍길동";  // 문자열은 ""로, 문자일 때는 ''로

	}
}
코드 시작 후 Memory

- java Student
- Method Area에 해당 클래스(Student)가 가지고 있는 정보를 기입한다.
: field 정보 - stuNum, stuName
static인 univName 공간이 만들어진다.
method 정보 - getName() {~~~}, getUnivName() {~~~}, main() {~~~} 실행 코드가 들어간다. - main() 호출 - method가 호출
- Stack에 main() 공간이 잡힌다.
- new Student() - Heap에 instance 공간이 잡힌다. 이 안에 필드들의 공간도 생긴다. 초기화는 아직 되지 않았다. static인 univName은 Method Area의 공간을 가리킨다. getName과 getUnivName method의 공간에는 Method Area의 실행 포인터가 연결되어 있다.
- stu라는 변수는 Stack의 main() 공간에 들어가고, Heap의 instance 주소를 레퍼런스 한다.
- stu를 따라가서 홍길동을 필드에 넣는다.
- main()이 끝나면 Stack에서 main()을 pop한다.
- grabage collector는 Heap에서 참조가 되고 있지 않은 메모리를 청소한다.
-> 생성되었던 instance가 사라지게 된다. - Method Area에서 클래스 정보를 없앤다.
- 프로그램 종료
연습 코드 3
public class Student {

	static int a = staticCall("1번");
	int b = staticCall("2번");

	public static int staticCall(String msg) {
		System.out.println(msg);
		return 100;
	}

	public Student() {
		this.b = staticCall("3번");
	}

	public static void main(String[] args) {
		System.out.println("4번");
		int c = staticCall("5번");
		Student s = new Student();
	}
}

실행 결과 : 1번
		   4번
		   5번
		   2번
		   3번
a는 static이라서 instance가 만들어지기 전에 만들어져서 가장 먼저 1번이 출력된다. 인스턴스가 만들어지고, 4번 5번이 출력되고, s 인스턴스를 만들어진다. 생성자는 인스턴스를 초기화하는 것이기 때문에 2번이 먼저 출력되고 3번이 마지막으로 출력된다.
연습 코드 4
package lecture0712;

public class InstanceTest {

	// fields
	int a = myCall("1번출력");
	static int b = myCall("2번출력");

	// constructor
	public InstanceTest() {

	}

	// method
	public static int myCall(String msg) {
		System.out.println(msg);
		return 100;
	}

	public void printMsg(String msg) {
		int a = 100;
		System.out.println(msg);
	}
}
// java Main -> 이런 방식으로 실행된다.
package lecture0712;
public class Main {
public static void main(String[] args) {
InstanceTest test;
System.out.println("3번출력");
int k = InstanceTest.myCall("4번출력");
test = new InstanceTest();
test.printMsg("5번출력");
}
}
실행 결과 : 3번출력
2번출력
4번출력
1번출력
5번출력코드 시작 후 Memory
- java Main으로 시작한다.
- Method Area에 Main class의 정보가 저장된다.
: field, constructor, method, ...
해당 코드에서는 constructor Main() {~~~},
Main method public static void main(String[] args) {~~~} 이 올라간다. - main() 호출 - method가 호출
- Call Stack에 main() 공간이 잡힌다. stack의 main 공간 안에 args 공간도 잡힌다.
- InstanceTest test - 지역변수 선언. Stack의 main 공간에 test 공간이 잡힌다.
이때 InstanceTest class 정보가 Method Area에 저장된다.
: field, constructor, method, static, ... - myCall()이 호출될 때는 Call Stack에 쌓인다.
- new InstanceTest()를 하면 Heap에 instance 공간이 잡힌다. 이 안에는 a의 공간이 생긴다. b는 static이기 때문에 링크가 만들어진다. myCall()과 printMsg() method의 링크도 만들어진다.
- test라는 변수는 Stack의 main() 공간에 들어가고, Heap의 instance 주소를 레퍼런스 한다.
- PrintMsg를 Stack에 넣어서 실행한다. 여기에서 사용하는 msg, a와 같은 지역변수의 공간도 생긴다.
- 실행이 모두 끝나면 Stack과 Heap, Method Area가 텅 비게 된다.
- 프로그램 종료
Constructor(생성자)
-
Java의 모든 class는 constructor를 1개 이상 가진다.
constructor를 작성하지 않으면 default constructor가 javac 컴파일러에 의해서 자동 삽입된다. 없는 경우에만 삽입해준다. -
constructor는 method가 아니다. return이 존재하지 않는다. return type을 명시하지 않는다.
-
이름이 class명과 동일하다.
-
instance를 생성하고 초기화하려는 목적으로 사용한다.
Method Overloading
: 똑같은 이름의 method가 인자의 개수와 타입만 다르다면 존재할 수 있다.
public class Student {

	public void getScore(String k) {

	}

	public void getScore(int k) {

	}
}
=> 생성자에도 적용할 수 있다. Constructor Overloading
Constructor Overloading
public class Student {

	Student() {

	}

	Student(int k) {

	}
}
.
: (instance/class) . (field/method)
ex) System.out.println();
System - class
out - field
println() - method
java에서는 많은 class를 만들어 쓸 수 있다. 많은 class를 관리하고 재사용 할 수 있어야 한다.
-> 가장 원시적인 방법 : class file이나 source code를 project의 같은 폴더 내에 위치시킨다. 이 방법은 여러개의 copy본을 유지하게 되어서 결국은 유지보수에 문제가 발생한다.
=> Package라는 논리적인 단위로 관련있는 class들을 묶어서 사용
Package
: package의 논리적인 단위는 물리적으로는 folder로 표현한다.
package com.kakao.test;

public class Student {

}- 폴더 구조로 생긴다.

- 같은 package에 있으면 서로 사용할 수 있다.
- 다른 package에 있는 것을 사용하고 싶으면 어느 package에 있는지 명시해야 한다. -> import로 사용한다.
com.kakao.test.*; 을 하면 -> 해당 package에 존재하는 모든 것을 가져온다.
Access Modifier(접근 제어자)
public
: 제약없이(package에 상관없이) 사용이 가능하다.
method는 행위를 하는 작업이기 때문에 특별한 이유가 없는 한 외부에서 사용할 수 있도록 public으로 설정해야 한다.
protected
: 같은 package인 경우 사용이 가능하다. 다른 package인 경우, 상속 관계에 있으면 사용이 가능하다.
package(default)
: 같은 package 내에서만 사용이 가능하다. 키워드를 쓰지 않으면 된다.
private
: 같은 class 안에서만 사용이 가능하다.
class 내부에서 field는 보호해야 하는 정보이다. 외부에서 직접적으로 접근할 수 없게 해야 한다. field는 특별한 이유가 없는 한 모두 private으로 지정한다.
코드로 연습하기
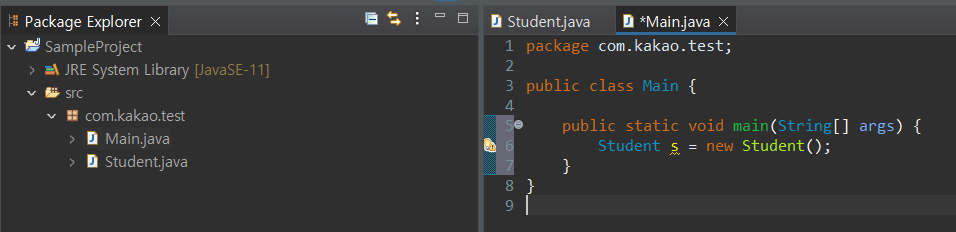
- 예제 1 (public, default)
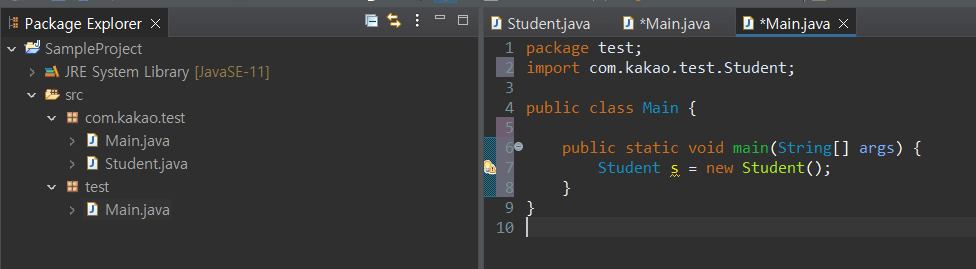
package com.kakao.test;

class Student {

}
package test;
import com.kakao.test.Student;
public class Main {
public static void main(String[] args) {
Student s = new Student(); // 오류 발생
}
}: Student class에 접근 제어자를 아무것도 붙이지 않았기 때문에 다른 package에서는 import를 해도 사용할 수 없다.
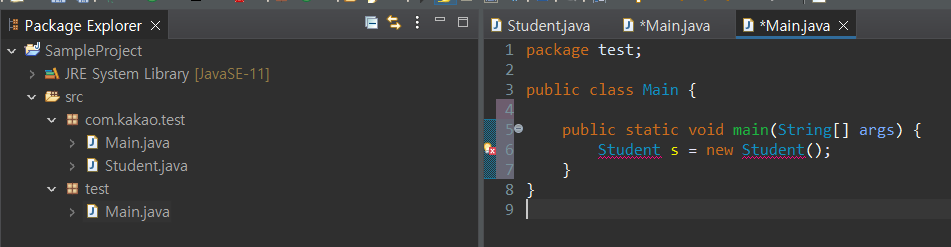
- 예제 2 (public, default)
package com.kakao.test;

public class Student {

	String stuName;
	public String stuNum;

	Student() {

	}
}
package test;
import com.kakao.test.Student;
public class Main {
public static void main(String[] args) {
Student s = new Student(); // 오류 발생
}
}: Student class의 생성자에 public이 붙어있지 않기 때문에 외부에서 클래스를 사용할 수는 있지만 인스턴스 생성은 하지 못한다.
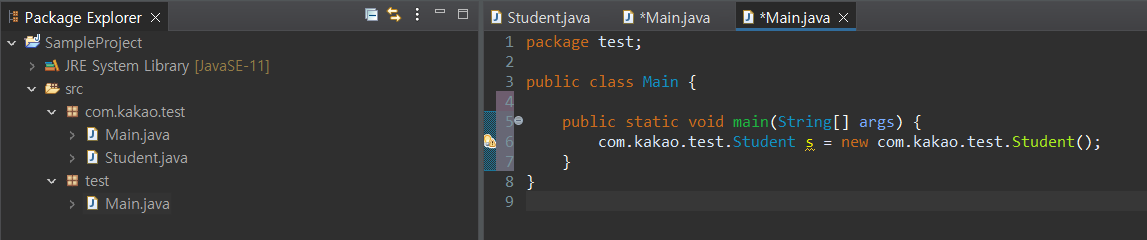
- 예제 3
package com.kakao.test;

public class Student {

	String stuName;
	String stuNum;

	public Student() {

	}
}

class Main {
	public static void main(String[] args) {
		Student s = new Student();
		s.stuName = "홍길동";
	}
}
: field에서 public을 빼면 외부에서는 접근할 수 없지만 같은 package나 같은 class이면 접근할 수 있게 된다.
package com.kakao.test;

public class Student {

	private String stuName;
	private String stuNum;

	public Student() {

	}
}

class Main {
	public static void main(String[] args) {
		Student s = new Student();
		s.stuName = "홍길동";  // 오류 발생
	}
}
: private을 지정해서 같은 클래스가 아니면 접근할 수 없게 한다.
-> Information hiding
- 예제 4
package lecture0712;

public class MyClass {

	// fields
	int aaa;
	static int bbb = staticCall();

	// 생성자
	public MyClass() {

	}

	// static block
	static {
		// main이 실행되기 직전에 다른 library 같은 것들을 loading할 필요가 있을 때 사용
		System.out.println("static block");
	}

	static int staticCall() {
		System.out.println("staticCall 호출되었어요!");
		return 100;
	}

	public static void main(String[] args) {
		System.out.println("main 호출");
	}

}

실행 결과 : staticCall 호출되었어요!
		   static block
		   main 호출
: static block - class가 loading 된 다음, main이 실행되기 직전에 다른 library 같은 것들을 loading할 필요가 있을 때 사용한다.
Getter / Setter
field를 private으로 설정했기 때문에 만들어주어야 한다.
package com.kakao.test;

public class Student {

	private String stuName;
	private String stuNum;

	public String getStuName() {
		return this.stuName;
	}

	public void setStuName(String stuName) {
		this.stuName = stuName;
	}

	public String getStuNum() {
		return stuNum;
	}

	public void setStuNum(String stuNum) {
		this.stuNum = stuNum;
	}

	public Student() {

	}
}
String
String을 만드는 방법
-
"" 로 문자열을 생성한다.
-
new String()
코드 예시
String a = "Hello";
String b = "Hello";
String c = b + "HI";
String d = new String("Hello");
- Heap 영역에서 "Hello"가 있는지 확인하고 없으면 만들고 a가 가리킨다.
- Heap 영역에서 "Hello"가 있는지 확인하고 있으면 b가 가리킨다.
- 같은 것을 가리키게 된다.
package lecture0713;

public class Main {

	public static void main(String[] args) {

		String str1 = "Hello";
		String str2 = "Hello";
		String str3 = new String("Hello");

		System.out.println(str1 == str2);  // true
		System.out.println(str1 == str3);  // false

        // 문자열 내용을 비교할 때는 당연히 equals()를 사용한다.
        // 문자열 내용이 같은지 확인할 때 == 사용하지 않는다.
		System.out.println(str1.equals(str3));  // true
	}

}

실행 결과 : true
		   false
		   true
Wrapper class
: 원시값을 객체화 시킬 수 있다.
각각의 primitive data type에 매핑된다.
- Byte class
- Short class
- Integer class
- Long class
- Float class
- Double class
- Character class
- Boolean class
총정리 문제
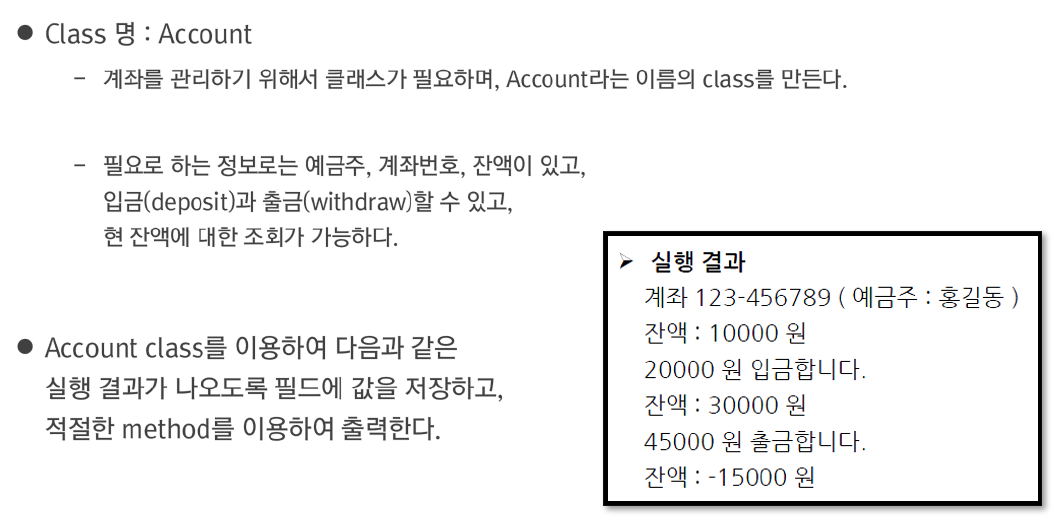
- 내 코드
public class Account {

	private String userName;
	private String accNum;
	private int accBalance;

	Account(String userName, String accNum, int accBalance) {
		this.userName = userName;
		this.accNum = accNum;
		this.accBalance = accBalance;
	}

	// 입금
	public void deposit(int money) {
		this.accBalance += money;
		System.out.println(money + " 원 입금합니다.");
	}

	// 출금
	public void withdraw(int money) {
		this.accBalance -= money;
		System.out.println(money + " 원 출금합니다.");
	}

	// 잔액 조회
	public int getAccBalance() {
		return this.accBalance;
	}

	public void setAccBalance(int accBalance) {
		this.accBalance = accBalance;
	}

	public String getUserName() {
		return userName;
	}

	public void setUerName(String userName) {
		this.userName = userName;
	}

	public String getAccNum() {
		return accNum;
	}

	public void setAccNum(String accNum) {
		this.accNum = accNum;
	}


	public static void main(String[] args) {
		Account acc1 = new Account("홍길동", "123-456789", 10000);

		System.out.println("계좌 " + acc1.getAccNum() + " (예금주: " + acc1.getUserName() + ")");
		System.out.println("잔액: " + acc1.getAccBalance() + " 원");
		acc1.deposit(20000);
		System.out.println("잔액: " + acc1.getAccBalance() + " 원");
		acc1.withdraw(45000);
		System.out.println("잔액: " + acc1.getAccBalance() + " 원");
	}
}