쇼핑몰 팀 프로젝트가 1차에서 2차로 접어들며 가장 첫번째로 해야 할 작업은 Mybatis -> JPA로의 전환이었습니다.
어떤 과정으로, 어떤 이유로, 어떻게 구현했는지 알아보도록 하겠습니다.
전환 계획
전환 과정은 다음과 같은 순서로 진행했습니다.
- Mybatis -> JPA 변환(호환)
- Mybatis, JPA 변환으로 기존 기능 동작, 테스트 코드 정상 작동 확인
- Mybatis 제거
이 과정에서 가장 중요하게 생각한 점은 SOLID 원칙을 준수하면서, 다른 계층(프레젠테이션, 서비스 등)에 영향을 최소화하는 것이었습니다.
이를 위해 디자인 패턴 중 하나인 Adapter 패턴을 활용하여 기존 Mybatis의 response타입에 JPA의 response타입을 호환시키기로 결정했습니다.
제가 담당한 도메인은 Product, ProductLine, Category이기 때문에 이를 위주로 예를 같이 살펴보겠습니다.
또한 해당 과정에서 여러 시도를 해보기 위해 아래의 두 가지 방식을 적용해보았습니다.
- Category → Adapter +
@Profile("mybatis/jpa")+ application.yml 설정 - ProductLine, Product → JPA Adapter와 RepositoryConfig +
@Primary어노테이션을 사용했습니다.
Mybatis에서 JPA로의 변환 과정
1. Entity 클래스 생성
JPA 사용을 위해 가장 먼저 엔티티 클래스를 생성했습니다. 예를 들어, 'Product' 엔티티는 @Entity 어노테이션을 통해 구현합니다.
@Entity
@Table(name = "products")
public class Product {
    @Id
    @GeneratedValue(strategy = GenerationType.IDENTITY)
    private Long id;

    @Column(nullable = false)
    private String name;

    @Column(nullable = false)
    private BigDecimal price;

    // 생성자, getter, setter 등
}
2. Repository
다음으로, JPA Repository 인터페이스를 생성했습니다.
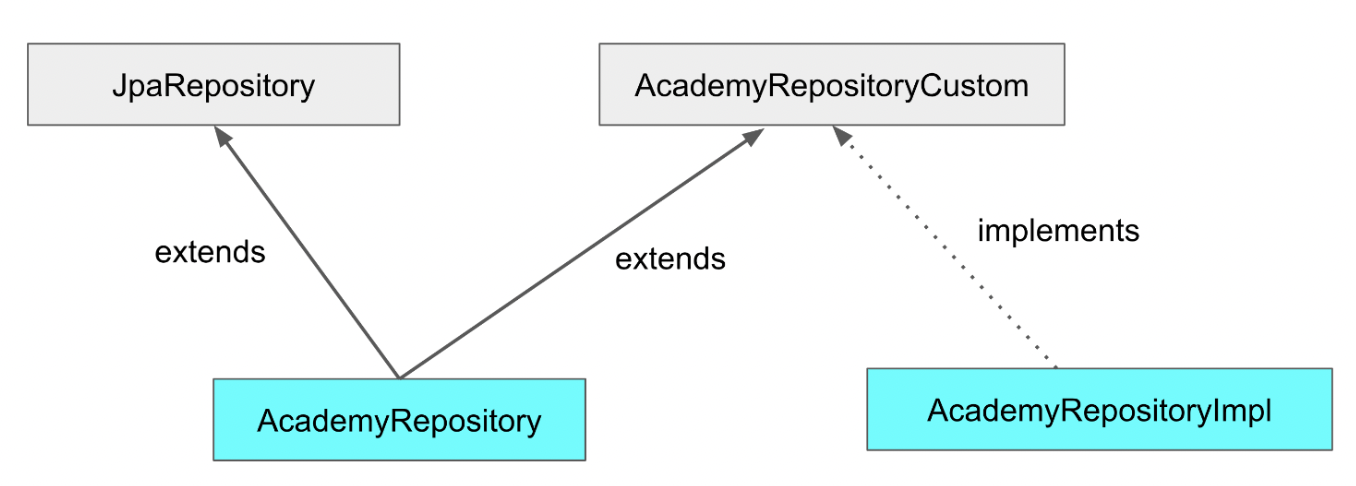
네이밍은 ~JPARepository로, JPARepository를 상속해 기본적인 CRUD 연산을 자동으로 제공하며, 필요한 경우 커스텀 쿼리 메서드를 추가할 수 있고, ProductLineRepositoryCustom을 상속받아 QueryDSL을 통한 복잡한 쿼리(동적 쿼리 등)가 가능도록 했습니다.
@Repository
public interface ProductLineJPARepository extends JpaRepository<ProductLineEntity, Long>, ProductLineRepositoryCustom {

    List<ProductLineEntity> findByDeletedAtIsNullAndStatusNotIn(List<ProductLineStatus> statuses);
}
위의 ~JPARepository구조를 그림으로 도식화하면 아래와 같습니다.
QueryDSL을 포함시킨 이유
기존 Mybatis에서 ResultMap을 사용해 Join을 통한 여러 테이블의 데이터를 response에 담아 응답했습니다.
이에 대한 방안으로
1. queryDSL로 join하여 response 타입 일치
2. Service계층에서 다른 service계층 또는 Entity의 관계 매핑을 통한 response 타입 일치
두 가지 방식을 모두 진행했습니다.
3. JPA, Mybatis Repository 호환 작업
공통 상속 클래스 ~Repository 생성
MybatisReposiory, JPARepository를 호환시키기 위해 공통으로 상속받을 클래스를 만듭니다.
네이밍은 ~Repository로 통일합니다.
public interface ProductRepository {

    List<Product> selectAllProductByProductLineId(Long productId);

    Optional<Product> selectByProductId(Long productId);

    int save(Product product);

    int updateProduct(Product product);

    int deleteProduct(Long productId);
}
해당 클래스는 ~MybatisRepository 인터페이스에서 extends 하고, ~Adapter 클래스에서 iplements합니다.
Adapter 클래스 구현
기존 Mybatis Mapper와 새로운 JPA Repository를 연결하기 위해 Adapter 클래스를 구현합니다:
@Repository
@RequiredArgsConstructor
public class ProductJPARepositoryAdapter implements ProductRepository {

    private final ProductJPARepository productJPARepository;
    private final ProductLineJPARepository productLineJPARepository;

    public List<Product> selectAllProductByProductLineId(Long productId) {
        return productJPARepository.findAllByProductId(productId)
                .stream()
                .map(Product::from)
                .collect(Collectors.toList());
    }

    @Override
    public Optional<Product> selectByProductId(Long productId) {
        return productJPARepository.findById(productId)
                .map(Product::from);
    }

    @Override
    public int save(Product product) {
        ProductEntity productEntity = convertToProductEntity(product);
        productJPARepository.save(productEntity);
        return 1;
    }

    @Override
    public int updateProduct(Product product) {
        ProductEntity productEntity = productJPARepository.findById(product.getProductId())
                .orElseThrow(() -> new ResponseStatusException(HttpStatus.NOT_FOUND, "Product not found with id: " + product.getProductLineId()));

        productEntity.updateOption(product);

        return 1;
    }

    @Override
    public int deleteProduct(Long productId) {
        ProductEntity productEntity = productJPARepository.findById(productId)
                .orElseThrow(() -> new ResponseStatusException(HttpStatus.NOT_FOUND, "Product not found with id: " + productId));

        productJPARepository.delete(productEntity);
        return 0;
    }

    private ProductEntity convertToProductEntity(Product product) {
        ProductLineEntity productLine = productLineJPARepository.findById(product.getProductLineId())
                .orElseThrow(() -> new ResponseStatusException(HttpStatus.BAD_REQUEST, "ProductLine not found with id: " + product.getProductLineId()));

        return ProductEntity.builder()
                .productId(product.getProductId())
                .productLine(productLine)
                .name(product.getName())
                .extraCharge(product.getExtraCharge())
                .stock(product.getStock())
                .build();
    }
}
이 Adapter 클래스는 기존 Mybatis Mapper 인터페이스를 구현하면서, 내부적으로는 JPA Repository를 사용합니다. 이를 통해 기존 코드의 변경을 최소화하면서 JPA로의 전환을 가능케 했습니다.
3.4 서비스 레이어 수정
서비스 레이어에서는 최소한의 변경만이 필요했습니다.
Adapter와 MybatisRepository에서 공통적으로 상속 또는 구현하고 있는 ~Repository 인터페이스를 주입합니다.
  @Service
  @ReqiuredArgsConstructor
public class ProductService {
    private final ProductRepository productRepository;


    // 다른 메서드들...
}
인터페이스를 그대로 사용하므로, 서비스 코드는 거의 변경되지 않았습니다.
4. 테스트 및 검증
변환 후에는 Mybatis로 진행한 1차 프로젝트의 모든 기존 기능이 정상적으로 동작하는지 확인했습니다. Postman과 테스트 코드를 실행하여 모든 테스트가 통과하는지 검증했습니다.
5. Mybatis 제거 과정
JPA로의 전환이 완료되고 모든 기능이 정상 동작함을 확인한 후, Mybatis 관련 코드와 설정을 제거했습니다. 이 과정에서 주의깊게 의존성을 검토하여 불필요한 코드만을 제거했습니다.
6. 성능 비교 및 개선 사항
기존 Mybatis는 SQL Mapper 특성상 쿼리 작성에서는 자유롭지만 의존적이기 때문에, 비즈니스 로직이 변경되면 해당 SQL 또한 모두 변경해야 했습니다. 이는 어느 한 부분을 놓치기 쉽고, 에러가 발생했을 때 원인이 어디에서 발생했는지 파악하기가 어려웠으며, 재사용성이 떨어졌습니다.
JPA로의 전환 이후 엔티티간의 관계 매핑을 통해 코드의 생산성, 가독성 및 유지보수성이 크게 개선되었습니다. 하지만 JPA 기술의 정체성 및 특징인 지연로딩, 즉시 로딩에서 흔히 발생하는 N+1이나 영속성과 관련해서 주의가 필요했고, 이를 개선하기 위해는 JPA 및 QueryDSL에 대한 깊은 이해가 필요했습니다.
7. 결론 및 향후 계획
이번 Mybatis에서 JPA로의 전환을 통해, 코드의 품질을 향상시키고 개발 생산성을 높일 수 있었습니다. 앞으로는 JPA의 더 고급 기능들을 활용하여 프로젝트를 더욱 발전시켜 나갈 계획입니다.
이 전환 과정에서 가장 크게 얻은 교훈은 아키텍쳐를 미리 그려보고, 이에 이해를 통한 계획과 적절한 디자인 패턴의 사용이었습니다.
가장 공들였던 부분은 Adapter 패턴을 통해 기존 코드의 변경을 최소화하여 Persistence 외에 계층에는 영향이 가지 않으면서도 새로운 기술을 도입할 수 있도록 하는 것이었습니다.