1. UI
1-1. 준비 단계
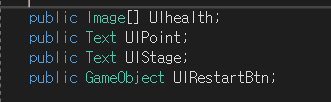
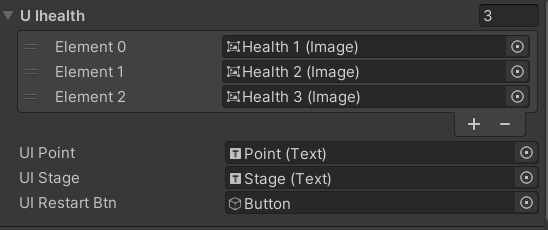
- 목숨을 나타는 3개의 Image와 몇번째 stage를 알려주는 text, total점수를 알려주는 text, 죽거나, 게임클리어시 재도전 할수있도록 하는 buttom 생성.
- GameManager 스크립트에 선언.
- 각각에 알맞게 동기화.
1-2. total점수
private void Update()
    {
        UIPoint.text = (totalPoint + stagePoint).ToString();
    }
- 매 프레임마다 빠르게 변하게 하도록 Update()에 작성.
- 코인을 먹을때마다 쌓이는 stagePoint를 totalPoint에 더해줌.
- totalPoint와 stagePoint는 int형 변수로 마지막에 ToString()처리.
1-3. Stage점수
public void NextStage()
{
   ...
   UIStage.text = "stage " + (stageIndex + 1);
}
- stage는 총 1~3, index는 0~2로 되어있기때문에, 다음 stage에 갈때마다 stageindex + 1로 처리해줌.
1-4. 체력
 public void HealthDown()
 {
        if(health > 1)
        {
            ...
            //색상 어둡게 변경 레드를 좀더 밝게
            UIhealth[health].color = new Color(1, 0, 0, 0.4f);
        }
        else
        {
            //마지막 목숨도 색상변환
            UIhealth[0].color = new Color(1, 0, 0, 0.4f);
            ...
            ...
        }
 }
- 목숨이 줄면, 목숨을 나타내는 image의 색상을 new Color()를 이용해 어둡게 변경.
1-5. 재시작 버튼
public void Restart()
{
        Time.timeScale = 1;
        SceneManager.LoadScene(0);
}
public void NextStage() { ... ... else { ... ... Text btnText = UIRestartBtn.GetComponentInChildren<Text>(); btnText.text = "Game Clear!"; UIRestartBtn.SetActive(true); } }public void HealthDown() { ... ... else { ... ... UIRestartBtn.SetActive(true); } }
- 버튼을 누를때 재시작 하는 함수인 Restart()함수에 SceneManager.LoadScene(0)을 이용해 첫번째 신 불러옴.
- Time.timeScale을 이용해 시간 멈출시 다시 복구.
- 목숨이 0일때와 마지막 Stage에서 도착할 시, 버튼을 SetActive(true).
- 마지막 Stage에서는 text내용을 바꿔주어 버튼 활성화.
- button의 text는 자식오브젝트로 GetComponentInChildren 이용해 불러옴.
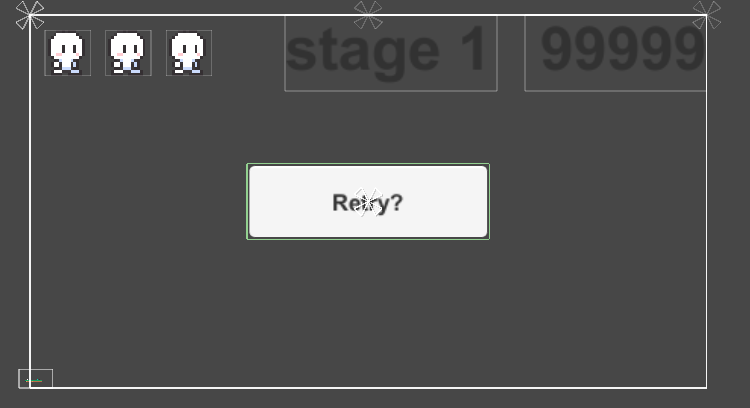
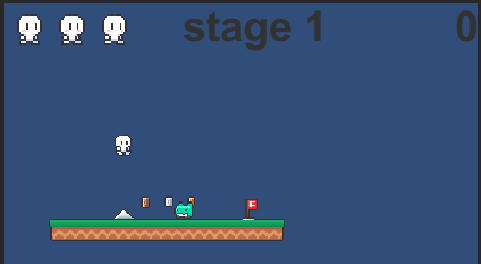
2. 완성 모습
( 피격 시, 왼쪽 상단 체력이미지 하나가 붉게 바뀐 모습과, 도착 시, stage 변경 및 코인 먹을때마다 total 점수가 오르는 모습.)
(죽을 시 , Retry 버튼이 활성화 되는 모습)
(버튼이 나올때 누르면 stage 1로 돌아가는 모습)
3. 오디오 설정
1. 준비 단계
- asset store에서 원하는 audio 파일 다운.
- player에 audio source 추가.
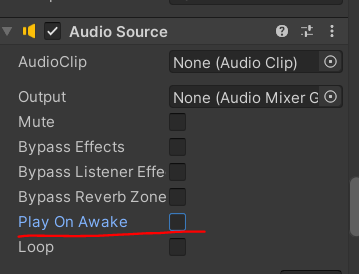
- Play On Awake 를 false.
- true 해놓으면 scene이 실행되면서 자동 실행.
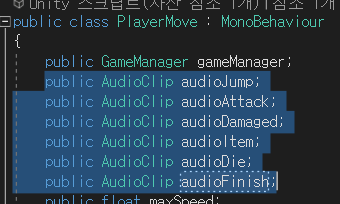
- playerMove 스크립트에 각 행동마다 실행될 AudioClip 변수 생성.
- AudioSource 변수도 생성.
2. 소스 코드
void Awake()
{  ...
   ...
   audioSource = GetComponent<AudioSource>();
}
void PlaySound(string action) { switch (action) { case "JUMP": audioSource.clip = audioJump; break; case "ATTACK": audioSource.clip = audioAttack; break; case "DAMAGED": audioSource.clip = audioDamaged; break; case "ITEM": audioSource.clip = audioItem; break; case "Die": audioSource.clip = audioDie; break; case "FINISH": audioSource.clip = audioFinish; break; } audioSource.Play(); }if (Input.GetButtonDown("Jump") && !anim.GetBool("isjumping")) { ... ... PlaySound("JUMP"); } if(collision.gameObject.tag == "Item") { ... ... PlaySound("ITEM"); } else if(collision.gameObject.tag == "Finish") { ... ... PlaySound("FINISH"); } void OnAttack(Transform enemy) { ... ... PlaySound("ATTACK"); } void OnDamaged(Vector2 targetPos) { ... ... PlaySound("DAMAGED"); } public void OnDie() { ... ... PlaySound("Die"); }
- Awake()함수에서 AudioSource 가져오기.
- PlaySound 함수를 따로 만들고, audioSource.clip과 audioSource.Play()를 이용해서 각 행동에 맞는 소리 실행.
- 각 행동 코드 안에 PlaySound() 선언.
- 각 변수에 원하는 audio 파일 input.
<참고>
골드 메탈님 강의 영상:https://www.youtube.com/watch?v=GHUJMXtHKL0&list=PLO-mt5Iu5TeYI4dbYwWP8JqZMC9iuUIW2&index=23
사용한 텍스처 소스 : http://u3d.as/2mvJ (by골드메탈님)


개발노트