일자 : 24-2 14주차 1차시 (2)
[1] 예시
<!DOCTYPE html>
<html>
<body>

<!-- 폼을 설명하는 제목 -->
<h2>HTML Forms</h2>

<!-- 폼 시작. action 속성은 폼 제출 시 데이터가 전송될 URL을 정의 -->
<form action="/action_page.php">

  <!-- 'First name' 입력 필드를 위한 라벨과 입력 박스 -->
  <label for="fname">First name:</label><br>
  <input type="text" id="fname" name="fname" value="John"><br>

  <!-- 'Last name' 입력 필드를 위한 라벨과 입력 박스 -->
  <label for="lname">Last name:</label><br>
  <input type="text" id="lname" name="lname" value="Doe"><br><br>

  <!-- 제출 버튼 -->
  <input type="submit" value="Submit">
</form>

<!-- 폼 제출 시 데이터가 전송될 URL에 대한 설명 -->
<p>If you click the "Submit" button, the form-data will be sent to a page called "/action_page.php".</p>

</body>
</html>
<label>태그의for속성은<input>요소의id속성과 같아야 두 요소가 연결된다.- 이렇게 하면 라벨을 클릭할 때 해당 입력 필드로 포커스가 이동하거나, 키보드 접근성 및 사용자 경험을 향상시킬 수 있다. 이를 통해 라벨과 입력 요소가 서로 연결되며, 화면 리더기기 등에서도 더 나은 접근성을 제공한다.
[2-1] <form> 요소
<form>
.
  form elements
.
</form>- HTML
<form>요소는 사용자 입력을 위한 HTML 폼을 생성할 때 사용된다.
[2-2] <input> 요소
- HTML
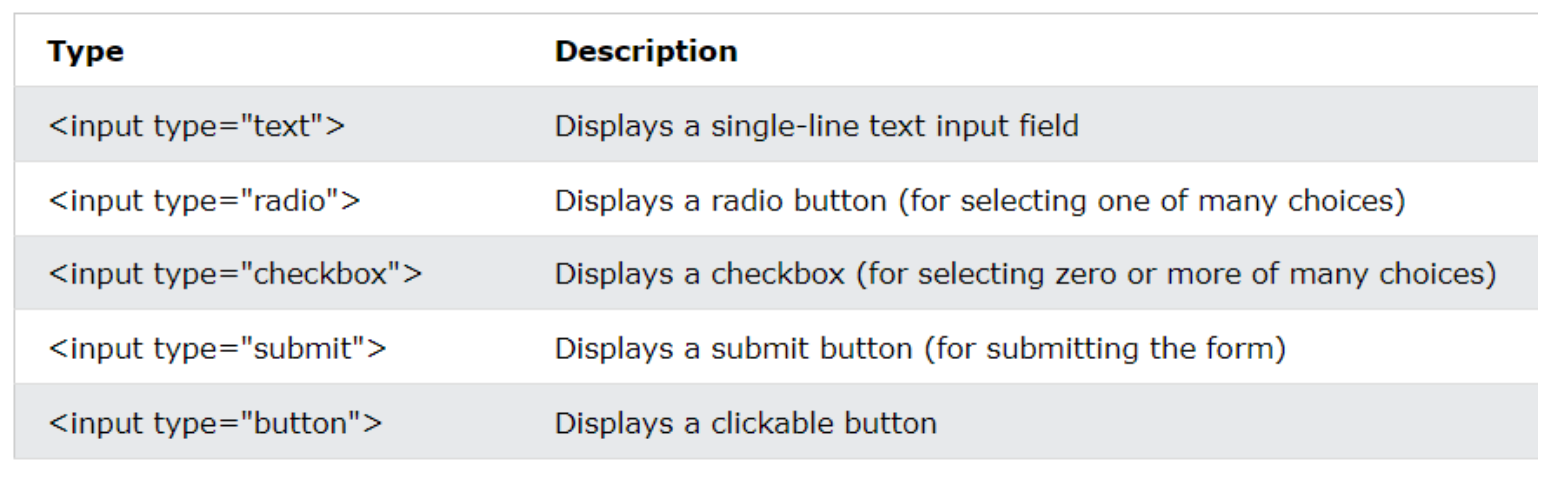
<input>요소는 가장 많이 사용되는 폼 요소이다. <input>요소는type속성에 따라 여러 방식으로 표시될 수 있다.
1) type 종류
| Type | Description |
|---|---|
<input type = "text"> | 한 줄짜리 텍스트 입력 필드를 표시한다. |
<input type = "radio"> | 라디오 버튼을 표시한다 (여러 선택 중 하나를 선택할 때 사용). |
<input type = "checkbox"> | 체크박스를 표시한다 (여러 선택 중 0개 이상 선택 가능). |
<input type = "submit"> | 제출 버튼을 표시한다 (폼 제출 시 사용). |
<input type = "button"> | 클릭 가능한 버튼을 표시한다. |
[2-3] The <select> and <option> element
1) 예시
<label for="cars">Choose a car:</label>
<select id="cars" name="cars">
    <!-- 드롭다운에서 선택할 수 있는 옵션들 -->
    <option value="volvo">Volvo</option>
    <option value="saab">Saab</option>
    <option value="fiat">Fiat</option>
    <option value="audi">Audi</option>
</select>
[3] JS를 사용한 button 예시
<!DOCTYPE html>
<html>

<body>

    <!-- 버튼 요소에 대한 제목 -->
    <h1>The button Element</h1>

    <!-- 버튼을 클릭하면 'Hello world!' 메시지를 알림으로 표시하는 코드 -->
    <button type="button" onclick="alert('Hello world!')">Click Me!</button>

</body>

</html>
[4] class를 사용한 form 예시
<!DOCTYPE html>
<html>

<head>
    <style>
        /* 버튼의 기본 스타일 설정 */
        .button {
            border: none;
            /* 테두리 없애기 */
            color: white;
            /* 글자 색을 흰색으로 설정 */
            padding: 15px 32px;
            /* 버튼의 패딩 설정 */
            text-align: center;
            /* 텍스트를 가운데 정렬 */
            text-decoration: none;
            /* 텍스트 장식 없애기 */
            display: inline-block;
            /* 버튼을 인라인 블록 요소로 설정 */
            font-size: 16px;
            /* 글자 크기 설정 */
            margin: 4px 2px;
            /* 버튼 간의 여백 설정 */
            cursor: pointer;
            /* 마우스 커서를 포인터로 변경 */
        }
        .button:hover{
            opacity: 0.7;
        }

        /* Green 버튼 스타일 */
        .button1 {
            background-color: #04AA6D;
            /* 배경색을 초록색으로 설정 */
        }

        /* Blue 버튼 스타일 */
        .button2 {
            background-color: #008CBA;
            /* 배경색을 파란색으로 설정 */
        }
    </style>
</head>

<body>

    <!-- 버튼 제목 -->
    <h1>The button element - Styled with CSS</h1>
    <p>Change the background color of a button with the background-color property:</p>

    <!-- 스타일이 적용된 두 개의 버튼 -->
    <button class="button button1">Green</button>
    <button class="button button2">Blue</button>

</body>

</html>

안녕하세요, 사용자들의 문제 해결을 중심으로 하는 프론트엔드 개발자입니다. 티스토리로 전환했어요 : https://pangil-log.tistory.com