DialogFragment???
우선 구현해야 할 저 화면에서 사진 버튼을 눌렀을때 프로필 편집 창이 나오도록 해야하는데!! 어떤걸 써야할지 무척 고민이 많았음!!
그래서 구글링을 열심히 해본 결과
DialogFragment라는게 있다는 것을 알아냈고 이걸 쓰면 되겠다고 생각해서 열심히 공부했다..!
가장 애먹은 부분은 다이얼로그 크기 조정하고 위치 조정하는거!!!...힘드렀당
DialogFragment는 클래스명에서 보이듯 fragment이다. 하지만, dialog를 보여주는데 활용되는 fragment라는 특징이 있다. 이 Fragment는 Dialog 객체를 포함하고 fragment의 상태에 따라 적절히 화면에 디스플레이 된다.
Fragment의 생명주기나 기능들을 그대로 사용 가능 -> 그냥 AlertDialog를 쓰는 것보다 다양한 기능 구현 가능
사용법
1. gradle 추가
dependencies {

	com.google.android.material:material:1.6.1

}
2.bottomsheet.xml
처음엔 바텀시트트를 이용하려했어서 이름은 양해부탁ㅎㅎ
<?xml version="1.0" encoding="utf-8"?>
<layout xmlns:app="http://schemas.android.com/apk/res-auto">
<androidx.constraintlayout.widget.ConstraintLayout
xmlns:android="http://schemas.android.com/apk/res/android"
android:layout_width="match_parent"
android:layout_height="wrap_content"
//bottomsheet_background.xml 파일을 만들어 모서리 둥글게해줌
android:background="@drawable/bottomsheet_background">
<TextView
android:layout_width="wrap_content"
android:layout_height="wrap_content"
android:fontFamily="@font/gmarketsansmedium"
android:textSize="28sp"
app:layout_constraintLeft_toLeftOf="parent"
android:layout_marginLeft="120dp"
app:layout_constraintTop_toTopOf="parent"
android:layout_marginTop="30dp"
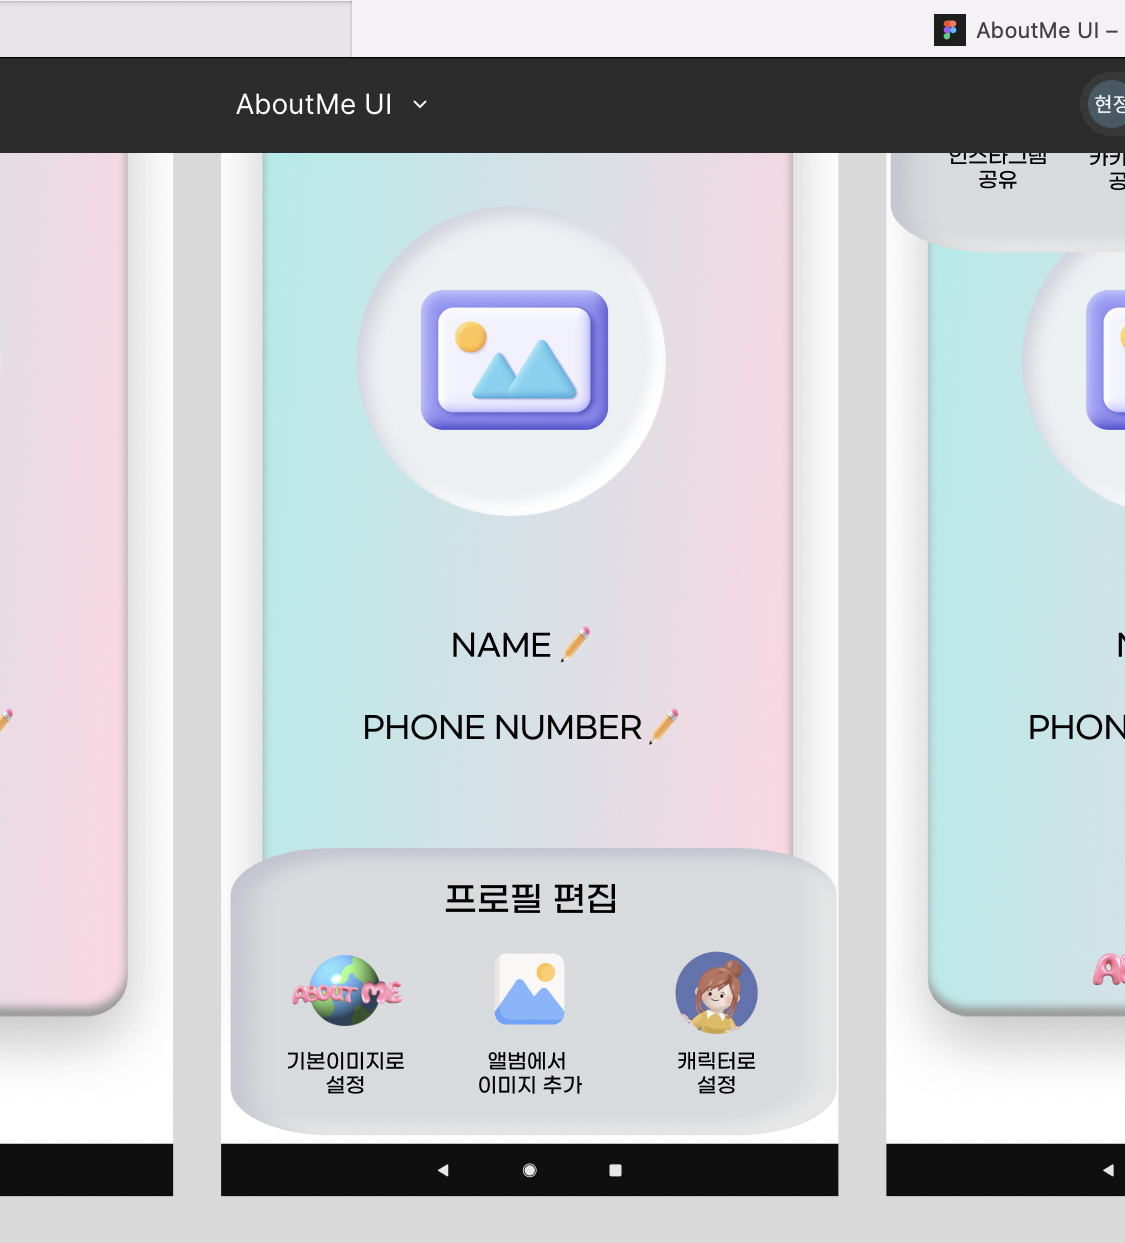
android:text="프로필 편집"/>
<LinearLayout
android:layout_width="match_parent"
android:layout_height="wrap_content"
app:layout_constraintTop_toTopOf="parent"
android:layout_marginTop="90dp">
<ImageButton
android:id="@+id/shareBottomSheet_logo_btn"
android:layout_width="70dp"
android:layout_height="70dp"
android:layout_marginLeft="50dp"
android:background="@drawable/logo"/>
<ImageButton
android:id="@+id/shareBottomSheet_image_btn"
android:layout_width="70dp"
android:layout_height="70dp"
android:layout_marginLeft="50dp"
android:background="@drawable/myprofile_image"/>
<ImageButton
android:id="@+id/shareBottomSheet_char_btn"
android:layout_width="70dp"
android:layout_height="70dp"
android:layout_marginLeft="50dp"
android:background="@drawable/myprofile_character"/>
</LinearLayout>
<LinearLayout
android:layout_width="match_parent"
android:layout_height="wrap_content"
app:layout_constraintTop_toTopOf="parent"
android:layout_marginTop="170dp">
<TextView
android:layout_width="wrap_content"
android:layout_height="wrap_content"
android:text="기본이미지로\n 설정"
android:layout_marginLeft="50dp"
android:fontFamily="@font/gmarketsansmedium"/>
<TextView
android:layout_width="wrap_content"
android:layout_height="wrap_content"
android:text="앨범에서\n이미지 추가"
android:layout_marginLeft="40dp"
android:fontFamily="@font/gmarketsansmedium"/>
<TextView
android:layout_width="wrap_content"
android:layout_height="wrap_content"
android:text="캐릭터로\n 설정"
android:layout_marginLeft="50dp"
android:fontFamily="@font/gmarketsansmedium"/>
</LinearLayout>
</androidx.constraintlayout.widget.ConstraintLayout>
</layout>3.BottomSheet
fragment의 생명주기를 따름
BottomSheet라는 이름의 클래스 파일 생성해서 DialogFragment 속성 상속 받음
//DialogFragment 속성 상속 받음
class BottomSheet() : DialogFragment() {

    //FrontprofileFragment위에 띄어줌
    lateinit var binding : FragmentFrontprofileBinding

    //메인 메서드(실행)
    override fun onCreateView(
        inflater: LayoutInflater,
        container: ViewGroup?,
        savedInstanceState: Bundle?
    ): View? {
        super.onCreateView(inflater, container, savedInstanceState)

       //FragmentFrontprofileBinding을 사용하여 레이아웃을 인플레이트
        binding = FragmentFrontprofileBinding.inflate(inflater,container,false)

        //다이얼로그 배경색을 투명하게함으로써 모서리 둥글게설정한게 보이도록
        dialog?.window?.setBackgroundDrawable(ColorDrawable(Color.TRANSPARENT))

        //배경에 이미지 넣어주기
        dialog?.window?.setBackgroundDrawableResource(R.drawable.bottomsheetbox)

        //다이얼로그 위치 조정 : 밑에 나타나도록(Top, Center, Bottom)
        dialog?.window?.setGravity(Gravity.BOTTOM)


        return inflater.inflate(R.layout.fragment_sharebottomsheet, container, false)
    }

    //다이얼로그 크기 조정하는 메서드
    //디바이스 크기 구해서 다이얼로그 높이, 너비 조정함
    override fun onResume() {
        super.onResume()

        val windowManager = context?.getSystemService(Context.WINDOW_SERVICE) as WindowManager
        val display = windowManager.defaultDisplay

        //Point()를 사용하여 디스플레이의 가로 및 세로 크기를 저장
        val size = Point()
        display.getSize(size)

  //dialog?.window?.attributes를 사용하여 현재 다이얼로그의 레이아웃 파라미터를 가져옴
        val params: ViewGroup.LayoutParams? = dialog?.window?.attributes
        val deviceHeight = size.y

        // 다이얼로그의 높이를 디바이스 높이의 25%로 설정
        params?.height = (deviceHeight * 0.25).toInt()

//dialog?.window?.attributes에 새로 설정한 파라미터를 적용하여 다이얼로그의 높이를 변경
        dialog?.window?.attributes = params as WindowManager.LayoutParams
    }

}
4. FrontProfileFragment.kt
버튼 클릭 -> BottomSheet 띄울 수 있게 설정해줌
class FrontProfileFragment : Fragment() {

    lateinit var binding: FragmentFrontprofileBinding


    override fun onCreateView(
        inflater: LayoutInflater,
        container: ViewGroup?,
        savedInstanceState: Bundle?
    ): View? {


        binding = FragmentFrontprofileBinding.inflate(inflater,container,false)


       //이미지 버튼 클릭했을떄
        binding.profileIv.setOnClickListener {

            // BottomSheet 객체 생성
            val bottomSheet = BottomSheet()

            // 생성한 BottomSheet를 childFragmentManager를 통해 보여줌
            //프래그먼트가 자신의 하위 프래그먼트를 다루는거
            bottomSheet.show(childFragmentManager, bottomSheet.tag)

        }


        return binding.root
    }
BottomSheetDialogFragment???
사용법
1. gradle 추가
dependencies {

	com.google.android.material:material:1.6.1

}
2. bottomsheet.xml
bottomsheet 화면 레이아웃 작성
일반 화면 구성할때처럼 내가 띄우고 싶은 bottomsheet 레이아웃을 작성해주기
<?xml version="1.0" encoding="utf-8"?>
<layout xmlns:app="http://schemas.android.com/apk/res-auto">
    <androidx.constraintlayout.widget.ConstraintLayout
        xmlns:android="http://schemas.android.com/apk/res/android"
        android:layout_width="match_parent"
        android:layout_height="match_parent">

        <TextView
            android:layout_width="wrap_content"
            android:layout_height="wrap_content"
            android:fontFamily="@font/gmarketsansmedium"
            android:textSize="30sp"
            app:layout_constraintLeft_toLeftOf="parent"
            android:layout_marginLeft="120dp"
            app:layout_constraintTop_toTopOf="parent"
            android:layout_marginTop="30dp"
            android:text="프로필 편집"/>

        <LinearLayout
            android:layout_width="match_parent"
            android:layout_height="wrap_content"
            app:layout_constraintTop_toTopOf="parent"
            android:layout_marginTop="100dp">

            <ImageButton
                android:id="@+id/shareBottomSheet_logo_btn"
                android:layout_width="70dp"
                android:layout_height="70dp"
                android:layout_marginLeft="50dp"
                android:background="@drawable/logo"/>

            <ImageButton
                android:id="@+id/shareBottomSheet_image_btn"
                android:layout_width="70dp"
                android:layout_height="70dp"
                android:layout_marginLeft="50dp"
                android:background="@drawable/myprofile_image"/>

            <ImageButton
                android:id="@+id/shareBottomSheet_char_btn"
                android:layout_width="70dp"
                android:layout_height="70dp"
                android:layout_marginLeft="50dp"
                android:background="@drawable/myprofile_character"/>

        </LinearLayout>

        <LinearLayout
            android:layout_width="match_parent"
            android:layout_height="wrap_content"
            app:layout_constraintTop_toTopOf="parent"
            android:layout_marginTop="180dp">

            <TextView
                android:layout_width="wrap_content"
                android:layout_height="wrap_content"
                android:text="기본이미지로\n       설정"
                android:layout_marginLeft="50dp"
                android:fontFamily="@font/gmarketsansmedium"/>

            <TextView
                android:layout_width="wrap_content"
                android:layout_height="wrap_content"
                android:text="앨범에서\n이미지 추가"
                android:layout_marginLeft="40dp"
                android:fontFamily="@font/gmarketsansmedium"/>

            <TextView
                android:layout_width="wrap_content"
                android:layout_height="wrap_content"
                android:text="캐릭터로\n    설정"
                android:layout_marginLeft="50dp"
                android:fontFamily="@font/gmarketsansmedium"/>
        </LinearLayout>


    </androidx.constraintlayout.widget.ConstraintLayout>

</layout>
3. BottomSheet
BottomSheetDialogFragment 클래스에서 제공하는 기능과 동작을 활용
//BottomSheetDialogFragment을 상속받아 클래스에서 제공하는 기능과 동작 활용 가능
class BottomSheet : BottomSheetDialogFragment() {


    override fun onCreateView(
        inflater: LayoutInflater,
        container: ViewGroup?,
        savedInstanceState: Bundle?
    ): View? {


        //fragment_sharebottomsheet레이아웃을 반환함
        return inflater.inflate(R.layout.fragment_sharebottomsheet, container, false)
    }
4. FrontProfileFragment.kt : BottomSheet를 띄울 화면
DialogFragment와 같은 코드!!!
class FrontProfileFragment : Fragment() {

    lateinit var binding: FragmentFrontprofileBinding


    override fun onCreateView(
        inflater: LayoutInflater,
        container: ViewGroup?,
        savedInstanceState: Bundle?
    ): View? {


        binding = FragmentFrontprofileBinding.inflate(inflater,container,false)


       //이미지 버튼 클릭했을떄
        binding.profileIv.setOnClickListener {

            // BottomSheet 객체 생성
            val bottomSheet = BottomSheet()

            // 생성한 BottomSheet를 childFragmentManager를 통해 보여줌
            //프래그먼트가 자신의 하위 프래그먼트를 다루는거
            bottomSheet.show(childFragmentManager, bottomSheet.tag)

        }


        return binding.root
    }
개발을 공부하고 있는 대학생