Fragment????
Activity는 사용자와 앱이 상호작용하는 진입점이고 하나의 화면을 구성하는 것인데, Fragment는 Activity 안에서 화면의 일부를 구성하는 것
쉽게 말해,,, 회면의 조각!!!
아무래도 바텀네비게이션뷰를 사용할때 메인액티비티에 바텀네비게이션을 넣고 프래그먼트로 화면 구성!

Fragment와 MainActivity2 연결
1. gradle 모듈 app
dependencies에 fragment 추가
implementation("androidx.fragment:fragment-ktx:1.3.6")2. activity_main2.xml에 fragmentcontainerview layout 작성
FragmentContainerView로 fragment 넣을 자리 만들기
꼭 id 설정해줘야함!!!!
<?xml version="1.0" encoding="utf-8"?>
<layout>
    <androidx.constraintlayout.widget.ConstraintLayout xmlns:android="http://schemas.android.com/apk/res/android"
        xmlns:app="http://schemas.android.com/apk/res-auto"
        xmlns:tools="http://schemas.android.com/tools"
        android:layout_width="match_parent"
        android:layout_height="match_parent"
        tools:context=".MainActivity2">

        //FragmentContainerView
        <androidx.fragment.app.FragmentContainerView
            android:id="@+id/frame_container"
            android:layout_width="match_parent"
            android:layout_height="match_parent"/>

    </androidx.constraintlayout.widget.ConstraintLayout>
</layout>
3.fragment_myprofile.xml 꾸미기
fragmentcontainerview에 들어갈 fragment
<?xml version="1.0" encoding="utf-8"?>
<layout>

    <androidx.constraintlayout.widget.ConstraintLayout
        xmlns:android="http://schemas.android.com/apk/res/android"
        android:layout_width="match_parent"
        android:layout_height="match_parent"
        xmlns:app="http://schemas.android.com/apk/res-auto"
        android:background="@color/white">

        <ImageView
            android:layout_width="100dp"
            android:layout_height="100dp"
            android:src="@drawable/logo"/>

        <ImageButton
            android:id="@+id/myprofile_share_btn"
            android:layout_width="100dp"
            android:layout_height="100dp"
            android:src="@drawable/myprofile_share"
            android:background="@color/white"
            app:layout_constraintTop_toTopOf="parent"
            android:layout_marginTop="5dp"
            app:layout_constraintLeft_toLeftOf="parent"
            android:layout_marginLeft="300dp"/>

        <Button
            android:id="@+id/myprofile_front_btn"
            android:layout_width="wrap_content"
            android:layout_height="wrap_content"
            android:backgroundTint="@color/white"
            android:text="FRONT"
            android:textColor="@color/black"
            android:fontFamily="@font/gmarketsansmedium"
            app:layout_constraintTop_toTopOf="parent"
            android:layout_marginTop="90dp"
            app:layout_constraintLeft_toLeftOf="parent"
            android:layout_marginLeft="80dp"
            android:textSize="20sp"/>

        <Button
            android:id="@+id/myprofile_back_btn"
            android:layout_width="wrap_content"
            android:layout_height="wrap_content"
            android:backgroundTint="@color/white"
            android:text="BACK"
            android:textColor="@color/black"
            android:fontFamily="@font/gmarketsansmedium"
            app:layout_constraintTop_toTopOf="parent"
            android:layout_marginTop="90dp"
            app:layout_constraintLeft_toLeftOf="parent"
            android:layout_marginLeft="200dp"
            android:textSize="20sp"/>


        <androidx.fragment.app.FragmentContainerView
            android:id="@+id/profile_frame"
            android:layout_width="350dp"
            android:layout_height="match_parent"
            app:layout_constraintTop_toTopOf="parent"
            android:layout_marginTop="150dp"
            app:layout_constraintLeft_toLeftOf="parent"
            android:layout_marginLeft="30dp"/>


    </androidx.constraintlayout.widget.ConstraintLayout>

</layout>
4. MainActivity2
fragmentcontainer에 MyProfileFragment 넣어주는 코드 작성
package com.example.aboutme

import android.graphics.Insets.add
import android.os.Bundle
import androidx.appcompat.app.AppCompatActivity
import androidx.fragment.app.commitNow

class MainActivity2 : AppCompatActivity(R.layout.activity_main2) {


   //onCreate함수 : 액티비티 처음 실행될때 실행되는 함수
    override fun onCreate(savedInstanceState: Bundle?) {
        super.onCreate(savedInstanceState)

        //널일때
        if (savedInstanceState == null) {

  //Acrivity에서 접근방법 : supportFragmentManager 사용
 //FragmentTransaction:FragmentManager로 Fragment를 추가/삭제/교체를 도와줌
            supportFragmentManager.commitNow {

               //트랜잭션이 실행될 때 프래그먼트의 순서를 변경할 수 있도록 허용
                setReorderingAllowed(true)

     //frame_container라는 FragmentContainerView에 MyProfileFragment를 추가
                add(R.id.frame_container, MyProfileFragment())
            }
        }
    }
}
5. MyProfileFragment
fragment 클래스 정의 하는 코드!!
package com.example.aboutme

import android.os.Bundle
import android.view.LayoutInflater
import android.view.View
import android.view.ViewGroup
import androidx.fragment.app.Fragment

//fragment() : fragment 속성 상속 받음
class MyProfileFragment : Fragment() {

    override fun onCreateView(inflater: LayoutInflater, container: ViewGroup?, savedInstanceState: Bundle?): View? {

    //특정 XML 레이아웃 파일을 인플레이트하여 View 객체를 생성
	val view = inflater.inflate(R.layout.fragment_myprofile, container, false)

    //inflate한 fragment 반환
    return view


    }

}
Fragment1에 Fragment2와 Fragment3 넣고 버튼 클릭 이벤트
1. fragment_myprofile.xml
fragmentcontainerview
<?xml version="1.0" encoding="utf-8"?>
<layout>

    <androidx.constraintlayout.widget.ConstraintLayout
        xmlns:android="http://schemas.android.com/apk/res/android"
        android:layout_width="match_parent"
        android:layout_height="match_parent"
        xmlns:app="http://schemas.android.com/apk/res-auto"
        android:background="@color/white">

        <ImageView
            android:layout_width="100dp"
            android:layout_height="100dp"
            android:src="@drawable/logo"/>

        <ImageButton
            android:id="@+id/myprofile_share_btn"
            android:layout_width="100dp"
            android:layout_height="100dp"
            android:src="@drawable/myprofile_share"
            android:background="@color/white"
            app:layout_constraintTop_toTopOf="parent"
            android:layout_marginTop="5dp"
            app:layout_constraintLeft_toLeftOf="parent"
            android:layout_marginLeft="300dp"/>

        <Button
            android:id="@+id/myprofile_front_btn"
            android:layout_width="wrap_content"
            android:layout_height="wrap_content"
            android:backgroundTint="@color/white"
            android:text="FRONT"
            android:textColor="@color/black"
            android:fontFamily="@font/gmarketsansmedium"
            app:layout_constraintTop_toTopOf="parent"
            android:layout_marginTop="90dp"
            app:layout_constraintLeft_toLeftOf="parent"
            android:layout_marginLeft="80dp"
            android:textSize="20sp"/>

        <Button
            android:id="@+id/myprofile_back_btn"
            android:layout_width="wrap_content"
            android:layout_height="wrap_content"
            android:backgroundTint="@color/white"
            android:text="BACK"
            android:textColor="@color/black"
            android:fontFamily="@font/gmarketsansmedium"
            app:layout_constraintTop_toTopOf="parent"
            android:layout_marginTop="90dp"
            app:layout_constraintLeft_toLeftOf="parent"
            android:layout_marginLeft="200dp"
            android:textSize="20sp"/>


        //FragmentContainerView
        <androidx.fragment.app.FragmentContainerView
            android:id="@+id/profile_frame"
            android:layout_width="350dp"
            android:layout_height="match_parent"
            app:layout_constraintTop_toTopOf="parent"
            android:layout_marginTop="150dp"
            app:layout_constraintLeft_toLeftOf="parent"
            android:layout_marginLeft="30dp"/>


    </androidx.constraintlayout.widget.ConstraintLayout>

</layout>
2.fragment_frontprofile.xml
fragmentcontainer에 넣어줄 화면 만들기1
<?xml version="1.0" encoding="utf-8"?>
<layout>
    <androidx.constraintlayout.widget.ConstraintLayout xmlns:android="http://schemas.android.com/apk/res/android"
        android:layout_width="match_parent"
        android:layout_height="match_parent"
        xmlns:app="http://schemas.android.com/apk/res-auto"
        android:background="@drawable/myprofile_bg">

        <ImageButton
            android:id="@+id/turn_btn"
            android:layout_width="50dp"
            android:layout_height="50dp"
            android:src="@drawable/myprofile_turn"
            app:layout_constraintTop_toTopOf="parent"
            android:layout_marginTop="70dp"
            app:layout_constraintLeft_toLeftOf="parent"
            android:layout_marginLeft="300dp"/>

        <ImageView
            android:id="@+id/profile_iv"
            android:layout_width="200dp"
            android:layout_height="200dp"
            android:src="@drawable/myprofile_profile"
            app:layout_constraintTop_toTopOf="parent"
            android:layout_marginTop="130dp"
            app:layout_constraintLeft_toLeftOf="parent"
            android:layout_marginLeft="110dp"/>

        <EditText
            android:id="@+id/profile_name_et"
            android:layout_width="wrap_content"
            android:layout_height="wrap_content"
            android:layout_marginBottom="24dp"
            android:ems="12"
            android:hint="             NAME"
            android:fontFamily="@font/gmarketsansmedium"
            app:layout_constraintTop_toTopOf="parent"
            android:layout_marginTop="350dp"
            app:layout_constraintLeft_toLeftOf="parent"
            android:layout_marginLeft="100dp"/>

        <EditText
            android:id="@+id/profile_num_et"
            android:layout_width="wrap_content"
            android:layout_height="wrap_content"
            android:layout_marginBottom="24dp"
            android:ems="12"
            android:hint="    PHONE NUMBER"
            android:fontFamily="@font/gmarketsansmedium"
            app:layout_constraintTop_toTopOf="parent"
            android:layout_marginTop="410dp"
            app:layout_constraintLeft_toLeftOf="parent"
            android:layout_marginLeft="100dp"/>

        <ImageView
            android:layout_width="150dp"
            android:layout_height="100dp"
            android:src="@drawable/myprofile_logo"
            app:layout_constraintTop_toTopOf="parent"
            android:layout_marginTop="530dp"
            app:layout_constraintLeft_toLeftOf="parent"
            android:layout_marginLeft="130dp"/>


    </androidx.constraintlayout.widget.ConstraintLayout>

</layout>
3. fragment_backprofile.xml
fragmentcontainer에 넣어줄 화면 만들기2
<?xml version="1.0" encoding="utf-8"?>
<layout>
    <androidx.constraintlayout.widget.ConstraintLayout xmlns:android="http://schemas.android.com/apk/res/android"
        android:layout_width="match_parent"
        android:layout_height="match_parent"
        xmlns:app="http://schemas.android.com/apk/res-auto"
        android:background="@drawable/myprofile_backbg">

        <ImageButton
            android:id="@+id/turn_btn2"
            android:layout_width="50dp"
            android:layout_height="50dp"
            android:src="@drawable/myprofile_turn"
            app:layout_constraintTop_toTopOf="parent"
            android:layout_marginTop="70dp"
            app:layout_constraintLeft_toLeftOf="parent"
            android:layout_marginLeft="300dp"/>

        <ImageView
            android:layout_width="150dp"
            android:layout_height="100dp"
            android:src="@drawable/myprofile_logo"
            app:layout_constraintTop_toTopOf="parent"
            android:layout_marginTop="50dp"
            app:layout_constraintLeft_toLeftOf="parent"
            android:layout_marginLeft="50dp"/>


        <EditText
            android:id="@+id/backProfile_et1"
            android:layout_width="wrap_content"
            android:layout_height="wrap_content"
            android:layout_marginBottom="24dp"
            android:ems="12"
            android:hint="내용1"
            android:fontFamily="@font/gmarketsansmedium"
            app:layout_constraintTop_toTopOf="parent"
            android:layout_marginTop="150dp"
            app:layout_constraintLeft_toLeftOf="parent"
            android:layout_marginLeft="50dp"/>

        <EditText
            android:id="@+id/backProfile_et2"
            android:layout_width="wrap_content"
            android:layout_height="wrap_content"
            android:layout_marginBottom="24dp"
            android:ems="12"
            android:hint="내용2"
            android:fontFamily="@font/gmarketsansmedium"
            app:layout_constraintTop_toTopOf="parent"
            android:layout_marginTop="230dp"
            app:layout_constraintLeft_toLeftOf="parent"
            android:layout_marginLeft="50dp"/>


        <EditText
            android:id="@+id/backProfile_et3"
            android:layout_width="wrap_content"
            android:layout_height="wrap_content"
            android:layout_marginBottom="24dp"
            android:ems="12"
            android:hint="내용3"
            android:fontFamily="@font/gmarketsansmedium"
            app:layout_constraintTop_toTopOf="parent"
            android:layout_marginTop="310dp"
            app:layout_constraintLeft_toLeftOf="parent"
            android:layout_marginLeft="50dp"/>

        <EditText
            android:id="@+id/backProfile_et4"
            android:layout_width="wrap_content"
            android:layout_height="wrap_content"
            android:layout_marginBottom="24dp"
            android:ems="12"
            android:hint="내용4"
            android:fontFamily="@font/gmarketsansmedium"
            app:layout_constraintTop_toTopOf="parent"
            android:layout_marginTop="390dp"
            app:layout_constraintLeft_toLeftOf="parent"
            android:layout_marginLeft="50dp"/>

        <EditText
            android:id="@+id/backProfile_et5"
            android:layout_width="wrap_content"
            android:layout_height="wrap_content"
            android:layout_marginBottom="24dp"
            android:ems="12"
            android:hint="내용5"
            android:fontFamily="@font/gmarketsansmedium"
            app:layout_constraintTop_toTopOf="parent"
            android:layout_marginTop="470dp"
            app:layout_constraintLeft_toLeftOf="parent"
            android:layout_marginLeft="50dp"/>


    </androidx.constraintlayout.widget.ConstraintLayout>

</layout>
4. FrontProfileFragment
fragment 상속 받고 위와 같이 똑같이 만들어주기
package com.example.aboutme

import android.os.Bundle
import android.view.LayoutInflater
import android.view.View
import android.view.ViewGroup
import androidx.fragment.app.Fragment

class FrontProfileFragment : Fragment() {

    override fun onCreateView(inflater: LayoutInflater, container: ViewGroup?, savedInstanceState: Bundle?): View? {

        val view = inflater.inflate(R.layout.fragment_frontprofile, container, false)


        return view
    }
}
5.BackProfileFragment
4랑 똑같이!!
package com.example.aboutme

import android.os.Bundle
import android.view.LayoutInflater
import android.view.View
import android.view.ViewGroup
import androidx.fragment.app.Fragment

class BackProfileFragment : Fragment() {

    override fun onCreateView(inflater: LayoutInflater, container: ViewGroup?, savedInstanceState: Bundle?): View? {

        val view2 = inflater.inflate(R.layout.fragment_backprofile, container, false)


        return view2
    }
}
6. MyProfileFragment_버튼 클릭->fragment전환
activity에서의 버튼 클릭과 약간 다르니깐 주의!!
데이터바인딩으로 버튼 클릭 처리
package com.example.aboutme
import android.os.Bundle
import android.util.Log
import android.view.LayoutInflater
import android.view.View
import android.view.ViewGroup
import androidx.fragment.app.Fragment
import com.example.aboutme.databinding.FragmentMyprofileBinding
class MyProfileFragment : Fragment() {
//보통은 onCreate에서만 사용하는 것이 아닌 다른 함수에서도 사용하므로 lateinit을 사용하여 초기화를 나중에 하겠다
lateinit var binding: FragmentMyprofileBinding
override fun onCreateView(inflater: LayoutInflater, container: ViewGroup?, savedInstanceState: Bundle?): View? {
//lateinit을 통해 나중에 초기화를 하겠다고 했으므로 onCreate 함수 내에서 초기화를 해야함.
binding=FragmentMyprofileBinding.inflate(inflater,container,false)
//binding.root=Root View 를 참조한다는 의미
//Root View는 레이아웃에서 가장 바깥쪽의 View Container
//호출 시 XML에 있는 ConstraintLayout의 Root View를 반환한다는 의미
val view3 = binding.root
//처음 화면은 front로!!
setFrag(0)
//똑같이 setonclicklistner사용
binding.myprofileFrontBtn.setOnClickListener {
setFrag(0)
}
binding.myprofileBackBtn.setOnClickListener {
Log.d("backbtn", "backclick")
setFrag(1)
}
//view3 반환
return view3
}
//setFrag()함수 선언(매개변수 = 정수형)
private fun setFrag(fragNum : Int){
//childFragmentManager:Fragment에서 접근 fragmentmanager에 접근할때
//beginTransaction():트랜잭션 인스턴스 가져올때
val ft = childFragmentManager.beginTransaction()
//fragnum에 따라 fragment 교체
when(fragNum)
{
0 -> {
//0일때 frontfragment로 교체
//반드시 commit() 호출
ft.replace(R.id.profile_frame, FrontProfileFragment()).commit()
}
1 -> {
//1일때 backfragment로 교체
//반드시 commit() 호출
ft.replace(R.id.profile_frame, BackProfileFragment()).commit()
}
}
}
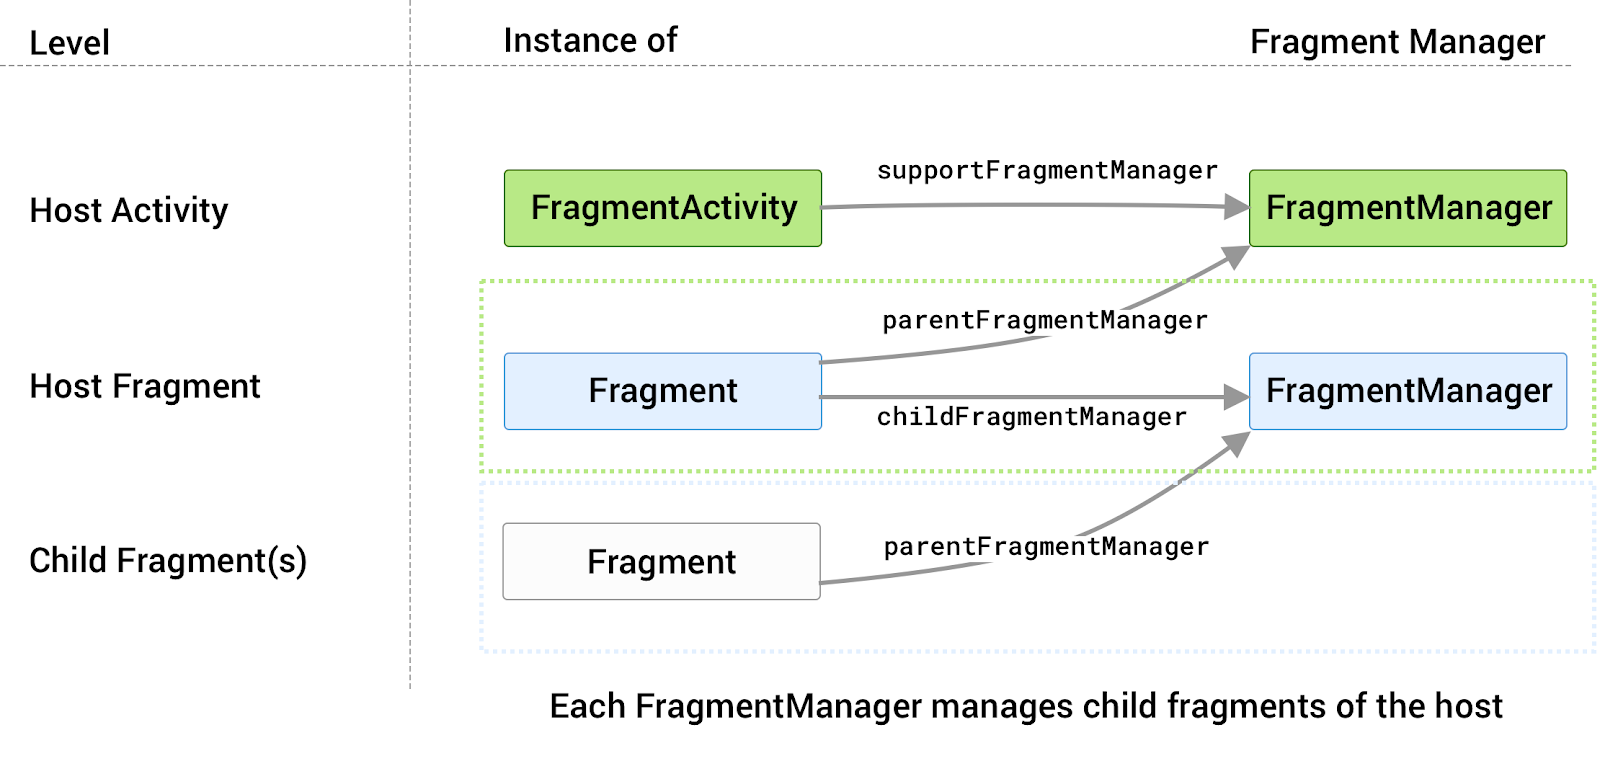
}"FragmentManager 접근" 구분하기!!
FragmentManager 접근
1.Acrivity에서 접근방법
FragmentActivity 및 이를 상속한 AppcompatActivity에서
supportFragmentManager를 통해 Fragment 접근
2.Fragment에서 접근
Fragment는 생성될때 또 다른 개인적인 FragmentManager를 갖게 됨
이를 childFragmentManager
3.Activity에 있는 FragmentManager를 접근
parentFragmentManager