combineReducers
redux로 부터 import하여 사용합니다.
먼저 state를 구상하겠습니다.
[{text: '코딩', done: false}, {text: '점심 먹기', done: false}]객체로 바꾸고, TODO를 complete 하면, done을 true로 바꾸겠습니다.
다음은 아래처럼 액션을 바꿔보겠습니다.
// {type: ADD_TODO, text: '할 일'}
export function addTodo(text) {
  return {
    type: ADD_TODO,
    text,
  };
}
todo 객체를 리턴해도 되지만 done 속성은 기본값이 고정이기 때문에 그대로 text string을 넘기겠습니다.
리듀서를 아래처럼 바뀐 state구성대로 객체를 리턴해주겠습니다.
const initialState = [];

function todoApp(previousState = initialState, action) {

  if (action.type === ADD_TODO) {
    return [...previousState, {text: action.text, done: false}];
  }

  return previousState;
}
아래처럼 index.js에서 dispatch를 실행하면,
store.subscribe(() => {
console.log(store.getState());
});
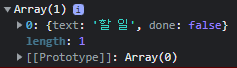
store.dispatch(addTodo("할 일"));아래와 같은 결과가 나오는 것을 확인할 수 있습니다.
객체가 store에 저장되었습니다.
지금은 초기값으로 done:false 를 주었지만, 이제 action을 하나 더 추가하여 done:true로 바꾸는 행위를 만들어 보겠습니다.
action 하나 더 추가해보기
순서
1. action 추가하기.
2. reducer에도 추가한 action을 처리할 로직작성.
// action.js
export const ADD_TODO = "ADD_TODO";
export const COMPLETE_TODO = "COMPLETE_TODO";

// {type: ADD_TODO, text: '할 일'}
export function addTodo(text) {
  return {
    type: ADD_TODO,
    text,
  };
}

// 어떤 todo를 done을 true로 바꿔야 할지,
// 현재는 애매하지만 일단 index번째 있는 todo를 바꾸는 것으로 로직을 작성하겠습니다.
// {type: COMPLETE_TODO, index: 3}
export function completeTodo(index) {
  return {
    type: COMPLETE_TODO,
	index,
  };
}
위처럼 completeTodo 액션을 하나더 추가해봅니다.
이제 reducer에도 추가한 action을 처리할 로직을 아래처럼 작성해줍니다.
// reducer.js

// [{text: '코딩', done: false}, {text: '점심 먹기', done: false}]
const initialState = []; // 보통은 먼저 초기 상태를 정의합니다.

export function todoApp(previousState = initialState, action) {
  if (action.type === ADD_TODO) {
    return [...previousState, { text: action.text, done: false }];
  }

  // 기존의 배열에서 action.index번째에 있는 요소를 얻어서 그 요소의 done을 true로 바꿔줍니다.
  if(action.type === COMPLETE_TODO) {
    return previousState.map((todo, index) => {
      if(index === action.index) {
        return {...todo, done: true};
      }
      return todo;
    })
  }

  return previousState;
}store.dispatch(completeTodo(0));를 실행하면
store안에 상태중에 현재 뷰에서 어떤것을 보여줄 것인지 필터링해주는 상태를 만들어보겠습니다.
filering하여 보여주는 기능을 넣기 위해 store가 복잡해질 필요성이 생겼습니다. 그래서 배열에서 객체로 변경합니다.
지금까지는 state가 곧 todos 이었습니다. 이제는 todo만 있는것이 아니라 현재 앱에서 어떤 filering으로 보여줄 것인지 까지 같이 저장해야하기 때문에,
배열을 객체로 변경하고 기존의 배열을 todos 속성의 값으로 넣고, filter 속성을 하나 추가하여 값을 'ALL' 이라고 넣습니다.
// reducer.js

// { todos: [{text: '코딩', done: false}, {text: '점심 먹기', done: false}], filter: 'ALL' }
const initialState = { todos: [], filter: "ALL" };
export function todoApp(previousState = initialState, action) {
  if (action.type === ADD_TODO) {
    return {
      ...previousState,
      todos: [...previousState.todos, { text: action.text, done: false }],
    };
  }

  if (action.type === COMPLETE_TODO) {
    return {
      ...previousState,
      todos: previousState.todos.map((todo, index) => {
        if (index === action.index) {
          return { ...todo, done: true };
        }
        return todo;
      }),
    };
  }

  return previousState;
}
여기까지는 store 변경에 따른 todos에 대한 처리만 해주었습니다.
이제 본격적으로 filter 기능도 추가하기 위해 filter 속성에 변경을 줄 action의 추가와 reducer의 변경 을 이어서 해보겠습니다.
아래처럼 action과 reducer를 변경합니다.
// action.js

export const SHOW_ALL = "SHOW_ALL";
export const SHOW_COMPLETE = "SHOW_COMPLETE";

export function showAll() {
  return { type: SHOW_ALL };
}

export function showComplete() {
  return { type: SHOW_COMPLETE };
}
// reducer.js
// reducer 안
// ...
if (action.type === SHOW_COMPLETE) {
return {
...previousState,
filter: "COMPLETE",
};
}
if (action.type === SHOW_ALL) {
return {
...previousState,
filter: "ALL",
};
}
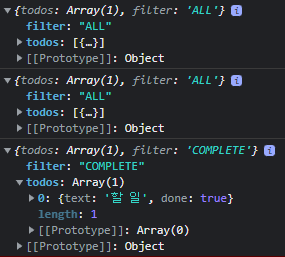
// ...이렇게 작성하고 실행하면 아래처럼 filter 속성을 false 에서 true로 바꾼것을 확인할 수 있습니다.
// index.js

store.dispatch(addTodo("할 일"));
store.dispatch(completeTodo(0));
store.dispatch(showComplete());
여기까지 진행했다면 우리는 reducer가 매우 복잡해 졌다는 것을 알 수 있습니다.
그리고 redux는 단일 store이기 때문에 복잡도를 줄이기 위해 store를 여러개로 나눌수도 없습니다.
그렇기 때문에 reducer 안을 쪼개는 능력이 필요하고, 많은 개발자 들은 쪼개서 작업을 진행합니다.
그렇다면 어떤식으로 쪼갤 수 있을까요?
우리가 작성한 리듀서를 기준으로 보면,
todos 값을 변경하는 로직은 filter에는 영향을 주지 않습니다.
반대로 filter의 값을 변경하는 로직에는 todos에는 영향을 주지 않습니다.
즉,
todos 속성의 값을 변경하는 로직 2개와
filter 속성의 값을 변경하는 로직 2개로 나눌수 있습니다.
이들을 별개의 reducer로 작성해서 하나로 합칠 수 있는 여지가 있습니다.
이런일을 도와주는 것이 combineReducers입니다.
그럼, combineReducers를 활용해보겠습니다.
combineReducers가 왜 필요한지 알아봤으니 이제 combineReducers 사용해보기
combineReducers는 함수입니다.
combineReducers의 인자로 객체를 넣을 수 있습니다.
const initialState = { todos: [], filter: "ALL" };

const todosInitialState = initialState.todos;
const filterInitialState = initialState.filter;

const reducer = combineReducers({
  todos: todosReducer,
  filter: filterReducer,
});

export default reducer;
리듀서를 state의 프로퍼티로 지정해서 세팅해주면됩니다.
이제 프로퍼티 별로 처리할 각각의 리듀서를 만듭니다.
todosReducer와 filterReducer로 reducer를 분리한 다음에 이 둘을 combineReducers로 합쳐서 최종적으로 combineReducers가 export될 reducer입니다.
// 각각의 reducer에는 각각의 initailstate가 들어가야 합니다.

// [{text: '코딩', done: false}, {text: '점심 먹기', done: false}]
function todosReducer(previousState = todosInitialState, action) {
  if (action.type === ADD_TODO) {
    return [...previousState, { text: action.text, done: false }];
  }

  if (action.type === COMPLETE_TODO) {
    return previousState.map((todo, index) => {
      if (index === action.index) {
        return { ...todo, done: true };
      }
      return todo;
    });
  }

  return previousState;
}

// filter: "ALL"
function filterReducer(previousState = filterInitialState, action) {
  if (action.type === SHOW_COMPLETE) {
    return "COMPLETE";
  }

  if (action.type === SHOW_ALL) {
    return "ALL";
  }

  return previousState;
}
분리하여 작성된 2개의 reducer는 export 할 필요가 없습니다. export 될 reducer는 combineReducers 이기 때문입니다.
기존에 하나의 reducer로 작성했던 함수를 그대로 2개 복사하여 각각 관련된 로직만 남기고 나머지는 제거합니다.
리듀서를 둘로 분리했기 때문에 각각의 속성의 타입과 구조에 맞는 initialState를 제 설정해주어야 합니다.
initialState 와 관련된 초기화 코드는 combineReducers 보다 위에 작성되어 있어야 에러가 나지 않습니다.
이제 아래처럼 store.js에서 store에 등록한 reducer를 combinereducer로 바꿔줍니다.
import { createStore } from "redux";
// import { todoApp } from "./reducers";
import reducer from "./reducers";

// const store = createStore(todoApp);
const store = createStore(reducer);

export default store;
아래는 결과 (combine전과 같습니다.)
이렇게 한 파일에 작업하다보면 복잡해지기 때문에 나눈 reducer별로 별도의 js파일로 관리하고 reducers 폴더안에 넣어 관리합니다.
별도의 파일과 폴더로 나누어 관리하기

reducer.js 에는 combineReducers 로직을 넣습니다.
reducer.js
import { combineReducers } from "redux";
import todos from "./todos";
import filter from "./filter";

const reducer = combineReducers({
  todos,
  filter,
});

export default reducer;
todos.js
import { ADD_TODO, COMPLETE_TODO } from "../actions";

const initialState = [];

export default function todos(previousState = initialState, action) {
  if (action.type === ADD_TODO) {
    return [...previousState, { text: action.text, done: false }];
  }

  if (action.type === COMPLETE_TODO) {
    return previousState.map((todo, index) => {
      if (index === action.index) {
        return { ...todo, done: true };
      }
      return todo;
    });
  }

  return previousState;
}
filter.js
import { SHOW_COMPLETE, SHOW_ALL } from "../actions";

const initialState = "ALL";

export default function filter(previousState = initialState, action) {
  if (action.type === SHOW_COMPLETE) {
    return "COMPLETE";
  }

  if (action.type === SHOW_ALL) {
    return "ALL";
  }

  return previousState;
}