목차
- What are Interfaces
- optional property
What are Interfaces
Interface : 타입을 만들어내는 방식.
타입을 내부적으로는 숨겨져있고 겉으로만 드러나 있는 호출방식같은 것을 의미하기도 합니다.
내부적인 것과 관계없이 외부적으로 들어나는 객체에 사용방식이 적혀있는 타입.
실습을 위한 환경설정
npm init -ynpm 프로젝트 시작
npm i typescript -D타입스크립트 설치
npx tsc --init tsconfig 파일을 default로 만들기
실습
시작
function hello1(person: {name: string, age: number}): void {
  console.log(`안녕하세요! ${person.name} 입니다.`);
}

const p1: {name: string, age: number} = {
  name: 'Mark',
  age: 39,
};

hello1(p1);
이런 코드에서 person이라는 객체를 따로 person이라는 데이터 구조로 만들어서 사용하면 편할 것 같다는 생각이 듭니다.
첫 interface 만들어보기
interface Person1 {
  name: string;
  age: number;
}
// Person1 이라는 데이터 구조로 설정하고 사용하겠습니다.
// 타이핑을 줄여주기도 하지만, 이런 구조의 데이터를 Person1으로 바로 지칭할 수 있습니다.
// 이렇게 person1 이라는 interface를 만들어냈습니다.

// function hello1(person: { name: string; age: number }): void {
function hello1(person: Person1): void {
  console.log(`안녕하세요! ${person.name} 입니다.`);
}

// const p1: { name: string; age: number } = {
const p1: Person1 = {
  name: "Mark",
  age: 39,
};

hello1(p1);
여기까지는 Person1은 매우 단순한 구조입니다.
이후에는 굉장히 여러가지 요구사항에 의해서 interface가 만들어집니다.
앞으로 요구사항에 맞춰서 interface를 만들 수 있는지를 배워보도록 하겠습니다.
사실상 typescript에서는 interface가 중요한 역할을 합니다.
왜냐하면, 타입의 시작점이기 때문입니다.
interface는 javascript에서는 없는 문법입니다.
그래서 interface를 javascript로 compile 했을 때, 어떤 식으로 나오는지 확인해보는 것도 필요합니다.
interface를 js로 compile 했을 때의 모습 확인해 보기
npx tsc위 명령어로 ts를 js로 compile합니다.
"use strict";

function hello1(person) {
    console.log(`안녕하세요! ${person.name} 입니다.`);
}

const p1 = {
    name: "Mark",
    age: 39,
};
hello1(p1);
compile하여 나온 js파일에는 어디에도 interface와 관련된 부분이 없습니다.
interface문법은 실제로 compile했을 때 사라지게 됩니다.
즉, compile 타임에만 필요하고, compile타임에 interface를 이용해서 문제가 없는지 관계를 규명해서 체크해주는 역할을 합니다.
그래서 interface를 잘 배워두는 것은 typescript를 잘 사용하기 위한 기본적인 스킬입니다.
optional property
interface를 작성할 때, 항상 꼭 필요한 프로퍼티가 아니고 상황에 따라서 있을수도 있고 없을수도 있는 optional property 를 작성하는 방법에 대해서 알아보겠습니다.
방법1: ?를 사용합니다
interface Person2 {
  name: string;
  age?: number;
}

function hello2(person: Person2): void {
  console.log(`안녕하세요! ${person.name} 입니다.`);
}

hello2({ name: "Mark", age: 39 });
hello2({ name: "Anna" }); // 에러없음
있을수도 있고 없을수도 있는 optional property 에는 ?를 붙여서 표현합니다.
방법2: 인덱서블 타입을 사용합니다
이 방식의 이름은 인덱서블 타입입니다.
interface Person3 {
  name: string;
  age?: number;
  [index: string]: any;
}

// a['index'] 과 [index: string]: 이 같은 의미로 보면 되겠습니다.
// 어떤 이름으로도 프로퍼티 이름으로 지정할 수 있습니다.

function hello3(person: Person3): void {
  console.log(`안녕하세요! ${person.name} 입니다.`);
}

const p31: Person3 = {
  name: 'Mark',
  age: 39,
};

// sister라는 속성이름을 새롭게 부여하고, 값으로 string 배열을 넣었습니다.
const p32: Person3 = {
  name: "Anna",
  sister: ['Sung', "Chan"]
};

// 값이 any 타입이므로 객체가 들어가도 문제가 없습니다.
const p33: Person3 = {
  name: 'Bokdaengi',
  father: p31,
  mother: p32,
};

// Person3 타입을 인자로 받는 함수에 넣어도 문제가 없습니다.
hello3(p33);
인덱서블 타입을 이용한 optional property 설정은 앞에서 배운 ? 방법과는 조금 다릅니다.
?방식은 속성의 이름이 정해져 있고, 프로퍼티 자체를 추가할 수 없지만,
인덱서블 타입 방식은 어떤 이름의 프로퍼티라도 계속 추가할 수 있습니다.
어떤 프로퍼티든지 추가로 설정할 수 있는 형태로 타이핑을 해야 한다면 인덱서블 타입 방식을 사용합니다.
function in interface
interface안에 function을 정의하는 방법에 대해서 알아보겠습니다.
interface Person4 {
  name: string;
  age: number;
  hello(): void;
}

const p41: Person4 = {
  name: "Mark",
  age: 39,
  hello: function (): void {
    console.log(`안녕하세요! ${this.name} 입니다.`);
  },
  // hello(): void {
  //   console.log(`안녕하세요! ${this.name} 입니다.`);
  // },
};

const p42: Person4 = {
  name: "Mark",
  age: 39,
  // hello: function(): void {
  //   console.log(`안녕하세요! ${this.name} 입니다.`);
  // },
  hello(): void {
    console.log(`안녕하세요! ${this.name} 입니다.`);
  },
};

// const p43: Person4 = {
//   name: "Mark",
//   age: 39,
//   hello: (): void => {
//     console.log(`안녕하세요! ${this.name} 입니다.`);
//   },
// };
// 화살표 함수에서는 this를 사용할 수 없습니다. 사용해도 그 this는 객체를 가리키지 않습니다.
// 화살표 함수 블록 안에서 this를 찾고, 없으면 그 외부인 global를 가리킵니다.

// this를 사용할 경우에는 이런식으로 사용할 수 없습니다.
// hello: (): void => {
//   console.log(`안녕하세요! ${this.name} 입니다.`);
// },

p41.hello();
p42.hello();
console을 확인해보기 위해 npx tsc 로 compile한 뒤, node interface4.js 로 compile된 js파일을 실행해봅니다.
class implements interface
interface를 이용하여 class를 만들어내는 방법에 대해서 알아보겠습니다.
interface IPerson1 {
  name: string;
  age?: number;
  hello(): void;
}

// implements를 이용해서 interface를 class로 사용할 수 있습니다.
// 사용한다기 보다는 interface에 있는 내용을 바탕으로
// Person이라는 class를 만들어냅니다.

class Person implements IPerson1 {
  name: string;
  age?: number | undefined; // age는 있어도 되고 없어도 되기 때문에 해당 라인은 없어도 문제없습니다.

  constructor(name: string) {
    this.name = name;
  }

  hello(): void {
    console.log(`안녕하세요! ${this.name} 입니다.`);
  }
}

// 클래스 또한 마치 타입처럼 사용할 수 있습니다.

const person: IPerson1 = new Person("Mark");
person.hello();
// Person은 IPerson1 을 implements 했기 때문에 person의 타입을 IPerson1이라고 해도 문제없습니다.
// person의 타입은 클래스인 Person의 타입으로도 할 수 있지만, 그보다는 interface의 이름으로 부르는 것이
// 조금 더 정확한 표현입니다.
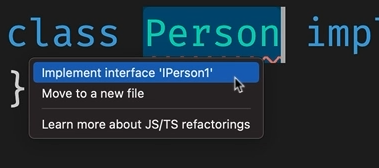
위처럼 구현하려하는 클래스 이름에서 나오는 메뉴를 클릭하면 interface 구현을 위한 코드가 자동완성 되어 들어갑니다.
클래스까지 배우게되면 이 단계를 이용해서 외부로는 interface만 노출하고, 내부적으로는 클래스 내부를 구현하는 방식으로 작업을 하게 됩니다.
interface extends interface
인터페이스끼리 상속하는 방법에 대해서 배워보겠습니다.
보통 상속이라고 말합니다.
interface IPerson2 {
  name: string;
  age?: number;
}

interface IKorean extends IPerson2 {
  city: string;
}
//IKorean은 IPerson2를 상속받았기 때문에 IPerson2의 속성을 기본적으로 모두 가지게 됩니다.

const k: IKorean = {
  name: "roro",
  city: "서울",
  age: 39,
};
구조적으로 상속관계를 이용해서 인터페이스를 많이 표현합니다.
대규모 프로젝트를 할 때 상속관계를 이용해서 인터페이스를 표현하는 것이 여러모로 편하고, 그렇게 할 수 밖에 없는 상황이 많습니다.
function interface
앞 강의에서는 인터페이스 안에 함수를 선언하고 사용하는 방법에 대해서 배웠습니다.
이번시간에는 함수를 가지고 있는 interface를 함수로 구현하는 방법에 대해서 배워보겠습니다.
interface HelloPerson {
  (name: string, age?: number): void;
}

// 똑같이 맞춰주는 것은 전혀 문제가 없습니다.
//const helloPerson: HelloPerson = function(name: //string, age?: number) {
//  console.log(`안녕하세요! ${name} 입니다.`);
//}

// 에러나지 않습니다.
const helloPerson: HelloPerson = function(name: string) {
  console.log(`안녕하세요! ${name} 입니다.`);
}

// 에러: 타입 범위가 넓은 것을, 적은 것에 넣을 수 없습니다.
//const helloPerson: HelloPerson = function(name: //string, age: number) {
//  console.log(`안녕하세요! ${name} 입니다.`);
//}


helloPerson('Mark', 39);
호출시의 helloPerson은 interface를 구현한 함수의 타입을 따라가는 것이 아니라, interface에 기재한 타입을 따라갑니다.
그러므로 age: number라고 한다면, 값을 반드시 받아야 하므로 interface에서 정의한 age가 undefined한 경우는 구현한 함수에서 받아 줄 수 없기에 에러가 납니다.
Readonly Interface Properties
Interface의 property의 Readonly 키워드에 대해서 배워보겠습니다.
interface Person8 {
  name: string;
  age?: number;
  readonly gender: string;
}

const p81: Person8 = {
  name: 'Mark',
  gender: 'male',
};

// p81.gender = 'female'; // 에러: readonly 속성은 할당 후 바꿀 수 없습니다.
interface에 readonly를 사용하면 class 에서도 readonly를 받아서 그대로 표현해 줄 수 있기 때문에 유용합니다.
typescript를 사용하는 가장 큰 이유는 코드에 의도를 담아서 다른 사람들이 코드를 사용하거나 수정하려고 할 때, 무엇이 되고 안되는지에 대한 의사표시를 할 수 있다는 점입니다.
type alias vs interface
type alias(타입별칭)와 interface를 비교해서 살펴보겠습니다.
함수의 표현
// type alias
type EatType = (food: string) => void;

// interface
interface IEat {
  (food: string): void;
}
Array의 표현
// type alias
type PersonList = string[];

// interface
interface IPersonList {
  [index: number]: string;
}
참고: 앞에서 배운 인덱서블 타입은 [index: string]: any 였습니다.
intersection의 표현
interface ErrorHandling {
  success: boolean;
  error?: { message: string };
}

interface ArtistsData {
  artists: { name: string }[];
}

// type alias
type ArtistsResponseType = ArtistsData & ErrorHandling;

// interface
interface IArtistsResponse extends ArtistsData, ErrorHandling {}
union types
// union 타입은 interface로 표현하기에는 조금 어렵습니다.
interface Bird {
  fly(): void;
  layEggs(): void;
}

interface Fish {
  swim(): void;
  layEggs(): void;
}

// type alias 방식으로는 유니온 타입을 표현하기 쉽습니다.
type PetType = Bird | Fish;

// 유니온 타입은 interface에 상속해 줄 수 없습니다.
interface IPet extends PetType {} // error TS2312: An interface can only extend an object type or intersection of object types with statically known members.

// 유니온 타입은 class에 implements 해 줄 수 없습니다.
class Pet implements PetType {} // error TS2422: A class can only implement an object type or intersection of object types with statically known members.
Declaration Merging - interface
인터페이스한테는 한가지 Declaration Merging 라는 독특한 기능이 있습니다.
이것은 type alias에서는 할 수 없는 행위입니다.
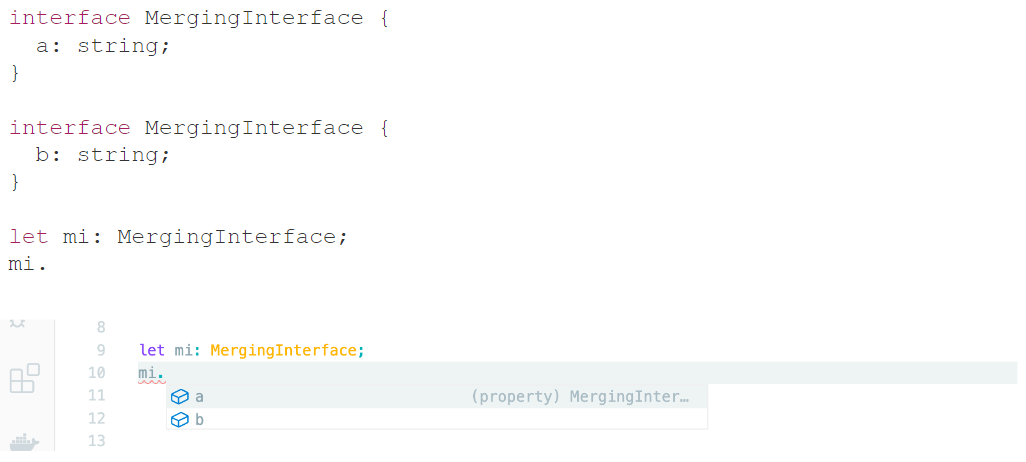
하나로 합쳐집니다.
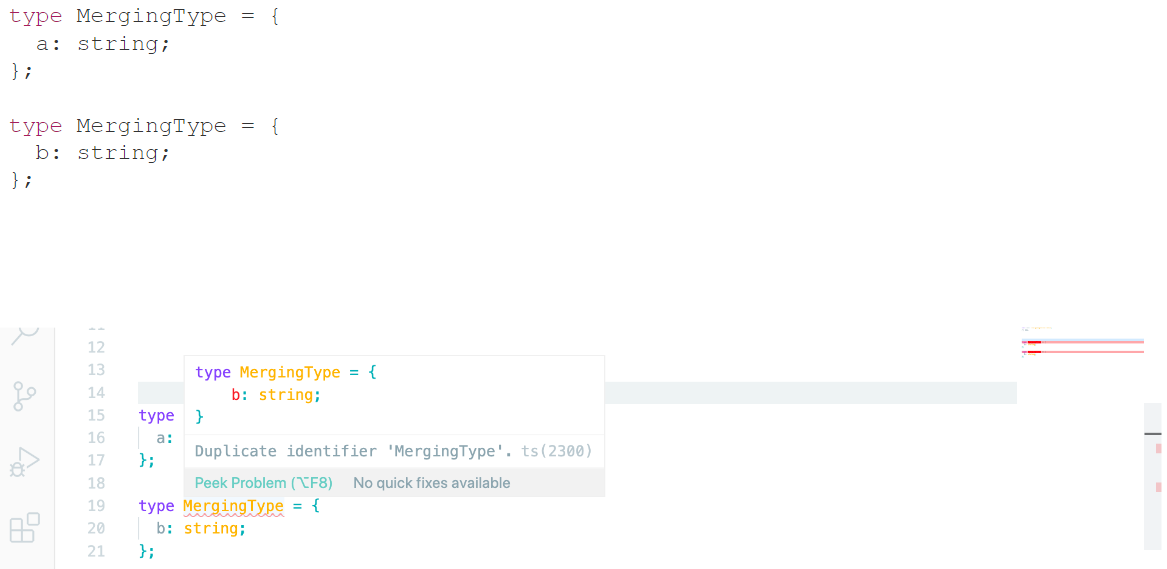
Declaration Merging - type alias
type alias에서는 에러가 발생합니다.
Declaration Merging의 유용한 점
html 엘리먼트를 확장하는 등의 확장 작업을 할 때, 기존의 interface에 추가를 할 수 있습니다.
마지막
기술적으로 interface와 type alias가 어떤 다른점을 가지고 있는지 어떤 표기가 다른지를 알아봤습니다.
type alias은 타입을 부르는 이름이라는 느낌. interface는 새로운 타입을 만들어 내는 느낌의 차이가 있습니다.
