개발환경 설정
npm init -y: npm 프로젝트로 관리를 시작합니다.npm i -D webpack webpack-cli webpack-dev-server: webpack을 설치합니다.- 루트에
src폴더,js폴더,index.js,css폴더,style.css,webpack.config.js파일을 만들어 줍니다. webpack.config.js에 다음에 같이 입력합니다.const path = require("path"); const TerserWebpackPlugin = require("terser-webpack-plugin"); module.exports = { entry: "./src/js/index.js", output: { filename: "bundle.js", path: path.resolve(__dirname, "./dist"), clean: true, }, devtool: "source-map", mode: "development", optimization: { minimizer: [new TerserWebpackPlugin()], }, };
entry속성은JavaScript 파일의 진입점을 나타냅니다.output속성은build를 했을 때,bundle파일 관련 세팅을 해주는 속성입니다.path속성은bundle된 파일이 생성될 경로입니다.clean속성은bundle된 파일이 생성될 경로에 이미 다른 파일들이 있다면, 그것을 지우고 다시 새로 생성하게 하는 옵션입니다.path속성에 그냥 상대경로를 적으면webpack에서 그 경로를 찾을 수 없습니다. 그래서path라는 모듈을 불러와서resolve라는 메소드를 사용하고__dirname을 사용하여webpack이 절대경로를 찾을 수 있도록 위처럼 적어줍니다.source-map은 배포용으로 빌드한 파일과 원본 파일을 서로 연결시켜주는 기능을 합니다.mode는development(개발모드)옵션과production(배포모드)가 있습니다. 개발 모드인 경우에는 개발자들이 좀 더 보기 편하게 웹팩 로그나 결과물이 보여지고, 배포 모드인 경우에는 성능 최적화를 위해 기본적인 파일 압축 등의 빌드 과정이 추가됩니다.
-
우리는 웹팩에서 제공하는 기본적인 압축외에 추가적인 압축 플러그인을 사용하겠습니다.
npm i -D terser-webpack-plugin. 설치 후optimization속성을 추가하고, 설치한 플러그인도 가져옵니다.const TerserWebpackPlugin = require("terser-webpack-plugin");
cmd 창에서npx webpack을 입력하여 확인해봅니다. -
dist 폴더와 그 안에bundle.js가 생성되었습니다. -
index.js에console.log("hi");를 입력하고 다시npx webpack으로 bundle이 잘 되는지 확인합니다. -
console.log("hi");를 입력하여 번들화 하고 나면 dist폴더에bundle.js.map이라는 새로운 파일이 생성되었다는 것을 확인할 수 있습니다. 이 파일은 우리가webpack.config.js에서devtool: "source-map"을 설정한 결과입니다. -
최상위 경로에
index.html을 생성해 줍니다.(기본양식만 간단하게..) -
html파일과 css파일 들을 설정해줄 모듈들을 설치해줍니다.
npm i -D html-webpack-plugin
npm i -D mini-css-extract-plugin css-loader css-minimizer-webpack-plugin -
webpack.config.js설정값들을 추가로 입력해줍니다.
const path = require("path");
const TerserWebpackPlugin = require("terser-webpack-plugin");
const HtmlWebpackPlugin = require("html-webpack-plugin");
const MiniCssExtractPlugin = require("mini-css-extract-plugin");
const CssMinimizerPlugin = require("css-minimizer-webpack-plugin");

module.exports = {
  entry: "./src/js/index.js",
  output: {
    filename: "bundle.js",
    path: path.resolve(__dirname, "./dist"),
    clean: true,
  },
  devtool: "source-map",
  mode: "development",
  plugins: [
    new HtmlWebpackPlugin({
      title: "keyboard",
      template: "./index.html",
      inject: "body",
      favicon: "./favicon.ico",
    }),
    new MiniCssExtractPlugin({
      filename: "style.css",
    }),
  ],
  module: {
    rules: [
      {
        test: /\.css$/,
        use: [MiniCssExtractPlugin.loader, "css-loader"],
      },
    ],
  },
  optimization: {
    minimizer: [new TerserWebpackPlugin(), new CssMinimizerPlugin()],
  },
};HtmlWebpackPlugin의inject속성은 build를 했을 때, js파일을 body에 넣을지 head에 넣을지 설정합니다.MiniCssExtractPlugin이 페키지는 html에 css를 넣기 위해서 사용합니다.MiniCssExtractPlugin의filename은 어떤 파일이름으로 html에 inject가 될것인지를 설정해줍니다.mode속성과rules를 입력해줍니다. 이 내용은.css파일을 해당 로더(MiniCssExtractPlugin)를 사용해서 읽어들이겠다는 의미입니다.
-
css-minimizer-webpack-plugin를 설정해줍니다. 조금 전에TerserWebpackPlugin을 통해 javascript의 압축을 설정했습니다.css-minimizer-webpack-plugin패키지는 css의 압축을 설정해줍니다. 이 패키지도minimizer에 추가해줍니다. -
조금 전에
HtmlWebpackPlugin의template을./index.html
로 사용하겠다고 했었습니다. 이렇게 하면HtmlWebpackPlugin이index.html안에서Lodash문법을 사용할 수 있게 해줍니다.Lodash문법을 사용해서 html문서의 title에 우리가 옵션으로 지정한title: "keyboard"을 출력할 수 있게 해줍시다.index.html에서<title>태그에
<title>
  <%= htmlWebpackPlugin.options.title %>
</title>
이라고 입력합니다.
index.js에서css파일을 import해주겠습니다.
import "../css/style.css"
console.log("hi");
테스트를 위해 간단하게 스타일을 적용해줍니다.
style.css
p {
  color: red;
}- 조금 전에는 cmd창에서
npx webpack으로 빌드를 했었지만, 이번에는package.json의scripts속성에 설정하여 빌드해보겠습니다.
"scripts": {
    "build": "webpack"
  },
cmd창에서 npm run build 입력해서 build해줍니다.
- dist폴더안의 내용을 확인해봅니다. 개발용으로 build를 했기 때문에 압축된 코드로 보이지 않습니다.
이번에는production모드로 build해보겠습니다.
package.json의scripts속성에 아래 내용을 추가합니다.
"scripts": {
    "build": "webpack --mode=production"
  },
그 다음, cmd 창에서 npm run build을 입력합니다.
dist폴더 안을 확인해 보면 압축된 파일을 확인할 수 있습니다.
- 이제
개발서버(webpack-dev-server)를 설정해보겠습니다.webpack.config.js에devServer속성을 추가해줍니다. 삽입위치를 어디든 상관없습니다.
npx webpack-dev-server를 입력하여 개발서버를 열어봅니다.
const path = require("path");
const TerserWebpackPlugin = require("terser-webpack-plugin");
const HtmlWebpackPlugin = require("html-webpack-plugin");
const MiniCssExtractPlugin = require("mini-css-extract-plugin");
const CssMinimizerPlugin = require("css-minimizer-webpack-plugin");

module.exports = {
  entry: "./src/js/index.js",
  output: {
    filename: "bundle.js",
    path: path.resolve(__dirname, "./dist"),
    clean: true,
  },
  devtool: "source-map",
  mode: "development",
  devServer: {
    host: "localhost",
    port: 8080,
    open: true,
    watchFiles: "index.html",
  },
  plugins: [
    new HtmlWebpackPlugin({
      title: "keyboard",
      template: "./index.html",
      inject: "body",
      favicon: "./favicon.ico",
    }),
    new MiniCssExtractPlugin({
      filename: "style.css",
    }),
  ],
  module: {
    rules: [
      {
        test: /\.css$/,
        use: [MiniCssExtractPlugin.loader, "css-loader"],
      },
    ],
  },
  optimization: {
    minimizer: [new TerserWebpackPlugin(), new CssMinimizerPlugin()],
  },
};
open: true,옵션은 실행할 때마다 새창으로 띄우기입니다.watchFiles: "index.html"은 index.html에 변화가 있을 때 마다 새로 reload를 하라는 의미입니다.
- 마지막으로
package.json에 하나 더 추가해줍니다.
"scripts": {
    "build": "webpack --mode=production",
    "dev": "webpack-dev-server"
  },
이제 개발서버를 열기 위해 npx webpack-dev-server긴 명령어 대신에 npm run dev로 간결하게 명령어를 입력할 수 있습니다.
버전 맞추기
Major 버전과 Minor 버전을 맞추기 위해서는
1. package.json에서 해당 package 버전정보에서 캐럿기호를 지우고, 원하는 버전으로 설정합니다.
2. cmd 창에 npm i 을 입력하여 package.json의 설정대로 다시 재설치를 합니다.
강의 프로젝트 버전
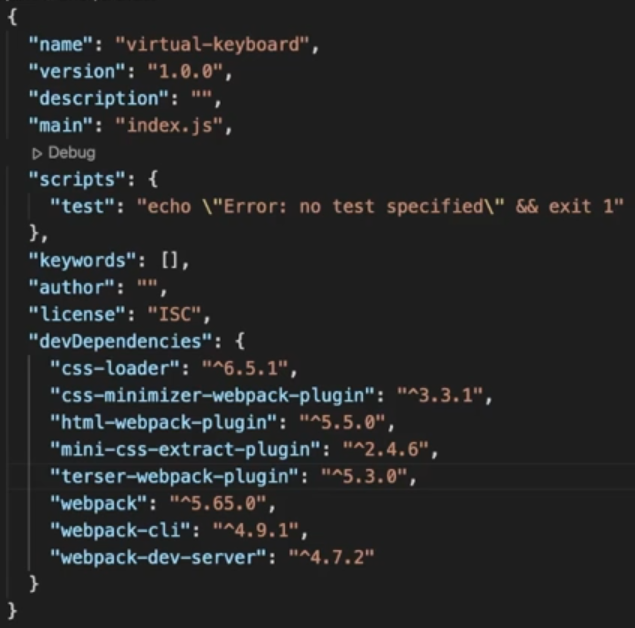
내 버전

- 해당 오류로
webpack-cli버전을4.10.0으로 올림
기타
path속성에 path모듈없이 상대경로로 기재해본다면?
위에서
path: path.resolve(__dirname, "./dist"),를 설정할 때, 그냥 상대경로를 입력하면 안된다고 했습니다.
한번, path모듈을 제거해보고 bundle해 보겠습니다.
path: "./dist",- cmd창에서
npx webpack실행.
- 결과

The provided value "./dist" is not an absolute path!
절대경로가 아니라고 에러가 발생합니다.
